Tetra UNICORN Agent Installation Guide (v3.8.x)
This guide shows how a system administrator can install Tetra UNICORN Agent versions 3.8.x.
To configure and use the Agent after it's installed, see the Tetra UNICORN Agent User Manual (v3.8.x).
UpgradesTo upgrade an Agent from a previous version, see Upgrade an Agent.
Overview
To Install the Tetra UNICORN Agent, do the following:
- Verify the prerequisites.
- Create an Agent and select a data connection type.
- Install the Tetra UNICORN Agent.
- Verify the Installation.
- Verify the data connection.
For instructions, see the procedures in each of the following sections.
Step 1: Verify the Prerequisites
To install and run Tetra UNICORN Agent v3.8.x, the following hardware and software are required.
Software Requirements
The machine running the UNICORN client must meet the following software requirements:
- UNICORN v6.x or UNICORN v7.0-v7.8
- Microsoft .NET Framework v3.5 (includes .NET 2.0 and 3.0) You can enable it from Windows Features and it is required to set up OPC Core Component.
- Microsoft .NET Framework 4.8 (Required to run the TetraScience UNICORN Agent)
- Microsoft Visual C++ 2015-2019 Redistributable (x86)
Highly RecommendedWindows 10, or Windows Server 2019 (or later) on the UNICORN machine (so we can get Microsoft support if needed)
Hardware Requirements
The machine running the UNICORN client must meet the following hardware requirements:
- 16 GB RAM as a minimum (64 GB RAM is recommended)
- 8 Core CPU
- Minimum 100 GB of free disk space
Prepare the UNICORN Server (Local Access)
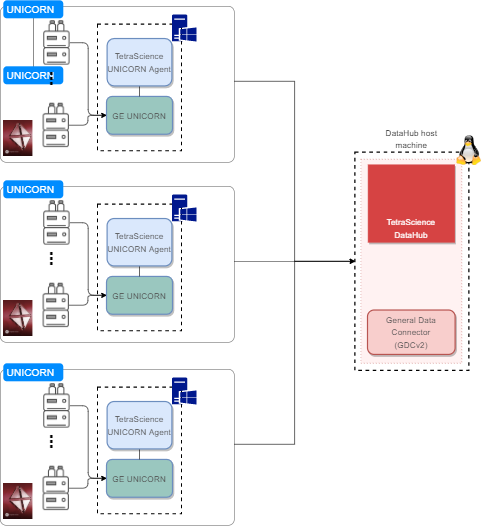
System Diagram
All TetraScience UNICORN Agents are installed on a GE UNICORN client computer. The UNICORN Client can either access a standalone UNICORN Database, or a centralized UNICORN Database. The UNICORN Agent connects to the Tetra Data Platform (TDP) through HTTP or HTTPS protocol.

System Diagram
Install the OPC Core Components Redistributable
The information is located in the UNICORN Agent installation folder, under the \\Tools folder.
OPC Core Components RedistributableThe OPC Core Components Redistributable (which is provided with the TetraScience UNICORN Agent) may not fit all the GE UNICORN versions. If it does not work, please use the OPC Core Components Redistributable in your UNICORN installation CD.
Step 2: Create an Agent and Select a Data Connection Type
To create a Tetra UNICORN Agent in the TDP, follow the instructions in Create a New Agent. For AGENT TYPE, make sure that you select UNICORN Agent.
When you create the Agent, you must also select a data connection type so that the Agent can communicate with the TDP.
Selecting a Data Connection Type
The Tetra UNICORN Agent generates RAW JSON files that are uploaded to the TDP either directly or through a Data Connector. Before you install the Tetra UNICORN Agent, you must set up the Agent's data connection to the TDP by using one of the following methods:
- TDP (No Connector): Connects Agents directly to the TDP and AWS APIs, or through a proxy that you configure in the Agent host server's settings. For instructions, see TDP (No Connector) Connections.
-or- - Tetra Hub: Uses an on-premises Tetra Hub to proxy connections to TDP and AWS APIs. For instructions, see Tetra Hub Connections.
For more information, see Agent Deployment Options.
Step 3: Install the Tetra UNICORN Agent
TetraScience provides a Microsoft Installation Package (.msi) file to install the Tetra UNICORN Agent on the host server.
To get the installation package and install the Agent, do the following:
IMPORTANTTo access the server and run the installation package, you must sign in as an Administrator.
- On a host server that runs a supported UNICORN version, download the latest UNICORN Agent installation package from the Tetra Agent & Connector Installers page in the TetraConnect Hub. For access, see Access the TetraConnect Hub.
- Move the downloaded files to a local folder.
- Run the installer by opening the installation package and follow the guided wizard to complete the installation.
Default Installation Folder Location
C:\\Tetrascience\\Tetrascience.Agent.Unicorn.vx.x.x
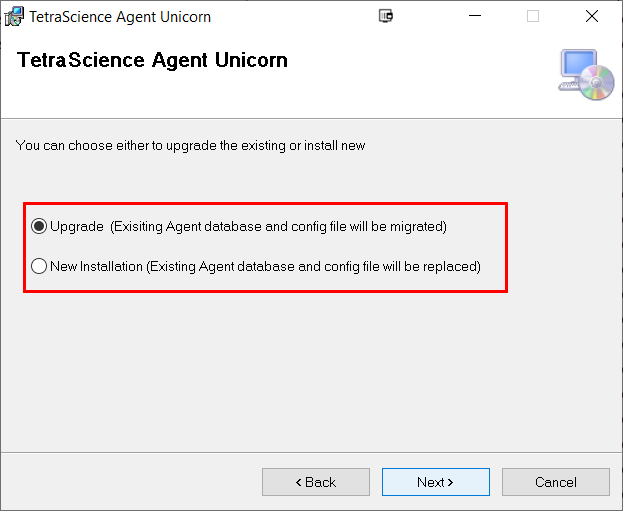
- Do one of the following:
- To upgrade an existing agent, choose Upgrade. The existing Agent database and configuration files from a previous version are migrated.
-or- - To install a new Agent, choose New Installation. The existing Agent database and configuration files are replaced.
Upgrade OptionIf you select Upgrade, the Agent retains the configuration settings and database from the previous version. As a result, any files that were generated from UNICORN are not regenerated and uploaded to the Tetra Data Platform (TDP).

Tetra Agent UNICORN Installation options
After the Agent is installed, the TetraScience Agent Unicorn shortcut is added to the Windows All Program Group menu. To initialize the Tetra UNICORN Agent, you must add the configuration settings.
NOTETo restrict access to the local Tetra Agent Management Console, you can edit the Agent’s installation folder’s permissions to grant least privilege access. For more information, see Restrict Access to Agent Installation.
Step 4: Verify the Installation
Confirm that the Tetra UNICORN Agent was installed on the local drive by verifying the following:
- The Agent is installed under the
C:\\TetraSciencedirectory by default. - Under the TetraScience folder,
TetraScience.Agent.Unicorn.3.8.xappears. - The TetraScience folder is added to the Windows Start Menu, which includes the TetraScience Agent UNICORN application.
NOTETo launch the TetraScience UNICORN Agent Management Console, select the TetraScience Agent Unicorn link in the Windows Start menu.
Step 5: Verify the Data Connection
To verify that the Agent can connect to the TDP, do the following.
Verify Agent Configuration Settings
To verify that the Agent can communicate with the TDP, do the following:
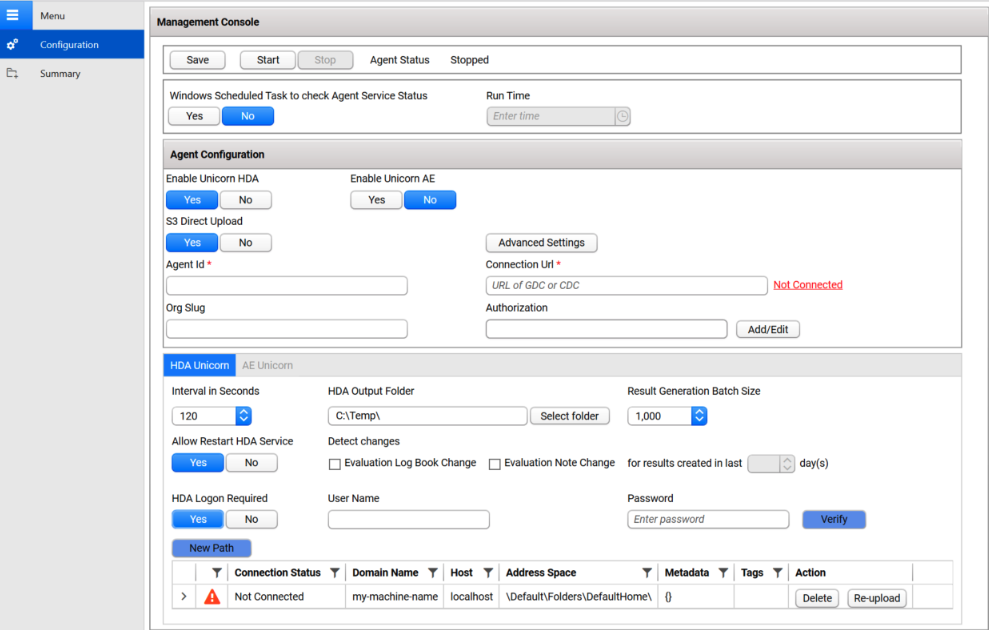
- From the Tetra UNICORN Agent Management Console, in the left navigation menu, under Menu, choose Configuration. The Configuration screen appears.

- Verify that the S3 Direct Upload toggle is set to Yes (the default setting). For more information, see S3 Direct Upload (Recommended).
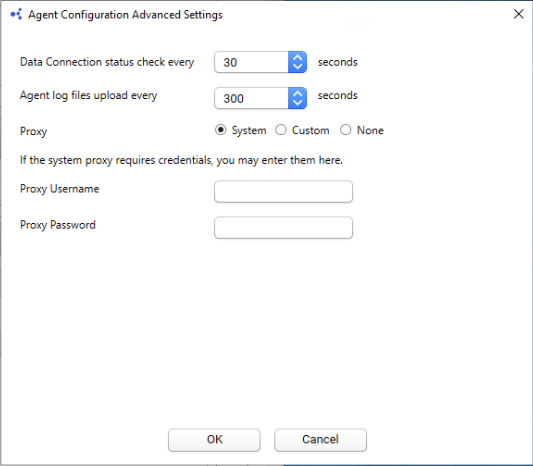
- (Optional) To reset the default settings for data connection status checks, Agent log file uploads, and proxy, select Advanced Settings. The Agent Configuration Advanced Settings dialog appears. In the dialog, you can edit the following settings:

- Data Connection status check every: Indicates how often the software checks the status of the connection (heartbeat) between the TDP and the Agent. If the TDP doesn't receive a heartbeat message for more than five minutes, the TDP assumes that the Agent is offline. The default value is
30seconds. - Agent log files upload every: Indicates how often the Agent uploads log files to the Data Lake. The default value is
300seconds. - Proxy Settings: Indicates what type of proxy the Agent is using (System or Custom), or if it's not using a proxy (None).
- System (default setting): Uses the system proxy specified in Windows for the service user. If basic authentication is required, you can specify a username and password for the proxy.
- Custom: Makes all of the Agent's proxy options configurable, regardless of any other settings. This proxy takes precedence over any existing system proxy or L7 proxy.
- None: Explicitly configures the Agent service to not use any proxies for web requests.
NOTEIf a system proxy requires credentials, make sure that you enter them in the Proxy Username and Proxy Password fields.
- To keep the recommended settings, or to save the new values you entered, choose OK. Only consider changing these values if connection checks (heartbeat) frequency needs to be changed, or if log files need to be uploaded to the TDP at a different frequency.
- For Agent Id, enter the Agent ID (you can find this on the Agents page in the TDP).
- For the Connection Url field, enter the complete URL of the Tetra Hub, Generic Data Connector (GDC) attached to a Data Hub, or No Connector, based on your connection type.
- (For “TDP (No Connector)” setups only) If you’re using an Agent without a Connector, make sure that you do the following:
- For Org Slug, enter your organizational slug. To get your organizational slug, see Viewing Organization Details. The organizational slug is required when using a JSON Web Token (JWT). Adding the slug to this field attaches it to the Agent’s API request headers.
- For Authorization, select Add/Edit. Then, enter your JWT in the dialog that appears. To get a JWT, see Generate a JWT for a Service User . Then, choose Save to encrypt and save the JWT. The Agent validates the connection immediately and displays the updated connection status next to the Connection Url field.
- (Optional) To allow files to be uploaded to the same Amazon S3 location from multiple Agents, enter the target Amazon S3 bucket's UUID in the Destination Id field. This feature helps to split the load into multiple Agents for scaling horizontally.
Save and Start the Agent
To save and start the Agent, do the following:
- In the Agent Management Console, select the Save button at the top of the page.
- Select the Start button.
- Verify that the Agent Status displays as Running.
Next Steps
To configure and use the Agent after it's installed, see the Tetra UNICORN Agent User Manual (v3.8.x).
NOTEWhen configuring the Agent, you can use a Windows task script to automatically restart the Tetra UNICORN Agent each day at a specific time. This setup ensures that the Agent remains online without having to check it each day. For instructions, see Windows Scheduled Task Settings in the Tetra UNICORN Agent User Manual (v3.8.x).
Documentation Feedback
Do you have questions about our documentation or suggestions for how we can improve it? Start a discussion in TetraConnect Hub. For access, see Access the TetraConnect Hub.
NOTEFeedback isn't part of the official TetraScience product documentation. TetraScience doesn't warrant or make any guarantees about the feedback provided, including its accuracy, relevance, or reliability. All feedback is subject to the terms set forth in the TetraConnect Hub Community Guidelines.
Updated 29 days ago
