Set Up and Edit Pipelines
The Pipeline Manager page displays all of your pipelines in one place so that you can view details about them, set them up, and edit them. If you need basic information on pipelines and pipeline terminology, check out the pipeline overview and terminology page.
NOTE:
Only administrators of an organization can set up, edit, disable, and enable pipelines.
Access the Pipeline Manager Screen
To see the Pipeline Manager screen, do the following.
- In the TDP hamburger menu, then select Pipelines > Pipeline Manager.
- The Pipeline Manager screen appears.
Pipeline Manager Screen
Tour of the Pipeline Manager Screen
The Pipeline Manager screen shows:
- The name of the pipeline.
- The name and version of the protocol used.
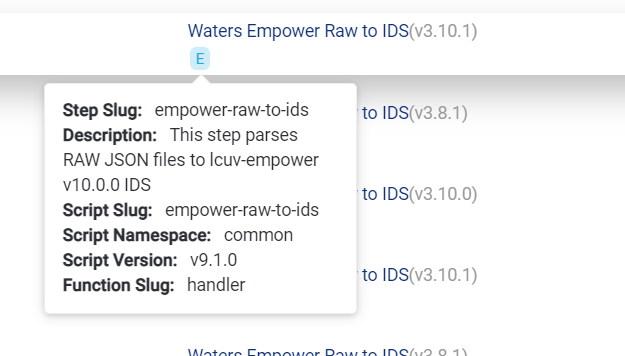
- Icons underneath the protocol that give you the first letter of the step (or steps) that are used. You can mouse over these to learn more about the steps in the protocol).
- The last time the pipeline configuration was updated.
You can also apply filters to see which pipelines are enabled or disabled, and you can also determine how you want the order of pipelines to display. You can also search for pipelines.
Filtering the List of Pipelines and Adjusting Ordering
You can filter and adjust the ordering of pipelines to make it easier for you find pipelines of interest.
Searching for Pipelines by Pipeline Name or ID
You can search pipelines by name or ID.
- In the Pipeline Manager screen, type the pipeline name or id in the upper left field that states "Search Pipeline name/id".
- As you type the name or ID, only pipelines that match what you entered appear.
Searching for Pipelines by Protocol Namespace, Protocol Name, and Protocol Version
You can filter the list by Protocol Namespace, Protocol Name, or Protocol Version.
- In the PipelineManager screen, click the Filters button. The list of filters that you can apply appears.
Pipeline Manager Pipeline Filters
- Click the drop-down menu next to the filter you want to apply. A list of choices appear. For example, if you click Protocol Name, the protocols available in your instance of TDP appear. Select the choices you want. Note that the protocol versions available depend on the protocol name that was chosen.
- Click Apply Filters.
Viewing Enabled and Disabled Pipelines
You can filter the list of pipelines so that you see enabled (active) pipelines, disabled (inactive) pipelines, or both.
In the Pipeline Manager screen:
- Select All to view both enabled and disabled pipelines.
- Select Enabled to view only active pipelines.
- select Disabled to view only inactive pipelines.
Adjusting the Pipeline List Order
You can reorder the list of pipelines so that you can view pipelines by name, last update, created date, and more.
In the Pipeline Manager screen, click the Order By drop-down menu, then select an option. These options are available.
- Last Update, New - Old
- Last Update, Old - New
- Name , A - Z
- Name, Z - A
- Create Date, New - Old
- Create Date, Old - New
- Protocol Name, A - Z
- Protocol Name, Z - A
Viewing More Information about a Pipeline
In the Pipeline Manager screen, you can view information about the steps in a pipeline protocol, as well as details about the way the pipeline is set up and the workflow.
Viewing Step Summaries
Beneath each Protocol, there are lettered icons that show the steps. The letter corresponds to the first name of the Step Slug.
Mousing over the icons will show a summary of step information including the Step Slug (which is a unique name for the step), Description, Script Slug, Script Namespace, Script Version, and Function Slug. If you want to know more about these terms and how they work, see Self-Service Pipeline documentation.

Step Summary
Viewing Additional Pipeline and Workflow Information
In the Pipeline Manager screen, click the name of the pipeline to view the Pipeline and Workflow information.
- Click the Pipeline tab to view detailed information about how the pipeline is set up.
- Workflow tab to view the workflow history, latest workflow details, file properties, and more. This is discussed in more detail in the Monitor Pipeline Protocol topic.
Pipeline and Workflow Panels
Setting Up A Pipeline
Setting up a pipeline involves four steps.
- Step 1: Define Trigger Conditions
- Step 2: Select the Protocol
- Step 3: Set Notifications
- Step 4: Finalize the Details/Settings
Step 1: Define Trigger Conditions
Trigger conditions indicate the criteria a file must meet for pipeline processing to begin. Trigger conditions can be simple or complex.
- For simple trigger conditions, files must meet just one criterion, like a data file that has a specific metadata tag.
- Complex trigger conditions are a combination of several trigger conditions, such as a data file that has a certain metadata tag and is also in a specific file path. Conditions can be combined using standard Boolean operators (AND/OR) and can even be nested.
To define trigger conditions, do the following.
- On the Pipeline Manager page, click the New Pipeline button. The New Pipeline page appears.
Defining a Trigger
- Select the trigger source type from the drop-down menu.
- Trigger source types are divided into two categories: Platform Metadata and Custom Metadata.
- Platform Metadata source types are available to all TDP users.
- Custom Metadata source types are available to your organization.
To learn more about the different trigger source types, see the table below.
List of Triggers Source Types (Platform Metadata) and Descriptions
| Trigger Source Type | Description |
|---|---|
| Source Type | Indicates the instrument that generated the data. |
| Source | Source that loaded the data into the data lake (e.g. specific Agents, API upload, box upload). |
| Pipeline | Indicates the name of a pipeline. |
| IDS | Indicates the IDS schema. |
| IDS Type | Indicates the type of IDS (e.g. lcuv_empower). |
| File Path | The file path in the data lake. |
| File Category | File category. Options are: RAW (sourced directly from an instrument), IDS (harmonized JSON) and PROCESSED (auxiliary data extracted from a RAW file). |
| Tags | Tags available to the organization. |
- In the value field, type in the name or select an option from the drop-down menu.
- Enter whether you want the item to match the value by selecting is or is not from the drop-down menu. Note that some source types have other options.

Adding a trigger condition
- If you want to add another item for your trigger (like, a certain pipeline has already been run) click Add Field and repeat steps 2-4.
- If you want the pipeline to run if the file meets both trigger conditions, select "Matches All-AND". If you want the pipeline to run if the file meets at least one trigger condition, select "Matches All-ANY".
- If you want to nest trigger conditions, select Add Field Group, then repeat steps 2-6.
- When complete, click the Next button.
- Go to the next step: Step 2: Select the Protocol.
Step 2: Select the Protocol
After you have defined a trigger, select and configure the protocol.
There are many different protocols that are available for you to use. Protocols are divided into two basic categories.
- common out of the box (OOB) protocols are available to TDP users. The available OOB (common) protocol list is here.
- client-specific protocols are client-specific and are available to your organization.
To select a protocol, complete the following steps.
- In the Select Protocol section of the Managing Pipeline page, scroll down the list and select a protocol. You can also search by entering text in the Search field.
Select Protocol
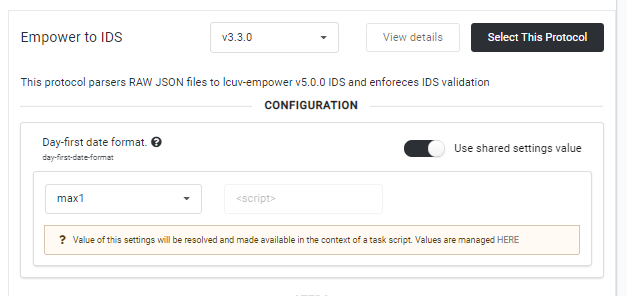
- Enter the configuration options for the protocol, if there are any.

Sample Configuration Options for Empower to IDS, v3.3.0 Protocol
- If you want more details on the script, click the View Details button to see the protocol.json and script.js files. The protocol.json file defines the protocol. It provides a brief description of the steps run and the configurations. The script.js file shows the workflow.
Protocol.json and Script.js files for the pipeline
- You can also click the Task Script README button to learn more about the steps.
Task Script Readme
- Click the Select this Protocol button.
- Click the Next button.
- Go to the next step: Step 3: Set Notifications.
Step 3: Set Notifications
After you have defined your trigger and selected the protocol, set notification options. You can determine when to send notifications and who you want to send them to.
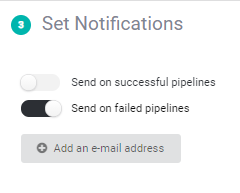
- In the Set Notifications section of the Managing Pipeline section of the page, determine whether you want send email notifications if the pipeline runs successfully and/or if it fails.

Set Notifications
- If you want to send an email when the pipeline completes successfully, slide the Send on successful pipelines slider to the right.
- If you want to get an email when the pipeline fails, slide the Send on failed pipelines slider to the right.

Notification sliders
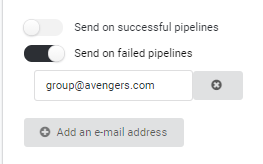
- Indicate where you want notifications to be sent by adding an email address. Click “Add an e-mail address”, then add the email address in the text field that appears.

Email Address Added
NOTE:
For ease of maintainance, use a group alias for email addresses instead of individual emails.
- If you need to add more email addresses, repeat step 2.
- Click the Next button.
Step 4: Finalize the Details
After you have defined your trigger, selected the protocol, and set notifications, the last step is to provide details about the pipeline, such as its name, description, whether it should be active (enabled), and how many standby instances you want to include (if any).
To finalize the details, complete the following steps.
- Enter the name for the pipeline.
- Enter the pipeline description.
- Choose whether you want the pipeline to be available for processing. If you want the pipeline to start running as soon as files that meet the trigger conditions are ingested in the data lake, move the Enabled slider to the right. Otherwise, slide it to the left.
Finalize Details
- Indicate the number of maximum parallel workflows (concurrent workflows per pipeline). 0 indicates that there is an unlimited number of workflows. You can specify up to 1000.
- If desired, adjust the retry behavior. It can retry three times if there is a failure, three times only after an out of memory (OOM) error, or you an specify that there are no retries allowed.
- When complete, click the Create button.
- If the pipeline has been enabled, it will start when the trigger conditions are met.
More Detail on Retry Behaviors
By default, if there is an error or issue that prevents the processing a file, the pipeline tries three more times before the pipeline fails.
If the failure is due to an out of memory error, more memory is allocated with each retry:
- Initial Amount of Memory Allocated: 512 MB
- Memory allocated for the 1st Retry: 1 GB
- Memory allocated for the 2nd Retry: 2 GB
- Memory allocated for the 3rd Retry: 3 GB
If the out of memory error persists after the third retry, the pipeline fails.
If a file is unable to successfully go through the Pipeline, you can also manually click the Retry button that will display next to the workflow steps. The Retry button allows you to manually re-trigger the pipeline for that file.
Edit a Pipeline
To edit a pipeline, complete the following steps.
- In the Pipeline Manager page, click the name of the pipeline you want to edit, then click Edit Pipeline in the Pipeline Actions part of the Pipeline Panel.
Edit Pipeline
- Click the edit button to the right of the section you want to edit: Trigger, Protocol, Notifications, or Details.
- When complete, click the Save button to save that section.
- Click Save to save the entire pipeline.
Copy a Pipeline
To copy a pipeline, complete the following steps.
- In the Pipeline Manager page, click the name of the pipeline you want to copy, then click Copy Pipeline in the Pipeline Actions part of the Pipeline Panel.
- The Copy Pipeline pop up window appears. Enter the new pipeline name, then click save. The new pipeline appears in the list with a "New" icon next to it. Note that the pipeline is enabled by default.
Enabling and Disabling Pipelines
You can enable (make a pipeline active) or disable (make a pipeline inactive).
Enable an Existing Pipeline
For a pipeline to run if a file meets the trigger condition, you'll need to enable it. To do this, complete the following steps.
- In the Manage Pipelines page, click the pipeline. The Edit Pipeline page appears.
- Click the edit button to the right of the Details section.
- Move the Enabled slider to the right.
- When complete, click the Save button to save that section.
- Click Save to save the entire pipeline.
Disable an Existing Pipeline
To make a pipeline inactive, disable it. To do this, complete the following steps.
- In the Manage Pipelines page, click the pipeline. The Edit Pipeline page appears.
- Click the edit button to the right of the Details section.
- Move the Enabled slider to the left.
- When complete, click the Save button to save that section.
- Click Save to save the entire pipeline.
Updated over 1 year ago
