How to Reprocess Files
You can use the Files Health dashboard to reconcile files to ensure consistency between places where data is stored and accessed in the Tetra Data Platform (TDP). Data is currently stored in these locations:
- Data Lake (S3)
- System Properties (FileInfo) Service
- Search Indices (Elasticsearch)
- Athena
Because these systems (locations) are loosely integrated, data discrepancies may occur. To address these potential data discrepancies, the Reprocess Files feature provides clear reporting and monitoring capabilities that enable you to:
- Solve historical data inconsistencies or major service/platform failures and return to a consistent state in a timely manner (Typically performed by an Enterprise IT Admin)
- Ensure regular clean-up of data inconsistencies that may occur intermittently (Typically performed by an IT Admin)
To reprocess files from the Files Health Dashboard:
- Log in to TDP using an Administrator user account.
- In the Tetra Data Platform, click the Hamburger icon at the top left corner of the page to expand the TDP menu options (or hover over the list of icons to display the menu options).
- Select Health Monitoring from the list of menu options that appears on the left side of the page.
- From the Health Monitoring page, click the Files tab to view the Files Health Dashboard:
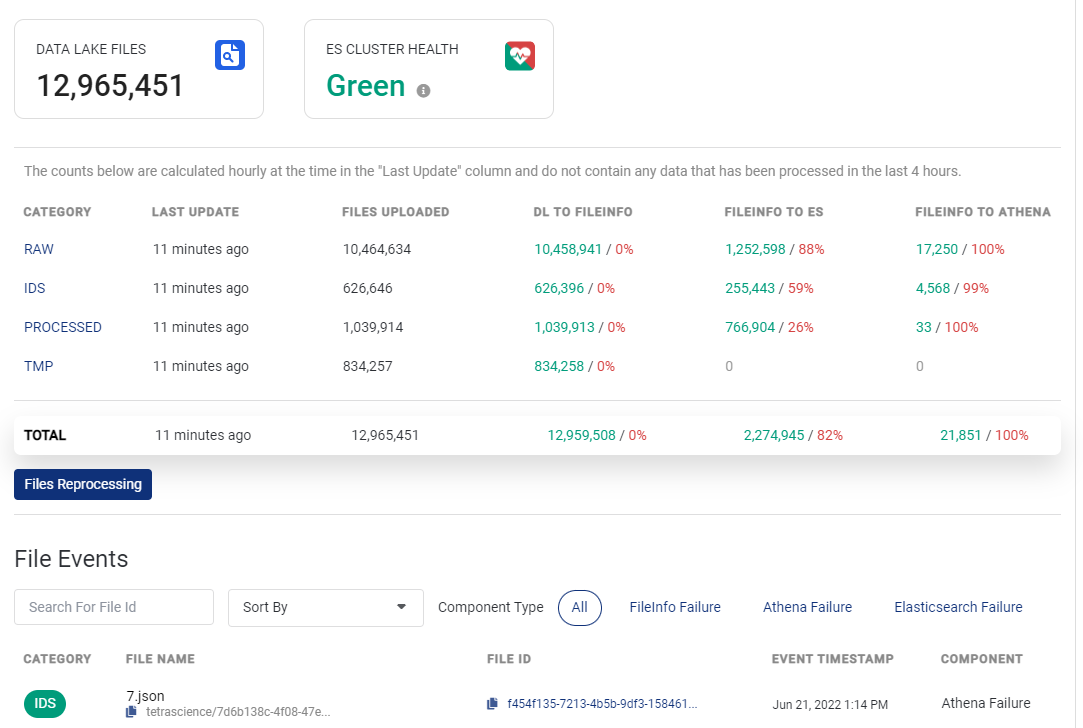
Files Health Dashboard
- If any file discrepancies exist, you can click Files Reprocessing to perform a system file cleanup and return to a consistent data state. As an Admin, you can reconcile files and create jobs for:
- DL to FileInfo
- FileInfo to ES
- FileInfo to Athena
Reprocess Files for DL to FileInfo Example
As an Administrator, click Files Reprocessing to reprocess files for DL to FileInfo:

Files Reprocessing
The Files Reprocessing page displays:
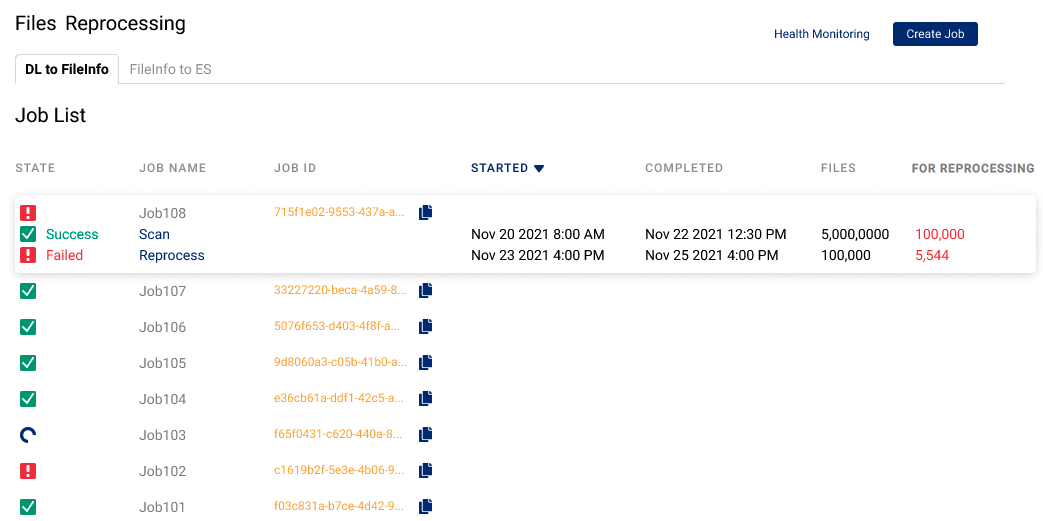
Files Reprocessing page
As an Administrator, you can view the reprocessing jobs history.
- What is a job? A job is comprised of a maximum of two phases: scan and reprocess. A job may also have only one phase (scan or reprocess). Jobs are unique per organization. You can cancel a job, but you cannot pause and then resume a job.
- What is a phase? A phase can be a service scan or service reprocess. During a service scan phase, the job will generate a list of reprocessing events which determines how the reprocess phase functions.
From the Files Reprocessing page, you can select which Job Type you want to review:
- Click the DL to FileInfo tab to display its list of reprocessing jobs
- Click the FileInfo to ES tab to display its list of reprocessing jobs
- Click the FileInfo to Athena tab to display its list of reprocessing jobs
This table describes the Job List information:
| Field | Description |
|---|---|
| State indicated by these icons: - Green check mark: Job completed successfully - Blue spinning circle: Job in progress - Red exclamation point: Job failed - Red circle with diagonal line: Job cancelled | Displays the overall job status which is determined by the least favorable status of both job phases: scan and reprocess. In the example, even though the scan phase completed successfully for Job 108, the overall status for Job 108 shows a failed state because its reprocess phase failed. |
| Job Name | Displays the name of the job assigned when it was created. |
| Job ID | Unique identifier for the job. You can hover over the ID to view it entirely. To copy the unique ID for the job, click the copy file icon. |
| Started | Date/Time when the job started. |
| Completed | Date/Time when the job completed. |
| Files | - Number of files scanned - Number of files reprocessed |
| For Reprocessing | Scan: Number of files with discrepancies to scan for reprocessing Reprocess: Number of files that could not be reprocessed |
At the bottom of the page, you can set the number of historical jobs to display on the page (25 jobs is the default).
Click Health Monitoring at the top of the page to return to the Files Health Dashboard.
Create a Job for DL to FileInfo Example
As an Administrator, you can create a new job.
To create and initiate a new DL to FileInfo Job:
- Select the DL to FileInfo tab at the top of the Files Reprocessing page.
- Click Create Job at the top right of the page.
- A warning displays alerting you that scanning the files (may be millions of files) in the Data Lake may take several hours or days. To continue to create a job, click Next; or Click Back to return to the Files Reprocessing page.
- From the Job Details dialog, enter a user-friendly name in the Job Name field (optional). If you do not specify a name, then the system will automatically generate a random name, for example, Job1514.
Job Name Specifications
- Maximum name length: 64 characters
- Name may contain any of these characters: /^[0-9a-zA-Z-_+. ]+$/
- Click Next. The new job is created.
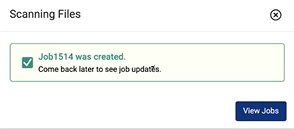
New Job created
- Click View Jobs to see the new job added to the top of the Job List with an automatically created Job ID.
Select an Existing Completed Phase to View Details
As an Administrator, you can review details for an existing completed (successful) phase (scan or reprocess).
To review details for a completed scan phase of a job:
- From the Files Reprocessing page, select a job that has a successful scan phase (in this example, "nomer 6" is the job used):
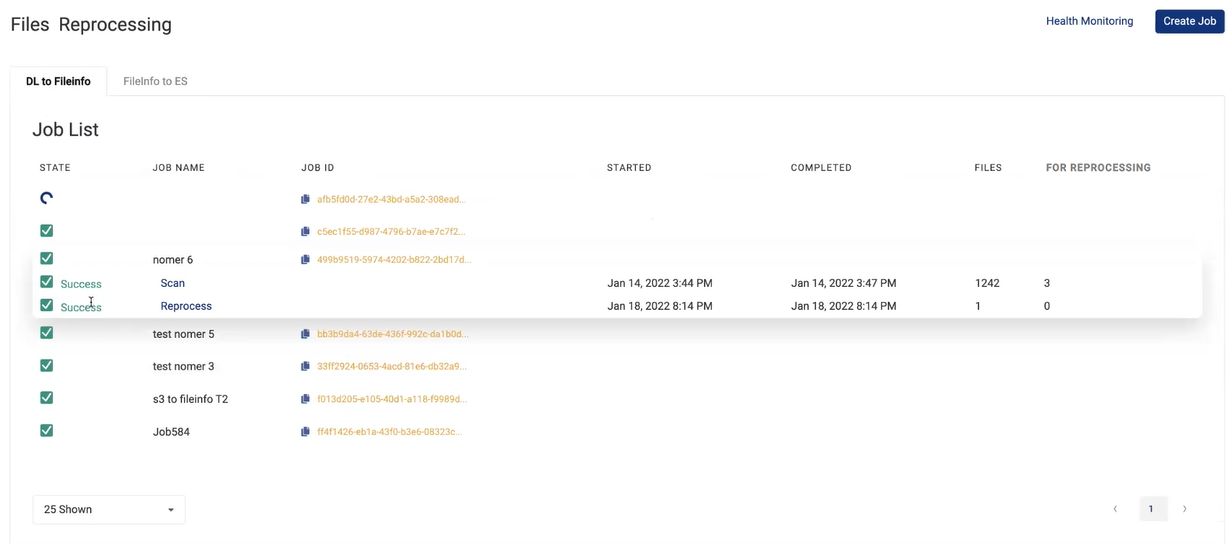
Successful Scan Phase to View
- Job nomer 6 contains both a successful scan and reprocess phase. Click Scan to open the Scan details page to check for any file inconsistencies for Job nomer 6:

Scan Contains One File Discrepancy
The scan for Job nomer 6 contains one file discrepancy in the RAW category.
3. To reprocess the file, click Select 1 files. A check mark displays next to the RAW category field. Depending on how many file discrepancies a scan has, you can select:
- One file to reprocess
- Several files to reprocess
- To reprocess all files

Selected File to Reprocess
- Click Reprocessing to initiate the reprocess phase and remove the inconsistency. After the reprocessing phase completes, the Job History page displays:

Job History page
For the nomer 6 job example, the reprocessing was successful and no more discrepancies exist.
Job History Page Shows Failed Files
However, if after reprocessing you still had files that failed to reprocess, they would display on this page. In that case, you should begin troubleshooting and contact your TetraScience Customer Success Manager (CSM) for assistance.
- After you finish reprocessing the files, you should review the Files Health Status Dashboard to check that the status in the DL to FileInfo and FileInfo to ES columns is green with 0% file discrepancies:
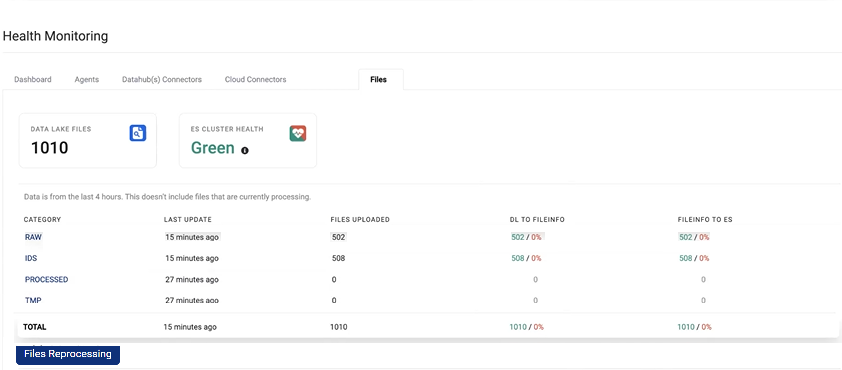
Green Status with 0% Discrepancies
Create a Job for FileInfo to Elasticsearch (ES) Example
As an Administrator, you can create a new job.
To create and initiate a new FileInfo to ES Job:
- Select the FileInfo to ES tab at the top of the Files Reprocessing page.
- Click Create Job at the top right of the page to open the Job Details dialog.
- From the Job Details dialog, you can:
- Determine how to reindex the files: Partial Reindex or Reindex All Files.
- Select Partial Reindex to scan and compare files in DL and File Info Service. Only inconsistent files are reindexed and corrected. Select a start and end date for the scan.
- Select Reindex All Files where no scan is required and all files are reindexed regardless of status. This operation may take a significant amount time and the Search experience will be inconsistent while the operation is in progress.
- Enter a user-friendly name in the Job Name field (optional). If you do not specify a name, then the system will automatically generate a random name, for example, Job1514.
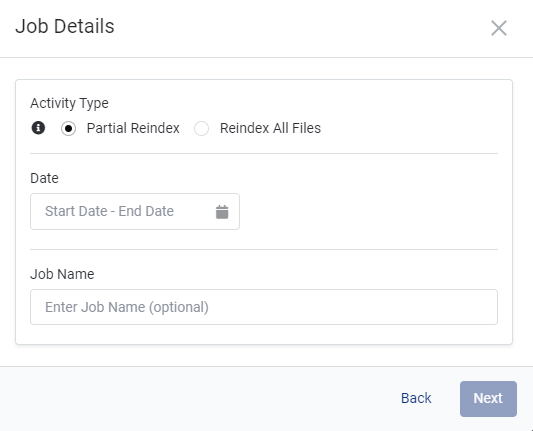
Job Details dialog
Job Name Specifications
- Maximum name length: 64 characters
- Name may contain any of these characters: /^[0-9a-zA-Z-_+. ]+$/
- Click Next. The new job is created.
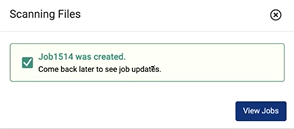
New Job created
- Click View Jobs to see the new job added to the top of the Job List with an automatically created Job ID.
Create a Job for FileInfo to Athena Example
As an Administrator, you can create a new job.
To create and initiate a new FileInfo to Athena Job:
- Select the FileInfo to Athena tab at the top of the Files Reprocessing page.
- Click Create Job at the top right of the page to open the Job Details dialog.
- From the Job Details dialog, you can set the Activity Type to Reindex All Files. By selecting this option, files are not rescanned. Instead, the information in the FileInfo is used as the basis to reindex all files (whether or not they were in a valid state), and any existing files will be overwritten.
Updated over 1 year ago
