Tetra Empower Agent User Manual (Versions 4.1.2 and 4.1.3)
This page describes how to use and connect the Tetra Empower Agent from the Empower Agent Management Console. You can use the Agent Management Console to:
- Configure the Tetra Empower Agent
- Use the Project panel
- Monitor Injections summary and processing
- Troubleshoot issues
The Agent Management Console is divided into nine sections:
Agent Management Console
Configure the Tetra Empower Agent
Section 1: Agent Status
This section indicates the Agent's running status using these statuses:
- Agent Service Not Installed
- Running
- Stopped
When you finish configuring the required parameters, click Start to start the Agent.
To stop the Agent from running, click Stop.
Section 2: Windows Scheduled Task
You can increase the Agent's reliability by ensuring that it remains online without having to manually check it each day. If you enable this option, the Tetra Empower Agent creates a Windows Task that checks the status of Agent service daily (at the run time you specify). Enter the time in the Run Time field.
- If the Agent is stopped, then the scheduled Windows Task automatically restarts the Agent service.
- If the Agent is running, nothing further happens.
- If you manually stop the Tetra Empower Agent, then the Windows task is removed, and the Windows Task that you create runs under the LocalSystem account.
Section 3: Empower Database
The Empower Database section contains these required fields:
- Empower Database Name
- User Name
- Password
You must enter information in all of the fields to access Empower. Please make sure this account has the correct privileges to extract the projects.
Click Test Connection to test the connection to the Empower Database.
Section 4: Empower Group User
The Empower Group User section contains these required fields:
- User Name
- Password
This is the user account running the Tetra Empower Agent used to access the Empower File Server. This user account may be located in the same Organization Unit as Empower so that it has the privileges required to access the Empower File Server to fetch raw data.
Section 5: Connector
You can use the Connector section to:
- Have the Tetra Empower Agent directly upload files to the AWS S3 bucket
- Add an Agent ID and connection URL to set up a Tetra Empower Agent from GDC or CDC
- Enable Injection and Archival services
Set the S3 Direct Upload Option
To have the Tetra Empower Agent directly upload files to the AWS S3 bucket bypassing GDC or CDC, set the S3 Direct Upload option to Yes. No is the default setting.
- If you use the S3 Direct Upload option with GDC, you must add an L7 Proxy Data Connector in the same Data Hub where you set up the GDC. Additionally, please endures that the port of the L7 Proxy Data Connector is open. To learn more about GDC, see this link.
- To learn more about CDC, see this link.
SQLite Database File Backups
To enable the Tetra Empower Agent to automatically perform regular backups of the SQLite database file, set the S3 Direct Upload option to Yes. When you enable this option, the SQLite database file (which stores agent configuration data) is uploaded to the backup bucket in the Data Lake. If a Tetra Empower Agent failure occurs, you can restore the database file from the backup bucket and continue processing.
If you do not use not use the S3 Direct Upload option, then we recommend that you create periodic backups of the Tetra Agent database, which is typically stored in the installation folder under C:\TetraScience<agent>\Bin\Database. In the event of a failure (for example, if the host server drive is lost), this would enable the data extraction to continue from where it left off without having to re-upload all of the data.
Enter the Agent ID and Connection URL
Before you set up a Tetra Empower Agent from GDC or CDC, you must enter:
- (Required) An Agent ID. The Agent ID (a UUID) is used to connect the Tetra Data Platform. You can retrieve Agent ID from the Tetra Data Platform when you set set up GDC or CDC.
- A full connection URL from GDC or CDC (as shown in these URL examples):
- GDC URL is
http://10.100.1.1:8888/generic-connector/v1/agent - CDC URL is
https://api.tetrascience-dev.com/v1/uda/
- GDC URL is
Verify the Agent ID and Connection URL
- Agent ID is required. The Connection URL is required if you are uploading RAW files to the Tetra Data Platform; optional if you are not.
- Before you use the Agent ID and URL with the Tetra Data Platform, we strongly suggest that you verify both with your TetraScience Delivery Engineer.
If you use the CDC Connector, then you must:
- When using the JWT token, the Org Slug field is required. Enter the Org Slug to attach it to the header.
- Enter the JWT token in the Authorization field to attach it to the header. To learn how to get the JWT token, see CDC.
- Click Add/Edit to open a dialog and enter the JWT token.
- Click Save to close the dialog and encrypt and save the JWT token. The Agent validates the connection immediately and displays the updated connection status next to the Connection URL field.
Enable Services
The Tetra Empower Agent contains two services:
- Injection Service
- Archive Service
Click Yes to enable a service. You can enable either service, or both services.
NOTE:
This Tetra Empower Agent User Manual describes the Injection Service only.
Section 6: Batch Size
Use this section to set the number of Injections being processed simultaneously. The default size is eight. As a System Administrator, you can adjust it based on the hours of the day. You can set the number up to 10 or 12, if the host server has robust hardware specifications. You can also adjust the number lower, if the Agent consumes more CPU and memory than the host server allows.
Section 7: Error Retry (Times)
If any unhandled errors occur, use this section to set the retry policies for both injection RAW file generation and injection upload.
Section 8: Agent Run Time
Use this section to configure the Agent run time. You can:
- Set the Agent to upload the RAW files to the Tetra Data Platform.
- Set to keep RAW files in the local drive after the files are uploaded successfully.
- Set the Empower Injection RAW file output folder. This must be a valid path.
- Set the scan interval in minutes for how often the Tetra Empower Agent periodically scans Empower projects to detect for new or reprocessed injections.
- Set the number of processors you wat to use to process injections.
- Sets the minimum required free disk space needed for the Tetra Empower Agent to process an injection.
If you set the Upload Raw Files to TDP field to Yes, then the Keep Local RAW File After Upload field is automatically set to Yes.
If you set the Keep Local RAW File After Upload field to No, then the RAW files are deleted from the output folder after the RAW files have been successfully uploaded to the Tetra Data Platform.
In version 4.1.1 of the software, three new settings were added: Generation Processor Number, Required Free Disk Space, and Upload Batch Size.
- The Generation Processor Number setting leverages the hardware of machines that have multiple cores, which allows you to specify how many processors you want the Tetra Empower Agent to use to process empower injections. You can specify up to 25 processors. Each processor handles one project at a time; specifying several processors allow the Tetra Empower Agent to process several projects in parallel and expedite processing time.
Optimize for Your Empower Infrastructure
Ensure the instance(s) running the Empower DB and Empower file server can sustain the load from the set Generation Processes. Using too many processes may increase the risk of overloading the instance(s) and reduce their service availability. During testing, six or ten processors were adequate when running Empower Services on a small instance t2.large. However, that may depend on your Empower Services needs (for example, how many concurrent sessions it should support, load of each session, and so on).
- The Required Free Disk Space setting allows you to set the minimum required free disk space required for the Tetra Empower Agent to process an injection. The default setting is 10 GB (changed from 1 GB in version 4.1.0). The free disk space refers to output disk. When the Tetra Agent processes an injection, it first checks if the machine meets, or exceeds, the minimum required free disk space value. If the machine meets the required free disk space, then it processes the injection. If it does not, then the machine writes a log message while the Tetra Empower Agent pauses and waits for other injections in progress to finish processing. Additionally, the Tetra Empower Agent waits for files to finish uploading to the Tetra Data Platform before it attempts to process the new injection again.
- The Upload Batch Size setting allows you to indicate how many processes to upload simultaneously. You can select up to 1,000,000 processes. However to prevent performance issues, the Tetra Empower Agent will only run a maximum of upload processes based on the number of Virtual CPUs available in the current instance (
Number of Virtual CPUs - 1).
RAW Files May Use a Large Amount of Disk Space
If you decide to retain the RAW files, be aware that RAW files may use most of the disk space. If the available disk space is less than what you've indicated in the Required Free Disk Space setting, then the Agent will pause the Injection generation. Use the Injection Summary page to check the available disk space.
Section 9: Non-Experiment
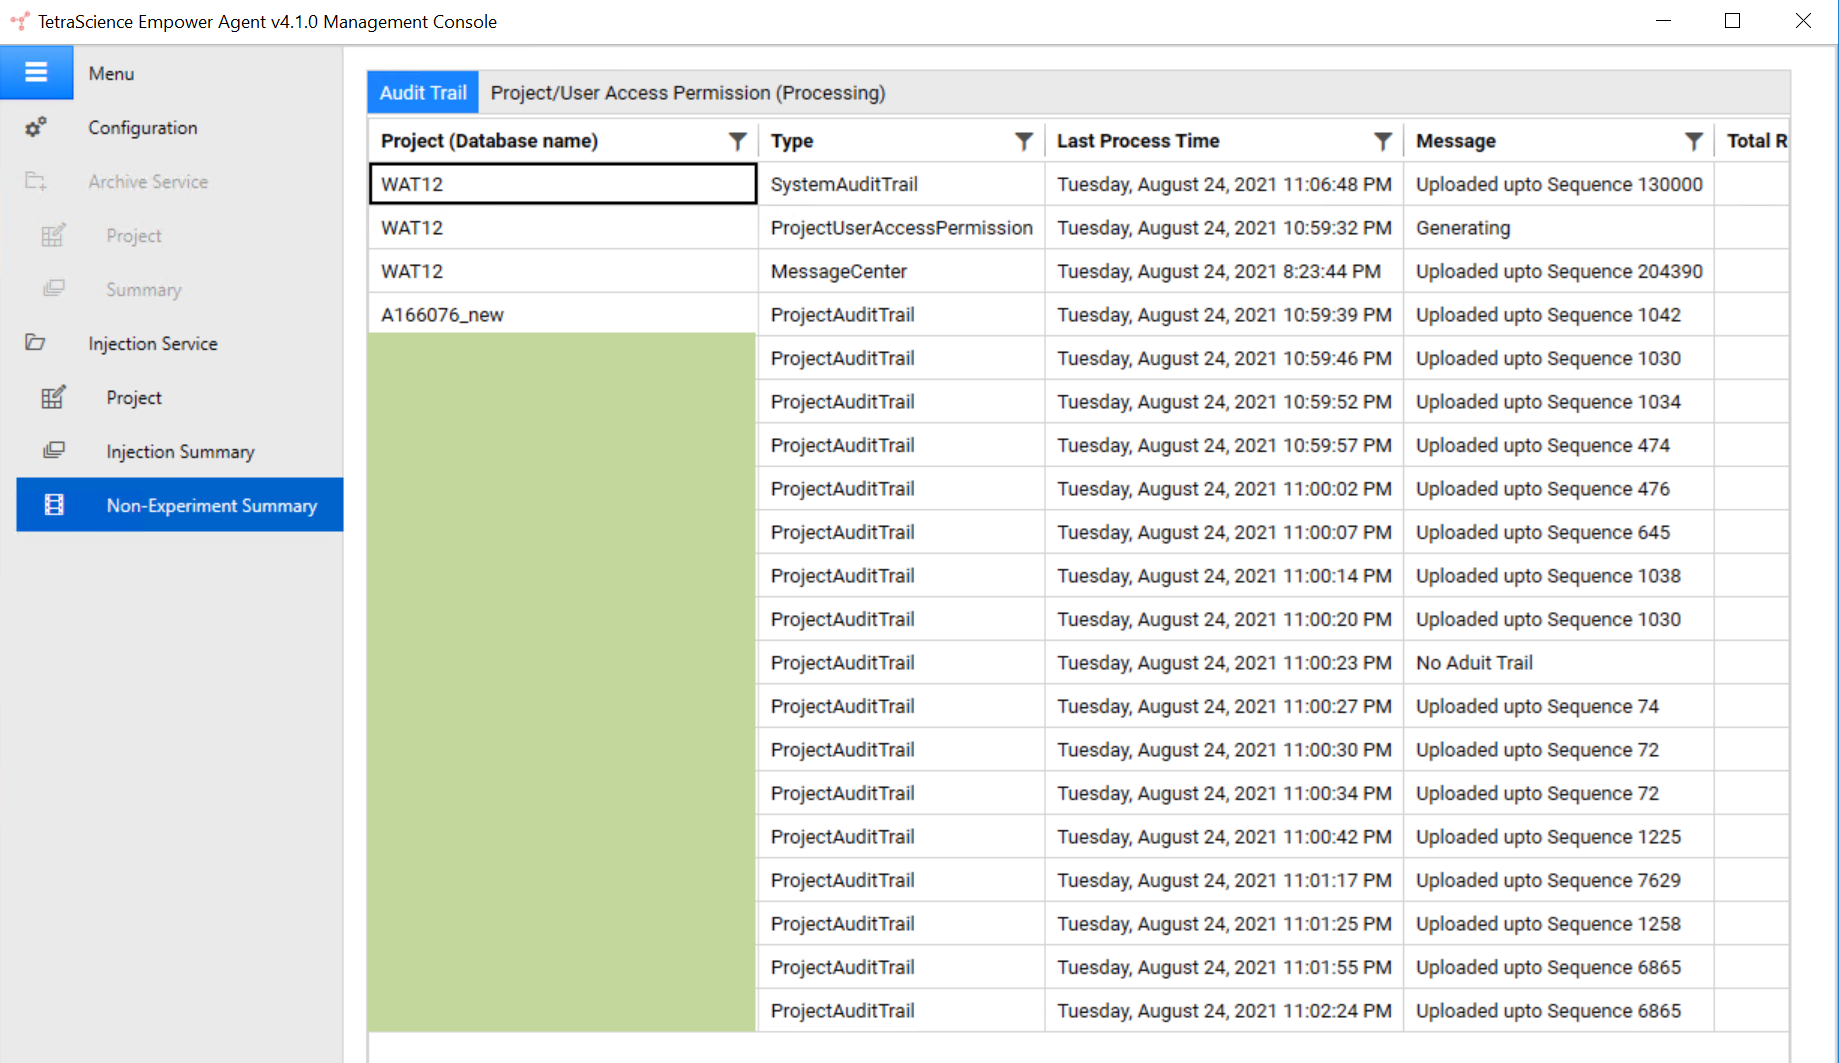
As of Tetra Empower Agent v4.0.0, you can extract and review processing summaries for Non-Experiment data. The Empower Agent can generate RAW files from these Empower data streams:
- System Audit trails
- Project Audit trails
- Message Center logs
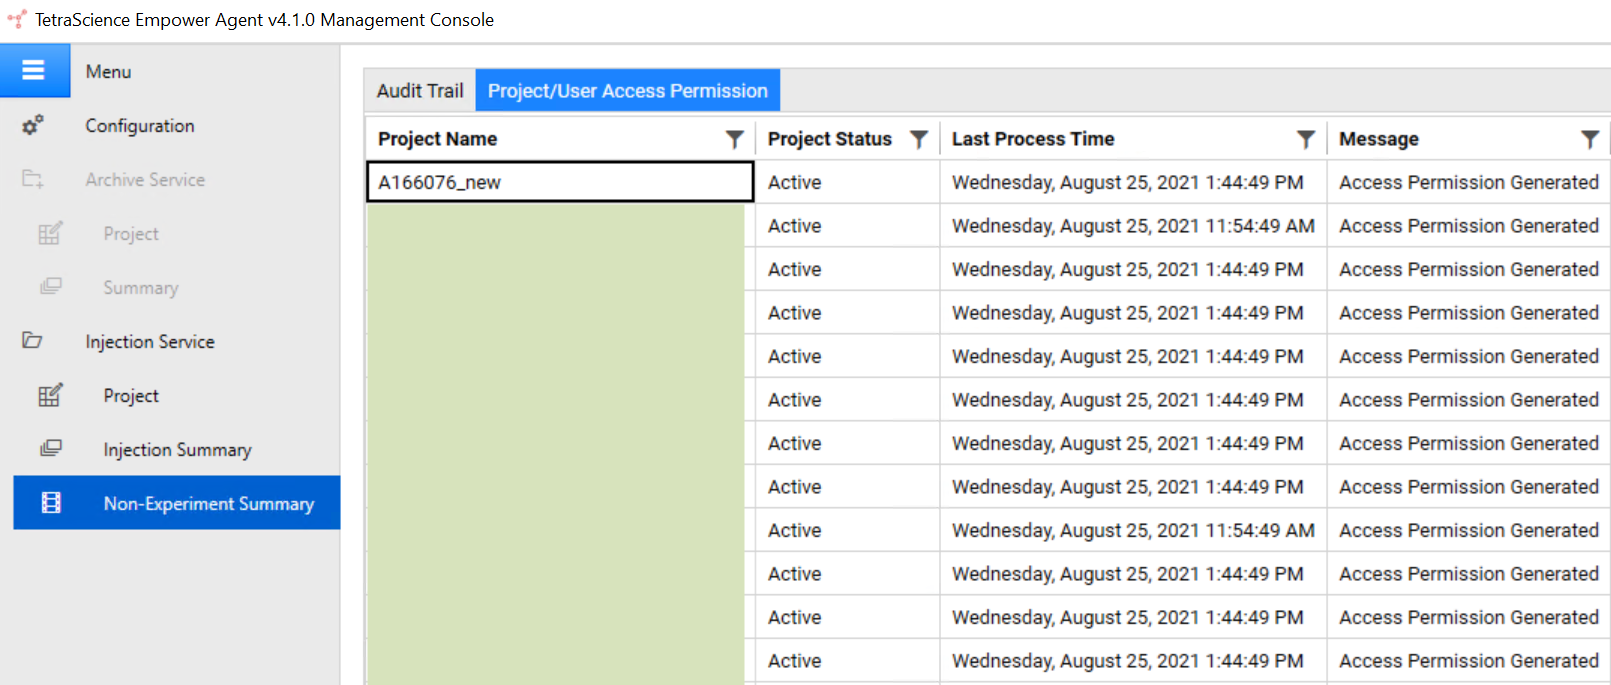
- Empower Project/User Access permission
Click Yes for the data stream you want to extract. Non-Experiment data shares the same configuration settings as Injection data for uploading to the Tetra Data Platform, and retaining generated data locally.
From the Audit Trail page, the project name is applied to ProjectAuditTrail. For SystemAuditTrail and MessageCenter, the Agent uses the Empower Database Name.

Non-Experiment Summary - Audit Trail
Additional data fields include:
- Message
- Total Generated Records
- Last Process Time
- Latest log (in JSON format)
Project/User Access Permission has its own summary page where you can review its Project Status and Last Process Time.

Project/User Access Permission
Empower Agent scans projects periodically. When the Agent detects any changes from project, user, user group, or user type, the Agent generates a JSON file containing all of the Empower users, user types, and projects with their associated user groups.
You can find which events trigger file regeneration and reupload in the section of the FAQ.
NOTE:
If you store Non-Experiment data in the local drive, it is moved to an Archive folder under this directory: <Output_Folder><Stream><Archive>\
Start the Agent
After you have entered and saved the configuration settings, click Start to run the Agent. When the Agent is running, all of the parameters are disabled. To modify any configuration settings, you must click Stop to stop the Agent.

Agent with Status of Running
Use the Project Panel
Select Projects
One Empower Database can contain hundreds to thousands of projects. You can select the projects you want to process. By default, the Project list contains all of the projects that the Empower DB User can access. As System Administrator, you can select which projects the Agent uses to generate the RAW files. Additionally, the Agent constantly monitors any project changes to detect new and updated Injections. To save any changes, click Save.
When new Empower projects are added to Empower System, the Agent detects them from its periodical scan job and adds those new projects to the Project list automatically. As System Administrator, you can manually select new projects for processing if the Auto Enable New Project check box remains unselected.
Auto Enable New Project
Auto Enable New Project Feature
This feature was introduced in version 3.3.0 of the software.
Select the Auto Enable New Projects check box to have the Agent extract the Injections automatically from the projects added to Empower. This feature applies only to those projects that were added or imported to the Empower Agent after you changed and saved the check box setting.

Auto Enable New Project
If you unselect the Auto Enable New Projects check box while the Agent is in the process of generating the Injection RAW files from that particular project, then the generation process continues until the Agent extracts all of the Injections from that project. Once completed, the Agent will stop monitoring that project for future changes.
To select or unselect all of the projects in the Project list, click Enabled to toggle your selection.
Conversion Status
As System Administration, you can monitor how the Tetra Empower Agent is processing by checking its overall status from the Conversion Status column. The Conversion Status has three options:
- No Injection - Project is not selected.
- Pending - Project is selected but has not been processed yet.
- Generated - Injection in the project has been processed completely. If it is in the middle of processing, it will show how many percentages of total Injections have been processed.
Sign Off Result Option
These are the available options that you can select for the Sign Off Result Option for a project:
- Not Required
- Level 1 Required
- Level 2 Required

Sign Off Result Option
Monitor Injections Summary and Processing
Processing Summary
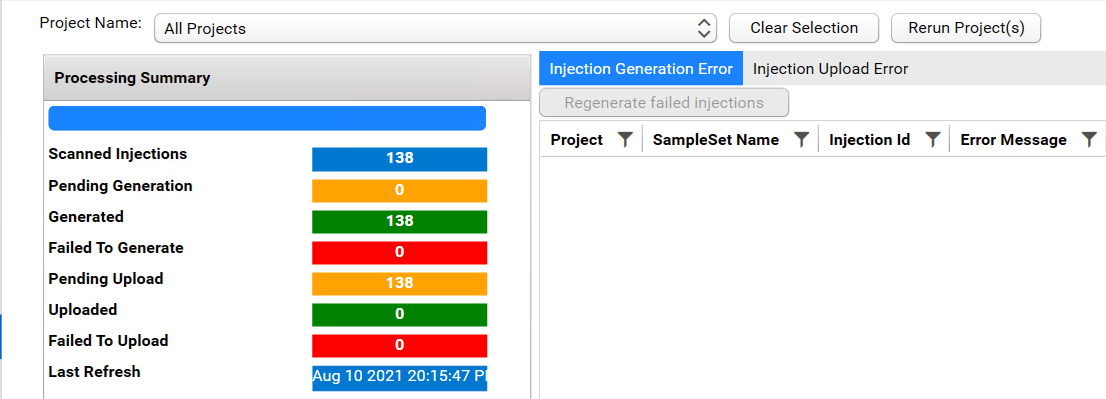
The Tetra Empower Agent detects and generates Injections from projects that have been enabled. The Processing Summary is a dashboard that provides information about Agent scanning, generation, and upload activities. All dates and times display in local time.

Processing Summary Dashboard
The Processing Summary dashboard displays this information:
- Scanned Injections - Number of Injections scanned by the agent
- Pending Generation - Number of Injections waiting to be scanned by the agent
- Generated - Number of Injections that RAW files generated
- Failed to Generate - Number of Injections that failed to generate a RAW file
- Pending Upload - Number of Injections waiting to be uploaded to the agent
- Uploaded - Number of Injections have been uploaded to the agent successfully
- Failed to Upload - Number of Injections that failed to upload to the agent
- Last Refresh - Time stamp of latest Injection processing summary displayed in local time
- Any exception messages
You can select an individual project from the Project Name drop-down. The data displayed in the dashboard changes based on the selected project.
- To clear the project drop-down list, click Clear Selection.
- To view a list of all projects, select All Projects. Only enabled projects are included.
- To re-generate Injection RAW files from any of the projects, you can select a Project(s) and click Rerun Project(s).
Injection Error Messages
These are the possible errors that may occur during processing:
- Injection Generation Error
- Injection Upload Error
When an error occurs, the Injection information is captured and shown in the data grid with a detailed error message. The Agent will retry the failed errors multiple times based on Error Retry (Times) setting you specified in the Management Console. To regenerate and re-upload the failed injections manually, click Regenerate failed injections.
System Messages
The Empower Agent generates host server system metrics every minute and provides these metrics:
- Data Connection (connection status between the Agent and the Tetra Data Platform)
- Available Disk Space (in GB)
- Disk Usage (as a % of the total)
- CPU Usage (as a % of the total)
- Memory Usage (in MB)

System Messages
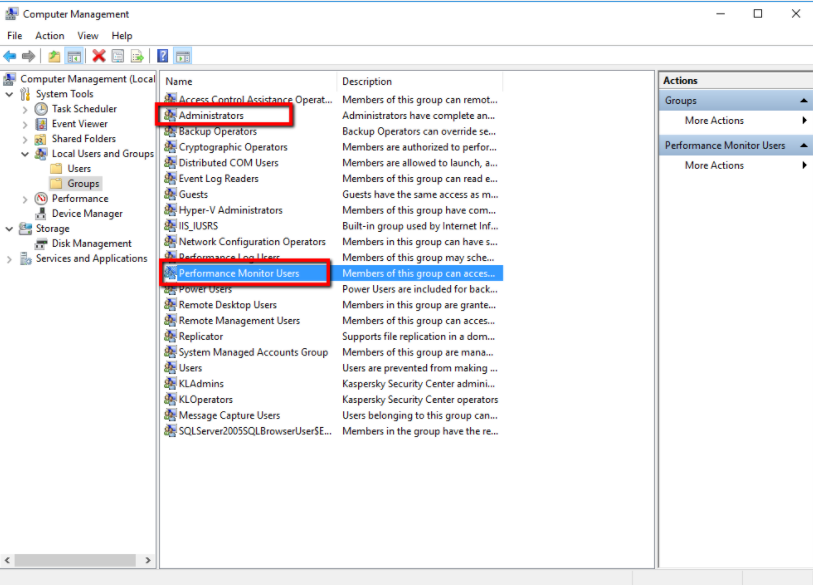
CPU Usage Percent is 0%
If the CPU Usage Percent shows 0%, then the user account that was defined as an Empower Group User was not included in either the Administrators group or the Performance Monitor Users group.

User Groups
Troubleshooting Issues
Review the table for existing troubleshooting issues and suggested actions to take to resolve the issues.
| Issue | Details and/or Action to Take |
|---|---|
| Missing result and chromatogram data | May occur if the Group User Account running the Tetra Empower Agent is not part of the Empower User Group. |
| Injection JSON is not generated | From the Management Console, determine if the Agent is up and running. If it stops unexpectedly, restart the Agent. |
| Previous version of an Empower Project is not generated | Empower V3 can automatically upgrade a Project with the Previous version. However, you must verify the upgraded version by opening the Project from Empower Client application and ensuring that Empower can access it. You may need to perform a manual upgrade. |
| Channel data is missing from the output | May occur because the account running the Tetra Empower Agent is not part of the Empower User Group in Active Directory when Empower Software was installed initially. |
| Error Code 105 in the Project page | The Agent is running, however no Injection is generated, and the status shows 105 in the Conversion Status field. This occurs if an exception was raised when the Empower Toolkit connected to Empower Client.Error 105 - The server threw an exception. (Exception from HRESULT: 0x80010105 (RPC_E_SERVERFAULT)This is an undocumented error. The root cause is unknown. To fix this, restart the Agent. |

Error Code 105 in the Project page
Learn More About the Tetra Empower Agent
To learn more about Tetra Empower Agent, check the FAQ section or contact your Customer Success Manager (CSM).
Updated over 1 year ago
