How to Search Files in the Tetra Data Lake
Tetra Data Platform (TDP) Versions
The following procedures apply to TDP versions 3.2.0 and higher. For earlier TDP versions, see (Version 3.1.x) Searching the Tetra Data Lake.
You can search for data in the Tetra Data Lake in the following ways.
TDP User Interface
- The Search Files page in the TDP UI includes the following:
- A List view with a search bar (searches can be saved as Collections and saved across an organization).
- A Label & Advanced Filters dialog where you can configure a custom query using a query builder or enter a RAW EQL query.
- A Browse view that provides a traditional tree-style view of your files as you would see in Windows Explorer or macOS Finder apps. (Shortcuts can be saved for frequently visited locations in this view.)
- The SQL Search page helps you build and run SQL statements.
Amazon Athena Queries
For more information, see Use SQL and Athena to Query Data.
RAW EQL Queries
For more information, see How to Search Using RAW EQL.
TetraScience API
For more information, see the TetraScience API Documentation.
You can easily apply filters to create complex searches and fine-tune queries. The search feature in the TDP behaves similarly to a common website search. Each field you enter is analyzed as both keyword (default) and text (field.text). The default behavior for Search sorts results by relevance or score.
NOTE
The TDP Search feature uses a search engine to help you look for specific datasets and corresponding files. To explore or analyze tabular data across one or more datasets, see Use SQL and Athena to Query Data.
What is Indexed for Search?
The first 1MB is all files is indexed for search. All of the data in harmonized (IDS) files is also indexed and available in search.
NOTE
You can turn on the Highlight option to have TDP UI highlight where in the text the search string is located.
How is Search Used?
You can use the TDP search feature to assist in the following:
- View and sort search results by name, source type, or upload date
- Browse files in specific folders and subfolders
- Filter search results by entering text in the Search box
- Save a query or grouping of results as a collection using the List view
- Save file path locations as shortcuts using the Browse view
- View files from specific file categories, sources, or pipelines
- Upload, download, preview, and delete files
- Open the file page to view its details
- View JSON files
- Add or edit attributes (metadata, tags, or labels)
Access the Search Feature
To access the Search feature, do the following:
- In the Tetra Data Platform, click the Hamburger icon at the top left corner of the page to expand the TDP menu options (or hover over the list of icons to display the menu options):
Hamburger icon
- Select Search Files from the list of menu options that appears on the left side of the page.
The Search page displays and enables you to:
- (In List view) Create, save, and manage search queries (grouping of results) as a collection to display at the top of the Search page
- (In Browse view) Create, save, and manage file path locations as a shortcut to display at the top of the My Home page
- Use quick filters where you can:
- List files by category (RAW, PROCESSED, or IDS), source, or pipeline.
- Browse files by your organization's folders in the Tetra Lake.
- Easily search files by entering any text in a Search box and view which filters have been applied.
- Conduct advanced searching and file uploading using additional filters and features.
- Review the file search results in a display area sorted by relevance (by default).
This table provides a list of the Search page items and their descriptions:
| Search Item | Description |
|---|---|
| All Files button | Click to display all of the available files. All files display as the default. |
| Save button | - From List view, click to create and save a search query as a collection. - From Browse view, click to save a file path location as a shortcut to reuse. For details, see How to Save Collections and Shortcuts. |
| List button | Click to display the files using a list format. |
| Browse button | Click to browse files within your organization's folders and subfolders. |
| Search box with Search button | Enter any term or field that you want to search, and then click Search. The Search feature filters and searches on terms similarly to a popular website's Search. To search and match for an exact phrase, enclose the text with "double quotes". These are possible search examples: - MyOrgTestFile traceId:bad94687-5cf1-4a55-9454 category:IDS - labels.value:name NOT labels.value:nameone - (_exists:metdata.name:country) empowr - fileId: abcdef-1589* For basic examples, see Basic Search Examples. For more examples and their results, see Search Query Examples. |
| HIghlight | Highlights matches of terms in yellow. Note that turning this on might slow down your query. |
| Label & Advanced Filters | Select to implement advanced search methods. You can search using basic filters, search on attributes, Data (IDS) filters, search IDS files by schema field, and search by RAW. |
| Upload File | Click to upload a file. |
| File Category | Indicates the type of files to show: RAW, PROCESSED, or IDS. |
| Source Type | When you click List, the available file sources display based on File Category (RAW, PROCESSED, or IDS), Source Type, or Pipeline. You can expand/collapse these source types to view the files. When you click on an item in the Source Type list, that selection is added to the Search string as an AND item. To remove the item from the Search string, click Clear. |
| My Home | Shows the files in your folder. This is available when you click Browse. |
| Tetra Lake | When you click Browse, you can search for files based on your organization's folders and subfolders. |
| Name | Displays the list of file names. Additionally, you can: - Select the box next to Name to delete the selected files in bulk. - Click on a file in the list to toggle the display of its summary details. |
| Source Name | Indicates the source of the file, for example: log-file-watcher. |
| Upload Date | Indicates the date and time when the file was last modified. You can click Upload Date to sort the files chronologically from earliest to latest, or vice-versa. |
| Show Match Details | Click to toggle details about where any matched terms display in the file. |
Perform a Basic File Search
To perform a basic file search, do the following:
- From the Search page, click List. The file name, source type, and the date/time that each file was last modified displays.
- Enter terms and fields that you want to search in the Search box. To search and match for an exact phrase, enclose the text with "double quotes". The Search feature filters and searches on terms similar to a common website search. You can enter both full-text queries (search all of the text associated with a file) and filtered queries. Filters are case-insensitive and AND is the default Boolean operator.
Fuzzy Search
A fuzzy search is done by means of a fuzzy matching program, which returns a list of results based on likely relevance even though search argument words and spellings may not exactly match. By adding the ~ after a keyword, you can make a typo (maximum of two characters), and still return relevant results.
However, do not add a ~ to the end of a keyword/value of a filter, or if the keyword it contains these wildcard characters (*, ?, or !) because the query will fail.
- Click Search. Files that match the search criteria you entered in the Search box display as results in the file list. The default behavior for Search is to sort results by relevance (or score) instead of by Upload Date. However, you can organize the result set chronologically by sorting on Upload Date. Click here for basic search examples.
- To perform additional filtering, you can select a source or pipeline from the list. To avoid unnecessary scrolling, you can expand and collapse the Source Types and Pipelines from the side panel of the Search page. Additionally, you can search within the filter or facet values. For example, you can click Source Type and start typing “humidity sensor”. You can also create and save a search query as a collection. For more details, see How to Save Collections and Shortcuts.
- To further filter your search results, you can select filters from the Label & Advanced Filters tabs.
- To clear the existing search criteria you entered in the Search box, click Clear.
View a File Summary
To view a summary of the file details, click the file from the list of files.
This table describes the list of File Summary items:
| Field | Description |
|---|---|
| Related Files | Lists: - Input Files: Files from which the current file was derived. For example, for an IDS file, the RAW file would be the input file. - Output Files: Files that this current file produced. For example, the IDS file typically produces a JSON file. |
| Date Created | Lists the date and time when the file was created. |
| Integration Type | Lists the integration (for example, datapipeline) that was used to ingest the file into the Data Lake. |
| Protocol | Lists the steps and configurations used to process data for the pipeline, if any. The protocol consists of two files: protocol.json and script.js. The protocol is the "heart" of the pipeline. |
| Task Script | Lists the task script related to this file, if any. Task scripts contain the code for the business logic needed to process the data. |
| Schema | Lists the schema (structure of the data) related to this file, if any. If a schema exists, you can click View Schema to open the Data Schema page. |
| Namespace | Lists the namespace for the schema. |
| Version | Lists the version of the schema (for example, v3.0.0) |
| Metadata, Labels, Tags | Displays relevant metadata, labels, or tags, if any. |
At the upper right corner of the File Summary panel, the following icons and the More option display:
- Open File Page
- Download File
- View JSON Details
- File Preview
View Additional File Details
To view additional file details, choose Open File Page for the selected file. The File Details page appears.
Files Details page section overview
| Section | Description |
|---|---|
| FILE VERSIONS | Lists the total number of file versions in chronological order with the most recent file displayed at the top of the list. You can: - Click a version to display its details in the File Details section. - Hover over the file to displays its full name, date/time when it was uploaded, and its full ID. - Copy the file ID to a clipboard. |
| FILE ACTIONS | You can: - Click Download to download the file to your computer. - Click View File Info Details to open a preview of the JSON file details. - Click Add New Version to upload a new version of the file. - Click Add Attributes to add or edit attributes (such as metadata, tags, and labels) to the file. - Click Remove to remove the file and its subsequent versions. This action is only available for the most recent file version. |
| File Info | Displays the following file details: - VERSION—shows the file version number - FILE NAME—shows the file's name - FILE ID—shows the file's ID number from the Amazon Simple Storage Service (Amazon S3) bucket - DATE CREATED—shows the date and time when the file was uploaded - FILE PATH—shows the location of the file in the Amazon S3 bucket (S3 Object Key) in the following format: {orgSlug}/{sourceId}/{category}/{filePath\*}Note: The filePath\* variable is determined by the TDP component that uploaded the file. For more information, see the documentation for the component that you’re using.- ES INDEX TIME—shows the date and time the file was indexed in Amazon Elasticsearch - ATHENA ADD TIME—shows the date and time the file was added to Amazon Athena - SOURCE TYPE—shows where the file came from - SIZE—shows the compressed file size. The actual file size is larger when you download it. |
| Attributes | Displays any associated file attributes such as: metadata, tags, and labels. |
| INPUT FILE | Shows files from which the current file was derived. For example, for an IDS file, the RAW file would be the input file. |
| OUTPUT FILES | Shows files that the current file produced. For example, the IDS file typically produces a JSON file. This also indicates the pipeline that processed the file, the file name, the date and time that the file was created, the IDS file name, and the TMP file. |
| View all Files and Workflows | Shows files and workflows that are related to the current file. |
View All Files and Workflows
On the File Details page, select the View All Files and Workflows button to display all of the current file's related files and workflows. The following All Files and Workflows page appears.
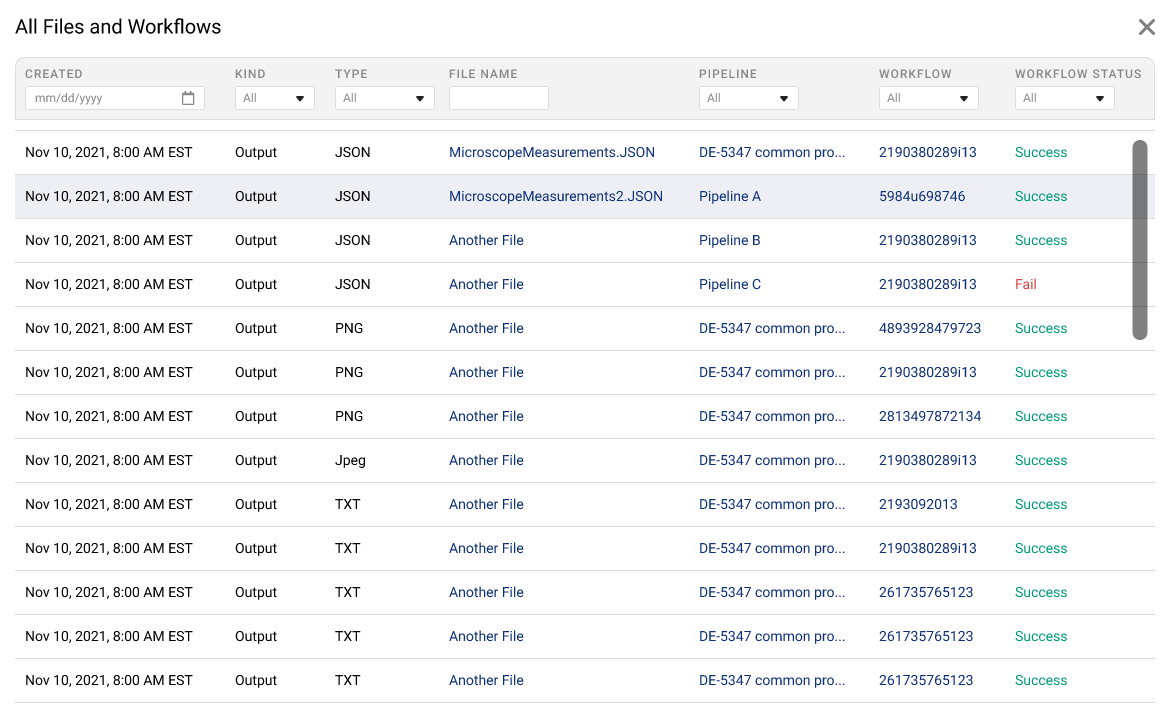
All Files and Workflows Page Section Overview
| Section | Description |
|---|---|
| CREATED | Shows the date the file was created |
| KIND | Indicates if a file is an input or output file |
| TYPE | Shows the file type |
| FILE NAME | Shows the file's name |
| PIPELINE | Shows the pipeline that contains the workflow that produced the file |
| WORKFLOW | Shows the workflow ID of the workflow that produced the file |
| WORKFLOW STATUS | Indicates if the workflow that created the file was successful or not |
Download a File
To download a file to your computer, you can select either of the following:
- The Download File icon from the File Summary page.
- The Download Version File Action from the File Details page.
Bulk File Downloads (Downloading Several Files at Once)
Bulk download allows you to quickly retrieve files sent to TDP. Instead of downloading files one at a time or having to write a custom script to send several requests to our API, you can now select up to 100 files from search results to download to your computer or device. Typically files are downloaded to the default location set in your web browser. If you want to change that location, see the documentation for your web browser.
- In the search page, select the files that you want to download. You can select up to 100 files to download. Note that you can select files on different search result pages.

Bulk Actions
- Select Bulk Actions from the top of the screen.
- Select Download ## Files. (## is replaced by the number of files that you selected. If you select more than 100 files - which is the limit – the number is grayed out.)

Bulk Actions (with Files Selected)
- A message appears asking if you are sure that you want to download the files. Note that the minimum size estimate of the download is displayed. Note that you’ll probably need more storage space for the files than is indicated by the minimum size estimate. This is because the minimum size estimate is the size of the stored compressed files: the actual size of all of the downloaded, uncompressed files is likely to be larger than that. Click Download Files to continue.

Download Files
- Your browser might prompt to you to allow the downloading of multiple files. The files are downloaded as separate files in your default download area on your computer or device. If you want to change this location or whether you will need to be prompted to download multiple files, see your web browser’s documentation. If the download fails, try the download again.
View JSON File Details
To preview the JSON file details, you can select either of the following:
- The View JSON icon from the from the File Summary page.
- The View File Info Details File Action from the File Details page.
From the JSON preview window, you can view details such as: total number of items, source type, when the file was created, the location of the file (bucket), source, category, and so on.
Add and Edit Attributes
To add or edit attributes (such as metadata, tags, and labels), you can do either of the following:
- Choose More from the File Summary page, and then select Add/Edit Attributes.
- Select the Add Attributes File Action from the File Details page.
Follow the instructions in this topic. When you have finished adding or editing attributes, click Save.
Upload a New File or New Version of the File
NOTE
When a new file version is uploaded, the TDP copies all file metadata from the previous file version, including workflow data. The system then uses this information to relate the new file version to the workflow that created the previous file version. This process results in the new file version being displayed on the File Details page and showing that the new, uploaded file version was produced by a workflow.
To upload a new version of the file, you can select any of the following:
- Upload File at the top right of the Search page.
- More from the File Summary page, and then select Upload New Version.
- The Add New Version File Action from the File Details page.
-
For a brand new file, you must select a source type for the uploaded file. Each newly uploaded file needs to be attributed to a source type.
-
You can add a new label, if desired. Labels are applied to an existing file without creating new versions. For details, see this topic. To add metadata or tags, click Advanced Fields. These fields create new file versions and trigger new workflows when modified. Be aware that the contents of these files may be versioned across edits.
-
Click the file upload box to select a file to upload, or drag and drop the file into the box.
-
To preview an uploaded file, click the Preview icon. Preview is available for these valid files and file types:
- Images with file type: .png, .jpeg, .gif, or .bmp (including 360-degree images)
- .csv
- .xlsx
- .docx
- Video with file type: .mp4 or .webm
- Audio with file type .mp3
If any valid file is greater than 50 MB, then a warning message displays indicating that the file size is too large to display in a preview.
-
When complete, click Upload.
File Size Limitation
The maximum file size you can upload through the TDP UI is 200 MB. To upload larger files, use the TDP API or a Tetra Agent or Connector.
Delete a File
To delete a file, you can do any of the following:
- Select one or more file(s) from list of files on the Search page, then click Bulk Actions, and Delete Selected.
NOTE
You can select all of the files on a single Search Files results page only (up to 20 at a time). To select more files, you must open each search results page individually.
- Click More from the File Summary page, and then select Delete.
- Click the Remove File Action from the File Details page. This action is only available for the most recent file version.
Click OK to confirm deletion of the file(s) and its subsequent versions; or click Cancel to retain the file(s).
NOTE
When you delete a file version, keep in mind the following:
- Deleting a file version is a soft delete.
- The file version remains in the Data Lake.
- The file version is still displayed in file details (with a URL for the
ID).- The file version is still available through the TetraScience API (with a URL for the
ID).- The file version isn't available through search or SQL queries.
Browse Files in Folders
To browse files in folders, do the following:
- From the Search page, click Browse. The Tetra Lake folders display as the source instead of the Source Type and Pipeline.

Tetra Lake folders
- Select the folder to browse the Tetra Lake's folder hierarchy based on your organization. You can continue to select subfolders until the files you are searching for display in the results section of the page.
Your current file path location displays at the top of the page. Additionally, you can save file path searches and add as shortcuts to the top of the My Home page. To quickly return to your home directory (and your shortcuts), you can click My Home at the top of the folder list. For more details, see How to Save Collections and Shortcuts. Any files that you removed display under the Removed Sources section at the end of the folder list indicated with the red trash icon.
- To further filter your search results, you can select filters from the Label & Advanced Filters tabs, or manually create a search query.
Updated over 1 year ago