Tetra Chromeleon Agent Installation and Configuration (Version 2.x)
This guide shows how IT Administrators can install, configure, and run Tetra Chromeleon Agent versions 2.x.
To install and run the Tetra Chromeleon Agent, do the following:
- Verify the prerequisites:
- Make sure the requirements of the hardware, software, and user account are met
- Install and configure the Agent:
- Select and set up a data connection
- Install the Tetra Chromeleon Agent
- Configure the Tetra Chromeleon Agent
- Verify the installation and monitor the agent:
- Start the Agent
- Verify the Data Vault can be selected
- Monitor progress and any errors
For instructions, see the procedures in each of the following sections.
Upgrades
To upgrade the Tetra Chromeleon Agent from a previous version, see Common Tetra Agent Upgrade and Installation Information.
Prerequisites
Hardware and Software Requirements
To install and run Tetra Chromeleon Agent v2.x, the following hardware and software are required:
- One of the following Microsoft Windows versions:
- Microsoft Windows 10 Enterprise and Microsoft Windows 10 Pro, 64-bit editions
- Microsoft Windows Server 2016
- Microsoft Windows Server 2019
- Microsoft Windows Server 2022
- Enabled Long path support
- .NET Framework 4.8
- 16 GB RAM minimum (64 GB RAM is recommended)
- 8 Core CPU
- 150 GB of free disk space minimum
- One of the supported Chromeleon software versions.
User Account Requirements
To run Tetra Chromeleon Agent v2.x, you must have the following valid user accounts:
Agent Group User
The Agent Group User account runs the Tetra Chromeleon Agent. This account must be a valid domain account or Windows local account. If the Agent Group User account isn't specified, the Agent uses the Windows LocalSystem account by default.
The Agent Group User account requires the following:
- Service Logon permissions to the host machine
- Local admin privileges
Chromeleon User
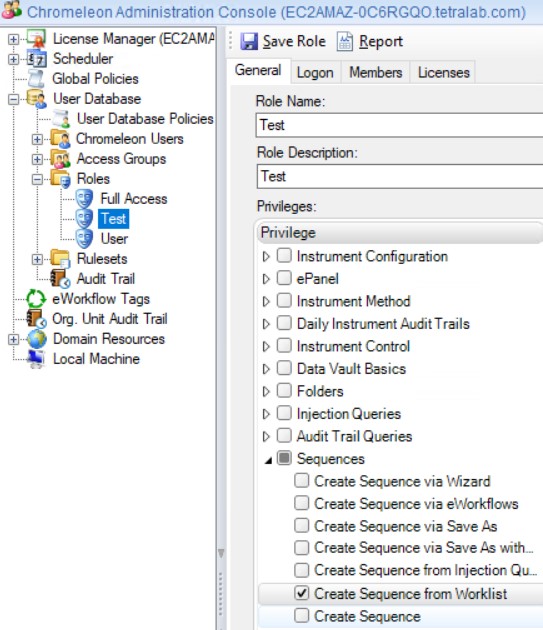
The Chromeleon User account accesses the Chromeleon software to fetch data. It is required only when User Mode is enabled on the Chromeleon software. In this case, a valid Chromeleon User Name, Password and Role must be entered in the Service Settings section of the Management Console of the agent.
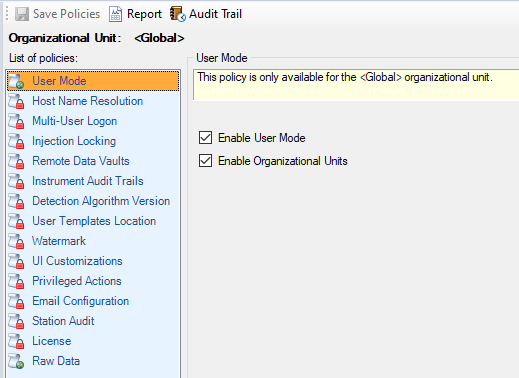
In general, the Chromeleon User does not need any role privileges to be able to use the Chromeleon Agent. The exception is when using SequenceCreation Command, in which case the Create Sequence from worklist privilege is required.
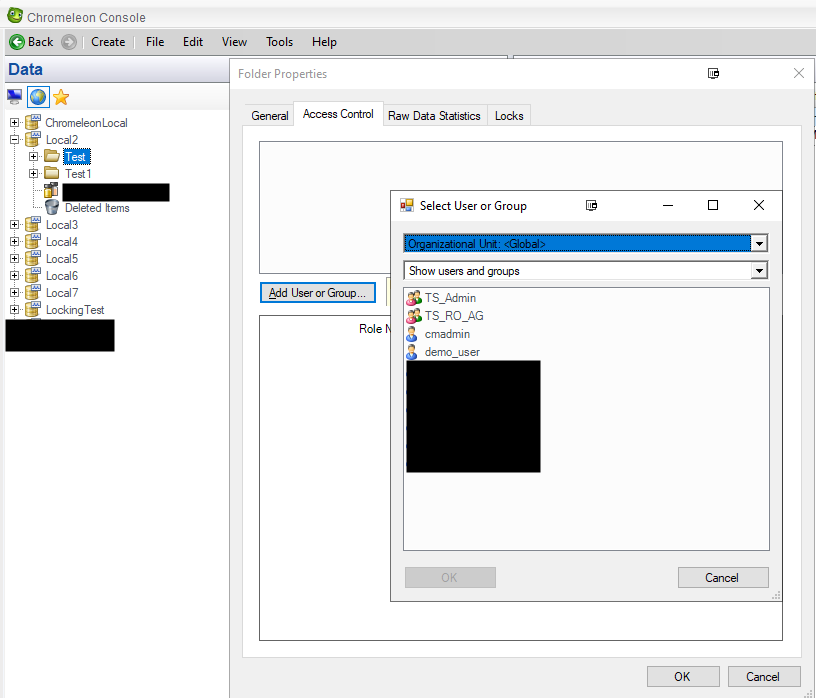
Access Control
A Chromeleon User may be allowed or denied access to a data vault or folder by the Access Control feature of the Chromeleon Software. This feature is accessed from the Chromeleon Console, by right clicking on a data vault or folder, and navigating to the Access Control tab. The Chromeleon Agent will only be able to ingest injections from data vaults or folders that are allowed access to the Chromeleon User used by the agent.
If the agent attempts to scan a data vault or folder for which the Chromeleon User used by the agent has no access, an error will be displayed on the Management Console of the agent.
The Access Control tab contains a list of users and groups. There are 2 ways to ensure a Chromeleon User has access to a specific data vault or folder.
- If the list is empty, every user is allowed access.
- If the list contains any entry, then every user must explicitly have an entry on the list to be allowed access. This can be achieved by adding the user, or adding a group that the user is part of.
IMPORTANT
If User Mode is not enabled, please clear any of the User or User Group from Access Control
Data Server and Data Vault Requirements
The machine hosting the Chromeleon Agent must have connectivity to the Data Servers and Data Vaults.
Installation and configuration
IMPORTANT
Not upgrading to v2.0.3 from earlier v2.x versions first will result in Data Vault connection errors.
- If using Tetra Chromeleon Agent v1.3.0 or v1.2.0, it's required that customers upgrade to v2.1.1 directly.
- If using Tetra Chromeleon Agent v2.0.0, v2.0.1, or v2.0.2, it's required that customers upgrade to v2.0.3 first, and then upgrade again to v2.1.1.
- The name of the installation folder must contain the Agent name and version (for example,
Tetrascience.Agent.Chromeleon.v2.0.3).- The name of the installation folder for the Agent can't include a space (for example, the following folder name wouldn't be valid:
C:\Program Files\TetraScience\...).- If the name of your preexisting installation folder for the Agent includes a space, a backup of the database and a clean reinstallation with the suggested folder name will be required.
- Make sure that you use the default installation folder:
C:\TetraScience\Tetrascience.Agent.Chromeleon.v2.0.3.
Step 1: Set Up a Data Connection
The Tetra Chromeleon Agent generates RAW files that are then uploaded to the Tetra Data Platform (TDP) through one of two methods:
-
On-Premises—requires the use of a Tetra Hub.
-or-
-
TDP (No Connector)—allows the Agent to upload source data directly to the TDP or Amazon Simple Storage Service (Amazon S3).
Before you install the Tetra Chromeleon Agent, you must set up one of these data connections. To determine which data connection type is required for your use case, see Agent Deployment Options.
NOTE
The Cloud Data Connector (CDC) was deprecated and replaced with the TDP (No Connector) data connection in TDP version 3.4.0. For more information, see Cloud Data Connector Deprecation.
Step 2: Install the Tetra Chromeleon Agent
TetraScience provides a Microsoft Installation Package (.msi) file to install the Tetra Chromeleon Agent on the host server.
To get the installation package and install the Agent, do the following:
- Get the link to the .msi installation package by contacting your TetraScience Customer Success Manager (CSM).
- After you have the link to the installation package, download the Agent to a machine that runs a supported version of Thermo Fisher Chromeleon.
IMPORTANT
To access the server and run the installation package, you must sign in as an Administrator.
- Start the installation wizard by double-clicking the Tetra Agent installation file. The installation wizard guides you through the prompts. The following is the default Tetra Chromeleon Agent installation path:
C:\Tetrascience\Tetrascience.Agent.Chromeleon.v2.x.x
📘 NOTE
You can install the Agent to a new folder, other than the default one. However, you must make sure that the installation path doesn't include any spaces (for example,
C:\Program Files\TetraScience\...).
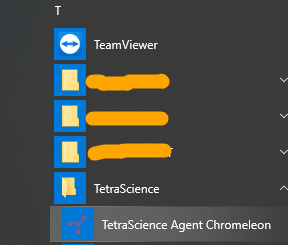
- After the Tetra Chromeleon Agent is installed, open the TetraScience folder within Windows Programs. Then choose TetraScience Agent Chromeleon to open the Agent Management Console.
Tetra Chromeleon Agent path
NOTE
To restrict access to the local Tetra Agent Management Console, you can edit the Agent’s installation folder’s permissions to grant least privilege access. For more information, see Restrict Access to Agent Installation.
Step 3: Configure the Tetra Chromeleon Agent
To configure the Tetra Chromeleon Agent after it's installed on the host server, do the following:
- In the Agent Management Console, select the hamburger menu icon in the left navigation pane. Then, choose Configuration. The Agent configuration page opens.
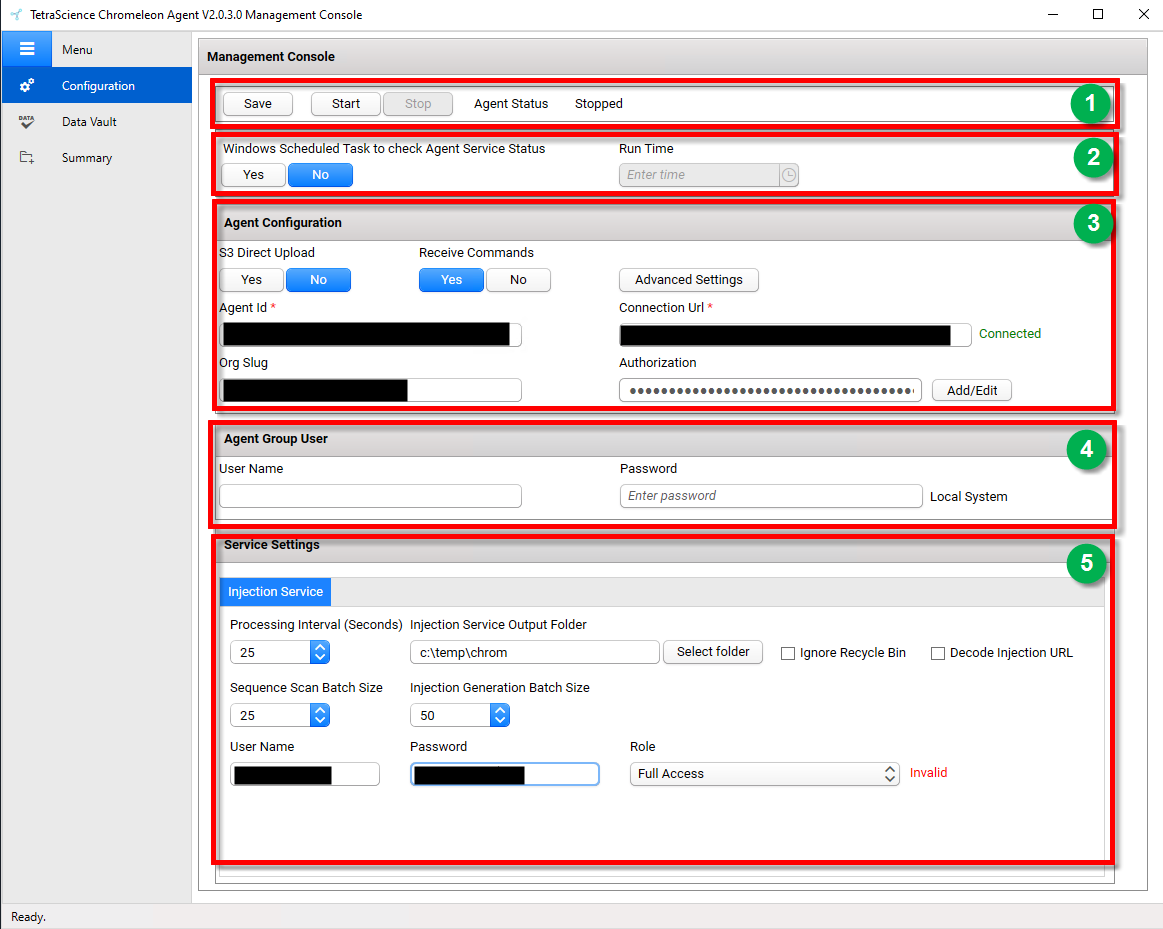
Tetra Chromeleon Agent Management Console
- Configure the Agent by filling out the fields in the following sections on the Agent Configuration page:
- (1) Agent Status
- (2) Windows Task Scheduler
- (3) Agent Configuration
- (4) Agent Group User
- (5) Service Settings
NOTE
Chromeleon stores the time stamps as Coordinated Universal Time (UTC). However, the date notation is displayed according to regional settings made in the operating system. The regional time is dependent on the time settings of the computer the time was acquired on.
Chromeleon generally displays time in the regional time plus the offset to the UTC. The UTC is a common time standard used across the world and is independent of location and daylight saving time.
For example, India Standard Time (IST) is UTC+5:30, which means the offset to the universal coordinated time is +5:30 hours. For 17:00:00 IST, Chromeleon would then display 17:00:00 +5:30.
Configure the Agent Status
The Agent Status section indicates the current state of the Agent's processing status, which can be any of the following:
- Agent Service Not Installed
- Stopped
- Running
To save, start, or stop the Agent, do the following:
- To save the Agent configuration, choose Save.
- To start the Agent after configuring new settings, choose Start. When the Agent starts, the status indicator shows Running.
- To stop a running Agent, choose Stop. The Stop button can be selected only if the Agent is running.

Agent Running status
Automate Status Checks by Using Windows Task Scheduler
To avoid needing to check the Agent’s service status manually, it’s recommended that you create a Windows task to perform daily status checks.
To create a Windows task, do the following:
- Under Windows Scheduled Task to check Agent Service Status, choose Yes.
- For Run Time, enter the time that you want the status check to run each day. If the Agent is stopped, then the scheduled Windows task restarts the Agent service automatically. If the Agent is running, it continues to run, and the Windows task will run at the time you selected.

Windows Task Scheduler
NOTE
If you manually stop the Agent, the task is removed from Windows Task Scheduler. When you run the Agent without specifying an Agent Group User account, the task runs under the LocalSystem account.
Set Up the Agent Configuration
NOTE
Make sure that you’ve set up a data connection (see Step 1: Set up a Data Connection) before completing the following procedure. You will need the Agent ID and Connection URL that you created during the data connection setup.
To set up the Agent configuration, enter the following information in the Agent Configuration section:
- For Agent Id, enter the Agent’s ID. The Agent ID is a Universal Unique Identifier (UUID) value that’s used to connect the Agent to the TDP. To find your Agent ID, do the following:
- Sign in to the TDP.
- In the left navigation menu, choose Data Sources. Then, choose Agents. The Agents page opens.
- In the AGENT column, find the name of the Agent that you’re configuring. The Agent ID is listed below the Agent name.
- For Connection Url, enter the complete connection URL of the Connector or integration type that you’re using. For example URLs, see Connection URL.
IMPORTANT
- Agent ID is required.
- The connection URL is required only if you're uploading RAW files to the TDP.
- Before you use your Agent ID and connection URL, it’s strongly recommended that you verify both with your TetraScience Customer Success Team.
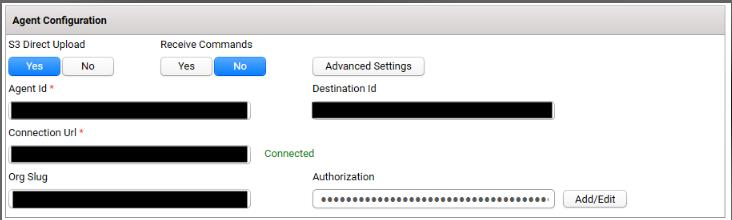
Agent Configuration section
- (Optional) To have the Agent upload files directly to your Amazon Simple Storage Service (Amazon S3) bucket, set the S3 Direct Upload option to Yes. If you choose this option, keep in mind the following:
- When you activate S3 Direct Upload, you can upload a maximum file size of one terabyte.
- If you use the S3 Direct Upload option with a Tetra Data Hub that uses a Generic Data Connector (GDC), you must add an L7 Proxy Connector in the same Hub where you set up the GDC. The port of the L7 Proxy Connector must also be open. For more information, see GDC Connections.
SQLite Database File Backups
To configure the Tetra Chromeleon Agent to automatically perform regular backups of the SQLite database file, set the S3 Direct Upload option to Yes. When you activate S3 Direct Upload, the SQLite database file (which stores Agent configuration data) is uploaded to the backup bucket in the Tetra Data Lake. If an Agent failure occurs, you can restore the database file from the backup bucket and continue processing.
If you don't use the S3 Direct Upload option, it’s recommended that you create periodic backups of the Agent database. The Tetra Chromeleon Agent database is stored in the installation folder under
C:\TetraScience<agent>\Bin\Database. In the event of a failure (for example, if the host server drive is lost), this setup allows the data extraction to continue from where it left off, without needing to re-upload all of the Agent’s data.
- (Optional) To allow the Agent to securely receive and run commands from the TDP, set the Enable Queue option to Yes. If you choose this option, keep in mind the following:
- When you activate the Enable Queue option, the Agent proactively polls the Amazon Simple Queue Service (Amazon SQS) messages sent from the TDP. The Agent then identifies messages that contain command requests and determines whether it should run the command or not.
- For Tetra Chromeleon Agent v1.2.0 and higher, the Agent can receive the Sequence Creation Command only.
TDP Commands and Queue Security
Amazon SQS queues allow the TDP to send commands to the Tetra Agent while keeping the command request process secured in the following ways:
- The TDP doesn't send the Agent actual commands. The TDP sends Amazon SQS messages that request commands to be run locally.
- Each Tetra Agent has its own Amazon SQS queue to receive messages from the TDP. Queues aren’t shared between agents.
- The Tetra Chromeleon Agent can run only a specific set of pre-built commands. As of Tetra Chromeleon Agent v1.2.0, the Agent can only execute the Sequence Creation Command.
-
(Optional) To specify the Destination Id for allowing the files to be uploaded to the same S3 location from multiple agents. Destination Id is a UUID. This feature helps to split the load into multiple agents for scaling horizontally.
-
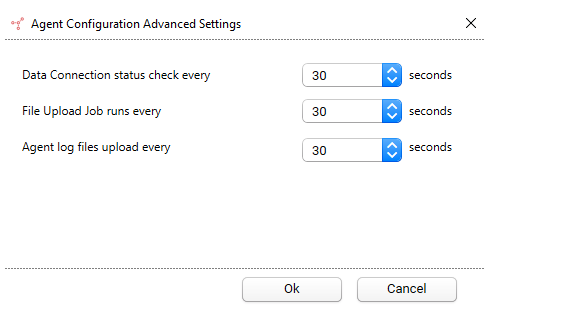
(Optional) To configure additional Agent settings, choose Advanced Settings. The Agent Configuration Advanced Settings dialog appears and displays the following configuration options:
- Data Connection status check every: Indicates how often the software checks the status of the connection (heartbeat) between the TDP and the Agent. If the TDP doesn't receive a heartbeat message for more than five minutes, the platform assumes that the Agent is offline.
- File Upload Job runs every: Indicates how often the Agent uploads files to the Tetra Data Lake.
- Agent log files upload every: Indicates how often the Agent uploads log files to the Data Lake.
NOTE
The default value for all Agent Configuration Advanced Settings is 30 seconds.
Agent Configuration Advanced Settings
- (For “TDP (No Connector)” setups only) If you’re using an Agent without a Connector, make sure that you do the following:
- For Org Slug, enter your organizational slug. To get your organizational slug, see Viewing Organization Details. The organizational slug is required when using a JSON Web Token (JWT). Adding the slug to this field attaches it to the Agent’s API request headers.
- For Authorization, select Add/Edit. Then, enter your JWT in the dialog that appears. To get a JWT, see Generate a JSON Web Token for an Existing Service User. Then, choose Save to encrypt and save the JWT. The Agent validates the connection immediately and displays the updated connection status next to the Connection Url field.
Configure the Agent Group User
The Agent Group User is the Windows service account that runs the Tetra Chromeleon Agent.
To configure the Agent Group User, do the following:
- In the Agent Group User section, for User Name, enter the user name.
- For Password, enter the password.
The Agent then validates the account. If the user name and password are correct, the Agent displays a Valid status in the console.

Agent Group User
NOTE
If you're using a Windows local account, add .\ at the front of the user name. For example, if the user name is Tetra, enter .\Tetra.
Configure Agent Service Settings
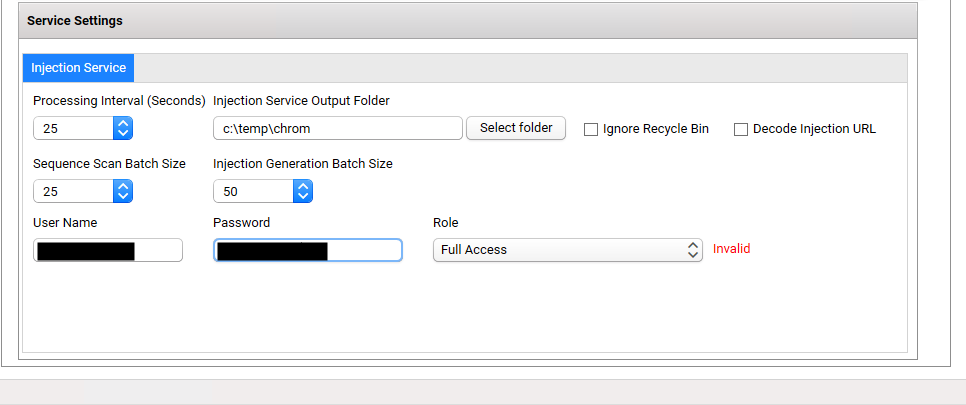
To configure the Agent's service settings, enter the following information in the Service Settings section:
Service Settings
- For Processing Interval (Seconds), enter how often the Agent should run the injection extract task. The extract task includes scanning Chromeleon to detect new or modified injections and the generation of the RAW injection file.
- For Injection Service Output Folder, enter the name of the folder where you want to temporarily store the generated RAW files. After the files are uploaded to the TDP, the RAW files are deleted from the temporary folder to save disk space.
- (Optional) For Ignore Recycle Bin, check the box to skip the generation of any deleted injections in data vaults. This setting is available in Tetra Chromeleon Agent v2.0.1 and higher.
- (Optional) For Decode Injection URL, check the box to escape URL encoding in the injection path created in Amazon S3. This setting is available in Tetra Chromeleon Agent v2.0.2 and higher.
IMPORTANT
If you're upgrading from a previous version of the Tetra Chromeleon Agent, selecting the Decode Injection URL option can result in new RAW JSON files for changed injections in the new Amazon S3 path. For more information, see What is the impact of changing the Decode Injection URL setting in Agent UI?
- For Sequence Scan Batch Size and Injection Generation Batch Size, enter the batch sizes that you want the Agent to use when querying data through the Chromeleon SDK. The batch sizes that you choose need to balance the application’s footprint and overall throughput. The number can be adjusted based on the data type. Injections with 3D data fields will generate large RAW JSON files. These two settings are available in Tetra Chromeleon Agent v2.0.3 and higher.
- (For when Chromeleon User Mode is activated only) For User Name, Password, and Role, enter the credentials of a Chromeleon local user or a Lightweight Directory Access Protocol (LDAP) authenticated user. This configuration allows the Agent to access Chromeleon through a specific user account. The credentials you enter must be for a valid Chromeleon user account. A busy indicator appears while the user account is being verified. You can’t start the Agent until the Chromeleon user account is verified.
IMPORTANT
If Chromeleon User Mode is activated, User Name, Password, and Role are required fields. The Agent validates the account before the Agent starts.
If Chromeleon User Mode is turned off, the User Name, Password, and Role fields are deactivated in the console.
Verify the Installation and Monitor the Agent
Step 1: Start the Agent
In the Agent Management Console, select the top Start button. Then, verify that the Agent Status displays as Running.

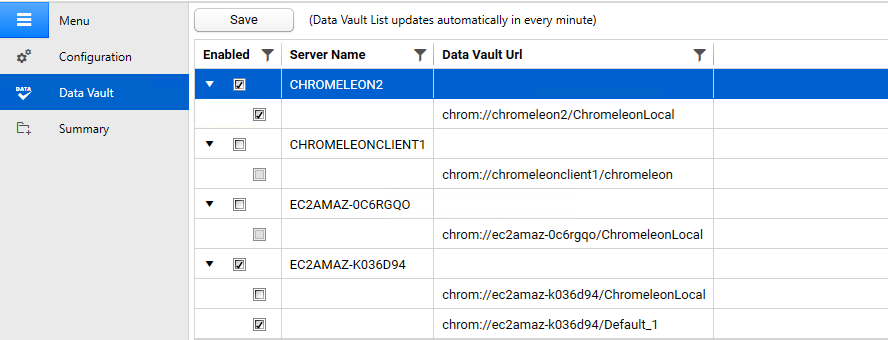
Step 2: Select the Data Vault
The Tetra Chromeleon Agent can access all of the Data Vaults that the configured Chromeleon user has permission to access. Instead of generating the injections from all of the Data Vaults, you can select individual ones from the Data Vault list.
To select individual Data Vaults to scan and extract injections from, select Data Vault from the left navigation pane. A list of available Data Vaults appears. The Data Vaults are grouped by their Chromeleon Data Servers, which are listed in the Server Name column.
NOTE
The Server Name column is available in Tetra Chromeleon Agent v2.0.3 and higher. In Tetra Chromeleon Agent v2.0.0 to v2.0.2, you can select individual Data Vaults only.
Data Vault section
When selecting Data Vaults, keep in mind the following:
- You can select Data Vaults only when their associated Data Server is activated.
- If a Data Server or a Data Vault is unchecked when the Agent is running, the Agent will postpone the pending injection generations that belong to those Data Vaults.
Step 3: Monitor Tetra Chromeleon Agent Progress and Server System Metrics
View the Agent's Summary Dashboard
To review the Tetra Chromeleon Agent's run time progress and host server's system metrics, do the following:
- Open the Agent Management Console.
- In the left navigation pane, choose Summary. The Summary dashboard opens.
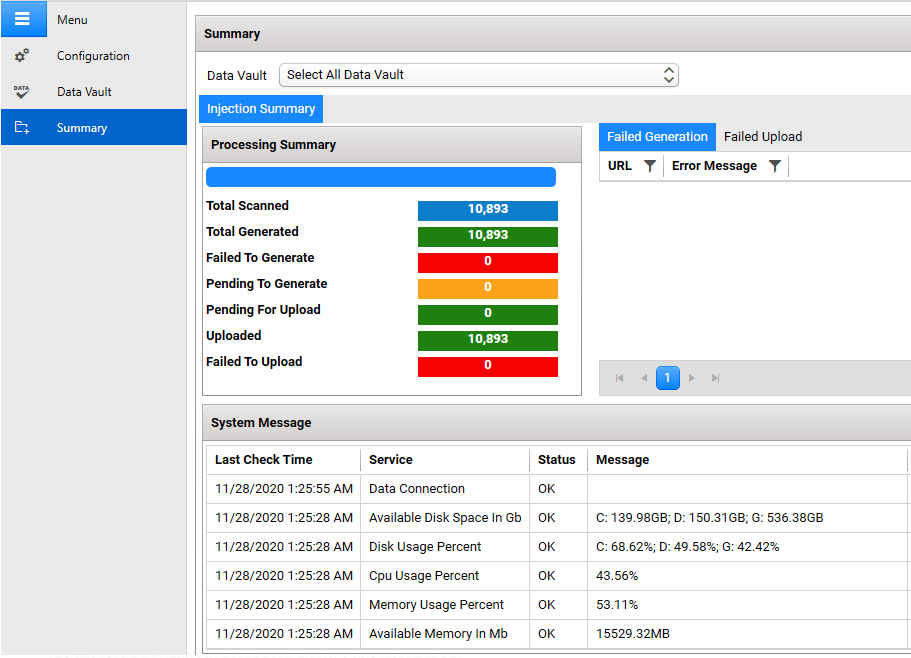
Summary dashboard
Summary Dashboard Contents
Processing Summary
The Processing Summary section shows the following information:
| Field | Description |
|---|---|
| Total Scanned | Shows the total number of unique Injections in the selected Data Vault that the Agent scans. If the path of a Sequence is changed, the Injections in the Sequence are counted twice. |
| Total Generated | Shows the total number of Injections the Agent has successfully generated in the selected Data Vault. If a Sequence is modified, the Injections are removed from this count. If an individual Injection is modified, the Injection is counted again. |
| Failed to Generate | Shows the total number of Injections that the Agent has failed to generate in the selected Data Vault. |
| Pending to Generate | Shows the total number of Injections awaiting generation in the selected Data Vault. |
| Pending for Upload | Shows the total number of successfully generated Injections awaiting upload in the selected Data Vault. |
| Uploaded | Shows the total number of Injections that the Agent successfully uploaded in the selected Data Vault. |
| Failed to Uploaded | Shows the total number of Injections that the Agent has failed to upload in the selected Data Vault. |
Injection Generation and Upload Error Messages
The Error Messages section displays detailed error messages for any errors that occur during generation or upload.

To open a dialog window that shows the file name and the error message, select the error record. To have the Agent regenerate the failed injection, select the Regenerate button.

You also can regenerate all of the failed injections by selecting the Regenerate failed injections button, under the Failed Generation tab.
Scan Error Messages
The Scan Error Messages section displays the connection issues the Agent encounters when accessing the Chromeleon objects during scans. These issues can result from network connection or access permissions issues and can happen to the Data Server, Data Vault, Folder, or Sequence. If the issue is resolved, the error is removed from the list.

System Messages
The System Messages section displays the following host server system metrics and messages, which are updated every minute:
- Data Connection (connection status between the Agent and the Tetra Data Platform)
- Available Disk Space (in GB)
- Disk Usage (as a percent of the total)
- CPU Usage (as a percent of the total)
- Memory Usage (in MB)
- Available Memory (in MB)
View Chromeleon Cultural Settings
To see Chromeleon cultural settings that are set on the host server, such as decimal or dot symbols, date formatting, and negative number formatting, do the following:
- Open the RAW JSON file for the injection in the TDP.
- Find the
"AgentContext"and"AgentHostServer"sections. The Chromeleon Cultural settings are listed here.
Example Chromeleon Cultural Settings as They Appear in a RAW JSON File
{
"RawJsonSchemaVersion": "v2",
    "AgentVersion":"v2.0.0",
    "AgentContext": {
        "AgentHostServer": {
            "CultureInfo": "en-US",
            "ShortDate": "M/d/yyyy",
            "LongDate": "dddd, MMMM d, yyyy",
            "ShortTime": "h:mm tt",
            "LongTime": "h:mm:ss tt",
            "DecimalSymbol": ".",
            "DigitGroupingSymbol": ",",
            "NegativeSignSymbol": "-",
            "NegativeNumberFormat": "LeadingNegativeWithNoSpace"
            }
      }
    ...
  }
"NegativeNumberFormat" Patterns
| RAW JSON Name | Associated Pattern |
|---|---|
| 0 - Parenthesis | “(n)” |
| 1 - LeadingNegativeWithNoSpace | “-n” |
| 2 - LeadingNegativeWithSpace | “- n” |
| 3 - TrailingNegativeWithNoSpace | “n-” |
| 4 - TrailingNegativeWithSpace | “n -” |
Troubleshooting
The Agent Returns a "Failed to Fetch Injection" Error When I Try to Access a Custom Data Vault
"Failed to Fetch Injection" Error When I Try to Access a Custom Data VaultThe Tetra Chromeleon Agent can return a "Failed to Fetch Injection" error when trying to access a custom Data Vault if CM7RE.ocx, a Chromeleon component related to report templates, isn't registered in the Agent host server.
To resolve the error, register the CM7RE.ocx component on the Agent host server by running the following command from the local Windows Command Prompt as an administrator:
regsvr32 c:\Program Files (x86)\Thermo\Chromeleon\bin\CM7RE.ocx
NOTE
When a
"Failed to Fetch Injection"error occurs because theCM7RE.ocxisn't registered, the following message displays in the Agent logs:exception":"System.Runtime.InteropServices.COMException (0x80040154): Retrieving the COM class factory for component with CLSID {B96F4D03-7A8E-4B55-AE22-1DAD515991D3}
Updated 7 months ago