Tetra Benchling Connector v1
The Tetra Benchling Connector is a standalone, containerized application that listens to a Benchling Events subscription and uploads the events and related resources to the Tetra Data Platform (TDP). Benchling is a cloud-based informatics platform designed for life sciences research and development. It provides tools for managing and analyzing biological data, facilitating collaboration among scientists, and scientific workflow management.
To set up a Tetra Benchling Connector, see the Operational Guide. For troubleshooting information, see the Tetra Benchling Connector Troubleshooting Guide.
Design Overview
Architecture
The following diagram shows an example Tetra Benchling Connector workflow:
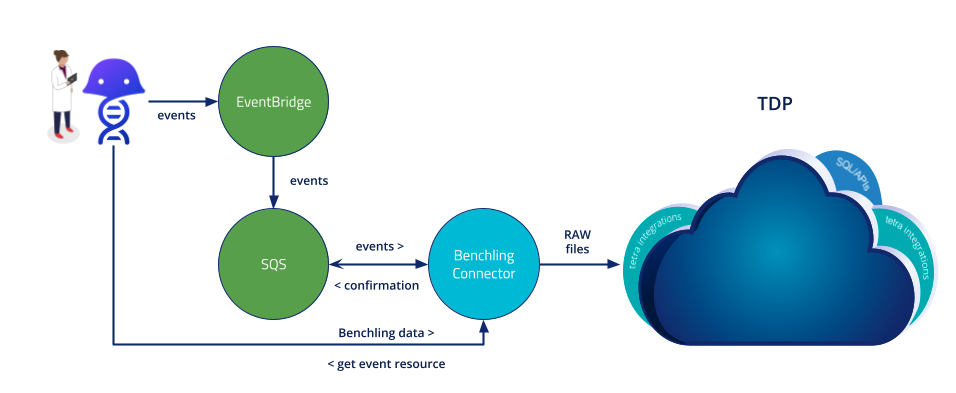
Tetra Benchling Connector architecture
Operational Guide
The Tetra Benchling Connector allows Benchling Events and associated resources to be uploaded to the TDP. This integration is accomplished by subscribing to actions or changes of interest within Benchling. The Connector is then notified when subscribed events occur, retrieves the events, downloads the applicable resources, and uploads them to the TDP. By pairing this functionality with the existing, pipeline-based push integration (Tetra Benchling Pipeline), you can build bidirectional workflows between Benchling and the TDP.
Benchling delivers its events over Amazon EventBridge, and the Connector requires Benchling-side configuration as well as specific AWS resources to work. TetraScience provides the following AWS CloudFormation templates to simplify provisioning the AWS resources: benchling-event-bus.yaml and benchling-sqs-queue.yaml.
For more information, see Getting Started with Events in the Benchling documentation.
Prerequisites
- Benchling Notebook
- Tenant Admin privileges in Benchling to set up event subscriptions
- AWS role with sufficient permissions to create required resources
- (Optional) Tetra Hub. You can deploy the Tetra Benchling Connector as a standalone service on the AWS Cloud or to a Tetra Hub (for on-premises networking requirements). If deployed to a Tetra Hub, internal networking/firewalls rules to allow communication between the Connector and the Hub must be configured. For more information, contact your customer success manager (CSM).
Create a Benchling Subscription
For the Connector to be notified of actions or changes of interest, you must first create a Benchling subscription by doing the following:
- Sign in to Benchling as a user with Tenant Admin permissions.
- Subscribe to events of interest by following the instructions in Setting Up a Subscription in the Benchling documentation. For a complete list of possible events, see the Benchling Events Reference.
Key Considerations When Setting Up a Benchling Subscription
As you set up your Benchling subscription, keep in mind the following:
- When you create a Benchling subscription, Benchling creates an Amazon EventBridge partner event source in the specified AWS account and AWS Region. This account and Region don't need to be the same as your TDP deployment. However, without special permission from Benchling, you can create only one subscription for any given AWS account and Region pairing.
- To modify or delete the subscription after you create it, you can use the controls on the right side of each subscription in the Events page in Benchling.
- Event sources use the following format:
aws.partner/benchling.com/<benchling-tenant-name>/<event-bus-name>. - After first creating the event source, the subscription shows as Pending in Benchling. To activate the subscription, you must associate an EventBridge event bus with the partner event source within 14 days of creating the event source. For instructions, see the next section, Create an Associated Event Bus.
Get the Required AWS CloudFormation Templates and TDP Account Details
Contact your TetraScience customer success manager (CSM) to get the following information and resources:
AWS CloudFormation Templates
benchling-event-bus.yamlprovisions the AWS resources required to create a Benchling event busbenchling-sqs-queue.yamlprovisions the AWS resources required to create an Amazon Simple Queue Service (Amazon SQS) queue
NOTE
By using these CloudFormation templates, you can automate the provisioning of the required AWS resources in the following setup procedure.
TDP Account Details
TDPAWSAccountIDis the AWS account ID for the TDP deployment where the Connector will beTDPAWSRegionis the AWS Region for the TDP deployment where the Connector will beTDPEnvironmentis a string used internally by the TDP for describing the type of environment a given deployment represents. It is used by the CloudFormation templates as part of determining the appropriate Connector AWS Identity and Access Management (IAM) role to put in the queue policy.
Create a Benchling Event Bus
An event bus is a mechanism Benchling uses to send events to subscribers. Events are delivered by using Amazon EventBridge. To set up a Benchling event bus for your Connector, do the following:
- Sign in to the AWS Management Console and open the AWS CloudFormation console.
- Choose Create stack , With new resources (standard). The Create stack page appears.
- On the Create Stack page, do the following:
- For Prerequisite - Prepare template, select Template is ready.
- For Specify template, choose Upload a template file. Then, select Choose fileto upload the
benchling-event-bus.yamlfile.
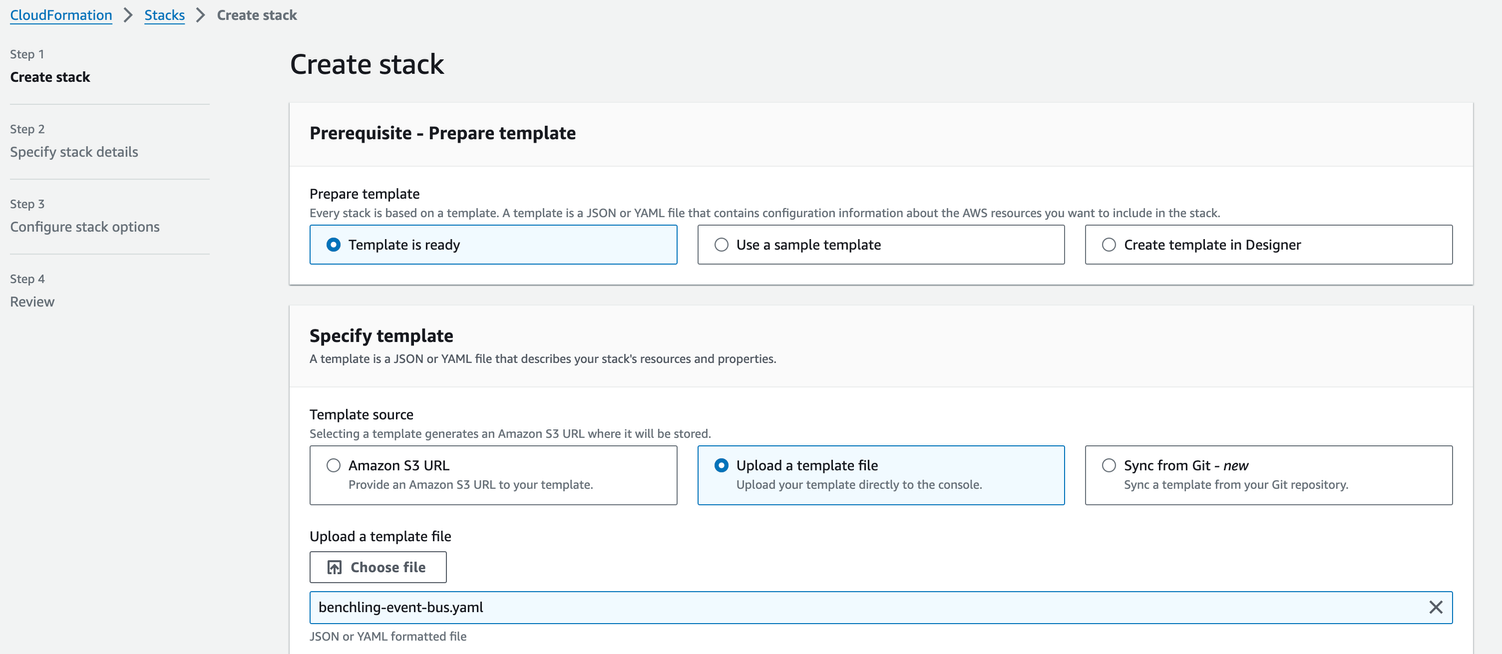
AWS CloudFormation Create stack page
- Choose Next. The Specify stack details page appears.
- On the Specify stack details page, do the following:
- For Stack name, enter a name for the stack. The stack name controls how the stack appears in CloudFormation.
- Under Parameters, for PartnerEventSource, enter the event source name that you created when you set up the Connector's Benchling subscription.
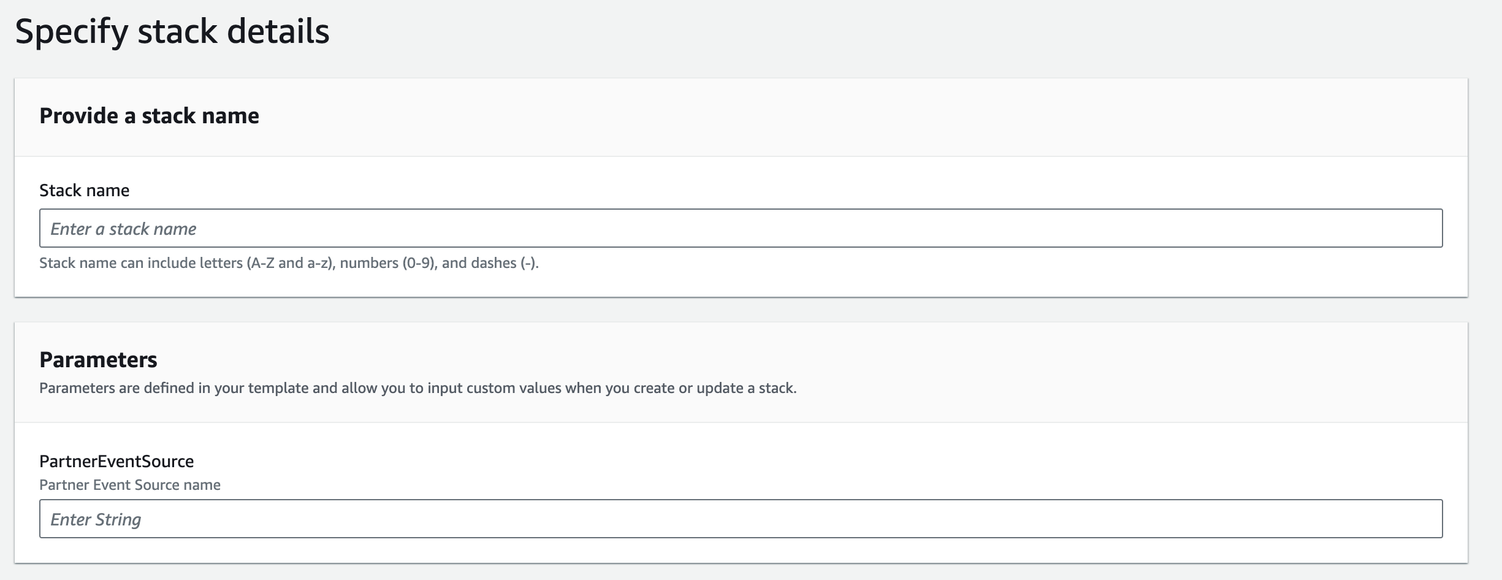
AWS CloudFormation Specify stack details page
- Choose Next twice. The Review page opens.
- On the Review page, review and confirm the settings.
- Choose Submit to launch the stack. You can view the status of the stack in the AWS CloudFormation console in the Status column. When the stack is created, the console displays a status of CREATE_COMPLETE.
NOTE
The CloudFormation template creates a new EventBridge event bus with a name that matches the partner event source listed in the Benchling subscription that you created. After the stack is launched, your Benchling subscription will display as Active in Benchling instead of Pending.
Create and Link an Amazon SQS Queue to the Connector
IMPORTANT
This step requires AWS Identity and Access Management (IAM) roles that are automatically provisioned when a Connector that uses the Pluggable Connector Framework is created. If there are no Pluggable Connectors in your TDP organization yet, follow the instructions in the Create a Tetra Benchling Connector section before you create an Amazon Simple Queue Service (SQS) queue.
To verify if a Pluggable Connector exists in your organization or not, you can access the Connectors page in the TDP and see if any are listed.
The Connector receives Benchling events through an Amazon SQS queue. To set up an Amazon SQS queue for your Connector, do the following:
- Sign in to the AWS Management Console and open the AWS CloudFormation console.
- Choose Create stack , With new resources (standard). The Create stack page appears.
- On the Create Stack page, do the following:
- For Prerequisite - Prepare template, select Template is ready.
- For Specify template, choose Upload a template file. Then, select Choose fileto upload the
benchling-sqs-queue.yamlfile.
IMPORTANT
The
benchling-sqs-queue.yamlCloudFormation template must be run in the same AWS account and AWS Region where the event bus was created.
- Choose Next. The Specify stack details page appears.
- On the Specify stack details page, do the following:
- For Stack name, enter a name for the stack. The stack name controls how the stack appears in CloudFormation.
- Under Parameters, for EventBusName, enter the event source name that you created when you set up the Connector's Benchling subscription.
- For OrgSlug, enter the TDP organizational slug where the Connector is created.
- For QueueMaxReceiveCount, enter the number of times that you want a message to be received before going to the dead-letter queue. The default value is 100.
- For QueueVisibilityTimeoutInSeconds, enter the visibility timeout that you want for the Amazon SQS queue in seconds. The default value is 300 seconds.
- For TDPAWSAccountID, enter your TDP deployment's AWS account ID. Confirm this value with your CSM.
- For TDPAWSRegion, enter the AWS Region that your TDP deployment is in. Confirm this value with your CSM.
- For TDPEnvironment, enter the TDP environment that your Connector is in. Confirm this value with your CSM.
- For UID, enter a unique deployment ID for the stack as a lowercase, alphanumeric string that's no more than 25 characters.
IMPORTANT
Don't use the same Amazon SQS queue for multiple Connectors. Configuring a single queue for more than one Connector can result in unpredictable behavior from the Connector.
Provisioned Amazon SQS Resources
The benchling-sqs-queue.yaml CloudFormation template provisions the following AWS resources for the Connector's Amazon SQS queue:
- An Amazon SQS queue
- An associated dead-letter queue. Messages that fail processing a (user-configurable) certain number of times will be moved out of the main queue and into the dead-letter queue.
- An Amazon CloudWatch alarm that triggers when the dead-letter queue isn't empty
- An Amazon EventBridge rule that sends all of the events from the event bus in Step 2 to the Amazon SQS queue
- an IAM policy for the SQS queue that allows a Tetra Benchling Connector in a specific TDP organization to receive and delete messages from the queue
Create a Benchling App
Authentication and authorization for the Connector are managed by using Benchling apps. This offers several advantages, including more granular access control and a higher HTTPS request rate limit. While it is possible to use an existing Benchling app, we recommend creating a new app for the Connector to use only.
For instructions, see Creating an app in the Benchling documentation.
Create a Tetra Benchling Connector
- Sign in to the TDP. Then, in the left navigation menu, choose Data Sources and select Connectors. The Connectors page appears.
- Choose Create Connector. The Create Connector page opens.

Connectors landing page
- For NAME, enter a name for the connector, such as Test Benchling Connector. This field is required.
- (Optional) For DESCRIPTION, enter a description of the Connector.
- For HUB OR CLOUD, select the deployment mode (Hub or Cloud) from the drop-down list.
NOTE
If you select Hub for the deployment mode, a Benchling Connector container is deployed in the selected Tetra Hub. If you select Cloud, a standalone instance running the Benchling Connector is deployed.
- For CONNECTOR TYPE, select common Benchling from the drop-down list.
- For CONNECTOR VERSION, select the latest version available.
- Choose Create. After a few seconds, the Connector instance is created and appears online.
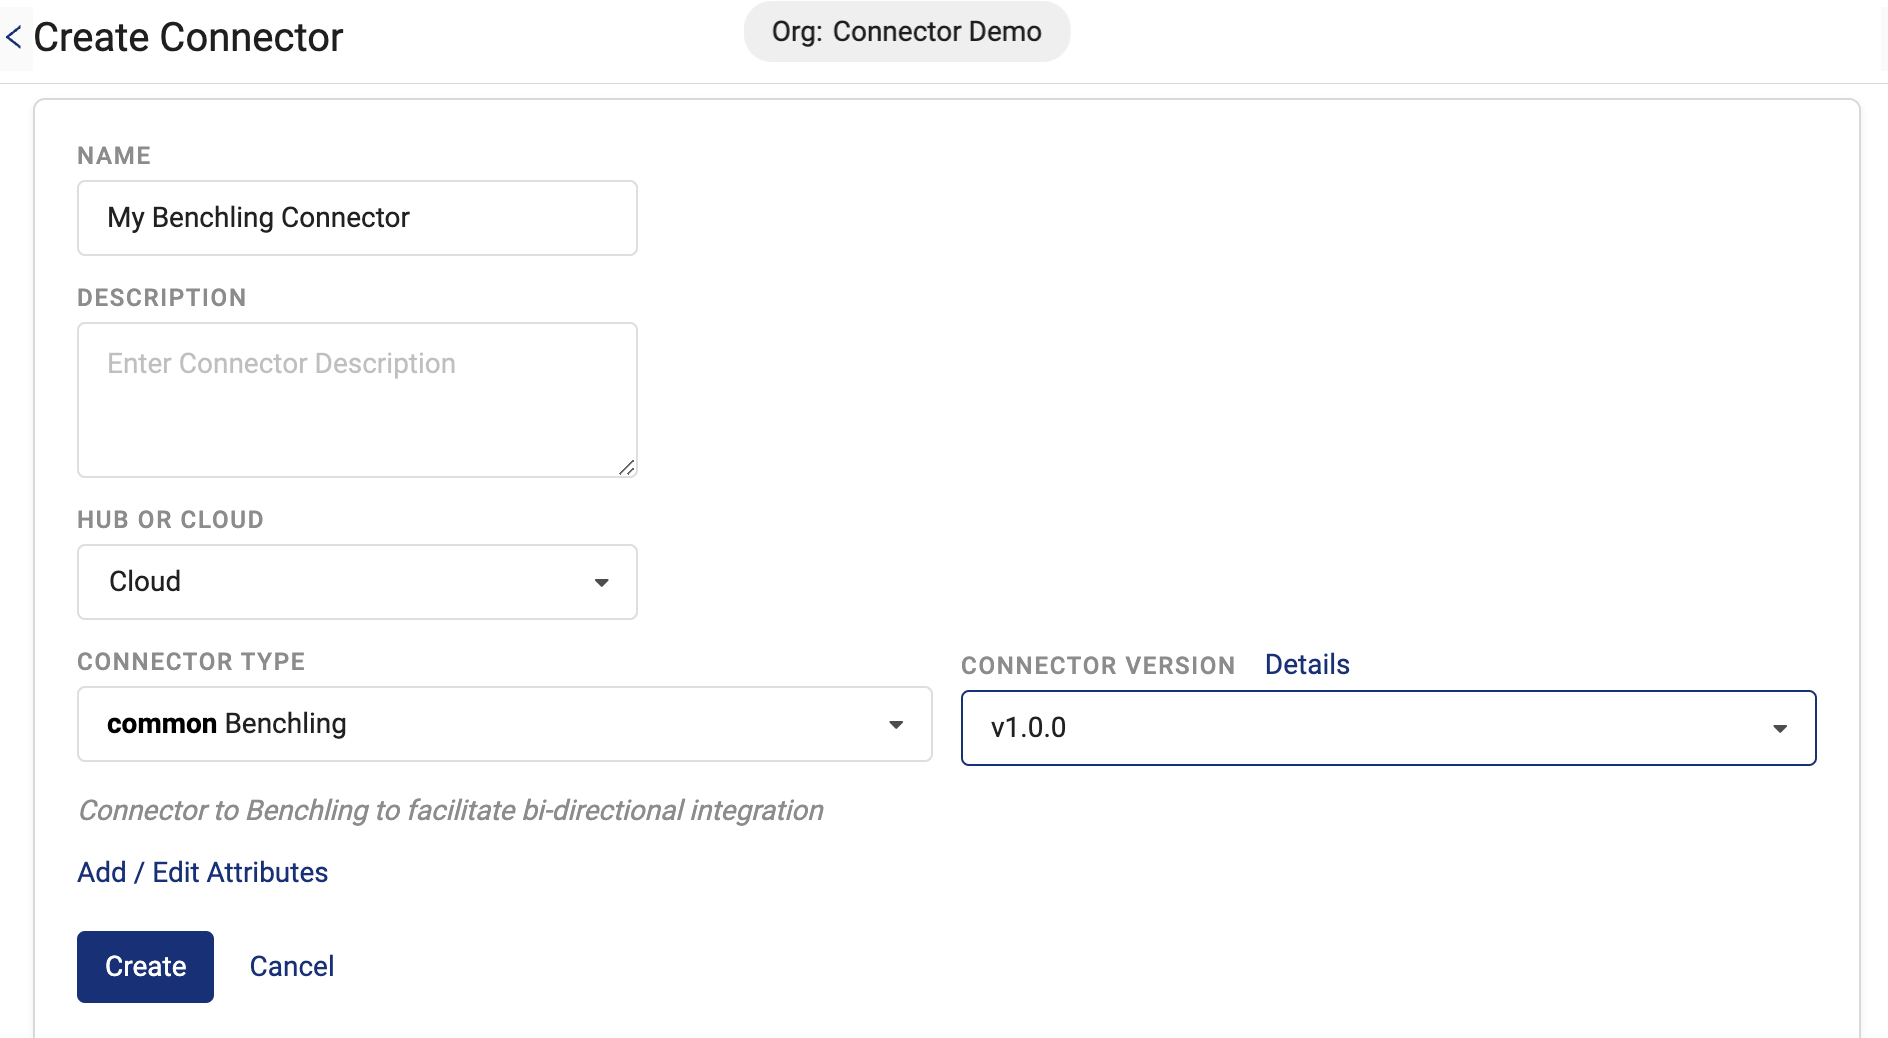
Create Connector page
NOTE
After the Connector is created, the initial MODE status is set to IDLE by default. To activate the Connector, you must configure its settings. For instructions, see the Configure the Connector section.
Configure the Connector
On the Connectors page, select the name of the connector that you created. Then, select the Configuration tab to configure the required settings.
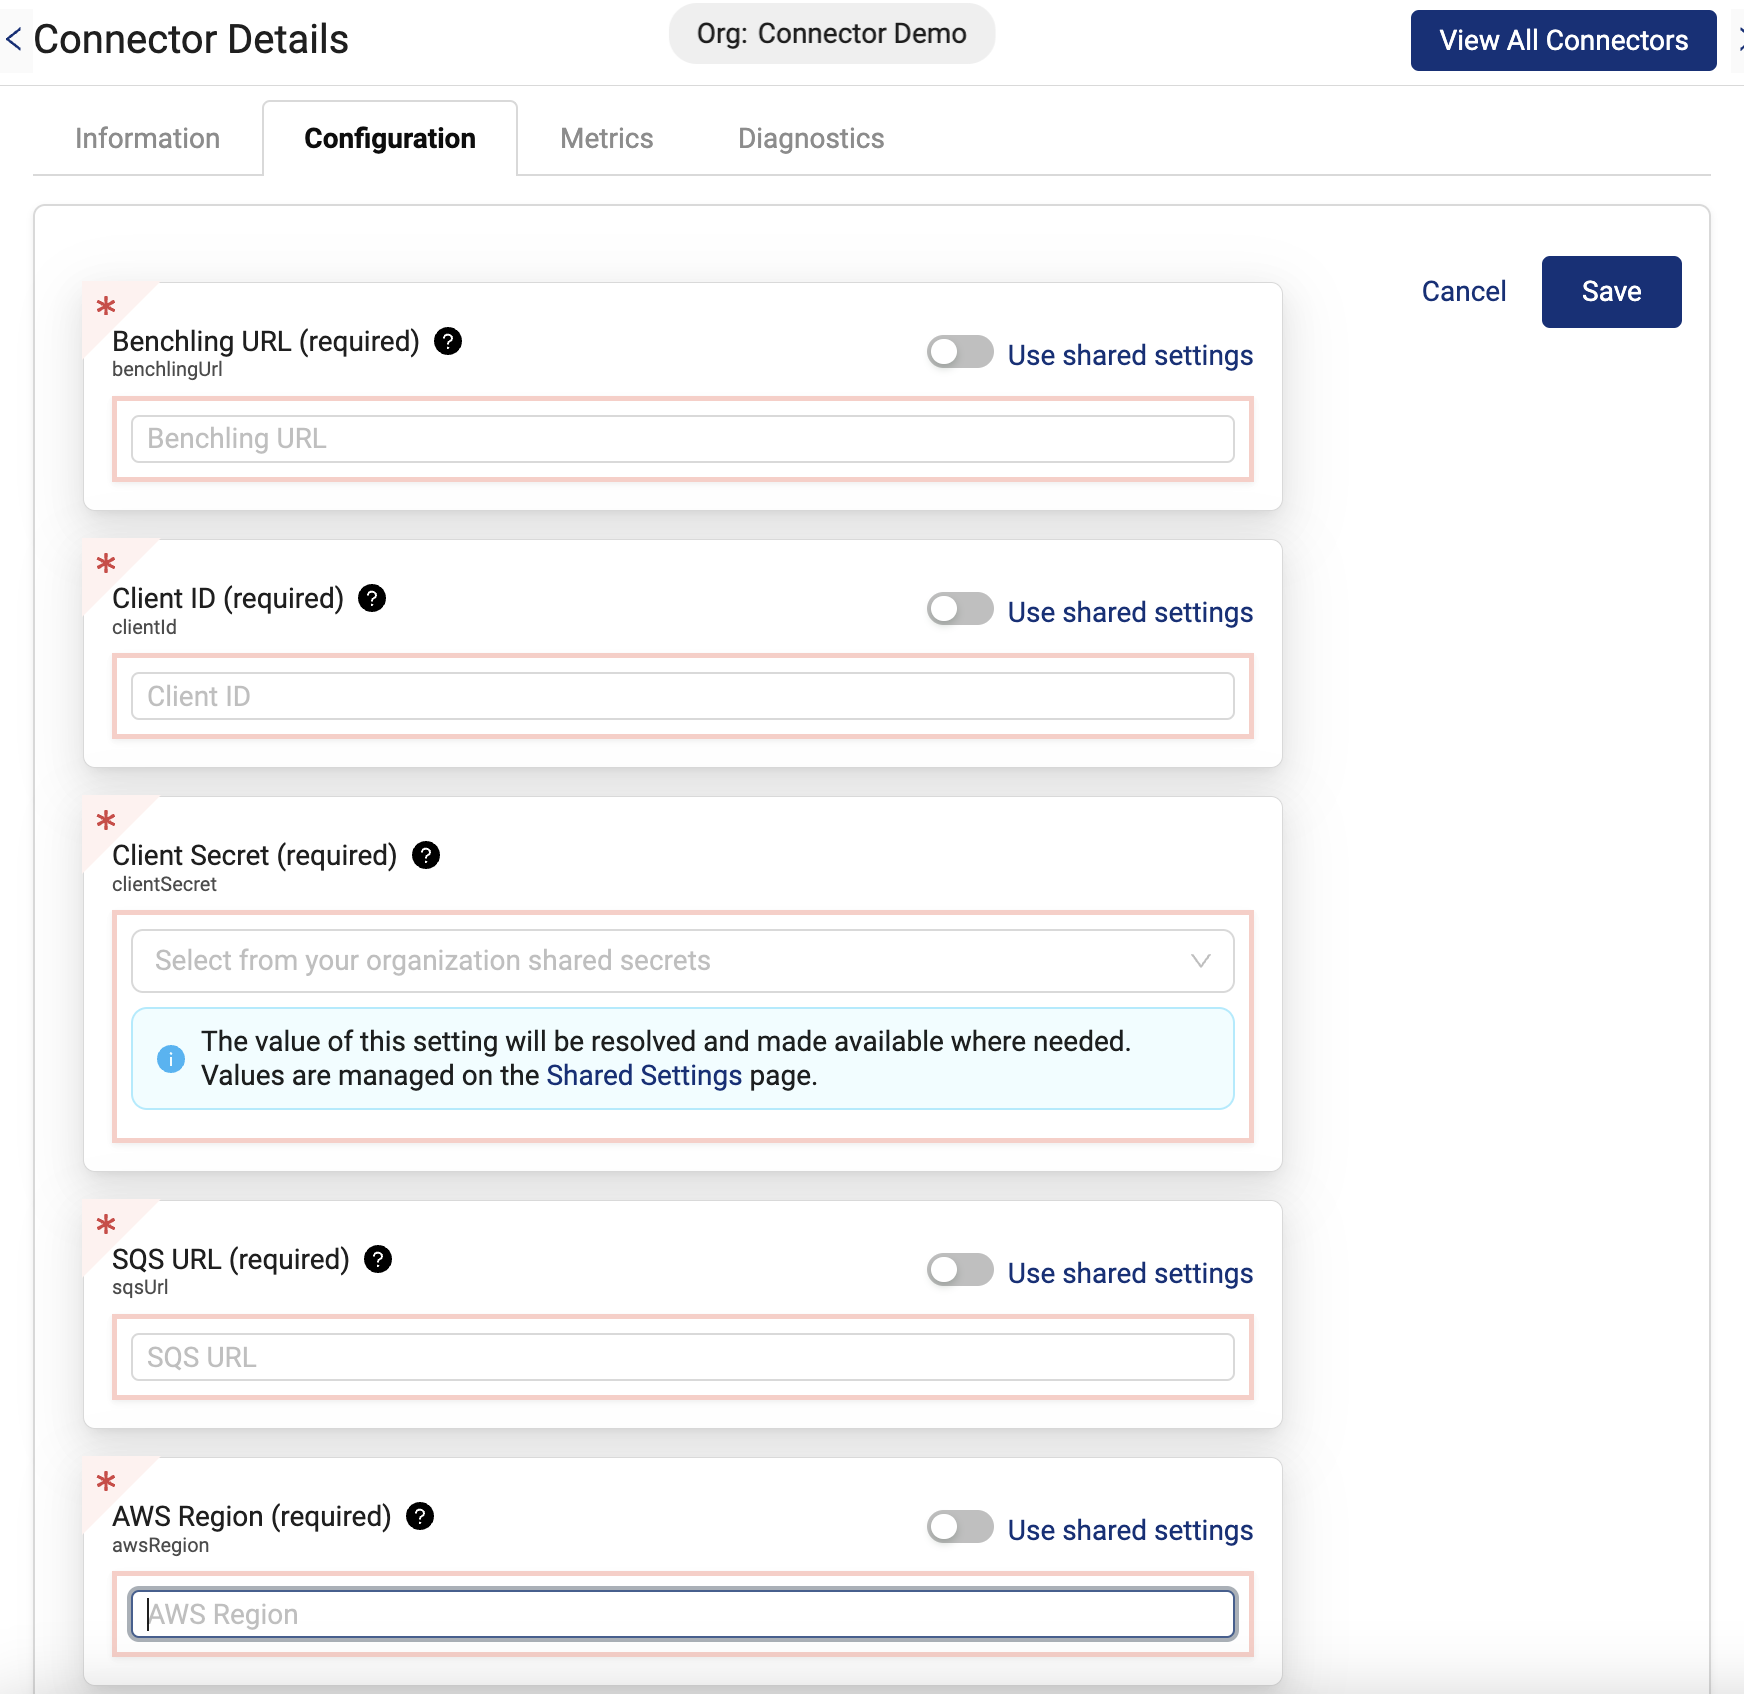
Connector Details page: Configuration tab
Configuration Parameters
The following table lists the configuration parameters that are required for the Tetra Benchling Connector.
| Configuration Parameter | Description |
|---|---|
| Benchling URL | The URL for the Benchling server, including protocol, hostname, and port. If a port isn't specified, the default port for the protocol is used (for example: https://yourbenchlingserver.com or https://yourbenchlingserver.com:8443) |
| Client ID | The client ID for Benchling App to use for authentication. A single Connector can only be associated with a single Benchling app. |
| Client Secret | The Client Secret for the Benchling app to use for authentication. |
| SQS URL | The Client Secret for the Benchling App to use for authentication. |
| Sample Result Export Interface IDs | URL for the Amazon SQS server, including protocol, hostname, and port. You can copy this URL from the Amazon SQS console. |
| AWS Region | The name of the AWS Region where the Amazon SQS queue is located. |
| Disable SSL Certificate Verification | If checked, then Secure Sockets Layer/Transport Layer Security (SSL/TLS) certificate verification is deactivated. The default value is false. |
Review and Edit the Connector's Information
The Information tab on the Connector Details page displays information about the Connector, the files pending, successfully uploaded, or failed. It also provides functionality to edit a Connector’s information, metadata, and tags.
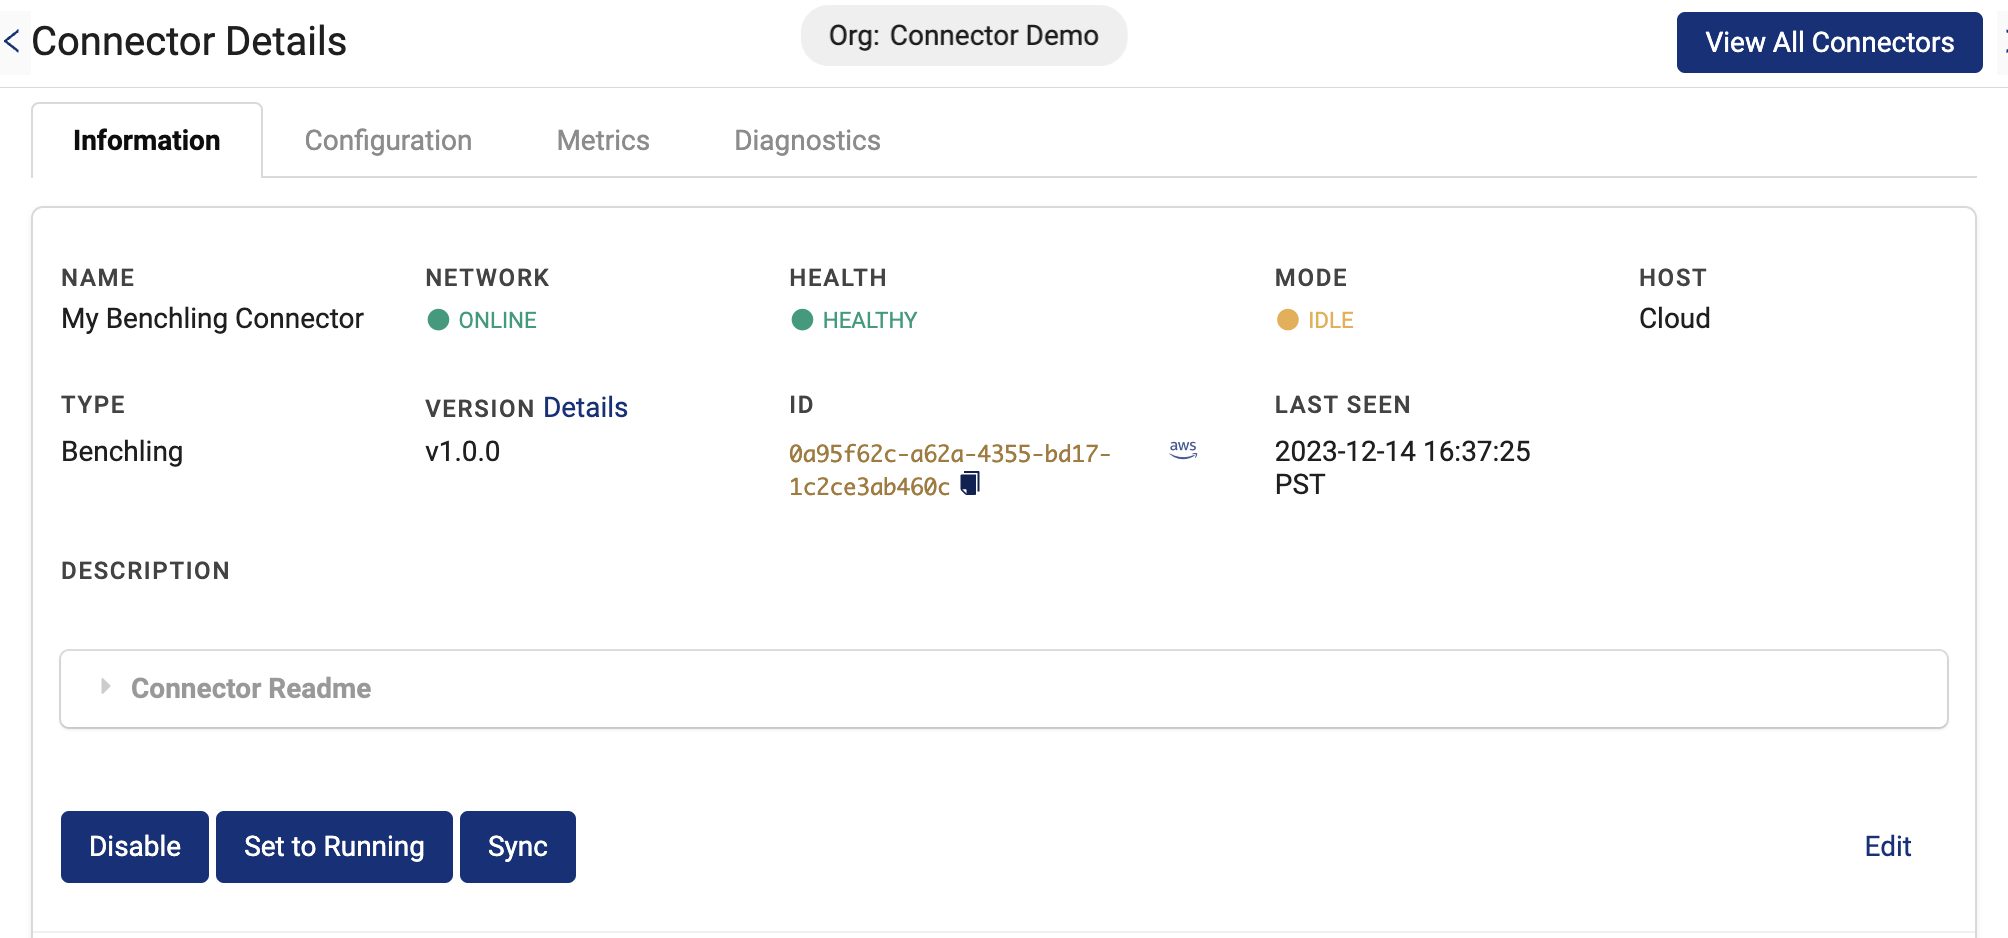
Connector Details page: Information tab
Connector Details
The following table provides the Connector details available on the Information tab on the Connector Details page.
| Field Name | Description |
|---|---|
| CONNECTION | - ENABLED - DISABLED Note: When disabled, no container is running for the connector. |
| NAME | Name of the connector |
| NETWORK | - ONLINE: Container is created and can be reached by the TDP. - OFFLINE: Container cannot be reached by the TDP. |
| HEALTH | - HEALTHY: Everything is fine, connector doesn’t see any issues. - WARNING: There is some issue but it’s not critical. - CRITICAL: Critical issue that prevents connector from running. Connector cannot upload data or execute some commands even in case its operational status is running. - N/A: The connector doesn’t have a health status yet. This generally indicates that a connector was created but has not been configured. |
| MODE | - IDLE: Connector is enabled, but should not be uploading data. The connector may accept and execute commands. When the connector is first created, its MODE status is IDLE by default. - RUNNING: Connector is enabled, should be running and uploading data. The connector may accept and execute commands. - DISABLED: Connector container is shut down. |
| HOST | - Cloud: Connector was deployed as a standalone server in the Cloud - Hub: Connector was deployed in Tetra Hub |
| CONNECTOR ID | The connector’s ID |
| TYPE | Connector type |
| VERSION | The connector’s version |
| LAST SEEN | Last NETWORK check |
| DESCRIPTION | User-defined connector’s description |
Edit the Connector
To edit the Connector’s information, select the Edit button on the Connector Details page’s Information tab. The Edit Connector Information page appears.
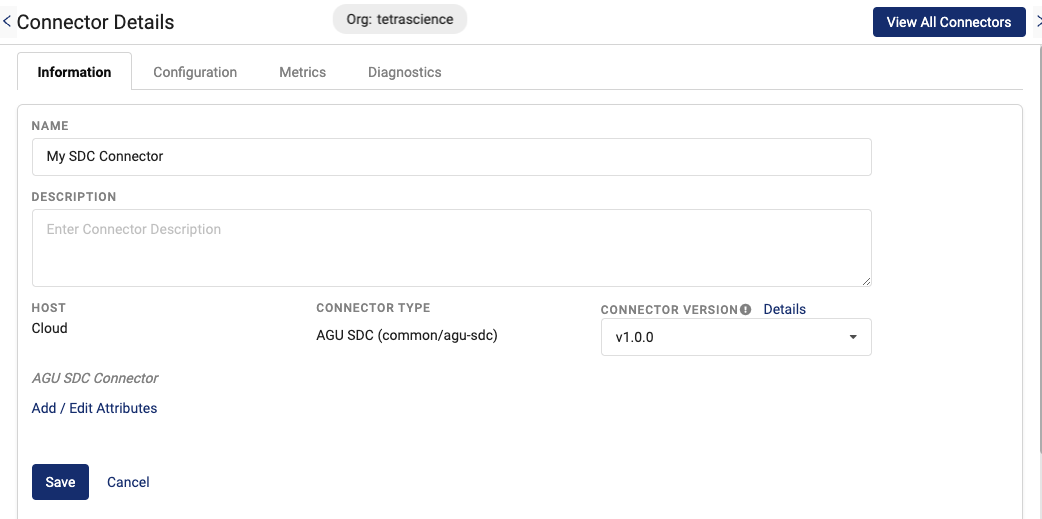
Edit Connector Information page
Connector Information That You Can Edit
The following table provides the connector information that can be edited after a Connector is created.
| Field Name | Description |
|---|---|
| Disabled/Enabled (toggle) | Toggle this field to enable/disable the connector |
| NAME | Connector’s name |
| DESCRIPTION | Connector’s description |
| CONNECTOR VERSION | Connector version |
| Add / Edit Attributes | Select this option to add or edit labels, metadata, and tags associated with the connector. |
Metrics
After a Connector instance is created and running, you can monitor the Connector’s health by selecting the Metrics tab on the Connector Details page. The Metrics tab displays the Connector's container metrics as well as aggregated states on total files scanned and uploaded as well as files that returned errors or are pending.
To troubleshoot specific errors, see the Tetra Benchling Connector Troubleshooting Guide.
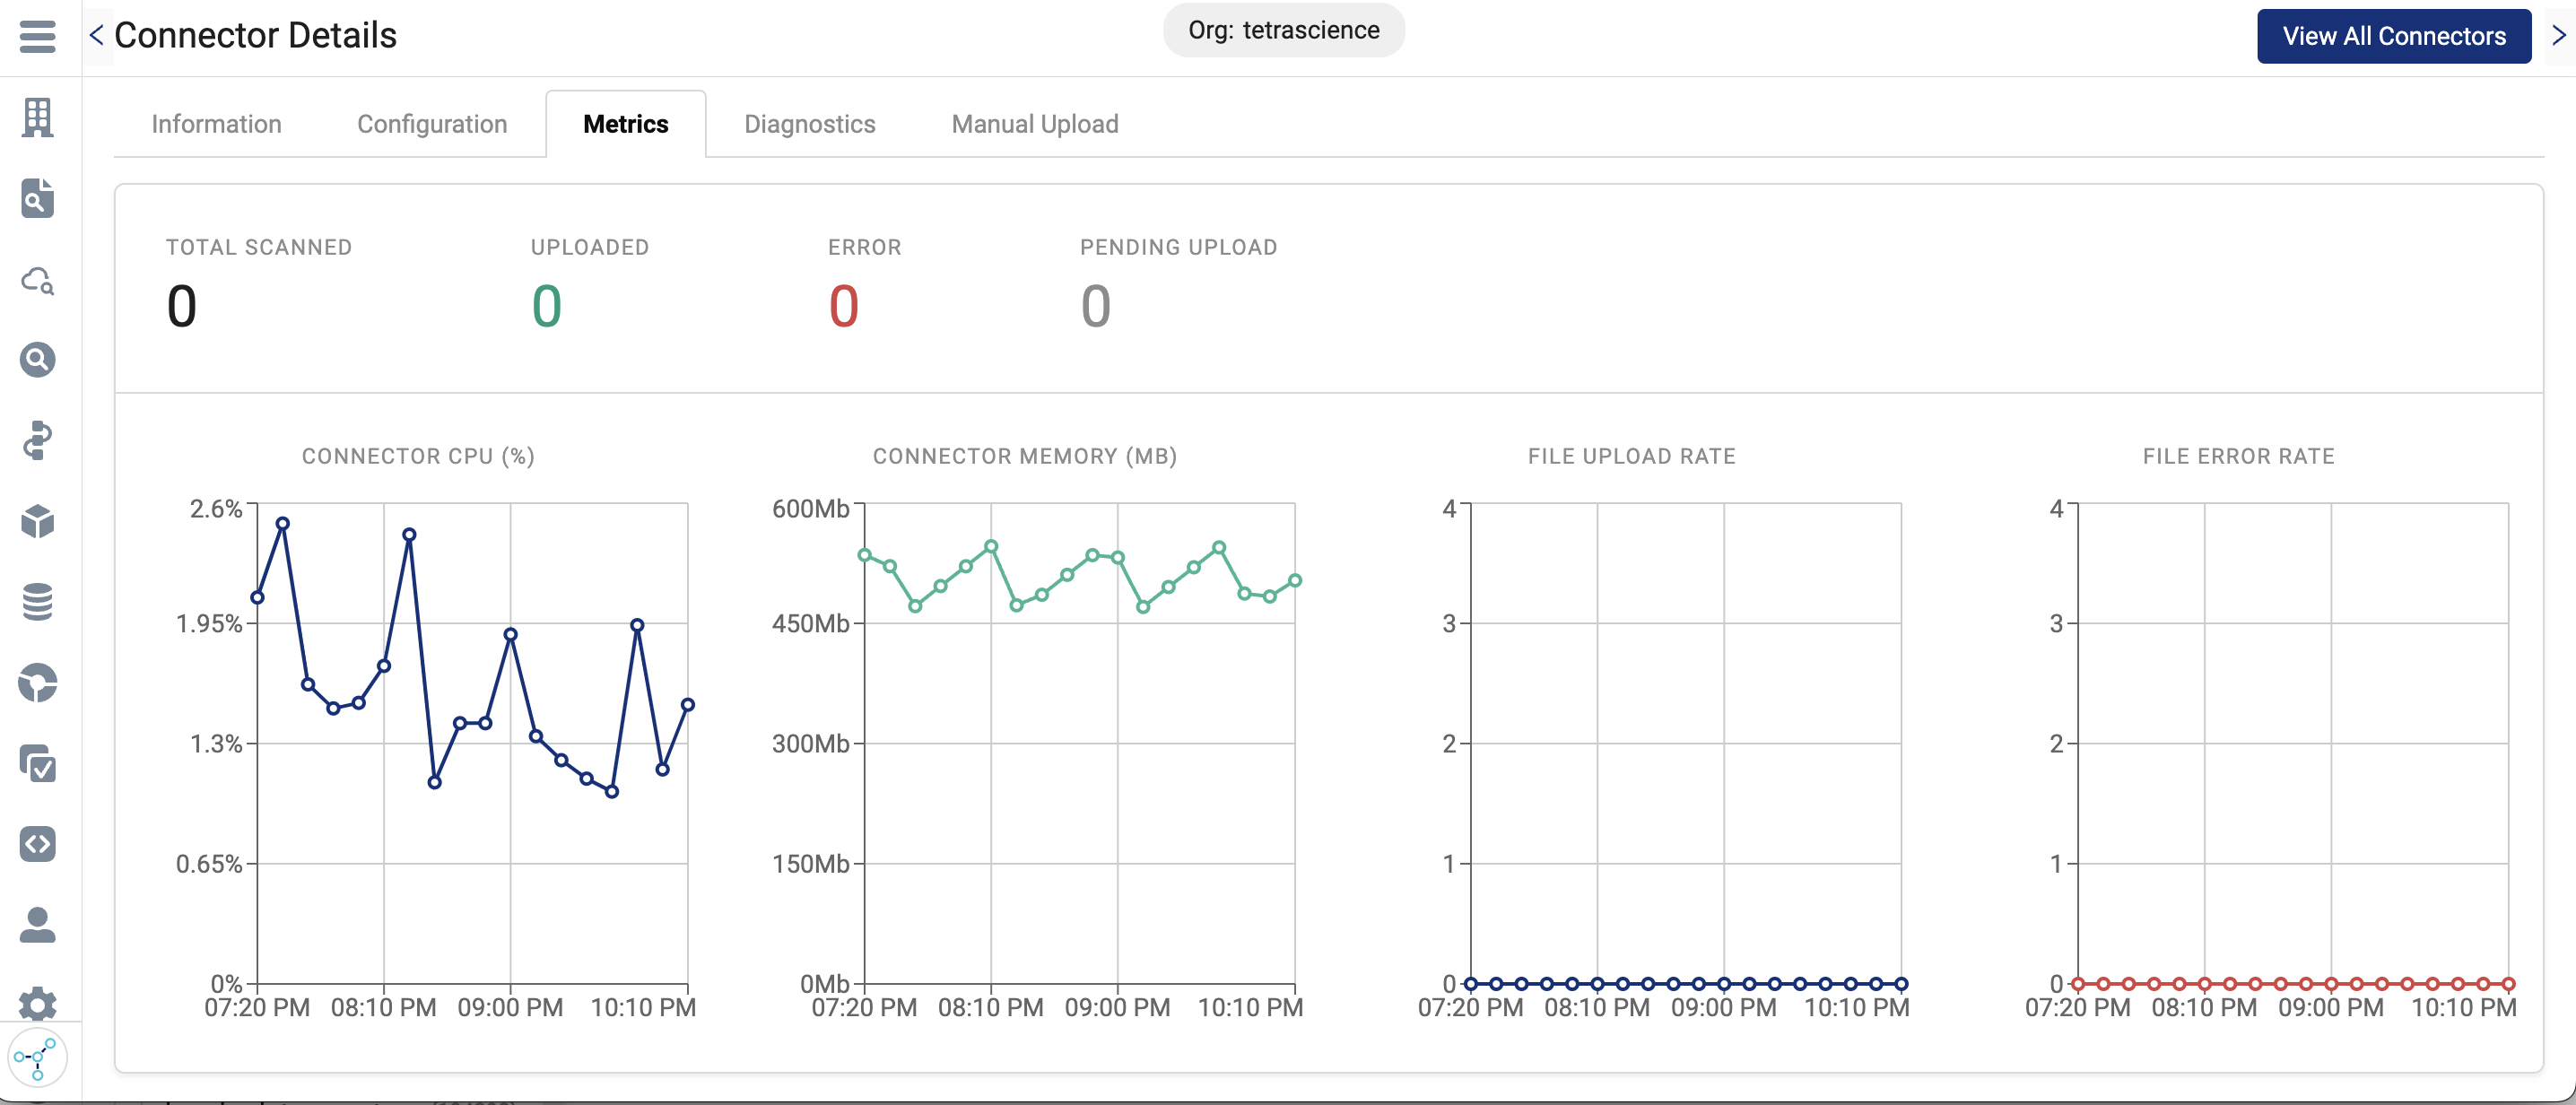
Connector Details page: Metrics tab
Integrate Data
The Connector uploads RAW files to the TDP that contain batches for up to 10 events. Events are grouped by resource type and schema ID. There’s one file per schema ID, and events in a file are grouped by resource ID.
Limitations
The underlying technologies used to broadcast events from Benchling don't have an uncapped retention time. Events from Benchling are retained for a maximum of 14 days before being discarded. This applies both to the events the Connector receives through EventBridge as well as the Benchling’s Events API. This means that if the Connector is inactive for a long period of time, events can be missed.
While ordering should be roughly maintained, neither the order that Benchling broadcasts the events, nor the order that the Connector processes events, is guaranteed to match the order that the underlying activities in Benchling occurred. When the Connector retrieves resources from Benchling, it is always retrieving the state of the resource at the time of processing the event, not the state of the resource at the time the event occurred.
Updated 11 months ago
