Tetra KEPServerEX Connector
The Tetra KEPServerEX Connector leverages KEPServerEX’s ability to connect to various industrial computers, such as programmable logic controllers (PLCs), and instruments through the OPC-UA protocol to offer an n-to-1 integration of data into the Tetra Data Platform (TDP).
Design Overview
The Tetra KEPServerEX Connector communicates to KEPServerEX by using Message Queuing Telemetry Transport (MQTT) as a listener client and the KEPServerEX’s Configuration (Config) API Service.
The connector subscribes to a MQTT topic that is published to by KEPServerEX and fetches additional information, such as tag units from the Config API Service. The connector receives messages at the frequency that KEPServerEX publishes them at—there is no throttle on the resolution of data by the connector.
To reduce the number of files sent to the Tetra Data Lake in the Tetra Data Platform (TDP), the connector employs the concept of a batching interval. While all data that is expected to be received from KEPServerEX will be received and stored, it is not transmitted real-time to the TDP. Instead, data is buffered locally on the connector’s storage. When the batching interval is met, the buffered data is sent to the TDP as one RAW CSV data file.
NOTE
The Tetra KEPServerEX Connector’s batching interval behavior can sometimes delay when your data is available in the TDP.
Example Use Case: Bioprocessing

An example use case for the Tetra KEPServerEX Connector is to use it to integrate data produced by automated bioreactor (AMBR) systems. AMBR systems are typically shipped with KEPServerEX and time-series data is produced continuously along with analyzer data, such as data produced from cell-counters, throughout the run.
The KEPServerEX architecture allows for the receipt of data from various systems and instruments. This capability coupled with the Tetra KEPServerEX Connector facilitates the transmission of all data collected to the TDP, which allows for further data harmonization and contextualization through Tetra Pipelines and the ability to quickly set up downstream data processing and visualization.
Prerequisites
For the Tetra KEPServerEX Connector to operate as expected, the following requirements must be met.
IMPORTANT
The following prerequisites aren’t within the scope of a TetraScience deployment.
- KEPServerEX v5.19+ with the IoT Gateway Plugin
- MQTT broker (installed and run on the same machine as KEPServerEX). For more information, see Workshop: Set Up MQTT and IoT Gateway for the Tetra KEPServerEX Connector.
NOTE
TetraScience isn't responsible for and doesn't support MQTT brokers. The example setup provided here is provided for reference only.
- (Recommended) Tetra Hub. You can deploy the Tetra KEPServerEX Connector as a standalone service in the cloud or to a Tetra Hub (for on-premises networking requirements). If deployed to a Tetra Hub, you must configure internal networking and firewall rules to allow communication between KEPServerEX and the Hub. For more information, contact your customer success manager (CSM).
IMPORTANT
For production environments, a Tetra Hub is recommended for all KEPServerEX Connector deployments. The Hub provides a durable disk buffer to the Connector, which allows it to recover from unexpected shutdowns without losing buffered events. This behavior is not as robust when the Connector is deployed to the cloud.
Operational Guide
To set up a Tetra KEPServerEX Connector, do the following.
Create a Tetra KEPServerEX Connector
- Sign in to the TDP. Then, in the left navigation pane, choose Data Sources and select Connectors. The Connectors page appears.
- Choose Create Connector. The Create Connector page opens.
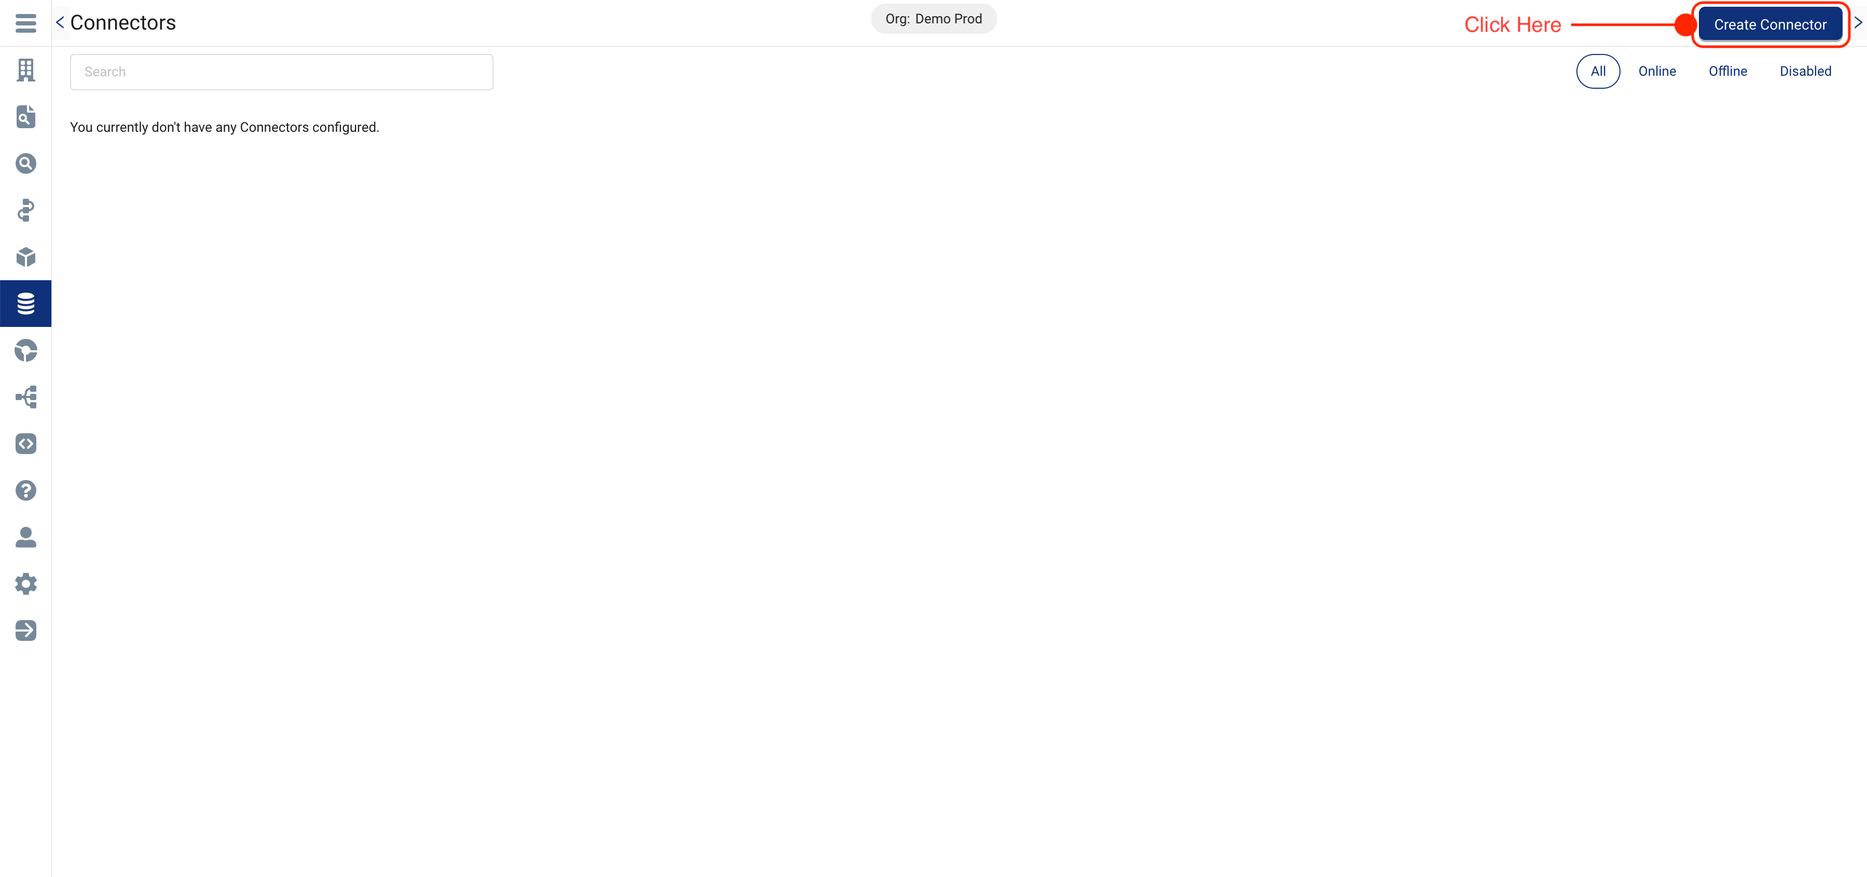
Connectors landing page
- For NAME, enter a name for the connector, such as KEPServerEX Connector. This field is required
- (Optional) For DESCRIPTION, enter a description of the connector.
- For HUB OR CLOUD, select the deployment mode (Hub or Cloud) from the drop-down list.
NOTE
If you select Hub for the deployment mode, a Tetra KEPServerEX Connector container is deployed in the selected Tetra Hub. If you select Cloud, a standalone instance running the Tetra KEPServerEX Connector is deployed.
- For CONNECTOR TYPE, select common KEPServerEX from the drop-down list.
- For CONNECTOR VERSION, select the latest version available. All versions with a major version 0, such as v0.x.y, are beta release versions.
- Choose Create. After a few seconds, the connector instance is created and appears online.
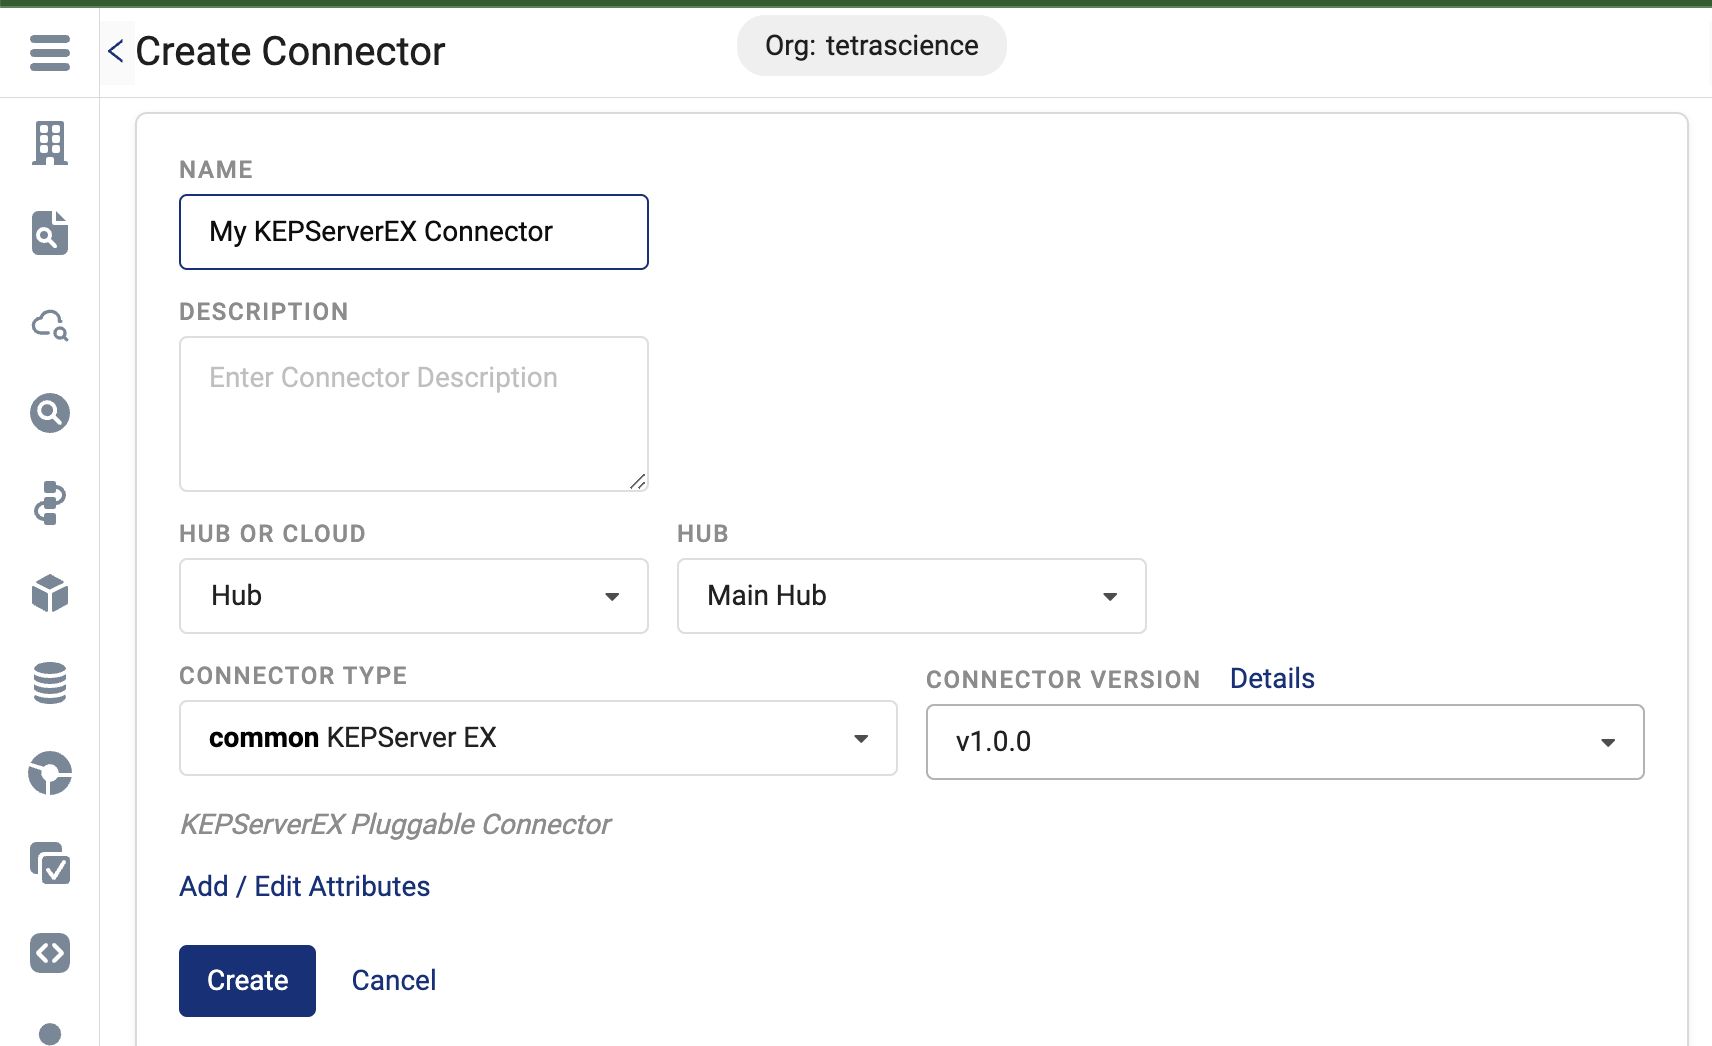
Create Connector page
NOTE
After the connector is created, the initial MODE status is set to IDLE by default. To activate the connector, you must configure its settings. For instructions, see the Configure the Connector section.
Configure the Connector
On the Connectors page, select the name of the connector that you created. Then, select the Configuration tab to configure the required settings.
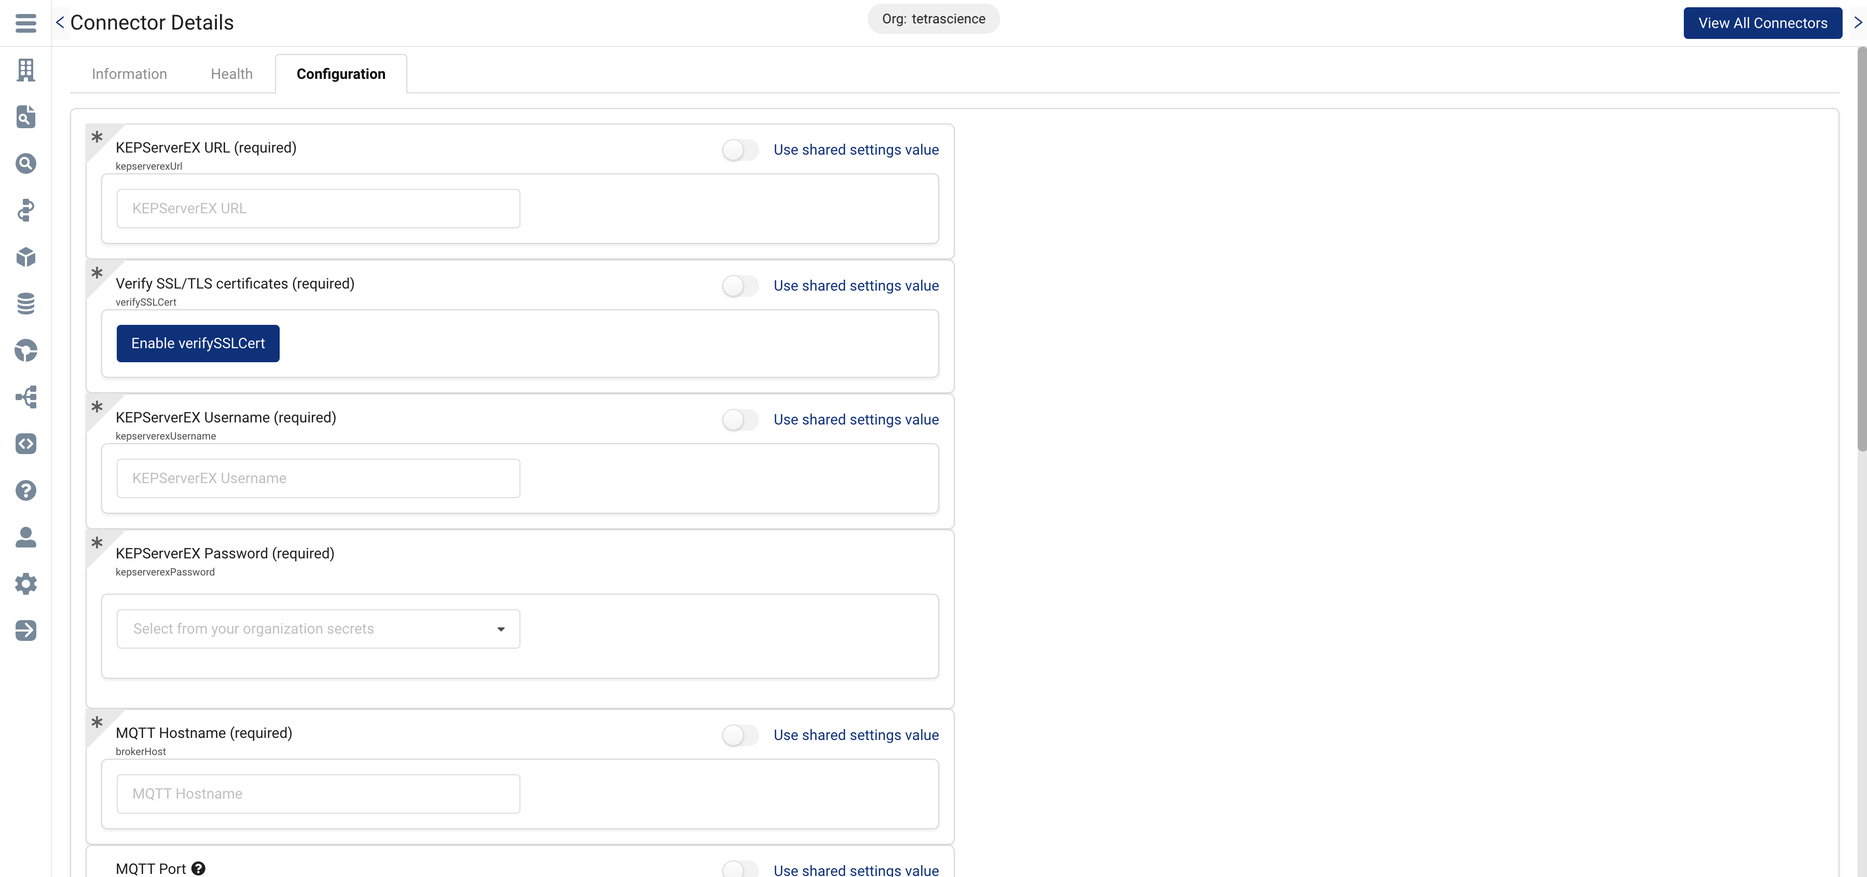
Connector Details page: Configuration tab
Configuration Parameters
The following tables lists the configuration parameters that are required for the Tetra KEPServerEX Connector.
| Configuration Parameter | Description |
|---|---|
| KEPServerEX Config API Service URL | URL for the KEPServerEX Config Service API including protocol, hostname and port. If port is not specified, the default port for protocol will be used. For example: https://yourkepserverex.com:57512 |
| KEPServerEX Username | Username of the user with read permissions to the KEPServerEX Config API Service. |
| KEPServerEX Password | Password for KEPServerEX user. |
| MQTT Broker Hostname | Example: 10.60.0.200 |
| MQTT Broker Port | Example: 1883 |
| MQTT Broker Username | Username for user to authenticate against the MQTT broker |
| MQTT Broker Password | Password for user to authenticate against the MQTT broker |
| MQTT Topic | MQTT topic to subscribe to (as configured in KEPServerEX) |
| Upload Interval | Interval, in minutes, of how often data will be uploaded to TDP. Minimum value is 1 minute. Default value is 10 minutes. |
| Disable SSL Certificate Verification | If checked, will disable verifying SSL/TLS certificates. Default value is false. |
Review and Edit the Connector's Information
The Information tab on the Connector Details page displays information about the connector, the files pending, successfully uploaded, or failed. It also provides functionality to edit a connector’s information, metadata, and tags.
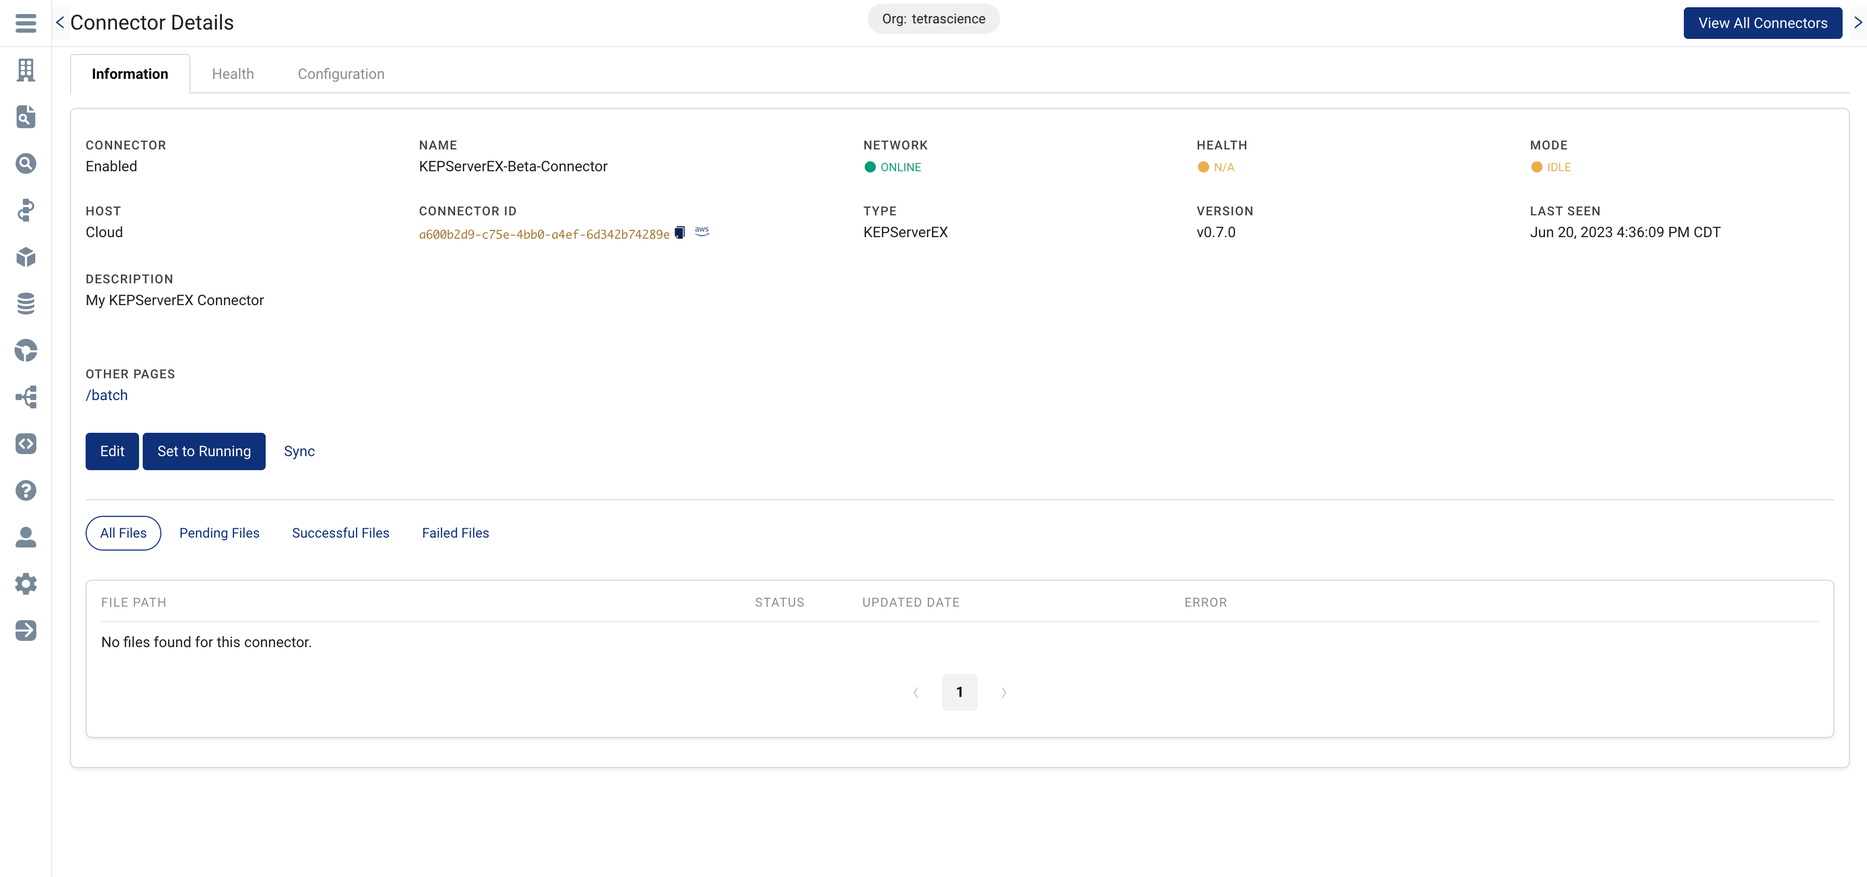
Connector Details page: Information tab
Connector Details
The following table provides the connector details available on the Information tab on the Connector Details page.
| Field Name | Description |
|---|---|
| CONNECTION | - ENABLED - DISABLED Note: When disabled, no container is running for the connector. |
| NAME | Name of the connector |
| NETWORK | - ONLINE: Container is created and can be reached by the TDP. - OFFLINE: Container cannot be reached by the TDP. |
| HEALTH | - HEALTHY: Everything is fine, connector doesn’t see any issues. - WARNING: There is some issue but it’s not critical. - CRITICAL: Critical issue that prevents connector from running. Connector cannot upload data or execute some commands even in case its operational status is running. - N/A: The connector doesn’t have a health status yet. This generally indicates that a connector was created but has not been configured. |
| MODE | - IDLE: Connector is enabled, but should not be uploading data. The connector may accept and execute commands. When the connector is first created, its MODE status is IDLE by default. - RUNNING: Connector is enabled, should be running and uploading data. The connector may accept and execute commands. - DISABLED: Connector container is shut down. |
| HOST | - Cloud: Connector was deployed as a standalone server in the Cloud - Hub: Connector was deployed in Tetra Hub |
| CONNECTOR ID | The connector’s ID |
| TYPE | Connector type |
| VERSION | The connector’s version |
| LAST SEEN | Last NETWORK check |
| DESCRIPTION | User-defined connector’s description |
| OTHER PAGES | Contains additional functionality available for the connector. |
Edit the Connector
To edit the connector’s information, select the Edit button on the Connector Details page’s Information tab. The Edit Connector Information page opens.
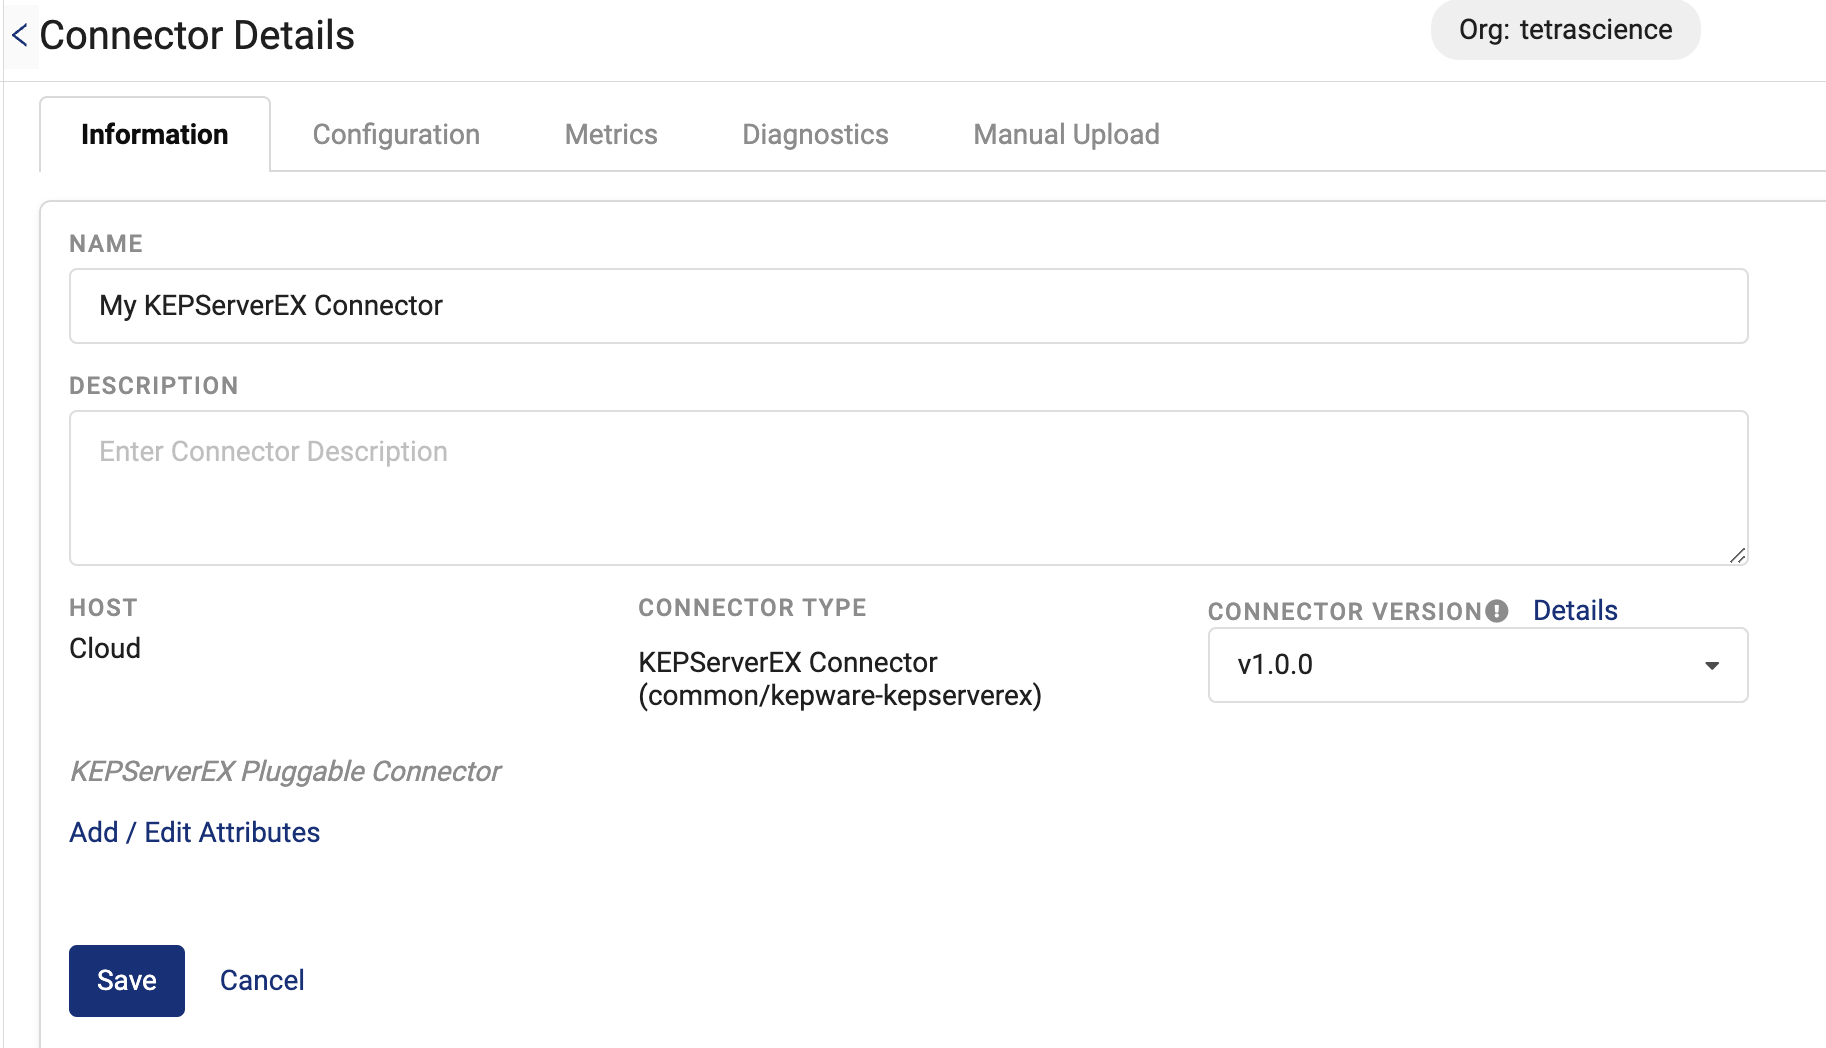
Edit Connector Information page
Connector Information That You Can Edit
The following table provides the connector information that can be edited after a connector is created.
| Field Name | Description |
|---|---|
| Disabled/Enabled (toggle) | Toggle this field to enable/disable the connector |
| NAME | Connector’s name |
| DESCRIPTION | Connector’s description |
| CONNECTOR VERSION | Connector version |
| Add / Edit Attributes | Select this option to add or edit labels, metadata, and tags associated with the connector. |
Manual Upload
The Manual Upload tab contains the feature to manually initiate an upload of all available data from the Tetra KEPServerEX Connector to TDP.
To perform a manual upload, do the following:
- Select the Manual Upload tab.
- Choose Upload button.
- All available data is uploaded immediately.
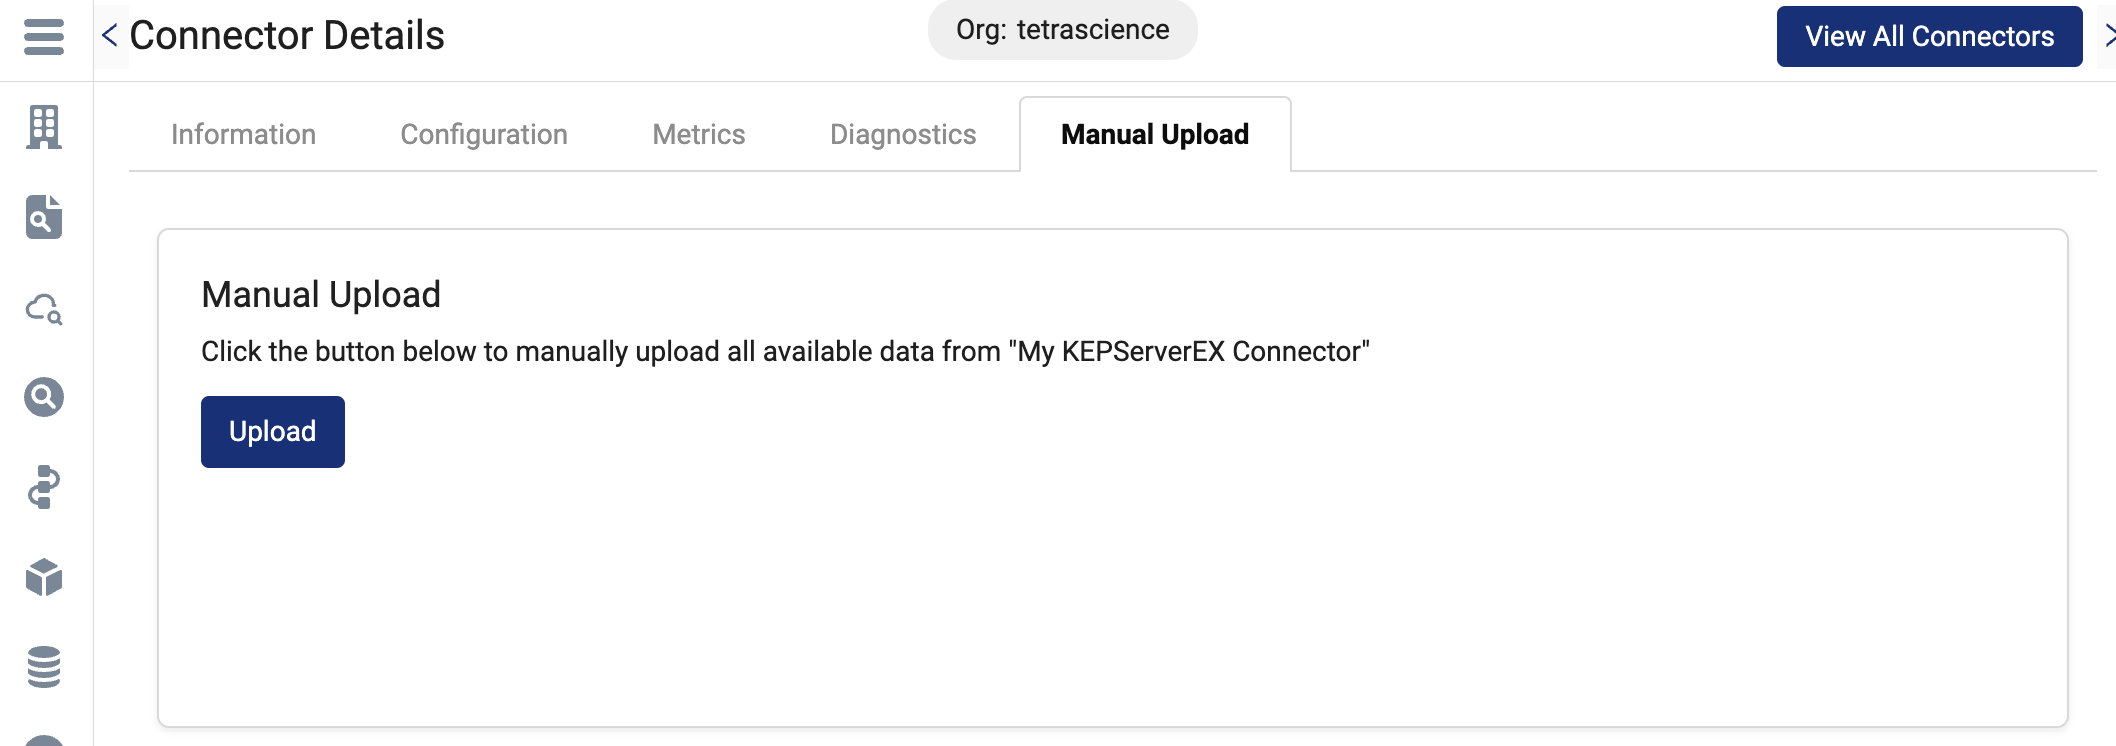
Connector Details page: Manual Upload tab
Metrics
After a connector instance is created and running, you can monitor the connector’s health by selecting the Metrics tab on the Connector Details page. The Metrics tab displays the connector's container metrics as well as aggregated states on total files scanned and uploaded as well as files that returned errors or are pending.
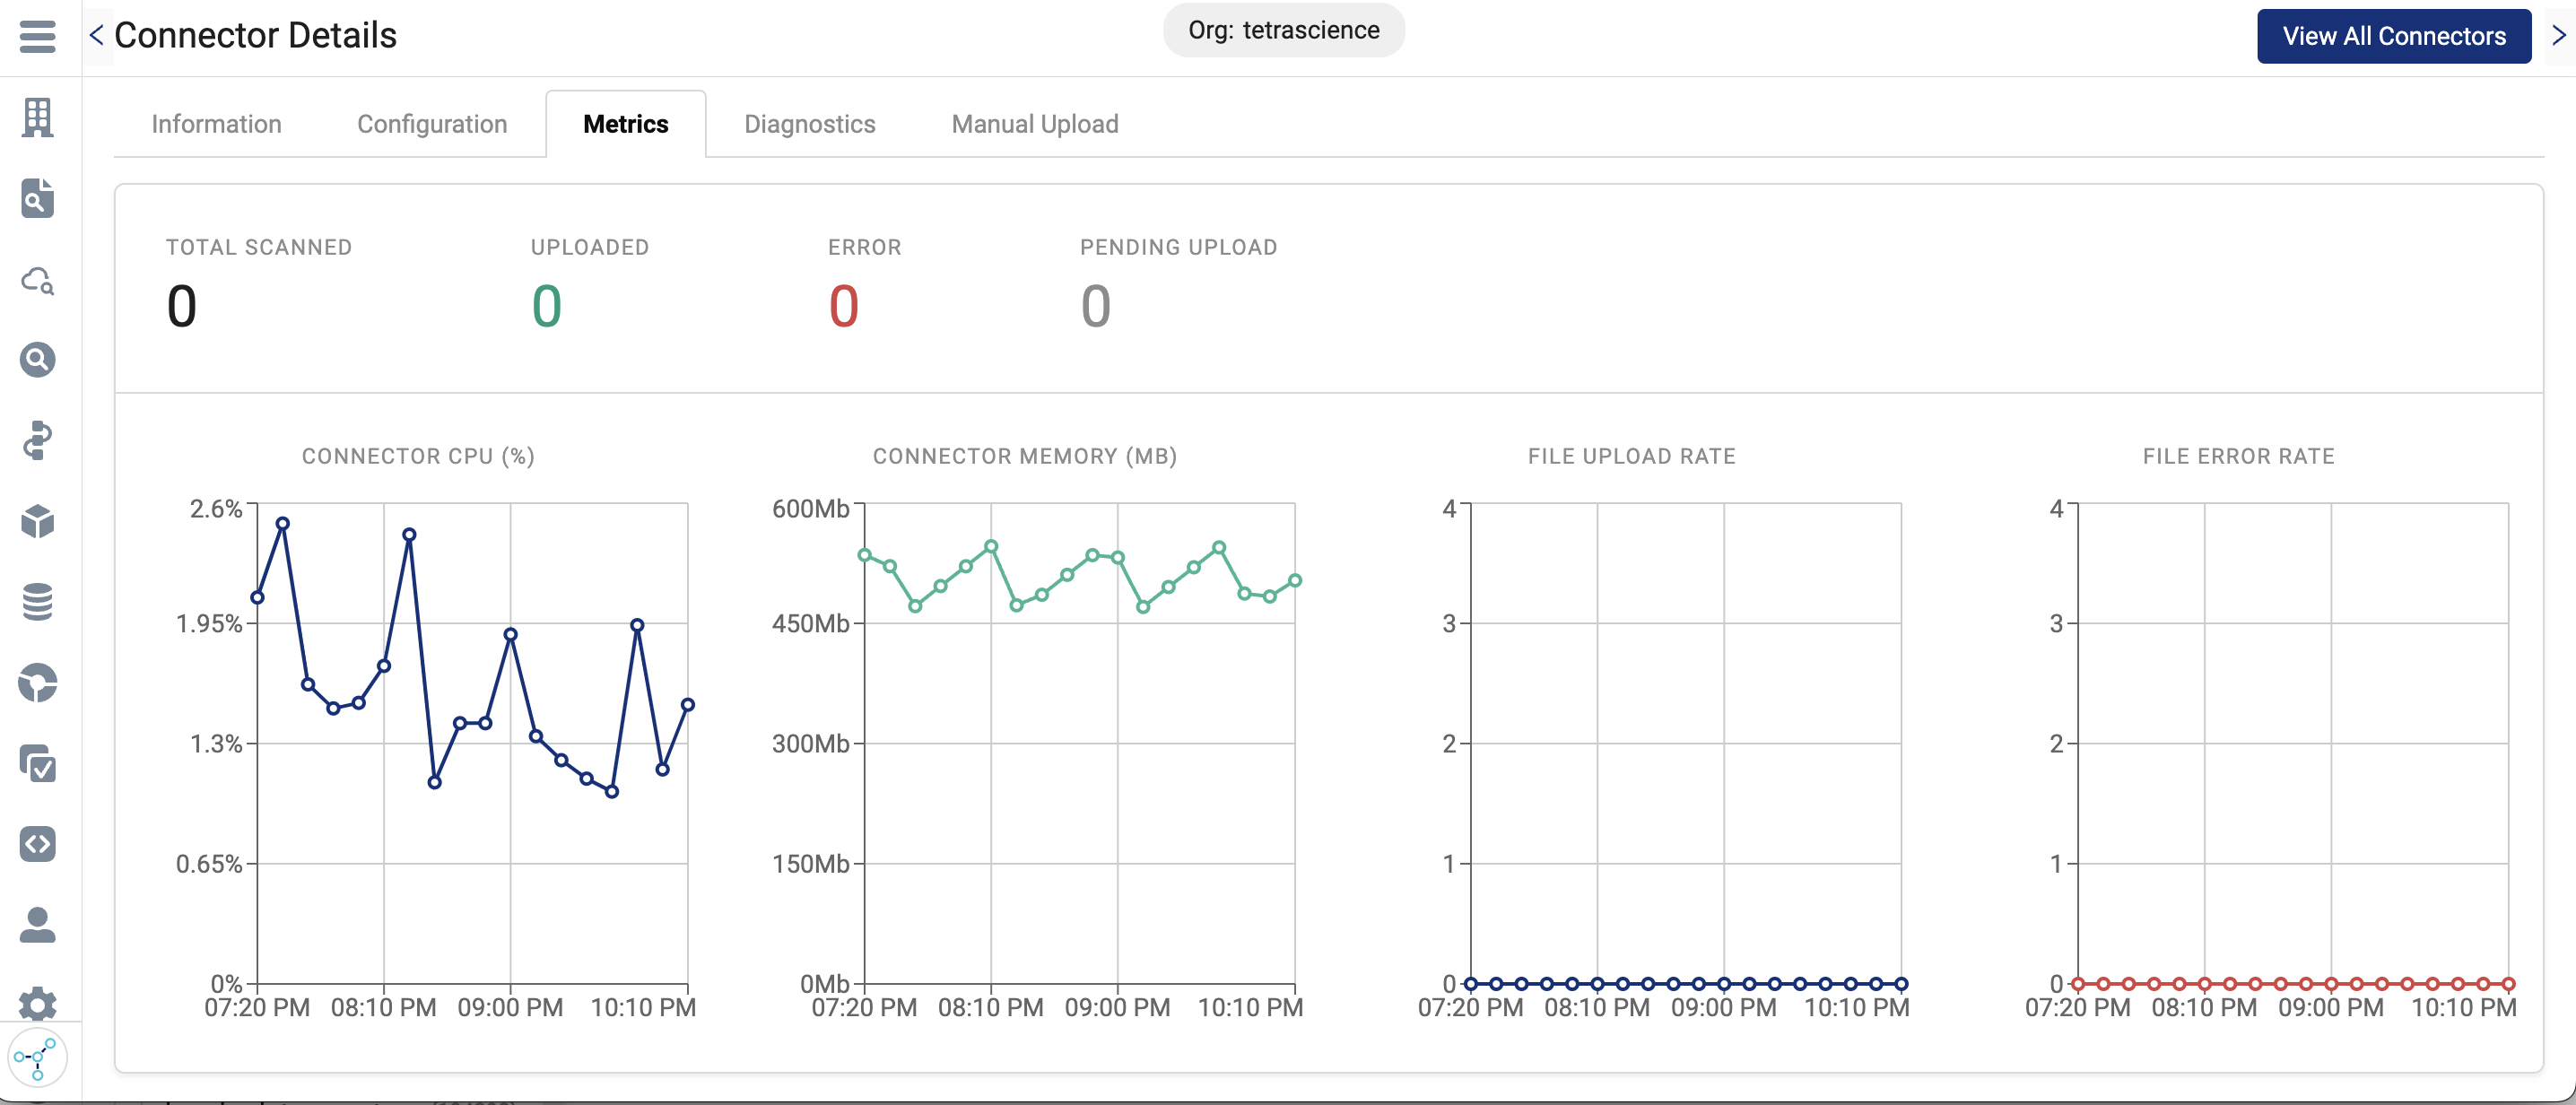
Connector Details page: Metrics tab
Integrate Data
After data is uploaded to the TDP, you can enrich and harmonize the data by using any of the following available scripts, protocols, and intermediate data schemas (IDS):
- Task script:
common/tagged-time-series-raw-to-ids:v3.0.0 - Protocol:
common/kepserverex-tagged-time-series-raw-to-ids:v1.0.0 - IDS:
common/tagged-time-series:v3.0.0
Updated 11 months ago
