How to Import a Spotfire Dashboard
To import a Spotfire Dashboard into your own Spotfire instance:
-
Receive the package from your TetraScience delivery team. The package should contain these three items:
- Exported ZIP file
- Exported DXP file (optional - DXP is usually part of exported ZIP file)
- Set of credentials you use to access the data within your organization
-
Using a tool, such as scp, add the ZIP file to the folder on the Spotfire server machine: <path_to_tibco>/tomcat/application-data/library/ (for example /usr/local/bin/tibco/tss/7.11.0/tomcat/application-data/library).
-
Log in to the Spotfire client using your Spotfire root account.
-
Select Tools->Library Administration to open the Library Administration.
-
From the Library Administration, click Import to open the Import dialog. Click Browse.
-
The exported ZIP file from Step 1 should display. If it does not, then restart the Spotfire server.
-
Select the ZIP file and click Import.
-
After the import completes, select Tools->Information Designer to open the Information Designer.
-
Click Data Sources, and then right-click the appropriate Data source.
-
Select Edit and enter the correct username and password. Get the username and password from your dedicated TetraScience delivery team. Click Save to save the changes.
-
Close the Spotfire Client.
-
Run the Spotfire Client as either root or analyst.
-
Open the DXP file directly. The DXP file should display in the Spotfire Dashboard with all of the data tables. You can now save this Dashboard to your library.
Supported Spotfire Caching Types
Spotfire supports multiple types of caching. The most commonly supported caching approaches are:
- Embedded data in the Dashboard - Useful for small data. If the MS SQL Server is used as a backend RDBMS, then caching type has a limitation of a maximum of 2 GB.
- Spotfire Automation Services - This is a software service offered by Tibco and requires an additional license.
- Information Links Caching - Useful for TetraScience because we create Athena-based dashboards using Information links.
How to Use Information Links Caching
To support information links caching, server-side and client -side items need to be set. By default, the server settings are enabled. However if a customer has specific needs, then they must also change their server settings.
To support information links caching, TetraScience must change these configurations:
- Attachment Manager settings on the server configuration
- Information link with caching enabled
- Scheduled rule that loads the Dashboard which uses the particular information links
Attachment Manager
- Log in to the Spotfire server machine.
- Navigate to the \bin folder of Tomcat (which comes with the Spotfire installation, for example: c:\tibco\tss\7.11.8\tomcat\bin)
- Run uiconfig.bat (on Linux, it is: uiconfig.sh) to run the Spotfire configuration manager.
- Provide the password for the default bootstrap configuration file.
- The Server manager loads the default bootstrap configuration file.
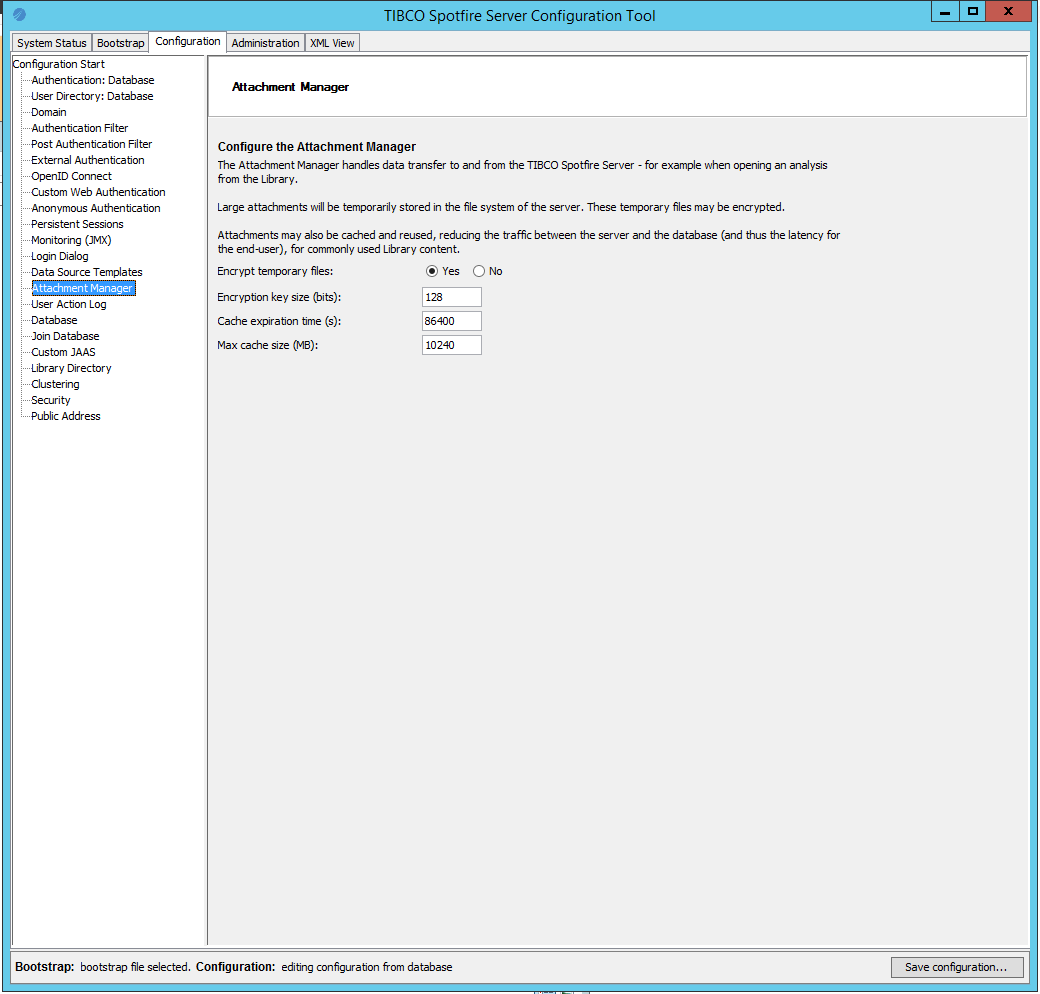
- Click Configuration, and then click the Attachment Manager node.
- Verify that the cache expiration time is greater than 0. The default value is 86400 (which is equal to one day). The default cache expiration time should be fine, but if needed, you can change it. To disable caching, you can set the value to 0. Additionally, the default value for Max cache size is 10 GB.
These are the default settings:

Default Settings
Attachment Manager Notes
- The Attachment manager cache is stored in Tibco’s Tomcat subfolder (\7.5.X\tomcat\temp\AttachmentManager).
- The Attachment manager cache is deleted every time you restart the Spotfire server.
Click here for more details.
Information Link Caching
You configure Information Link caching through the Spotfire client (as analyst). To configure Information Link caching, you must enable caching on that particular information link. By default, the caching option is disabled.
TetraScience will ensure that the:
- Caching option is enabled
- Cache timeout is set to a large value (for example, one day)
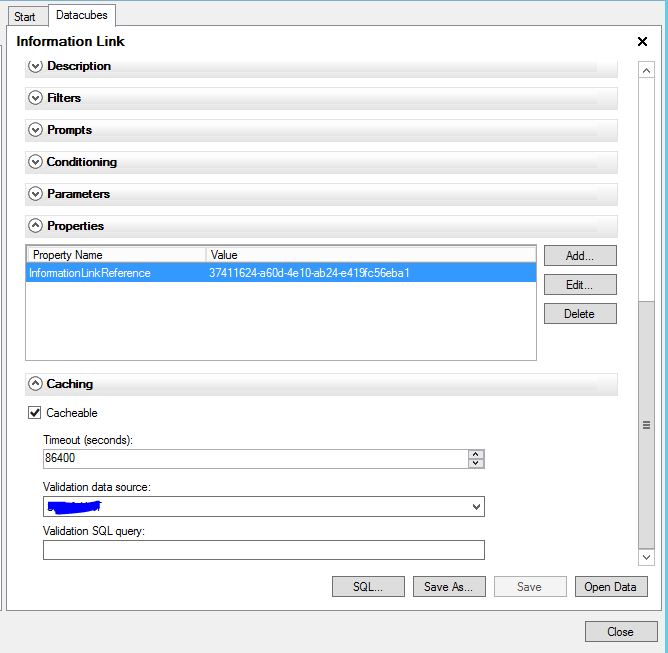
The Caching option is the last option on Information Link properties as shown in this example:

Caching Option
In this example, the Cacheable checkbox is selected and Timeout is set to 86400 (which is equal to one day). This means that when the first user who opens the Dashboard (that uses this information link), the system will query Athena and cache the data. Then, the next user who tries to open the same Dashboard within the day will use the cached data.
Loading Data Immediately Versus On Demand
This caching method works very well when all data is loaded immediately. However, when loading data on demand (system caches data based on users' selections), this caching method is not very usable.
For example, we have two tables with sample sets, and injection results which depend on the sample sets.
- One user selects three sample sets from the first table and then loads the injection results.
- Then, the next user who selects any single or double combination from those three sample sets (but not all three simultaneously) will trigger a new load from Athena, and not load from the cache.
The cache is accessed only if next user selects all three sample sets. That means that cache system has cache key, and in this example, the key is the user’s selection. With a lot of different data, it is very difficult to locate the same cache key. As a result, TetraScience uses the load data immediately method when handling reasonably large data (basically, everything except datacubes).
Scheduled Rule
TetraScience sets up this option from Spotfire’s web UI.
To set up the scheduled rule:
- Log in to the Spotfire web UI with root account (or with an account that has the proper permissions):
Spotfire Log In
- Click Nodes & Services.
Nodes & Services
- Validate that there is a WebPlayer instance installed and that it is activated:
WebPlayer Instance
- Navigate to Scheduling & Routing.
Scheduling & Routing
- Select Create rule.
Create Rule
- Select rule Type to: FILE - Schedule updates of a file in the library and specify the resource pool.
Rule Type
- Click Next.
- From the Create rule page:
a. Enter a meaningful name for the rule.
b. Select the dashboard to load by navigating through the library and selecting the correct dashboard file.
c. Select the resource pool.
d. Set the number of instances to load the data.
e. Set the priority
f. Select Use custom schedule.
Leave all other settings set with their default values.
Rule Settings
- For a custom schedule, TetraScience will set the start and end time to execute every day before the customer’s typical working hours. For example, set the time to 06:00 or 07:00 (based on how much time it takes to load the dashboard). Click Save.
Rule Start and End Times
- The rule is created and active by default:
Active Rule
- After the rule is triggered, it will load the Dashboard on the Spotfire Web player and all of the information links in that Dashboard. If the cache timeout has expired, then that will trigger the cache to reload and enable users to work with refreshed data.
Dashboard
- If everything is working properly, then the rule displays in a green box as a successful load, and an entry displays in the Activity tab:
Successful Rule
Activity tab
Click here for more details about information links caching.
Updated over 1 year ago
