Tetra LabX Agent Installation Guide (v2.0.1)
IMPORTANT
The Tetra LabX Agent must be installed in the same time zone as the LabX host server. If the Agent and LabX host servers are in different time zones, the Agent won't be able to interpret the timestamps returned by the LabX server.
This installation guide is for Tetra LabX Agent version 2.0.1.
This page describes how to do the following:
- Install the Tetra LabX Agent
- Configure the firewall settings
- Configure the Tetra LabX Agent
- Configure the Tetra LabX Agent Integration Services
- Start and Stop the Tetra LabX Agent
NOTE
To restrict access to the local Tetra Agent Management Console, you can edit the Agent’s installation folder’s permissions to grant least privilege access. For more information, see Restrict Access to Agent Installation.
Install the Tetra LabX Agent
TetraScience provides an installation package (.msi). To access the server and run the installation package, you must execute the installation as an Administrator. The default Tetra LabX Agent installation path for version 2.0.1 is: C:\TetraScience\Tetrascience.Agent.LabX.v2.0.1.
After the Tetra LabX Agent is successfully installed on the server, you can access its Windows-based Management Console under the TetraScience folder from the Windows Programs.
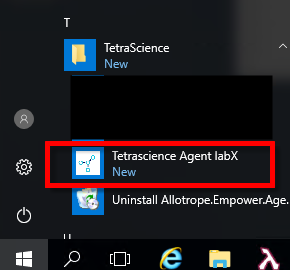
Tetra LabX Agent path
Configure Firewall Settings
Based on where you installed the Tetra LabX Agent, you may need to set firewall ports.
- If you installed the Tetra LabX Agent on the same server where LabX is installed and running, then no firewall action is required.
- If you installed the Tetra LabX Agent to run on a different server from where LabX software is installed and running, then:
- If you installed the Tetra LabX Agent on the LabX server properly, then these required firewall port exceptions should already be set automatically:
- Port 51155
- Port 51156
- Port 51157 (if we need to have the Agent connect to LabX Server using Https protocol)
- To communicate with the LabX Integration Service on the Agent server, you must add at least one outbound firewall exception. The default HTTP LabX InstrumentService endpoint is:
http://<address of server>:51155/LabX/BasicSystemIntegrationService.
If using HTTPS, the InstrumentService endpoint looks as
https://<address of server>:51157/LabX/BasicSystemIntegrationService
- If you installed the Tetra LabX Agent on the LabX server properly, then these required firewall port exceptions should already be set automatically:
Configure the Tetra LabX Agent
After you have successfully installed the Tetra LabX Agent, use the Windows-based Management Console to continue the Agent configuration.
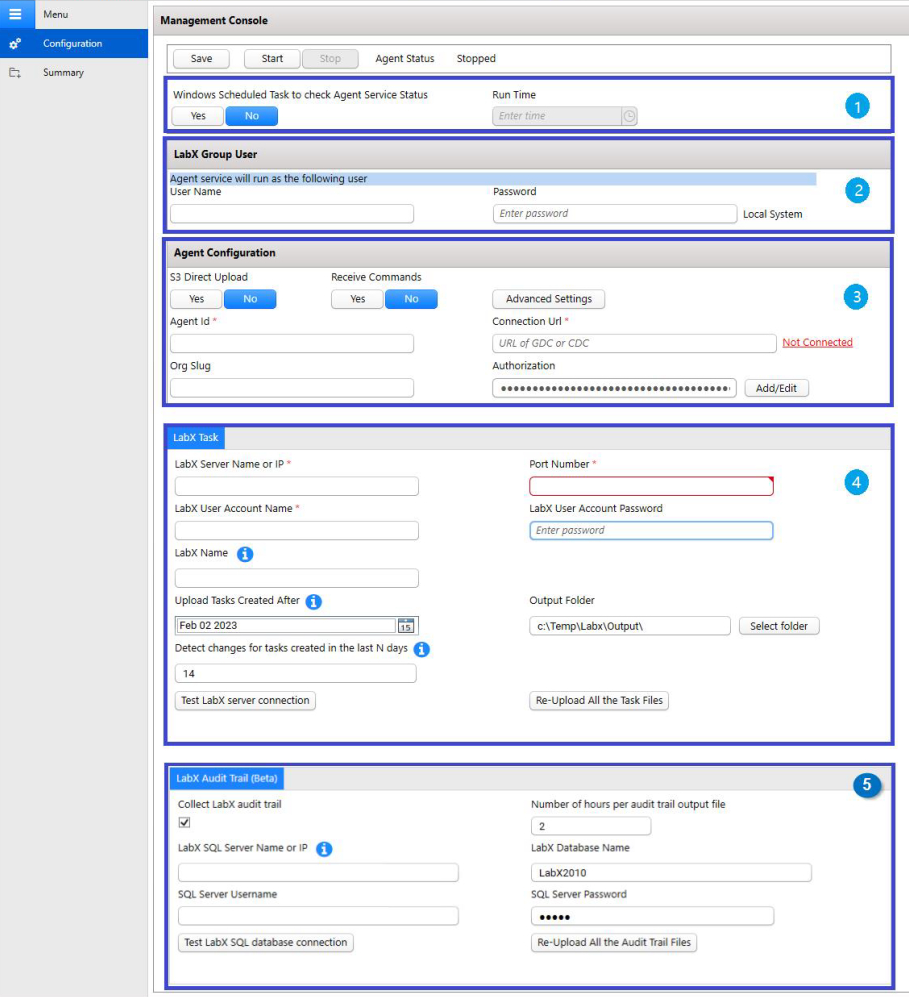
The Management Console is divided into five sections:
- Windows Scheduled Task
- LabX Agent Group User
- Agent Configuration
- LabX Task Configuration
- LabX Audit Trail Configuration
Section 1: Set Windows Scheduled Task
You can increase the Agent's reliability by ensuring that it remains online without having to manually check it each day.
- Select Yes to enable the Windows Scheduled Task to check Agent Service Status option on a daily basis.
- Specify the time in the Run Time field when you want the scheduled Windows task to check on the status of the LabX Agent service.
- If the Agent is stopped, then the scheduled Windows task automatically restarts the Agent service.
- If the Agent is running, nothing further happens.
- If you manually stop the Tetra LabX Agent, then the Windows task is removed, and the Windows Task that you create runs under the LocalSystem account.
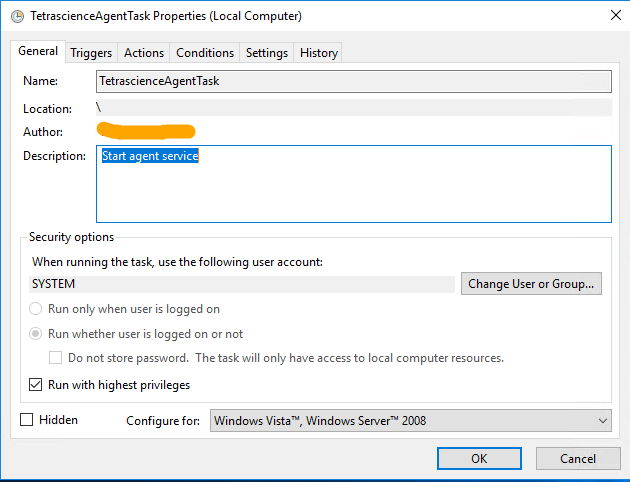
Windows Scheduled Task
Section 2: LabX Agent Group User
The LabX Agent Group User is the service account that runs the Tetra LabX Agent.
- If you leave the User Name field blank, then the Tetra LabX Agent runs using the Windows predefined LocalSystem account.
- For security purposes, we suggest that you provide a domain service account that:
- Is part of the local user group of the host server.
- Has no account expiration date. If an account expires, then the Tetra LabX Agent cannot extract data, and data acquisition is interrupted.
- Requires log on as service permission.
When you enter the LabX Group User Name and Password, the Agent validates the account immediately. If the user name and password are correct, then the Tetra LabX Agent displays a Valid status next to the field.
Section 3: Agent Configuration
Use this section to configure the Agent connection to the Tetra Data Platform (TDP). TetraScience provides several options to connect the TDP. For more information about each data connection option, see see Agent Deployment Options.
S3 Direct Upload
To have the Tetra LabX Agent directly upload files to Amazon Simple Storage Service (Amazon S3) buckets in the Tetra Scientific Data Cloud by using AWS API endpoints, set the S3 Direct Upload option to Yes. When you set this option to Yes, you can upload a maximum file size of one TB. No is the default setting. For more information, see S3 Direct Upload (Recommended).
SQLite Database File Backups
To enable the Tetra LabX Agent to automatically perform regular backups of the SQLite database file, set the S3 Direct Upload option to Yes. When you enable this option, the SQLite database file (which stores agent configuration data) is uploaded to the backup bucket in the Data Lake. If a Tetra LabX Agent failure occurs, you can restore the database file from the backup bucket and continue processing.
If you do not use not use the S3 Direct Upload option, then we recommend that you create periodic backups of the Tetra Agent database, which is typically stored in the installation folder under C:\TetraScience<agent>\Bin\Database. In the event of a failure (for example, if the host server drive is lost), this would enable the data extraction to continue from where it left off without having to re-upload all of the data.
Advanced Settings
- Click Advanced Settings to open the Agent Configuration Advanced Settings pane.
You can specify the time intervals for these fields (the default value for each field is 30 seconds):
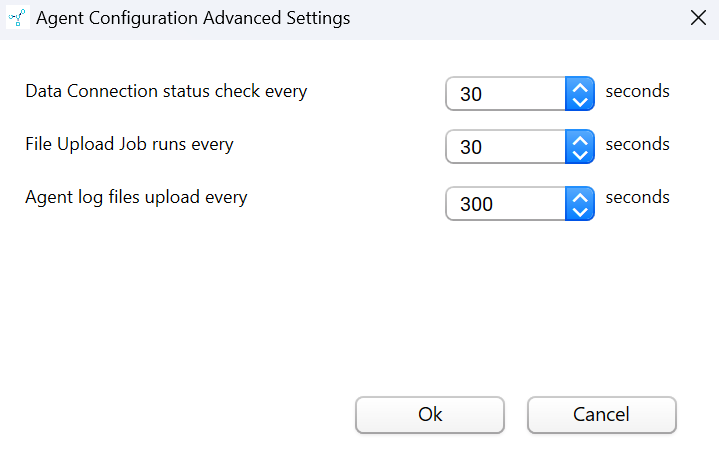
Agent Configuration Advanced Settings
- Data Connection status checks every - Indicates how often the software checks the status of the connection (heartbeat) between the Tetra Data Platform and the LabX Agent. If the Tetra Data Platform does not receive a message indicating that the LabX Agent is "alive" for more than 5 minutes, it assumes that the Agent is offline.
- File Upload Job runs every - Indicates how often to upload files to the Data Lake.
- Agent log files upload every - Indicates how often to upload log files to the Data Lake.
Software Version 3.4 Update
To improve readability, the After a watched file is modified, wait for it to stop changing field was renamed to File Upload Job runs every, and the Upload Log File field was renamed to Agent log files uploads every.
Agent ID and Connection URL
Before you set up a Tetra LabX Agent, you must enter:
- (Required) An Agent ID. The Agent ID (a UUID) is used to connect the Tetra Data Platform. You can retrieve Agent ID from the Tetra Data Platform when you set up the Agent.
- A full connection URL for the TDP connection endpoint that you're using:
- Generic Data Connector (GDC):
http://10.100.1.1:8888/generic-connector/v1/agent - Tetra Hub :
http://10.100.1.2:8443/generic-connector/v1/agent - TDP:
https://api.tetrascience-dev.com/v1/data-acquisition/agent/
- Generic Data Connector (GDC):
Verify the Agent ID and Connection URL
- Agent ID is required.
- The connection URL is required only if you're uploading RAW files to the TDP.
- Before you use your Agent ID and connection URL, it’s strongly recommended that you verify both with your TetraScience Customer Success Team.
If you use the Connector without an Agent, then you must do the following:
- When using the JWT token, the Org Slug field is required. Enter the Org Slug to attach it to the header.
- Enter the JWT token in the Authorization field to attach it to the header. To learn how to get the JWT token, see this reference.
- Click Add/Edit to open a dialog and enter the JWT token.
- Click Save to close the dialog and encrypt and save the JWT token. The Agent validates the connection immediately and displays the updated connection status next to the Connection URL field.
Section 4: Configure the LabX Agent Task Service
Use this section to configure and integrate the Tetra LabX Agent Integration Services for LabX tasks.
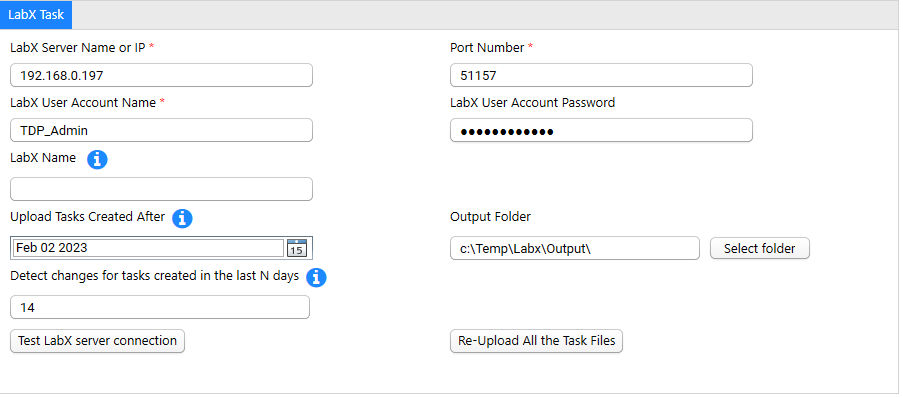
Tetra LabX Agent Task Service
To configure the Tetra LabX Agent Task Service:
- (Required) Enter the LabX host server name or IP address in the Server Name or IP field.
- (Required) Enter the port number in the Port Number field. 51155 is the default HTTP port number set from the LabX Agent installation process. (51157 for HTTPS, please check this link to configure LabX to allow integration over HTTPS)
- (Required) Enter a valid LabX user account in the LabX User Account Name field. The Tetra LabX Agent uses this account to log in to LabX Integration Services.
- Enter the password for the LabX user in the LabX User Account Password field.
- Enter the LabX Name in the LabX Name field. It is used as part of the file path in TetraScience. If it is empty, the upload process uses Server Name/IP
- (Required) Specify an Upload Tasks Created After for when the Tetra LabX Agent selects those tasks whose creation date is later than the specified in this field.
- (Required) Specify an Output Folder for the Tetra LabX Agent to store the generated files. After the generated files have been successfully uploaded to the TetraScience Data Platform, they are deleted.
- (Required) Enter an integer in the Detect changes for tasks created in the last N days. After the initial load from the "Upload Tasks Created After" date, the agent will only detect changes in the last N days repeatedly.
- Click Save to save the configuration and start the Agent.
LabX Name
Please be careful when using this configuration, since the LabX Name will be used in the Task RAW JSON's filePath in the TDP.
Section 5: Configure the LabX Agent Audit Trail Service
Use this section to configure and integrate the Tetra LabX SQL Server and load the audit trail data.

LabX Agent Audit Trail Service
To configure the Tetra LabX Agent Audit Trail Service:
1. Check the Collect LabX audit trail checkbox to enable the audit trail service when needed.
2. (Required) Enter an integer in the Number of hours per audit trail output file field. LabX agent can generate one audit trail file per given hours
3. (Required) Enter the LabX SQL Server information in the LabX SQL Server Name or IP field. It can be a server name/IP, or an instance or port number, such as "localhost", "127.0.0.1", "localhost/instanceName" or "localhost, 1234"
4. (Required) Enter the LabX database in the LabX Database Name field, the default database name for LabX V9, V10, and V11 is LabX2010.
5. (Required) Enter the SQL server login user name in the SQL Server Username field. This is the user name for SQL Server authentication. Windows authentication is not supported.
6. (Required) Enter the SQL server login password in the SQL Server Password field.
7. Click Save to save the configuration and start the Agent.
Start and Stop the Tetra LabX Agent
This section indicates the current state of the Agent's processing status:
- Agent Service Not Installed
- Running
- Stopped

Agent Processing Status
- To save the LabX Agent configuration, click Save.
- To start the LabX Agent with the new configuration settings, click Start. When the LabX Agent starts, the status indicator shows Running for an Agent that is successfully up and running.
- When the LabX Agent starts, the Stop button is enabled. To stop the LabX Agent, click Stop.
Daily Agent Run Schedule
After you complete the initial installation and configuration, you can use a Windows Task script to re-start the Tetra LabX Agent (for example, you can set it to run at 1:00 AM) and ensure that it runs constantly. For details, see link.
Troubleshooting
The Agent Can't Connect to the LabX Server
If the Tetra LabX Agent can't connect to the LabX Server, do the following:
Set Net.TCP Port Sharing Services to Startup Automatically
- On the host server, open the Services window by selecting the Start icon, and then searching for Services.
- In the Services window, select the Net.TCP Port Sharing Services service. A dialog appears.
- For Startup type, select Automatic.
- Choose Start. Then, choose OK.
Set the LabXHostService to Startup Automatically
- In the Services window, select the LabXHostService service. A dialog appears.
- For Startup type, select Automatic.
- Choose Start. Then, choose OK.
Verify the Connection
- Open the LabX Installation folder.
- Right click Installation Checker. Then, select Run as administrator.
- Choose the green Execute icon.
- In the Application section of the test results, verify that the following LabX services display a Running status:
- BusinessService
- InstrumentService
- LabXHostService
Updated 10 months ago
