Activate Single Sign-On (SSO)
Before You Begin
Before you enable single sign-on as a Site Admin, you must have deployed the Tetra Data Platform (TDP) using either one of these deployment options: Customer Hosted and Tetra Managed or Customer Hosted. If you chose the Tetra Hosted deployment option, then TetraScience will enable single sign-on (SSO) for you (if desired). Click here for details about the available deployment options.
Single sign-on (SSO) is an optional feature in the Tetra Data Platform (TDP) which uses the Amazon Cognito service to connect with your identity provider (IdP) and manage authenticated users from IdPs. To enable SSO, you must be a Site Admin.
To enable SSO, you must do the following:
- Set up the Identity Provider
- Use the Amazon Cognito Service to create a user pool
- Use the Amazon Cognito Service to configure the Cognito domain and app client
- Configure the app client and domain name
- Configure the identity provider and enable SAML
- Set up environment variables
- Configure SSO settings for your organization
Set Up the Identity Provider
The identity provider must be set up as a first step.
Create a User Pool
The user pool manages the overhead of handling the tokens that are returned from SAML (Security Assertion Markup Language (SAML) IdPs.
To create a user pool, do the following:
-
Navigate to the Amazon Cognito console and select User pools.
-
In the top-right corner of the page, select Create a user pool.
-
From the Configure sign-up experience tab, you configure the providers that are available to users when they sign in.
a. To have your users sign in through a federated third-party IdP, select Federated identity providers.
b. To set email as the required attribute used for the user pool sign-in, select Email. This determines how new users will be prompted to verify their identities when signing in to the TDP.
c. Click Save changes. -
From the Sign-up experience tab:
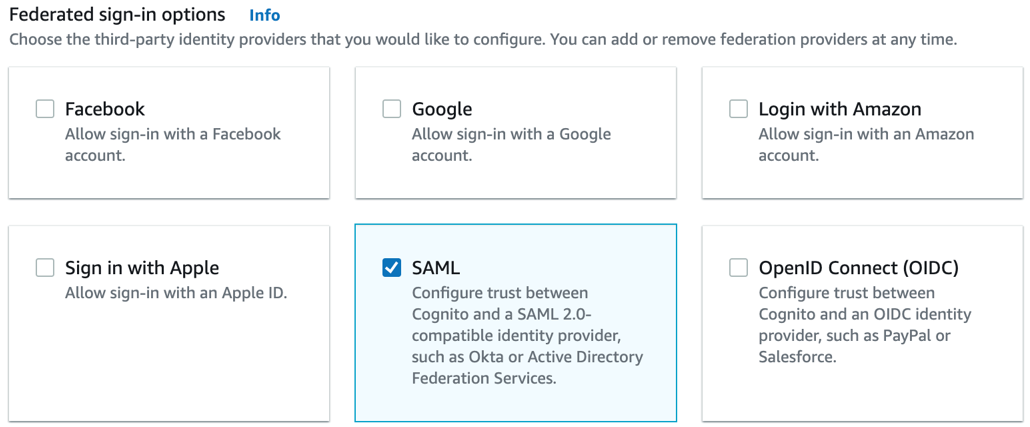
a. Locate Federated sign-in and select Add an identity provider. You must select at least one third-party IdP. Select SAML as the IdP:

SAML selected as IdP
b. For Self-service sign-up, make sure that the Enable self-registration option is disabled (unchecked). New users must be created by administrative API actions using IAM API credentials or by sign-in with federated providers.
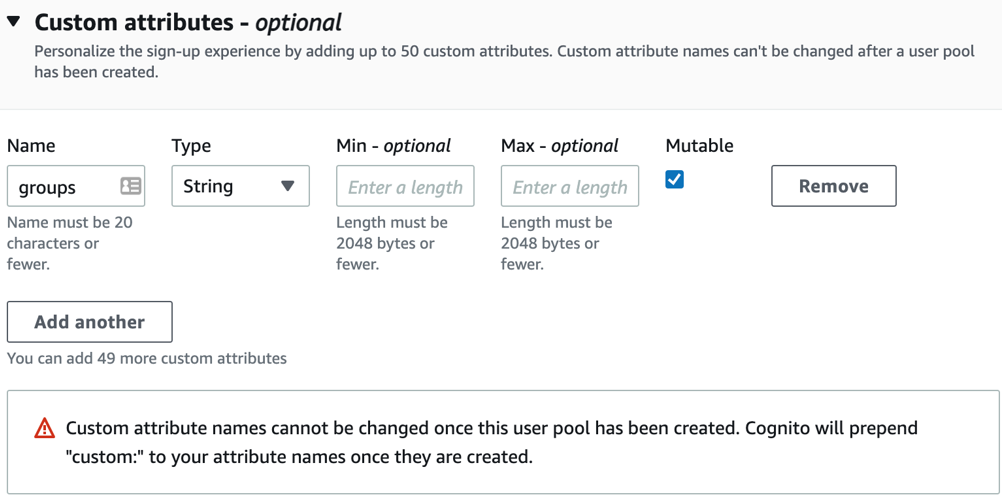
c. In the Custom attributes - optional section, select Add custom attributes.
d. Add a new custom attribute with:
- Name = groups
- Type = String
- Mutable is selected (provides users permission to change the value of a custom attribute after they set the initial value):

Add custom attributes
e. Click Save changes.
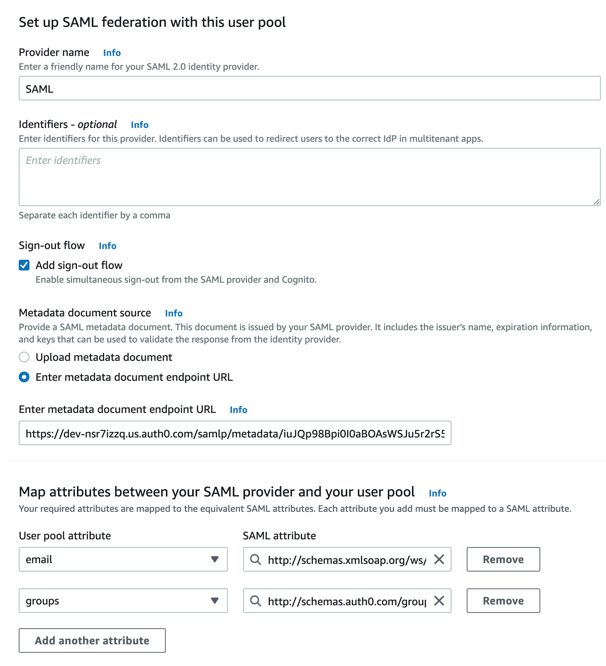
- Set up SAML configuration with the user pool using the values from provided by the third-party IdP:

Configure SAML with the user pool
a. Enter SAML as the Provider name.
b. Select the Add sign-out flow option to have Amazon Cognito send signed sign-out requests to your provider when a user logs out.
Sign-Out Flow Option
If you selected this option and your SAML IdP expects a signed logout request, then you must also configure the signing certificate provided by Amazon Cognito with your SAML IdP. The SAML IdP will process the signed logout request and sign out your user from the Amazon Cognito session.
You must configure your SAML IdP to send sign-out responses to the
https://<*your Amazon Cognito domain*>/saml2/logoutendpoint that is created when you configure the hosted TDP UI. Thesaml2/logoutendpoint uses POST binding.
c. Select Enter metadata document endpoint URL as the metadata document source, and then enter that public URL in the field. This enables Amazon Cognito to refresh metadata automatically. Typically, metadata refresh occurs every six hours or before the metadata expires (whichever is earlier).
d. Map your required attributes in your user pool to the equivalent SAML provider attributes. Each attribute you add must be mapped to a SAML attribute.
e. Click Save changes.
To continue with SSO process, go to Configure the Cognito Domain and App Client.
Configure the Cognito Domain and App Client
After you create a user pool, you configure the Cognito domain and app client:
- In Amazon Cognito, select App clients under the General settings menu section.
- The App client id now displays below the pool name. Copy the App client id value to a text editor. You will use this value as the environment variable for the
SSO_CLIENT_ID. - Select Show Details. The App client secret displays on the page. Copy the App client secret value to a text editor. You will use this value as the environment variable for the
SSO_CLIENT_SECRET. - From the left side of the page, select App client settings under the App integration menu section.
- From the App client settings page:
- Enter a URL in the Callback URL(s) field, for example: <platform_url>/login.
- Enter a URL in the Sign out URL(s) field, for example: <platform_url>/logout.
- In the OAuth 2.0 section:
- In the Allowed OAuth Flows section, select Authorization code grant.
- In the Allowed OAuth Scopes section, select: email, openid, and profile.
- Click Save changes to continue.
- From the left side of the page, select Domain name under the App integration menu section.
- Enter the domain name in the Domain prefix field, for example:
ts-demo-tetrascience. Select Check availability. If the domain is available, then a message displays at the top of the page confirming its availability. - Copy the full URL address to a text editor. You will use this value as the environment variable for the
SSO_DOMAIN. - Click Save changes to continue.
Configure the Identity Provider and Enable SAML
To configure the identity provider and enable SAML, do the following:
- In Amazon Cognito, select Identity providers under the Federation menu section.
- Select SAML. You need to define the attributes (
email,family name,given name, andcustom:groups) that you want to export in the identity provider's software (for example, Duo, Idaptive, Keycloak, and so on). - The identity provider's software should allow the export of SAML configuration as either an XML file, or with a URL address. Click Select file to upload the XML file, or enter the URL address in the Provide metadata document endpoint URL field.
- Click Create provider.
- From the left side of the page, select Attribute mapping under the Federation menu section.
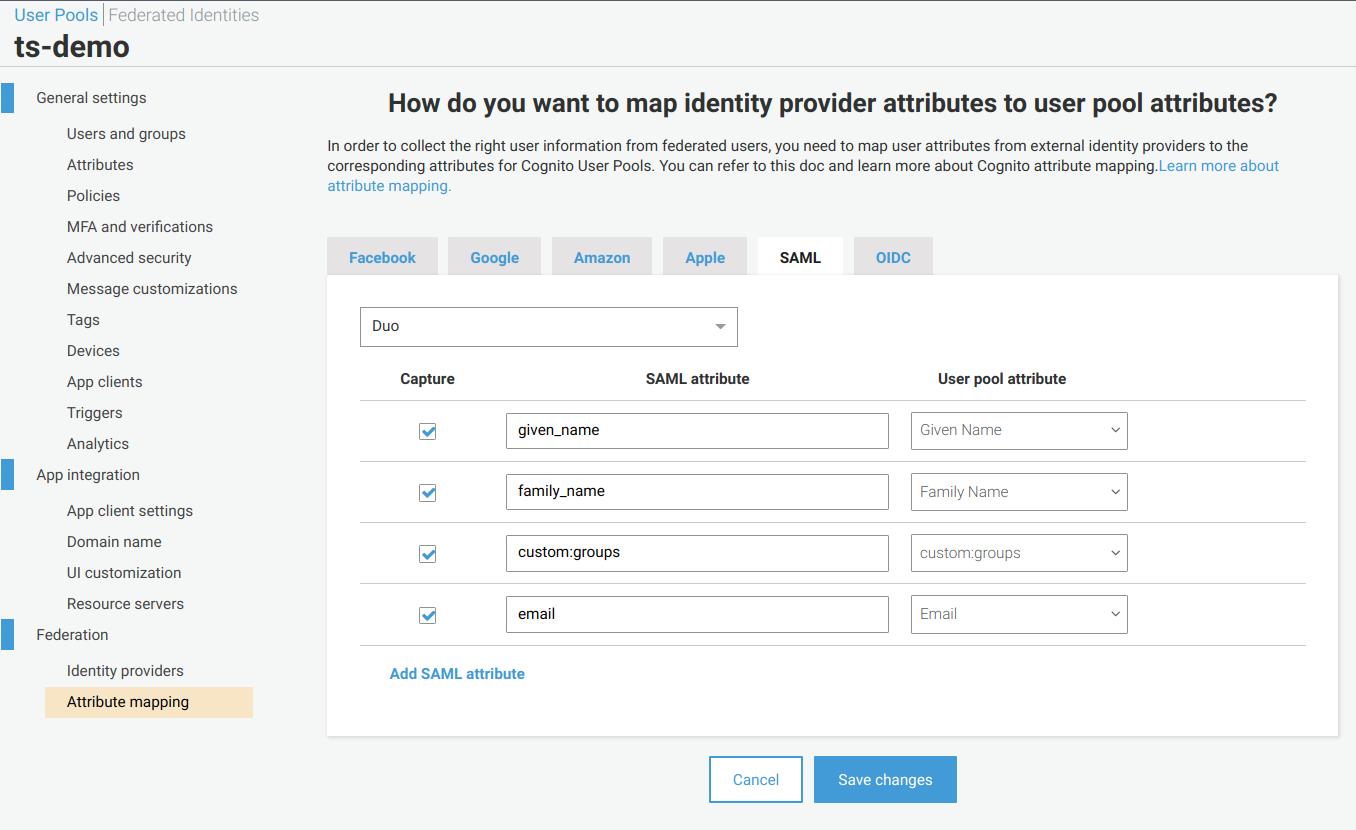
- Select the SAML tab. This is a configuration example for Duo:

SAML Attribute Mapping
- You must provide the actual name of the attribute that identity provider sends to Amazon Cognito. In the User pool attribute column, select the Amazon Cognito attributes.
- Define mappings for the four attributes that you used:
given name,family name,custom:groupsandemail. - Click Save changes.
- From the left side of the page, select App client settings under the App Integration menu section.
- In the Enabled Identity Providers section, select the identity provider you just created (for example, Duo). Verify that all of the other values that you previously defined also display: Callback URL(s), Sign out URL(s), and OAuth 2.0 selections.
- Click Save changes.
Identity Provider Managed by a Different Team
If your identity provider is managed by a different team, then you must provide these Amazon Cognito user pool parameters and values to them:
- Assertion Consumer Service (ACS) URL - Locate the domain name under the the App Integration menu section, and then add this suffix:
https://<domain>/saml2/idpresponse- URN - Locate the Pool Id under the General settings menu section, and then add this prefix:
urn:amazon:cognito:sp:<Pool Id>
To continue with the SSO process, go to Set Up Environment Variables.
Set Up Environment Variables
The Tetra Data Platform uses Amazon Cognito to enable users to log in to the TDP using single sign-on (SSO). With TDP release (v3.1.0/v3.1.2), SSO works only in Customer Hosted deployments because environment variables ts-service-user-org and ts-service-web services were used for implementation.
The environment variables using the Joi schema are described using example values:
ts-service-user-org
{
  SSO_DOMAIN: Joi.string().optional(), // value configured in Amazon Cognito (for example, https://ts-dev.auth.us-east-2.amazoncognito.com)
  SSO_REDIRECT_URI: Joi.string().optional(), // TDP SSO login page to be redirected from Amazon Cognito (for example, https://tetrascience-dev.com/login/sso)
  SSO_CLIENT_ID: Joi.string().optional(), // Amazon Cognito client ID - public available (for example, 5tus3nieu9sgv02aaq7f28hhir)
  SSO_CLIENT_SECRET: Joi.string().optional(), // Amazon Cognito client secret - hidden (for example, 1c0fdvv63caat3e7r2v9unuj3fl5k344j1pqpfc0lkhdacc8k1i3)
  SSO_GROUPS_ATTRIBUTE: Joi.string() // Amazon Cognito client groups mapping
    .optional()
    .default('custom:groups')
}
ts-service-web
{
  SSO_DOMAIN: Joi.string() // value configured in Amazon Cognito (for example, https://ts-dev.auth.us-east-2.amazoncognito.com)
    .allow('')
    .optional(),
  SSO_CLIENT_ID: Joi.string() // Amazon Cognito client ID - public available (for example, 5tus3nieu9sgv02aaq7f28hhir)
    .allow('')
    .optional(),
  LOGIN_REDIRECT_PATH: Joi.string() // redirect path for login (for example, /login/sso)
    .optional()
    .allow('', null)
    .empty(['', null])
    .default('/login')
}
You can define these variables using a AWS CloudFormation template or by using AWS Systems Manager. This table describes where to find attribute values and what their corresponding parameter names should be in AWS Systems Manager.
| Attribute Name | Where to Find the Attribute | AWS Systems Manager Parameter Store Location |
|---|---|---|
| SSO_DOMAIN | Navigate to: Cognito > App Integration > Domain name | /tetrascience/{environment}/ECS/ts-service-user-org/SSO_DOMAIN /tetrascience/{environment}/ECS/ts-service-web/SSO_DOMAIN |
| SSO_CLIENT_ID | Navigate to: Cognito > General Settings > App Clients > App client Id | /tetrascience/{environment}/ECS/ts-service-user-org/SSO_CLIENT_ID /tetrascience/{environment}/ECS/ts-service-web/SSO_CLIENT_ID |
| SSO_REDIRECT_URI | Navigate to: Cognito > App Integration > App Client Settings > Callback URL | /tetrascience/{environment}/ECS/ts-service-user-org/SSO_REDIRECT_URI |
| SSO_CLIENT_SECRET | Navigate to: Cognito > General Settings > App Clients > App client Secret | /tetrascience/{environment}/ECS/ts-service-user-org/SSOCLIENT_SECRET Set this parameter as _SecureString. |
| SSO_GROUPS_ATTRIBUTE | Navigate to: Cognito > General Settings > Attributes > Custom Attributes | /tetrascience/{environment}/ECS/ts-service-user-org/SSO_GROUPS_ATTRIBUTE |
After you create AWS Systems Manager parameters, you must restart both ts-service-user-org and ts-service-web services.
To complete the SSO process, continue to Set Organization to Enable SSO.
Set Organization to Enable SSO
Initially, a Site Admin must enable SSO for the organization, and then configure an active directory (AD) group to the Tetra Data Platform (TDP) role mapping. Click here to learn how to enable SSO for an organization in the TDP.
Updated 21 days ago
