Legacy Tetra Signals Connector Admin Configuration
Setting up the Legacy Tetra Signals Connector requires work on both the Signals side and within the Connector itself. The Connector must be configured to enable communication with the Tetra Data Platform (TDP) and with Signals Notebook. Once the Connector is configured, the DataWeave tab offers tools for setting up the desired external action in Signals Notebook. Finally, when a DataWeave template is ready, you must set up a corresponding external action in Signals Notebook.
Connector Admin Configuration
Admin Role RequiredThis screen is only available to users that are assigned the Administrator role or a custom role with either Organization Admin or Tenant Admin policy permissions.
If the Connector is started and neither SSO or TDP logins are configured, you will be given a bootstrap role that has admin access. Once you have configured either SSO (in step 2) or TDP login (in step 3), you will be asked to authenticate.
Prerequisites
To receive access the TetraScience Signals Connector, please contact your TetraScience account or support representative.
Instructions for initial installation can be found in the Legacy Tetra Signals Connector Installation Guide.
Step 1: Access the Connector
If the Connector is running from the previous step, enter http://<hostname>:<portNumber>/ or https://<hostname>:<portNumber>/ in your browser to access it.
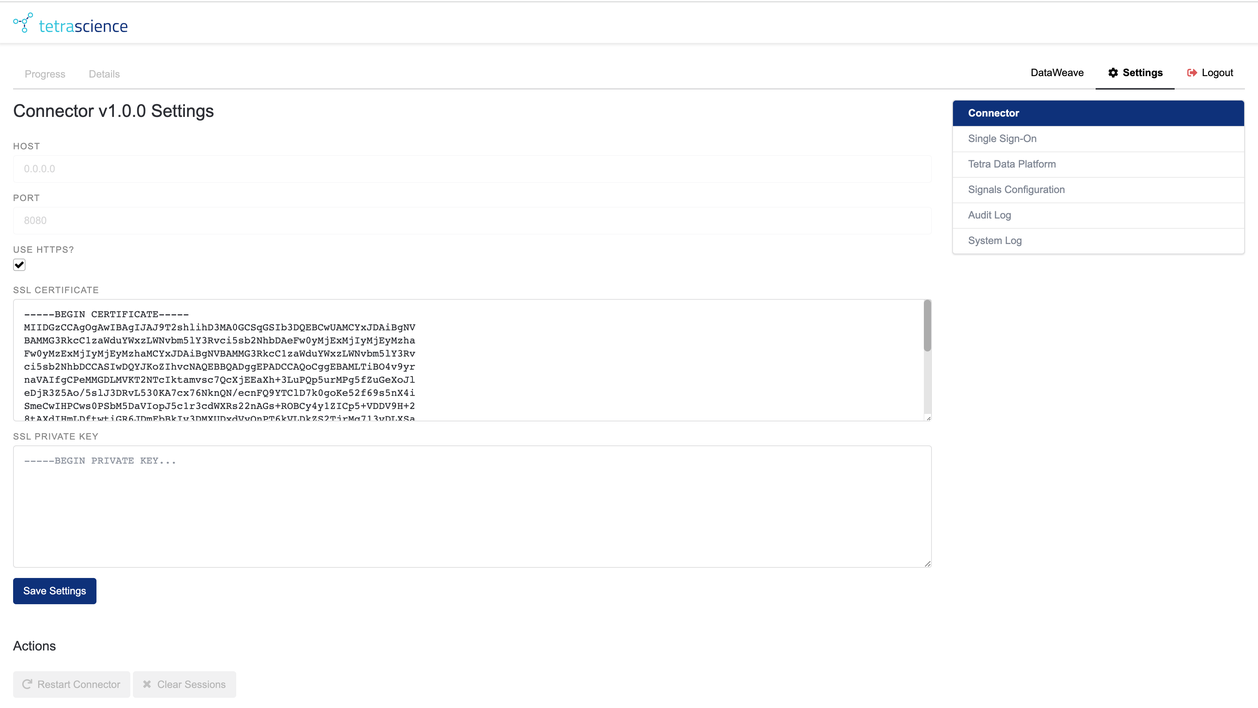
Figure 1. The TetraScience Signals Notebook Connector settings landing page
- A fresh install of the Connector will not have SSL certificates set up, so the initial setup will be done through the
http://<hostname>:<portNumber>/URL. - After providing the Connector with the appropriate SSL certificates and keys, and checking the
Use HTTPS?option, the Connector will be available athttps://<hostname>:<portNumber>/after the next restart.NOTEUntil the Connector is restarted, it will continue serving in HTTP, not HTTPS.**
- The screenshot above shows the Connector pane where the SSL certificate and private key are entered. The certificate is provided and
Use HTTPS?checkbox is marked. - This pane also provides options to export (or import) the entire configuration as a JSON document. Sensitive fields (such as access tokens for TDP or Signals Notebook) are removed from the export and would need to be re-entered upon import.
Step 2 (Optional): Configure SSO and role mapping
The SSO Configuration screen (available to users with the admin role) shows the details required to use single sign-on (SSO) through Amazon Cognito.
- If configured and enabled, SSO will authorize you to use the Connector after authenticating with your identity provider (IdP).
- If SSO is not configured and enabled, the Connector requires you to authenticate directly with the TDP.
- Authenticating through the TDP grants you permissions that reflect your TDP role and permissions.
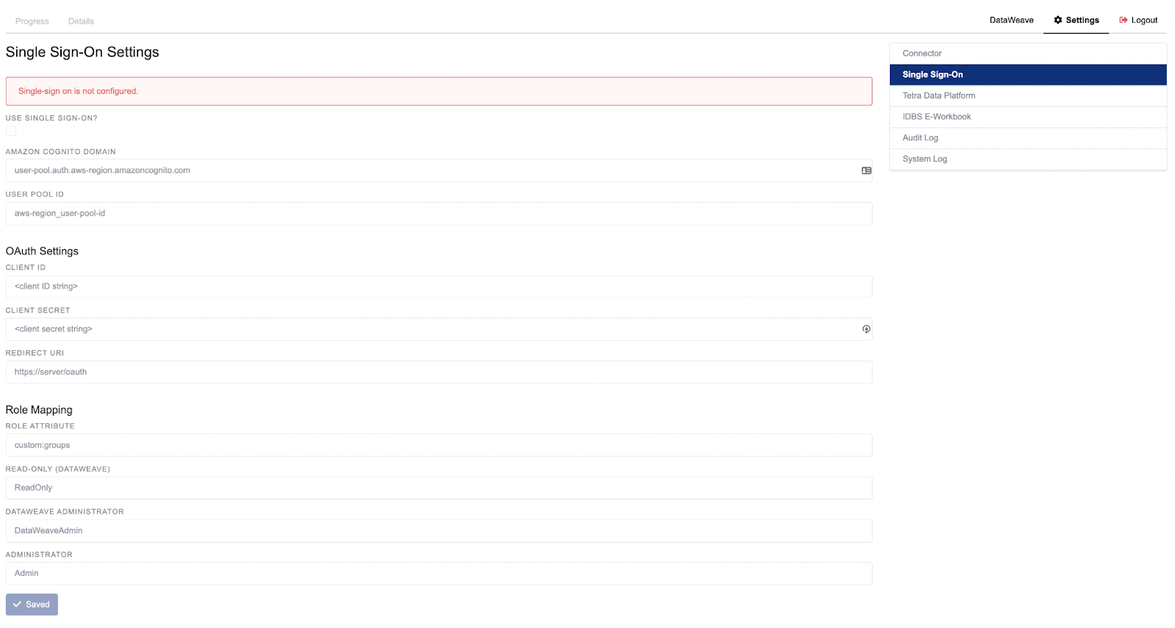
Figure 2. The SSO Configuration Screen
The following settings are updated from the SSO Configuration screen:
- Use single sign-on? When this box is checked and all of the other fields are completed, the SSO authentication is enabled.
- Amazon Cognito Domain: Defines the domain used to reach the Amazon Cognito endpoints. It is configured in the Cognito user pool settings by navigating to App integration > Domain name.
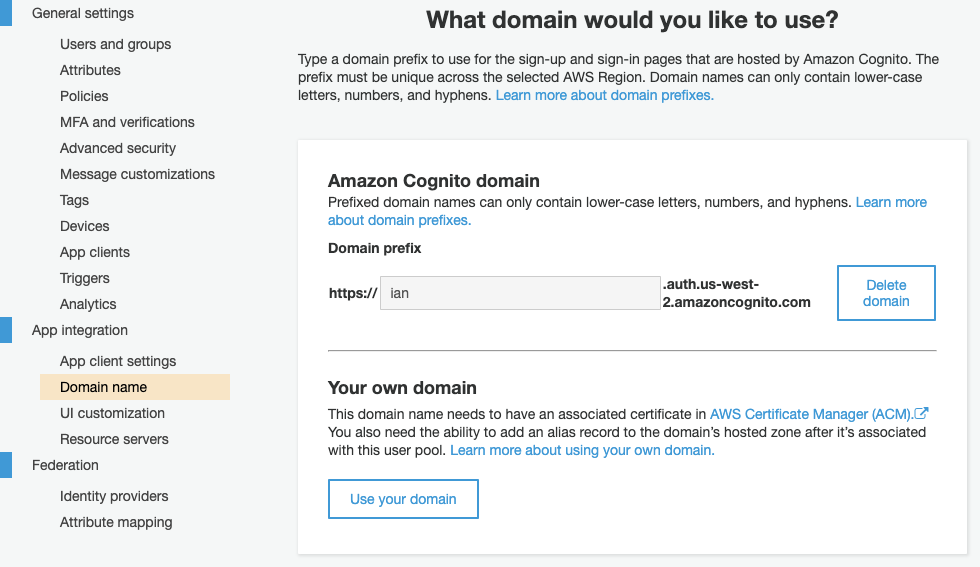
Figure 3. Domain Name Settings in AWS Cognito
- User Pool ID: The ID of the user pool in Amazon Cognito. This ID is used to download the public keys for user token verification. It can be found in the Cognito user pool settings, under General settings.

Figure 4. User Pool ID in AWS Cognito
- OAuth Settings: These settings are used to securely perform the authentication handshake with Amazon Cognito.
- Client ID: The client ID can be found in the Cognito user pool settings under General settings > App clients. It is automatically generated when the app client is added to the Cognito user pool.
- Client Secret: The client secret can also be found in the same place as the client ID, in the Cognito user pool settings under General settings > App clients. The secret is like a password. It is also automatically generated when the app client is added to the Cognito user pool.
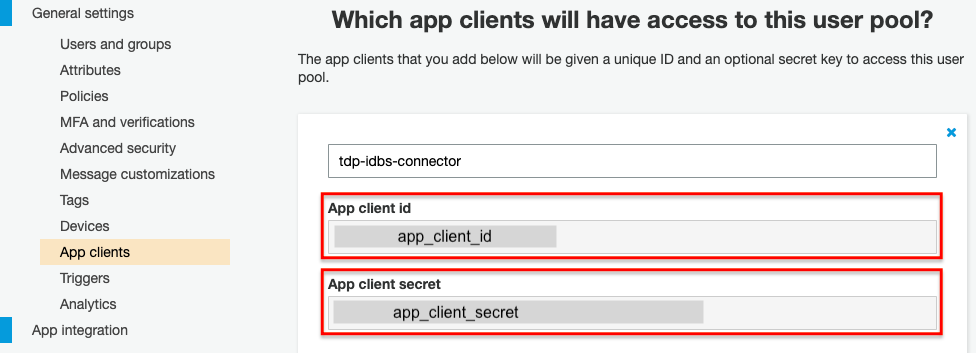
Figure 5. OAuth Settings in AWS Cognito
- Redirect URI: The URL to which Amazon Cognito redirects you after a successful third-party authentication. The redirect URI should always be using HTTPS. It also must match what is configured in the Cognito user pool settings under App integration > App client settings.
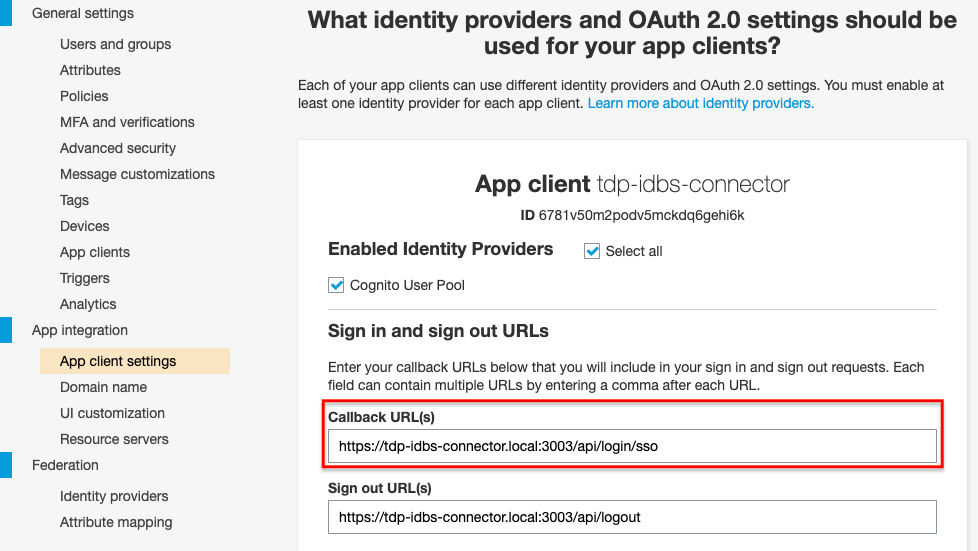
Figure 6. App Client Settings in AWS Cognito
- Role Mapping: This defines how the Connector determines which groups in Amazon Cognito map to which roles within the Connector. Currently, only a one-to-one mapping is possible. Users who have multiple groups will map to the highest level of access that any of their groups give them (read only < member < admin). Groups are configured in the Cognito user pool settings under General settings > Users and groups.
- Read-Only (DataWeave): Users in this group will be assigned the readonly role in the Connector.
- DataWeave Administrator: Users in this group will be assigned the dataweave-admin role in the Connector.
- Administrator: Users in this group will be assigned the admin role in the Connector.
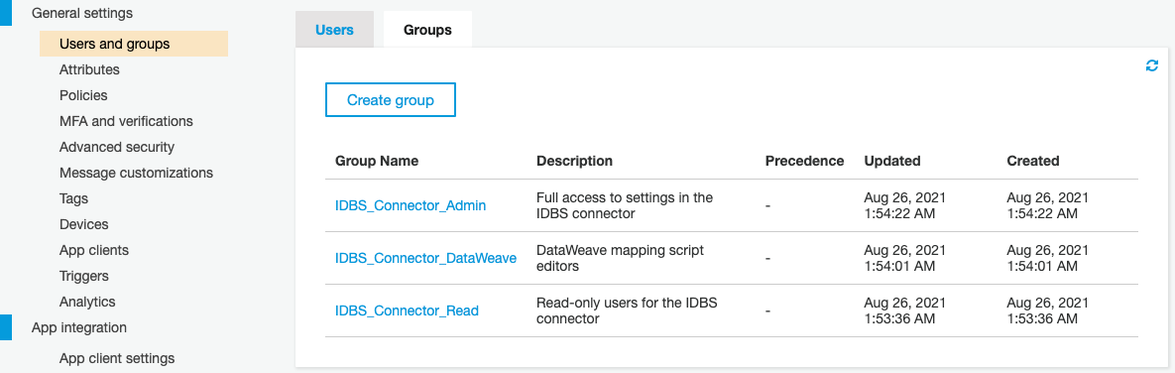
Figure 7. User and Groups Settings in AWS Cognito
Click Save Settings on the Connector Settings page to save any changes.
If you're currently logged in using TDP authentication and you enable SSO authentication, you will remain logged in until you manually log out, or your session expires.
Step 3: Set Up the TDP Connection
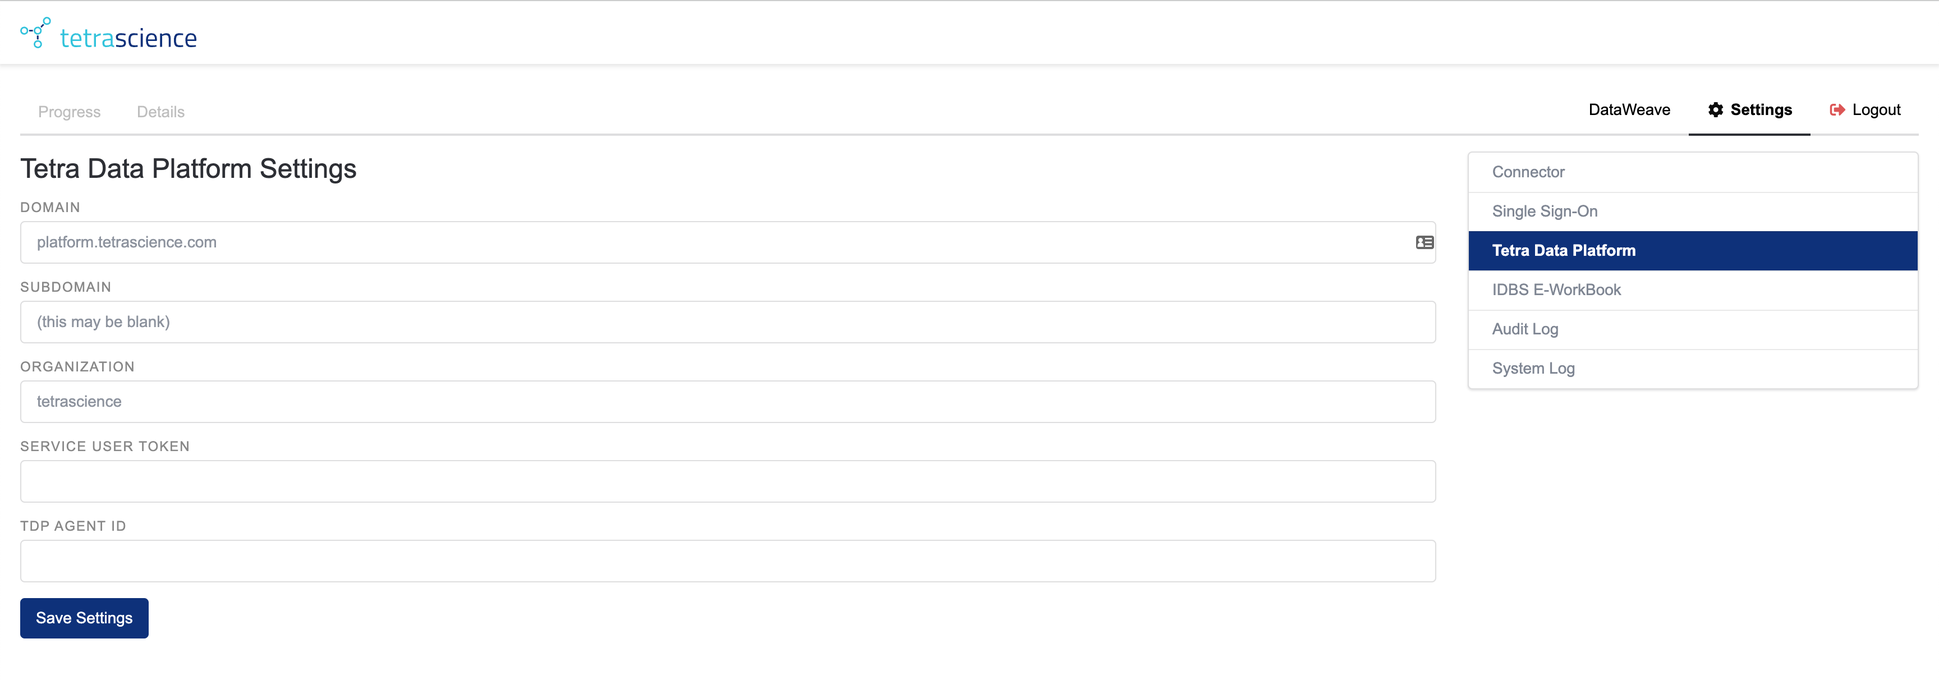
Figure 8. The Tetra Data Platform Settings Screen
The TDP Configuration screen shows the details required to connect to and authenticate with the TDP. This screen is only available to users that are assigned the Administrator role or a custom role with either Organization Admin or Tenant Admin policy permissions.
The following settings can be updated from the TDP Configuration screen:
- Domain: This is the root domain for the TDP instance to which the Connector should connect. Make sure to leave off any "
api." prefix or "https://". These prefixes are added automatically when needed. - Subdomain: For multi-tenant TDP deployments, you may have an assigned
subdomainfor your tenant. Thissubdomainshould be entered here. If you do not have one, leave this field blank. - Organization: This is the
slugof the organization within the TDP that this Connector is associated with. This org slug is used for connecting to the TDP for queries as well as authenticating users to the Connector and determining their role when SSO is not being used. - Service User Token: This is a user token that the Connector uses when sending OpenSearch queries or downloading files from the TDP. It should be associated with a service user with at least read-only access.
Service User TokenA normal user token will work, but the short time before expiration makes them impractical for use here. For details on how to create a TDP service user and obtain a token, see Manage Service Users .
- TDP Agent ID: This is only used when the Connector performs an upload action to the TDP. If you're using the Connector for retrieve actions only, you can leave this field blank. To use this feature, from the Data Sources > Agents page in the TDP, create a new user-defined Agent. The Agent ID associated with this user-defined agent (available from the Agents page) is what you should enter in this Connector setting field.
Click Save Settings to save any changes.
Step 4: Sign in
There are two options to sign in: single sign-on (SSO) or TDP Username and password.
Option 1: SSO
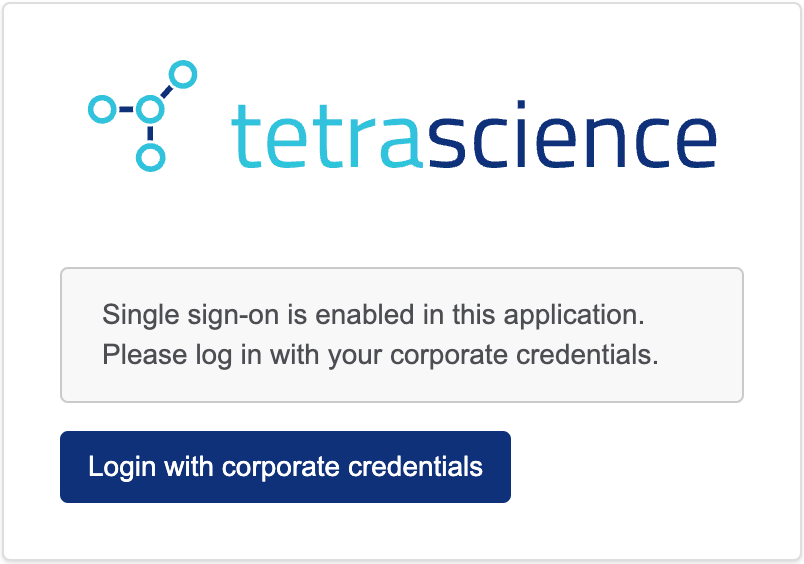
Figure 9. Signing into the Connector with SSO.
If you are using SSO to authenticate, the dialog box associated with your SSO provider appears at sign in.
Option 2: TDP Username and password
- When using the TDP to authenticate, the User Login screen prompts you for an email and password and attempts to authenticate the user to the TDP by using the supplied credential. No communication from the browser directly to the TDP is initiated.
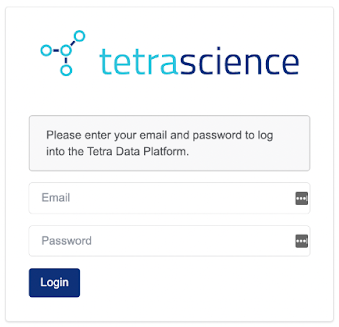
Figure 10. Signing into the Connector with TDP Username/Password.
When authenticating through the TDP, keep in mind the following:
- If there is an error connecting to the TDP or the credentials are not valid, a relevant error message is displayed on the login form.
- If authentication is successful, the user information, including the user's role in the appropriate TDP organization, is stored in the session.
- The page content will update automatically based on the user’s role.
Step 5: Set Up the Signals Notebook Connection
The Signals Configuration screen shows the details required to connect to and authenticate with Signals Notebook.
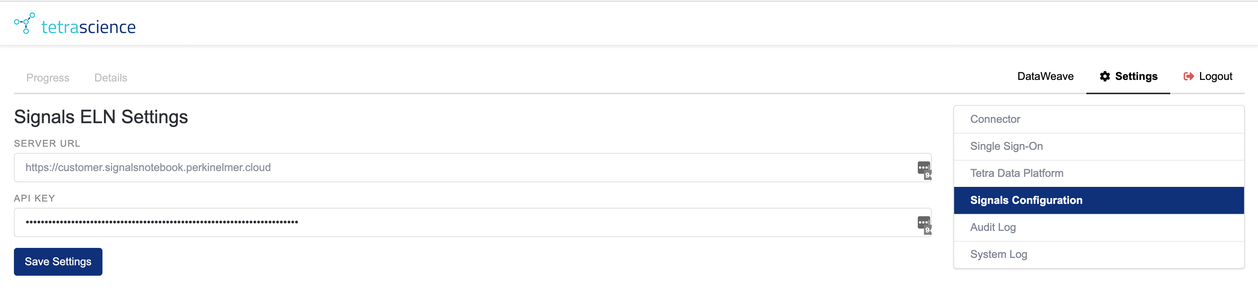
Figure 11. Signals Notebook authentication configuration
The following settings can be updated from the Signals Configuration screen:
- Server URL: This is the root URL (including the port number if a nonstandard value is used) that is used to access the Signals Notebook API. The address should be reachable from the Connector container's host server.
- API key: Currently, authorization to read and write to Signals Notebook is done using a Signals Notebook API key. The API key, once generated, is available from Signals Notebook System Configuration > System Settings > API Key.
As soon as you begin editing any of the settings, the button at the bottom will switch from a disabled Saved button to an enabled Save Settings button. Make sure that you click Save Settings to save any changes.
Signals Notebook Admin Configuration
Configuring External Actions in Signals Notebook
DataWeave Templates RequiredTo configure the external actions in Signals Notebook, you must first create the associated DataWeave template and scripts in the Connector DataWeave Settings.
Suppose we have a DataWeave template, example-round-trip-template, that we want to associate with external actions in Signals Notebook. The following is a screenshot of such a template in the DataWeave Explorer. The expanded view comes from clicking anywhere other than the name (which links to DataWeave Editor) on that row of the table.

Figure 12. Example round-trip DataWeave template information
The Round-trip template type has two associated actions: One for sending a command to TDP, and one for retrieving data later. To be useful, the DataWeave transformations need to know the expected format of the data within Signals Notebook—so it's useful to assign these actions to specific admin-defined table templates that are compatible with the DataWeave.
External actions are customizable through Signals Notebook System Configuration. From the Configuration page, click External Actions. The sidebar on the left will have an option to create a new external action, which will lead to something like the following screenshot:
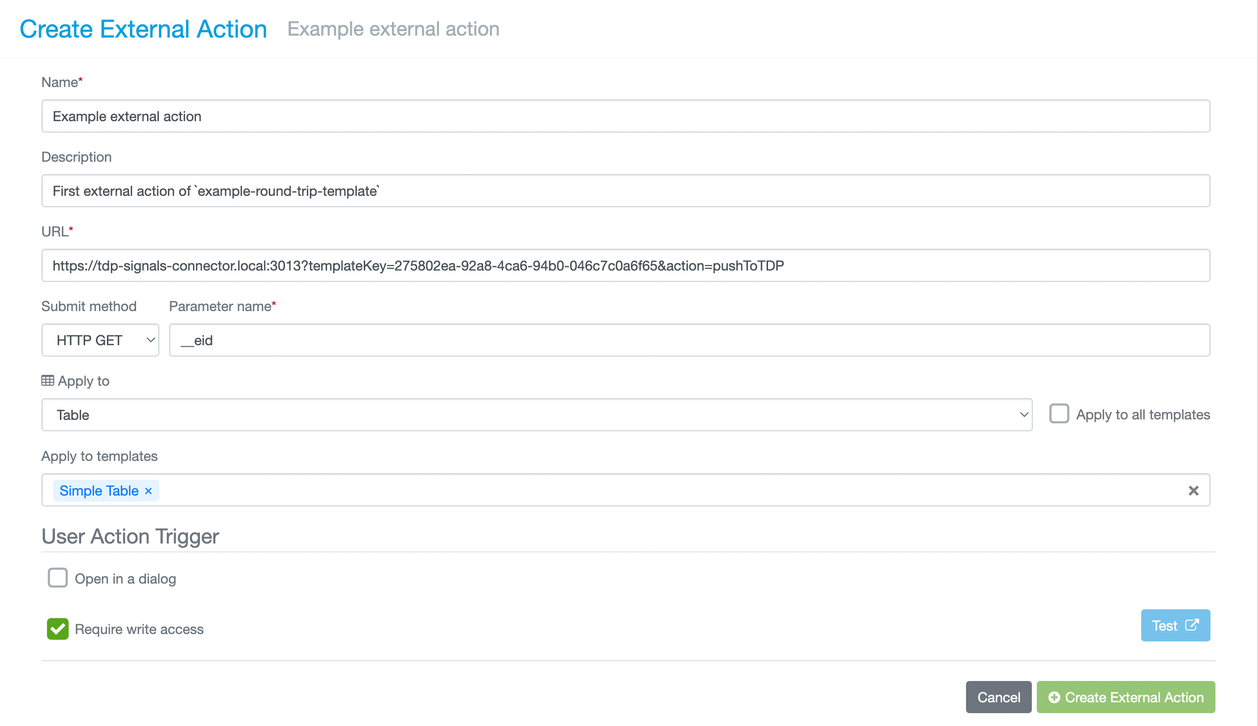
Figure 13. Create external action screen in Signals Notebook System Configuration
Reviewing the fields in the External Actions form:
Name: This is what will be visible to end users when they want to initiate the external action.Description: This is visible in the external actions configuration window.URL: Signals Notebook implements external actions as HTTP requests to some address. The URL and search parameters here correspond to starting the intended external action in the Connector.- Generating URL string: In the DataWeave Explorer, there is a sharing icon next to each template. Clicking this icon will bring up a window explaining the intended use of that type of DataWeave template, and URLs corresponding to the necessary external actions. Copy and paste one of these into the URL field of the External Action configuration form.
Submit method: The HTTP method used in the request to the URL. For the Connector, this should be left as HTTP GET.Parameter name: Signals Notebook will append the entity ID of the object that initiates the external action as a search param to the URL. The parameter name controls what that is called. For the Connector, this should be left as the default value:__eid.Apply to: This sets what type of Signals Notebook entity the external action can be initiated from. For the Round-trip template type, this should be Table. When Table is chosen, a checkbox appears to the right of this field to allow all tables to use this action. We recommend unchecking this, and instead choosing specific templates in the next field.Apply to templates: This field becomes visible when the Apply to all templates checkbox is unchecked. Multiple table templates can be selected here, and the external action can be executed from all selected templates.Open in a dialog: When unchecked, the external action will open in a new tab. When checked, the action instead opens in a window within the Signals Notebook page as a modal. The Connector can work with both configurations.
Signals Notebook Dialog Modal Requires HTTPSFor the Connector to work properly within a Signals Notebook modal, you must have the Connector configured to use HTTPS.
Require write access: This will restrict access to the given external action to people who have write access to the requesting entity.
When finished, click the Create External Action button.
Documentation Feedback
Do you have questions about our documentation or suggestions for how we can improve it? Start a discussion in TetraConnect Hub. For access, see Access the TetraConnect Hub.
NOTEFeedback isn't part of the official TetraScience product documentation. TetraScience doesn't warrant or make any guarantees about the feedback provided, including its accuracy, relevance, or reliability. All feedback is subject to the terms set forth in the TetraConnect Hub Community Guidelines.
Updated 2 months ago