Tetra Empower Agent Installation Guide (Version 5.2.x)
Agent and IDS/Protocol/Task Script CompatibilityThis release of the Tetra Empower Agent has changes that impact the Tetra Empower intermediate data schemas (IDS) and their parsers. Using this version of the Tetra Empower Agent with an incompatible or older version of the protocol and IDS will break your pipelines.
Please make sure that you have the compatible versions of the Tetra Empower IDS parsers and update the pipelines and processes to use the new protocols and IDS, so that pipelines continue to work as expected. For more information about the compatible IDS, protocol, and task script versions, see the Tetra Empower v5.x.x release notes
This page describes how a system administrator can install the Tetra Empower Agent and verify the system integration.
Before you can run the Tetra Empower Agent, you must do the following:
- Create a Tetra Empower Agent in the Tetra Data Platform (TDP)
- Set up the data connection
- Make sure that you have the required hardware, software, and user account credentials
For more information about all of the features and configuration options for the Tetra Empower Agent, see the Tetra Empower Agent User Manual (Version 5.2.x).
NOTETo restrict access to the local Tetra Agent Management Console, you can edit the Agent’s installation folder’s permissions to grant least privilege access. For more information, see Restrict Access to Agent Installation.
Set Up the Data Connection
The Tetra Empower Agent generates RAW JSON files that are uploaded to the TDP either directly or through a Data Connector. Before you install the Tetra Empower Agent, you must set up the agent's data connection to the TDP by using one of the following methods:
-
On-Premises—requires the use of a Tetra Hub.
-or-
-
TDP (No Connector)—allows the Agent to upload source data directly to the TDP or Amazon Simple Storage Service (Amazon S3).
For more information about each data connection option, see see Agent Deployment Options.
Hardware and Software Requirements
IMPORTANTFor the Tetra Empower Agent to automatically detect injection changes in an Empower project, the project must have Full Audit Trail enabled. This feature can only be activated when you first create an Empower project. If a project doesn't have Full Audit Trail enabled, the Agent can only process new injections, but not changes to any existing injections. For more information, see the Empower Software Audit Trails and Logs White Paper.
To install and run Tetra Empower Agent v5.2.x, the following hardware and software versions are required:
- One of the following Microsoft Windows versions:
- Windows 10 Enterprise or Professional, 64-bit
- Windows Server 2016 Standard or 2019 Standard
- .NET Framework 4.8
- 16 GB RAM at minimum (64 GB RAM is recommended)
- 8 Core CPU
- Minimum 150 GB of free disk space
- Empower 3 Service Release 2 (SR2) or higher Client Software (English Edition)
- For active Empower projects that you want the Agent to automatically detect changes in, make sure that you enable the Full Audit Trail feature in Empower when you first create the project
- If installing Empower software on an English-language computer, make sure that you confirm that the Windows region settings are configured for English (United States). The symbols for English (United States) use decimal formatting, not comma formatting, which is important when displaying numeric values (
12.56, not12,56).
NOTEFor files produced by Empower, the limit is approximately 2.5 GB for a RAW JSON file.
Empower 3 Client SoftwareYou must install the Tetra Empower Agent at the same workstation where the Empower 3 Client Software is running. The Tetra Empower Agent is compatible with Empower 3 Service Release 2 (SR2) or higher. If the Empower 3 Client version is earlier than SR2, then you must upgrade the Empower 3 Client software. For detailed system requirements, see the Client Software section in the Empower 3 System Administrator Guide.
User Account Credentials
To run the Tetra Empower Agent, you need the following valid user account credentials:
- Empower DB User account provides access to the Empower database through the Empower Toolkit.
- Empower Oracle TNS Names details provides access to the Empower database through the Empower client (the required information can typically be found in the
<Oracle Client Install folder>\\network\\admin\\tnsnames.orafile in the Oracle folder of the Empower client machine). - Group User account runs the Tetra Empower Agent and accesses the Empower file server.
Projects available for extraction from the Tetra Empower Agent depend on the access permissions of the EmpowerDB User account. The Oracle Transparent Network Substrate (TNS) Names' details are used to extract the date fields in a consistent ISO format.
You must ensure that the Group User account that runs the Tetra Empower Agent is part of the Empower User Group in the Active Directory Organization Unit, and has the same privileges as the standard Empower User which requires a read-only permission to access the Empower Raw data on the Empower File System. Furthermore, this account needs to have the following privileges from Empower and Windows.
- The Group User account should have the permission of Empower View Audit Trail to detect the Injection changes.
- The Group User account should have Windows Log on as a service permission to run the Agent as Windows Services program.
- Always verify the date time and decimal format settings of the Group User’s Windows Profile to ensure they match the settings from the current login user configuring the Empower Agent.
Notes for upgradeIf trying to upgrade the Empower Agent from the previous version, please ALWAYS backup Agent’s Sqlite database before proceeding.
The database is located in
<existing_empower_agent_installation>\db\applicationdb.sqlite
Install the Tetra Empower Agent
The Tetra Empower Agent includes an installation package. For download instructions, please contact your Customer Success Manager (CSM).
After you move the downloaded files to a local folder, run the following command to install the software: TetraScience.Agent.Empower.v5.2\_.x\_\_.msi
The following is the default installation folder location:
C:\TetraScience\TetraScience.Agent.Empower.v5.2.0\
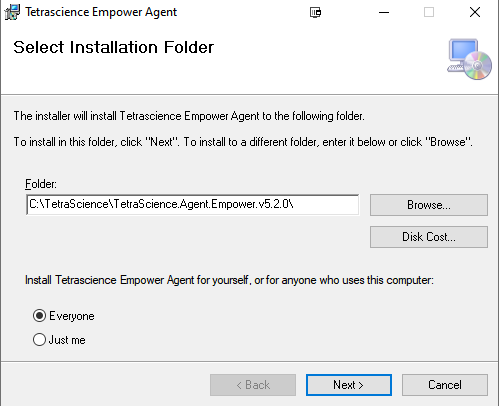
TetraScience Empower Agent Installer (Select Installation Folder)
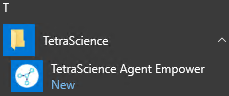
After the Tetra Empower Agent is installed, the TetraScience Agent Empower shortcut is added to the Windows All Program Group menu.
NOTETo initialize the Tetra Empower Agent, you must add the configuration settings.
Verify Tetra Empower Agent Installation
Confirm that the Tetra Empower Agent was installed on the local drive by verifying the following:
- The TetraScience Empower Agent is installed under the
C:\\TetraSciencedirectory by default. - Under the TetraScience folder, TetraScience.Agent.Empower.v5.2.x appears.
- The following subfolders appear under the TetraScience.Agent.Empower.v5.2.x folder:
- bin
- bin64
- db
- logs
- The TetraScience folder is added to the Windows Start Menu, which includes the TetraScience Agent Empower application.
NOTETo launch the TetraScience Empower Agent Management Console, select the TetraScience Agent Empower link in the Windows Start Menu.
Verify the Tetra Empower Agent Connection Setup
To verify that the Agent can connect to Waters Empower and the TDP, do the following.
Verify the Connection to Waters Empower
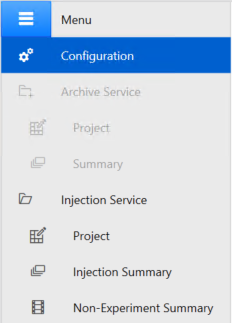
- Open the Tetra Empower Agent Management Console. Then, in the left navigation pane, under Menu, choose Configuration.
- Enter the Waters Empower Database Account in the Database Name field.
- Enter the Waters Empower User Account in the User Name field.
- Enter the Waters Empower User password in the Password field.
- Enter the Waters Empower Database Oracle Host Name in the Oracle Host Name field (you can get this information from
tnsnames.orafile). - Enter the Waters Empower Database Oracle Service Name in the Service Name field (you can get this information from
tnsnames.orafile). - Enter the Waters Empower Database Oracle Port in the Port field (you can get this information from
tnsnames.orafile). - Select Test Connection. Then, do one of the following based on if the connection test is successful or not:
- If the connection was successful, a dialog appears. Select OK to confirm the connection to the Empower system.
-or- - If the connection was not successful, then check the database account name/Empower user account credentials or the Oracle host name/service name/port. Then, repeat the steps to verify the connection.
- If the connection was successful, a dialog appears. Select OK to confirm the connection to the Empower system.

Verified Empower DB Connection
Verify the Empower Group Account
- Open Tetra Empower Agent Management Console. Then, in the left navigation pane, under Menu, choose Configuration.
- Enter the Waters Empower User Group Account in the User Name field. This is an active directory authenticated user account.
- Enter the password for the user in the Password field. This is an active directory authenticated user account.
After you move the cursor, the Tetra Empower Agent validates the account immediately.

Verified Empower Group User
Verify Connector settings
- Set up a Tetra Hub or use a direct connection to the TDP (no connector). For more information, see Agent Deployment Options.
- From the Tetra Empower Agent Management Console, in the left navigation pane, under Menu, choose Configuration.
- Select S3 Direct Upload toggle value. The default value is Yes.
- Select Receive Commands toggle value. The default value is No.
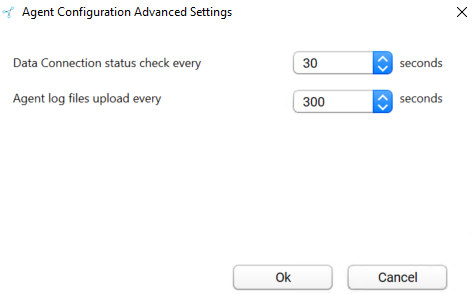
- (Optional) To reset the default settings for data connection status checks and agent log file uploads, select Advanced Settings The Agent Configuration Advanced Settings dialog appears, which includes the following settings:
- The Data Connection status check every setting has a default value of 30 seconds.
- The Agent log files upload every setting has a default value of 300 seconds.
- To keep the recommended settings, or to save the new values you entered, choose OK. Only consider changing these values if connection checks (heartbeat) frequency needs to be changed, or if logs files are needed to be uploaded to the TDP at a different frequency.
- Enter the Agent ID (created in the TDP) in the Agent Id field.
- For the Connection Url field, enter the complete URL of the Tetra Hub, Generic Data Connector (GDC) attached to a Data Hub, or No Connector, based on your connection type.
- (Optional if you select no connector) Enter the Org Slug and JSON Web Token (JWT) in the Org Slug field and Authorization field, respectively.
- (Optional Destination Id) When the Destination Id is entered, the Agent uploads the files to the platform using the Destination Id instead of the Agent Id. Agents sharing the same Destination Id will upload files to the same data lake location defined using the Destination Id instead of Agent Id, allowing files from multiple agents to be uploaded to the same S3 location.
- Verify Enable Injection Service is set to Yes and Enable Archive Service is set to No.
After you enter the information, the Tetra Empower Agent immediately validates the connection status.
After you enter the information, the Tetra Empower Agent immediately validates the connection status.
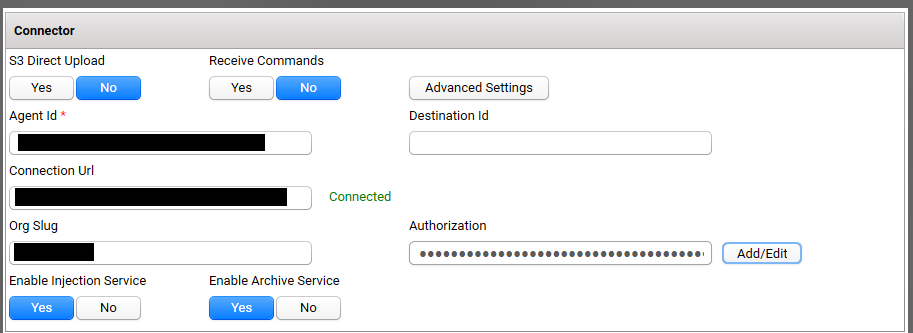
Verified Connector status
Verify Injection Configuration Settings
- In the Agent Run Time section of the Injection portion of the Configuration page, verify Upload Raw File to TDP is set to Yes.
- For the Empower Agent Output Folder field, select a folder in the local file system where the Empower Group User (if configured) or local system user has write access.

Agent Run Time settings
Injection ConfigurationFor the rest of the configuration settings in the Injection section, keep the default values. If any particular setting needs to be updated, see Tetra Empower Agent User Manual (Version 5.2.x) for details.
Save Configuration and Start the AgentAfter all of the configurations are verified, remember to Save and Start the agent.
Verify that the Tetra Empower Agent Can Retrieve Empower Data
When the Tetra Empower Agent is running, you can validate the detection, generation, and upload of the Tetra Empower Agent RAW JSON file by doing the following:
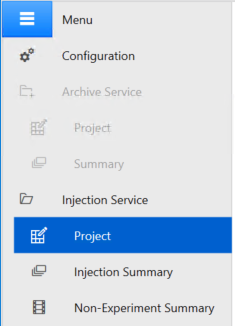
- Open the Tetra Empower Agent Management Console. Then, under Menu in the left navigation pane, select Injection Service and choose Project.
- Choose Refresh to retrieve the most recent list of Empower projects.
- From the Project list, select a test project (for example, Demo).
- Select the 3D MS Method option for the selected project. The default setting is Get3D. You can also select None or GetSpectra. To understand how this impacts the injection generation, see Tetra Empower Agent User Manual (Version 5.2.x).
- Choose Save.

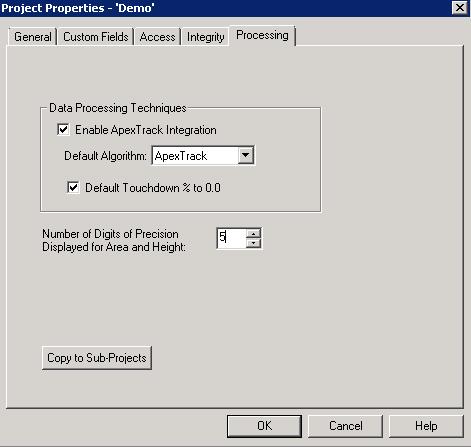
Notes for Peak Amount and Peak Height data precisionPlease verify the setting of Number of Digits of Precision for Area and Height in Processing tab from Empower Project Properties.
The Agent will output the values with the specified precision.
Verify Processing Status
- From the Tetra Empower Agent Management Console, navigate to the Injection Summary tab, and review the Tetra Empower Agent status.
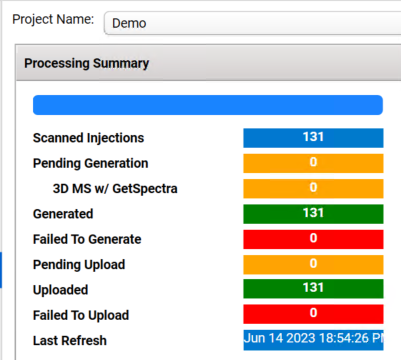
- After the Agent completes its routine scan and generates the RAW file, you can validate these tasks listed in the Processing Summary section:
- Scanned Injections: Number of injections the Agent detected for the Demo project
- Generated RAW File: Number of injections the Agent retrieved for the Demo project
- Uploaded: Number of injections the Agent uploaded to the Tetra Data Platform
The count for each step listed in the Processing Summary section should match the total injection count in the Waters Empower client.
Verify That the Generated RAW Files Are Uploaded to the TDP
- Sign in to the TDP.
- From the Search File page, check the RAW files of project Demo in the search result.
- Verify that the total number of RAW files from project Demo equals 131.

Daily Agent Run ScheduleAfter you complete the initial installation and configuration, you can use a Windows task script to restart the Tetra Empower Agent (for example, you can set it to run at 1:00 a.m.) and make sure that it runs constantly.
Updated 2 months ago