Create, Configure, and Update Pluggable Connectors
You can use the Connectors page in the Tetra Data Platform (TDP) to do any of the following:
- Create a Pluggable Connector
- Configure a Pluggable Connector
- Review and edit a Pluggable Connector’s information
- Monitor a Pluggable Connector’s metrics
- Manage self-signed and private SSL/TLS certificates
You can also use the Organization Settings page to manage self-signed and private SSL/TLS Certificates for Pluggable Connectors.
For information about the different Connectors that TetraScience supports, or how to manage Legacy Connectors, see Tetra Connectors.
Access the Connectors Page
To open the Connectors page, do the following:
- Sign in to the TDP. Then, in the left navigation menu, choose Data Sources.
- Choose Connectors. The Connectors page appears and displays a list of your Connectors.
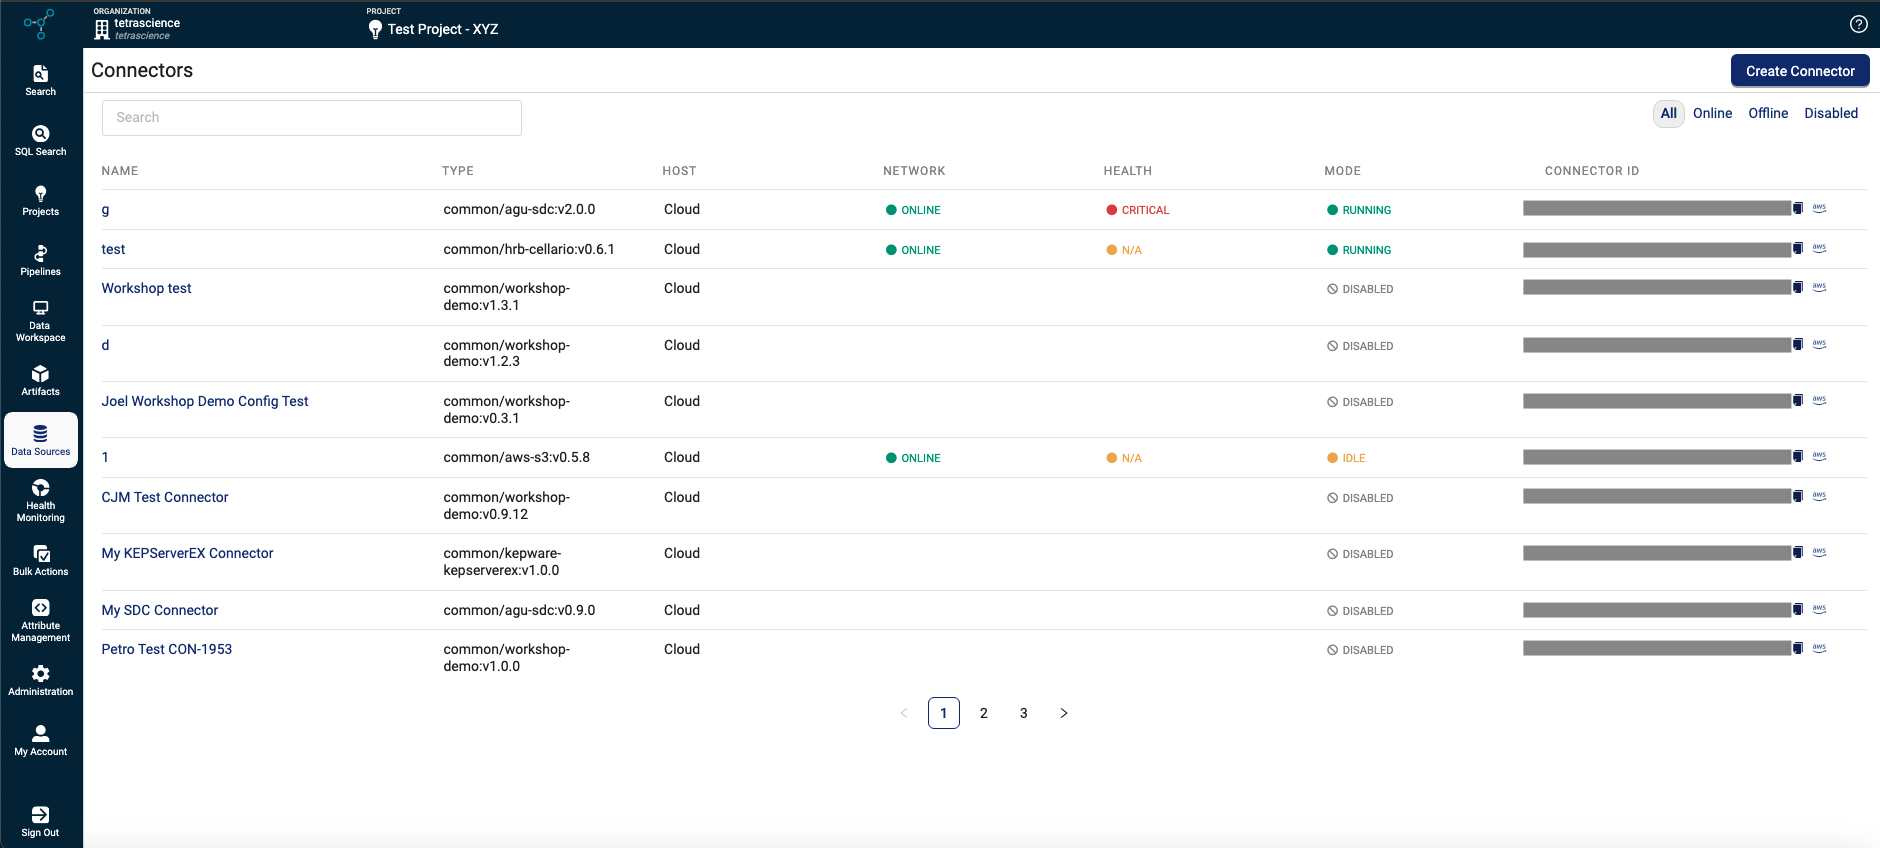
Information Available on the Connectors Page
The following table shows the details that are available on the Connectors page.
| Field | Description |
|---|---|
| NAME | Connector name |
| TYPE | Connector version |
| HOST | Deployment type: Either Hub or Cloud |
| NETWORK | Indicates whether the Connector is ONLINE or OFFLINE |
| HEALTH | Indicates whether the Connector is in a HEALTHY, UNHEALTHY, or CRITICAL state.
|
| MODE | Indicates whether the Connector is in RUNNING mode or IDLE mode |
| CONNECTOR ID | Connector ID |
| Search Text Box | Allows you to search for specific Connectors by name |
| Connector Type Filters | Allows you to see all results (All), or to view only Online, Offline, or Disabled Connectors |
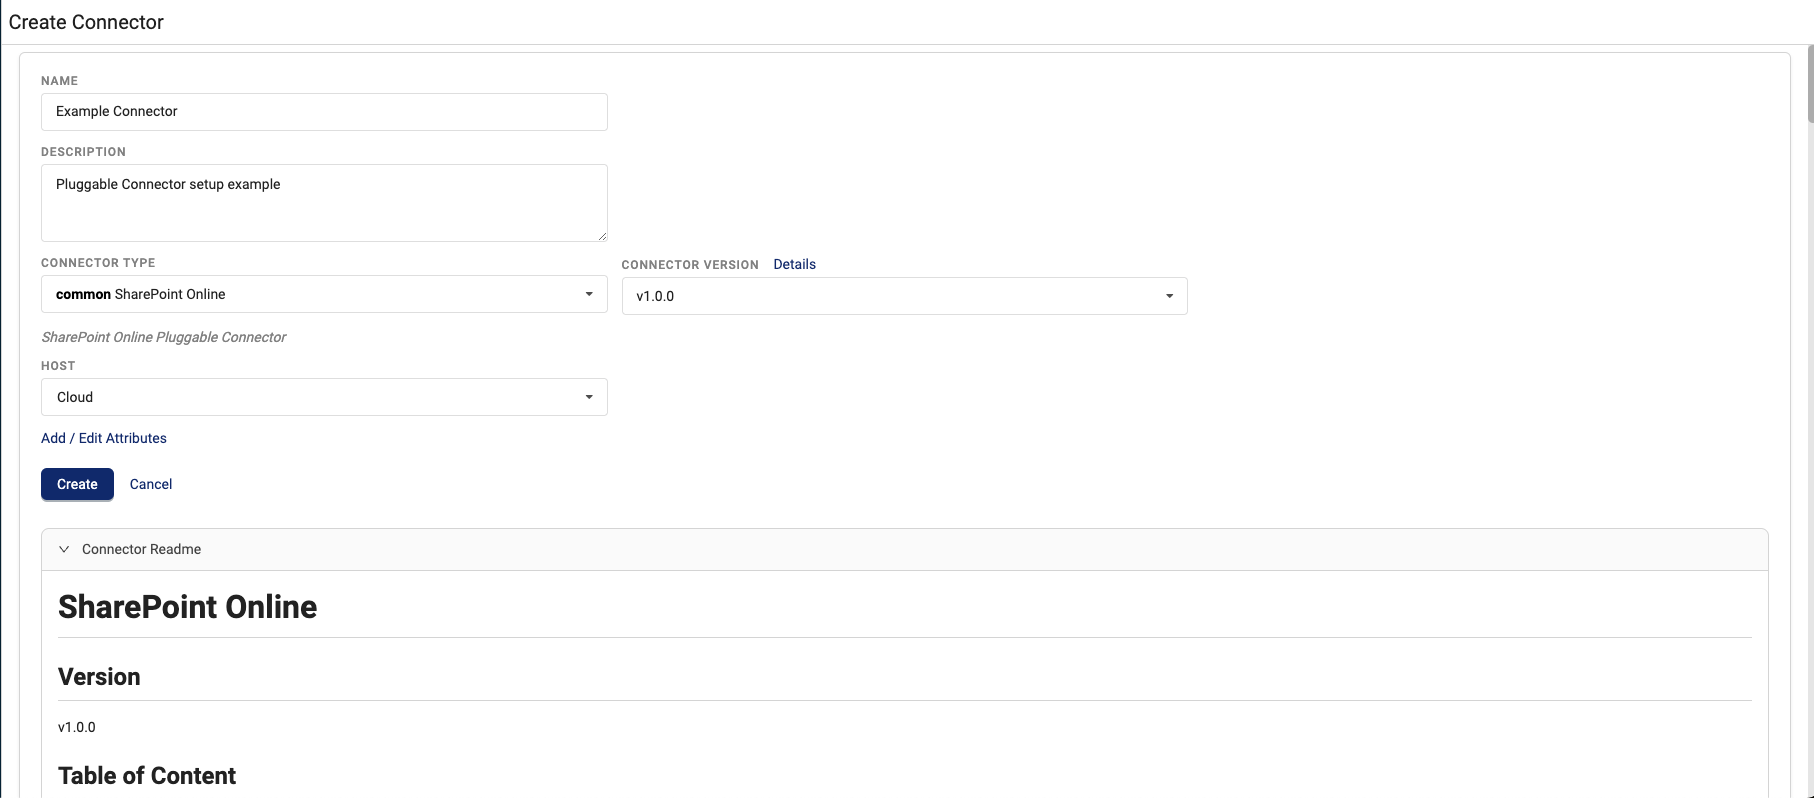
Create a Pluggable Connector
To create a new Pluggable Connector, do the following:
NOTEYou can also create your own custom Pluggable Connectors by building self-service Connectors.
- Open the Connectors page. Then, choose the Create Connector button. The Create Connector page appears.
-
On the Create Connector page, enter the following information:
-
For NAME, enter the Connector’s name.
-
(Optional) For DESCRIPTION, enter a description of the Connector.
-
For HOST, select the deployment mode (Cloud or Hub) from the drop-down list. For more information about hosting options, see Connector Deployment Options.
NOTEIf you select Cloud, a cloud-based instance running the Connector is deployed. If you select Hub for the deployment mode, a Connector container is deployed in the selected Tetra Hub. On-premises Standalone deployments that you can install on any host server that can run Docker containers are also available on request. To deploy a standalone Connector, contact your customer success manager (CSM) or account executive. For more information, see the Standalone Connector Installation and Upgrade Guide in the TetraConnect Hub. For access, see Access the TetraConnect Hub.
-
For CONNECTOR TYPE, select a Connector type from the drop-down list.
-
For CONNECTOR VERSION, select the latest version available.
-
(Optional) Select Add / Edit Attributes to add labels.
-
-
Choose Create. After a few seconds, the Connector instance is created and appears online.
NOTEAfter the Connector is created, the initial MODE status is set to IDLE by default. To activate the Connector, you must configure its settings. For instructions, see the Configure a Pluggable Connector section.
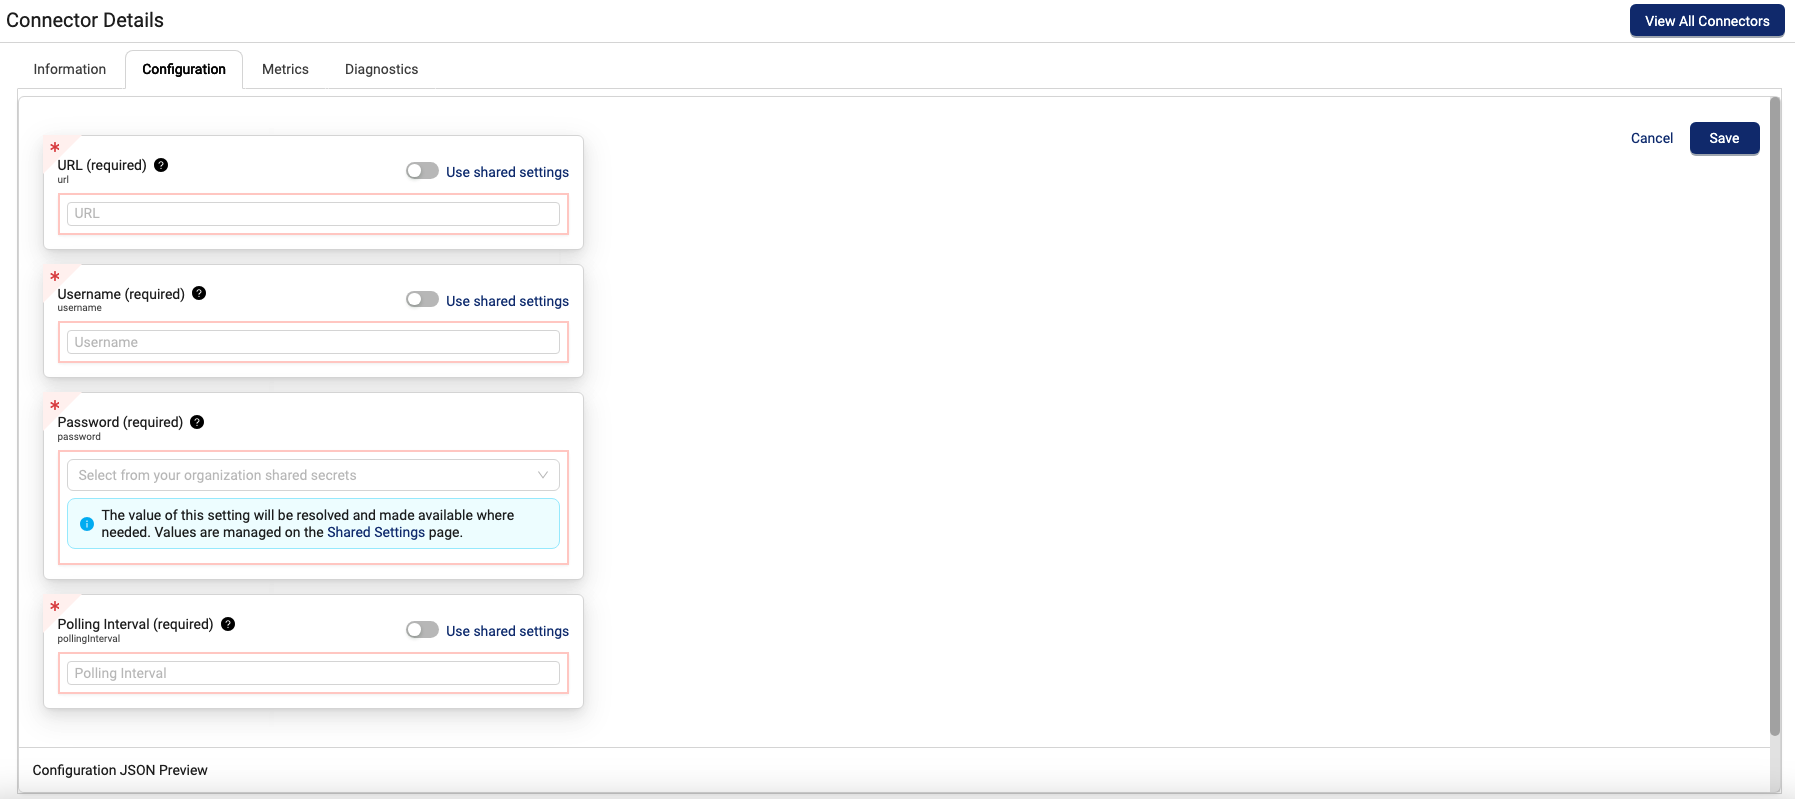
Configure a Pluggable Connector
To configure a Connector's settings, do the following:
- Open the Connectors page. Then, select the name of the Connector that you want to configure. The Connector Details page appears for the Connector that you selected.
- Select the Configuration tab and configure the required settings.
NOTEThe configuration parameters for each Connector are different. For more information about how to configure a specific Connector type, see Tetra Connectors.
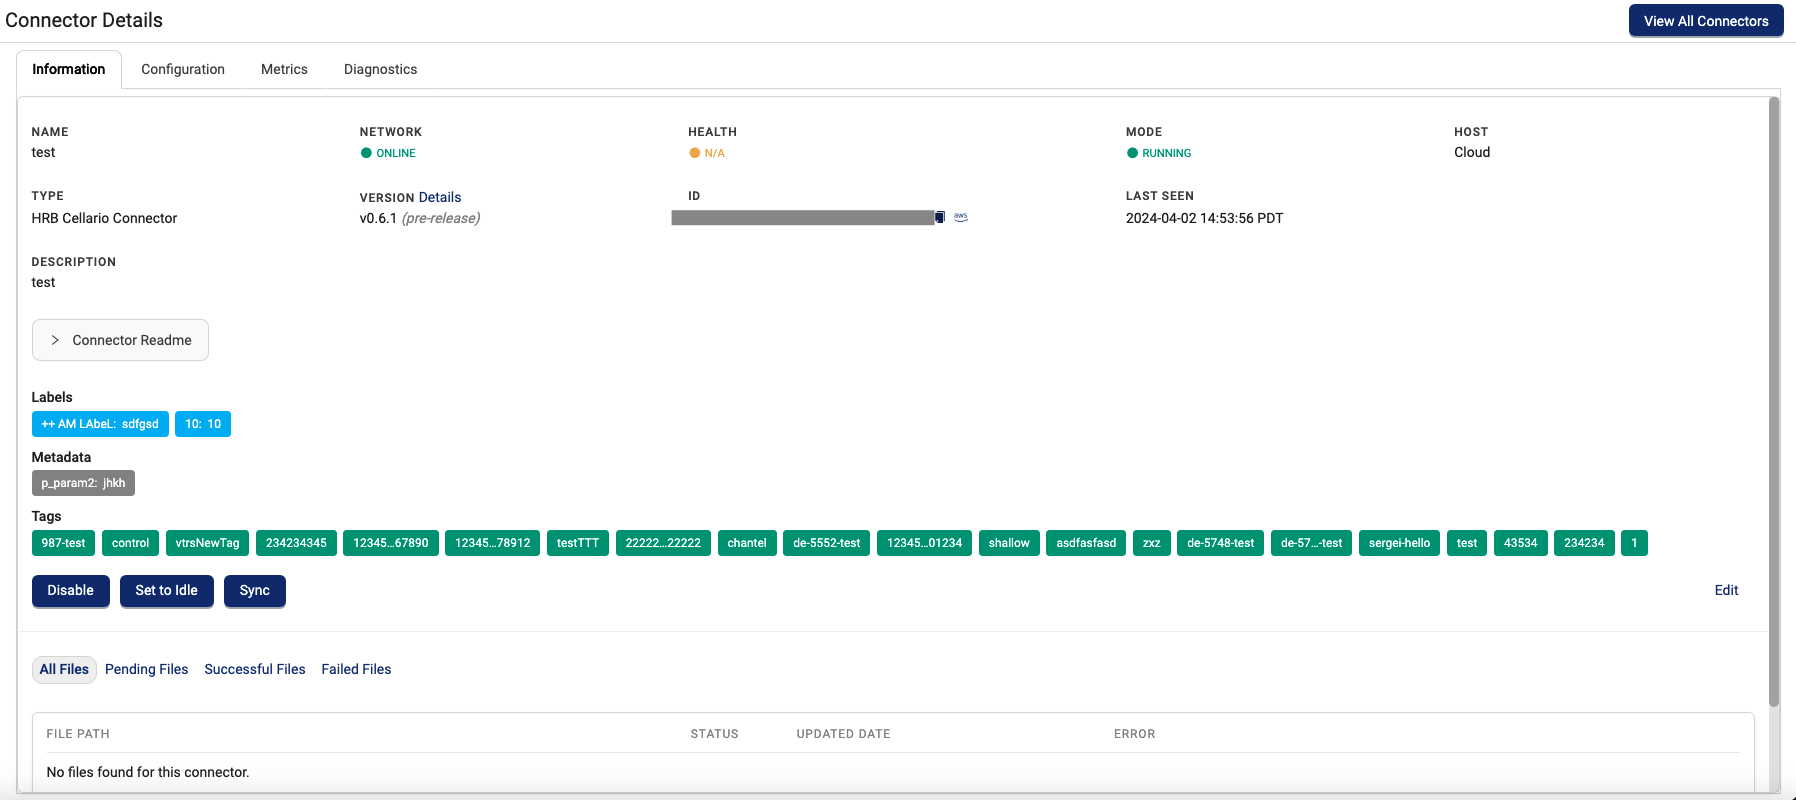
Review and Edit a Pluggable Connector’s Information
Each Connector has a Connector Details page that provides information about the connector, and that allows you to edit that information.
To access the Connector Details page for a specific Connector, do the following:
- Open the Connectors page. Then, select the name of the Connector that you want to review or edit. The Connector Details page appears for the Connector that you selected.
- Select the Information tab to display information about the Connector, including the files it has pending, successfully uploaded, or failed.
| Field | Description |
|---|---|
| CONNECTION | - ENABLED - DISABLED**Note:** When the connection is disabled, no container is running for the Connector. |
| NAME | Name of the Connector |
| NETWORK | - ONLINE: Container is created and can be reached by the TDP. - OFFLINE: Container can't be reached by the TDP. |
| HEALTH | - HEALTHY: Everything is fine, Connector doesn’t see any issues. - WARNING: There is some issue but it’s not critical. - CRITICAL: Critical issue that prevents Connector from running. Connector cannot upload data or execute some commands even in case its operational status is running. - N/A: The Connector doesn’t have a health status yet. This generally indicates that a Connector was created but has not been configured. |
| MODE | - IDLE: Connector is enabled, but should not be uploading data. The Connector may accept and execute commands. When the Connector is first created, its MODE status is IDLE by default. - RUNNING: Connector is enabled, should be running and uploading data. The Connector may accept and execute commands. - DISABLED: Connector container is shut down. |
| HOST | - Cloud: Connector was deployed as a standalone server in the Cloud - Hub: Displays the Hub Name as a link to the hub’s details page. |
| CONNECTOR ID | The Connector’s ID. |
| TYPE | The Connector type. |
| VERSION | The Connector’s version. |
| LAST SEEN | The last NETWORK check. |
| DESCRIPTION | The user-defined Connector’s description. |
| OTHER PAGES | Contains any additional functionality that's available for the Connector. |
Edit a Pluggable Connector's Information
To edit a Connector’s information, do the following:
- Open the Connectors page.
- Select the Connector that you want to edit. The Connector Details page appears.
- On the Information tab, select the Edit button. The Edit Connector Information page appears.
Connector Information That You Can Edit
The following table shows the Connector information that can be edited after a Connector is created.
| Field | Description |
|---|---|
| NAME | Connector’s name |
| DESCRIPTION | Connector’s description |
| CONNECTOR VERSION | Connector version
|
| Add / Edit Attributes | Select this option to add or edit labels, metadata, and tags associated with the Connector. |
Change a Pluggable Connector's Status
To change a Connector’s status, do the following:
- Open the Edit Connector Information page for the Connector that you want to update.
- Select one of the following buttons to change the Connector’s status (the options available depend on the current status):
- To activate a Connector, choose Set to Running.
- To turn off a Connector, choose Disable.
- To make a Connector idle, choose Set to Idle.
Sync a Pluggable Connector
The Sync button on the Connector Details page restarts a Pluggable Connector and pulls the latest configuration information from the integrated source system. Some Connectors must be synced to receive configuration updates from their source systems. The documentation for each Connector indicates if syncing is needed or not.
To sync a Connector, do the following:
- Open the Connector Details page for the Connector that you want to sync.
- On the Information tab, select the Sync button.
Change a Pluggable Connector's Host
To change a Connector's host to either another Tetra Hub or the cloud, do the following:
- Open the Edit Connector Information page for the Connector that you want to move to another host.
- Choose Edit.
- For HUB OR CLOUD, select either Hub or Cloud from the drop-down list. If you're changing Hubs, make sure that you also select the specific Hub that you want to move the Connector to from the HUB drop-down list that appears.
- Choose Save. The Connector shuts down on its existing host and starts again on the new host automatically after a few minutes.
IMPORTANTThe new host must meet all of the Connector's networking requirements for the Connector to continue working.
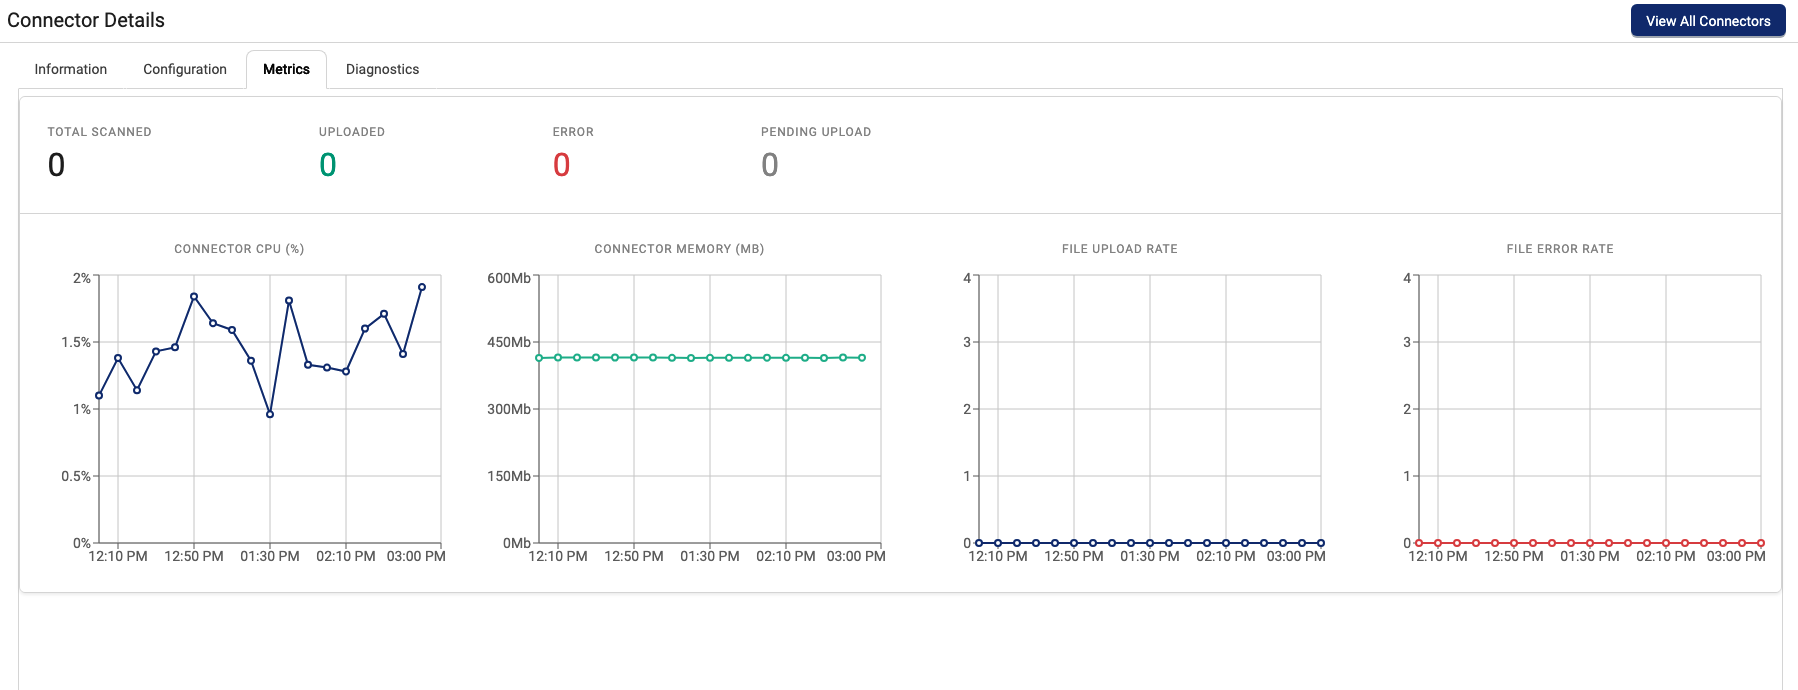
Monitor a Pluggable Connector's Metrics
After a Connector instance is created and running, you can monitor the Connector’s metrics by selecting the Metrics tab on the Connector Details page. The Metrics tab displays the Connector's container metrics as well as aggregated states on total files scanned and uploaded as well as files that returned errors or are pending.
Manage Self-Signed and Private SSL/TLS Certificates for Pluggable Connectors
Tetra Connectors sometimes need to trust self-signed or private Secure Sockets Layer/Transport Layer Security (SSL/TLS) certificates used by local systems. Pluggable Connectors provide the ability to upload and manage self-signed or private SSL/TLS certificates in the Tetra Data Platform (TDP).
NOTELegacy Connectors don’t use certificate verification. For more information about the different Connector types, see Tetra Connectors.
Upload Self-Signed and Private SSL/TLS Certificates
To upload a self-signed or private SSL/TLS certificate to the TDP for a Pluggable Connector, do the following:
- Open the Organization Settings page.
- Select the Certificates tab. Then, select the upper right Upload Certificate button. The Upload Certificate dialog appears.
- For CERTIFICATE NAME, enter a name for your certificate. Then, select a certificate file or drag and drop one into the Upload Certificate dialog.
- Choose Add. The certificate appears on the Certificates tab view.
NOTEExisting Connectors won’t pick up new certificates or stop using old certificates until the Connector is restarted. SSL/TLS certificates have an expiration date, after which they’re no longer valid. Users can't upload expired certificates. If a certificate is expired, the TDP rejects it.
Manage Self-Signed and Private SSL/TLS Certificates
To deactivate, rename, download, or delete a self-signed or private SSL/TLS certificate from the TDP for a Pluggable Connector, do the following:
- Open the Organization Settings page.
- Select the Certificates tab.
- In the list of certificates, find the certificate that you want to manage or download. Then, in that certificate’s row, select the far right hamburger menu icon. A drop-down menu appears that provides the following options:
- Disable
- Rename
- Download
- Delete
- Select an action from the menu.
Documentation Feedback
Do you have questions about our documentation or suggestions for how we can improve it? Start a discussion in TetraConnect Hub. For access, see Access the TetraConnect Hub.
NOTEFeedback isn't part of the official TetraScience product documentation. TetraScience doesn't warrant or make any guarantees about the feedback provided, including its accuracy, relevance, or reliability. All feedback is subject to the terms set forth in the TetraConnect Hub Community Guidelines.
Updated 2 months ago