Tetra Chromeleon Agent Installation Guide (v2.2.x)
This guide shows how a system administrator can install Tetra Chromeleon Agent versions 2.2.x.
To configure and use the Agent after it's installed, see the Tetra Chromeleon Agent User Manual (v2.2.x).
UpgradesTo upgrade an Agent from a previous version, see Upgrade an Agent.
Overview
To install and run the Tetra Chromeleon Agent, do the following:
- Verify the prerequisites.
- Create an Agent and select a data connection type.
- Install the Tetra Chromeleon Agent.
- Verify the Installation.
- Verify Agent configuration settings.
For instructions, see the procedures in each of the following sections.
Step 1: Verify the Prerequisites
Hardware and Software Requirements
To install and run Tetra Chromeleon Agent v2.x, the following hardware and software are required:
- One of the following Microsoft Windows versions:
- Microsoft Windows 10 Enterprise and Microsoft Windows 10 Pro, 64-bit editions
- Microsoft Windows Server 2016
- Microsoft Windows Server 2019
- Microsoft Windows Server 2022
- Enabled Long path support
- .NET Framework 4.8
- 16 GB RAM minimum (64 GB RAM is recommended)
- 8 Core CPU
- 150 GB of free disk space minimum
- One of the supported Chromeleon software versions.
User Account Credentials
To run Tetra Chromeleon Agent v2.2.x, you must have the following valid user account credentials.
Chromeleon User Account
NOTEChromeleon User Account credentials are needed only if User Mode is activated in your Chromeleon software. When User Mode is enabled, a logon is required to open Chromeleon. For more information, see Enable and configure user management in the Chromeleon documentation.
If User Mode is activated in your Chromeleon software, a valid Chromeleon User Name, Password, and Role must be entered in the Agent Management Console's Service Settings.
To access Chromeleon, the specified Chromeleon User Role must meet the following requirements.
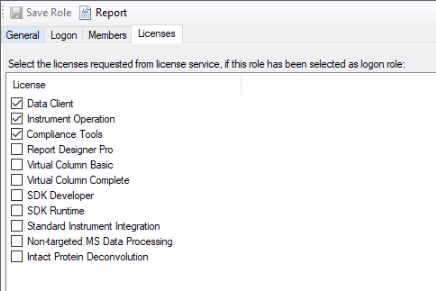
License Requirements
The User Role requires the following licenses:
- Data Client allows the Agent to access Data Vaults, sequences, and injections in Chromeleon.
- Compliance Tools allows the Agent to access Chromeleon if the Data Vaults are version-enabled.
- Instrument Operation allows the Agent to send eWorkflowCreation Commands to Chromeleon.
Privileges Requirements
The User Role requires at least the following privileges for the following Agent functionalities:
NOTEMore privileges could be required for specific use cases.
-
Injection Service: No additional privileges are required. Please review the Access Control section to verify that the Agent has access to the Data Vaults and folders.
-
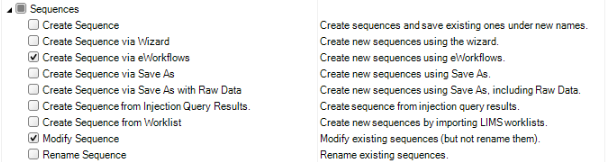
- For Sequences:
- Create Sequence via eWorkflows
- Modify Sequence
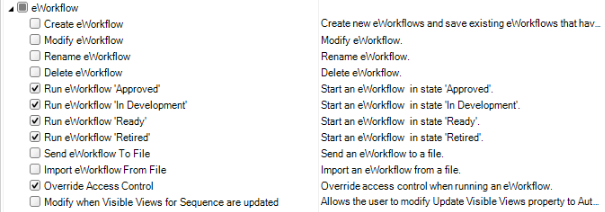
- For eWorkflow:
- Run eWorkflow 'Approved'
- Run eWorkflow 'In Development'
- Run eWorkflow 'Ready'
- Run eWorkflow 'Retired'
- Override Access Control
- For Sequences:
-
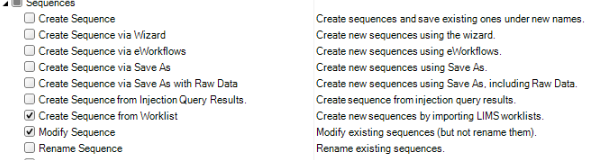
- For Sequences:
- Create Sequence from Worklist
- Modify Sequence
-
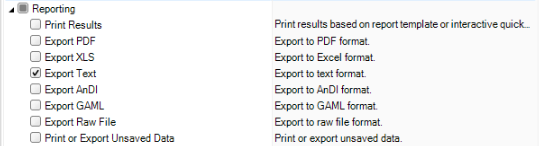
Report Service:
- For Electronic Report:
- Export Electronic Report
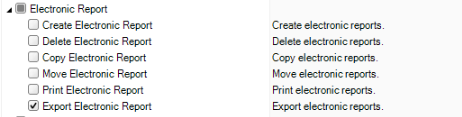
- If you're going to output a Text-based Report Template, the User Role must also have the Reporting > Export Text privilege granted.
- For Electronic Report:
Access Control
IMPORTANTIf User Mode is not enabled, make sure that you clear any User or User Group from the Access Control tab in Chromeleon.
Keep in mind the following:
- If User Mode is deactivated, you can't select specific folders to generate. All visible folders are generated.
- If the Agent attempts to scan a Data Vault or folder for which the Chromeleon User that the Agent is using has no access, an error is displayed in the Agent Management Console.
The Chromeleon Agent can ingest injections from Data Vaults or folders that are allowed access to the Chromeleon User that's configured in the Agent only. A Chromeleon User is allowed or denied access to a Chromeleon Data Vault or folder by using the Chromeleon Access Control feature.
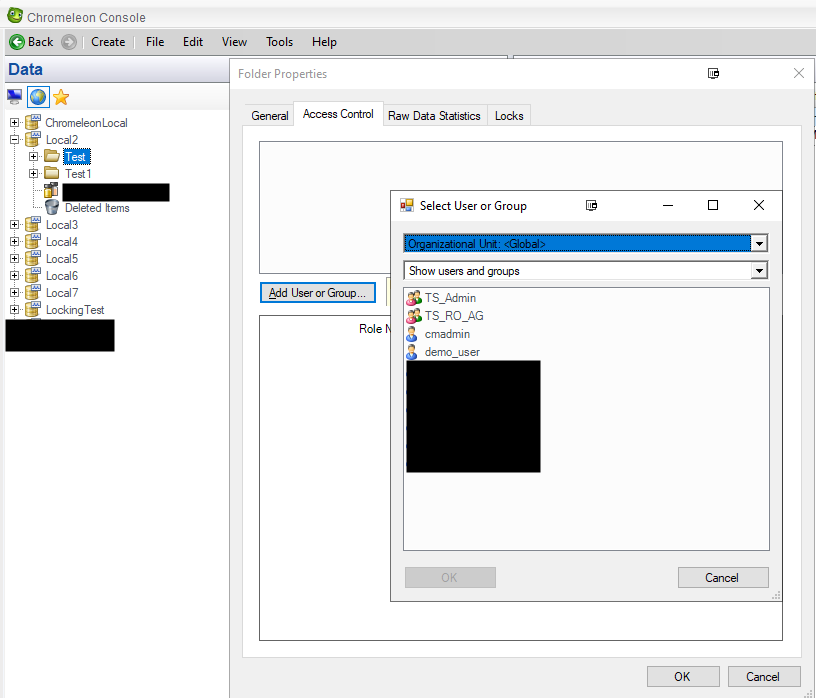
To open the Access Control feature in Chromeleon, do the following:
- Open the Chromeleon Console.
- Right click on a Data Vault or folder that you want to provide access to.
- Select the Access Control tab. The Access Control tab appears and displays a list of users and groups.
There are two ways to configure a Chromeleon User to have access to a specific data vault or folder:
- If the list of users is empty, every user is allowed access.
-or- - If the list of users contains one or more entries, then every user must explicitly have an entry on the list to be allowed access. You can add users individually or by adding a group that the user is part of to the list.
Data Server and Data Vault Requirements
The machine hosting the Tetra Chromeleon Agent must have connectivity to your Chromeleon Data Servers and Data Vaults.
Step 2: Create an Agent and Select a Data Connection Type
To create a Tetra Chromeleon Agent in the TDP, follow the instructions in Create a New Agent. For AGENT TYPE, make sure that you select Chromeleon Agent.
When you create the Agent, you must also select a data connection type so that the Agent can communicate with the TDP.
Selecting a Data Connection Type
The Tetra Chromeleon Agent generates RAW JSON files that are uploaded to the TDP either directly or through a Data Connector. Before you install the Tetra Chromeleon Agent, you must set up the Agent's data connection to the TDP by using one of the following methods:
- TDP (No Connector): Connects Agents directly to the TDP and AWS APIs, or through a proxy that you configure in the Agent host server's settings. For instructions, see TDP (No Connector) Connections.
-or-- Tetra Hub: Uses an on-premises Tetra Hub to proxy connections to TDP and AWS APIs. For instructions, see Tetra Hub Connections.
For more information, see Agent Deployment Options.
Step 3: Install the Tetra Chromeleon Agent
TetraScience provides a Microsoft Installation Package (.msi) file to install the Tetra Chromeleon Agent on the host server.
To get the installation package and install the Agent, do the following:
IMPORTANTTo access the server and run the installation package, you must sign in as an Administrator.
- On a host server that runs a supported Chromeleon version, download the latest Chromeleon Agent installation package from the Tetra Agent & Connector Installers page in the TetraConnect Hub. For access, see Access the TetraConnect Hub.
- Move the downloaded files to a local folder.
- Run the installer by opening the installation package and follow the guided wizard to complete the installation.
Default Installation Folder Location
C:\Tetrascience\Tetrascience.Agent.Chromeleon.vx.x.x
NOTEYou can install the Agent to a new folder, other than the default one. However, you must make sure that the installation path doesn't include any spaces (for example,
C:\Program Files\TetraScience\...).
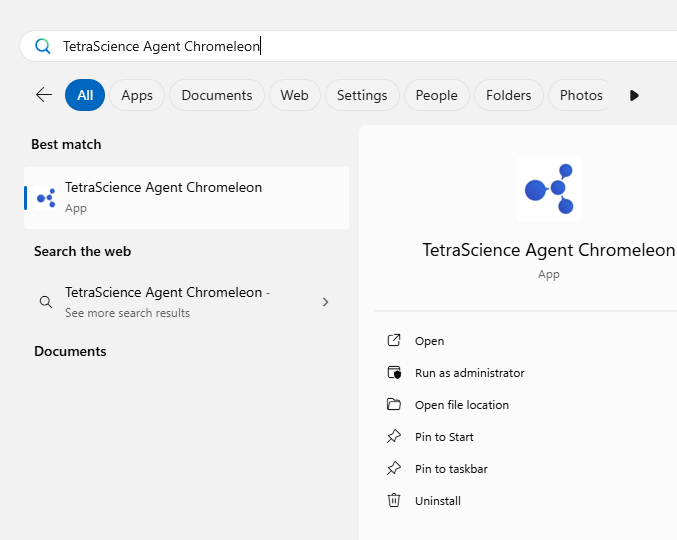
After the Agent is installed, the TetraScience Agent Chromeleon shortcut is added to the Windows All Program Group menu. To initialize the Tetra Chromeleon Agent, you must add the configuration settings.
NOTETo restrict access to the local Tetra Agent Management Console, you can edit the Agent’s installation folder’s permissions to grant least privilege access. For more information, see Restrict Access to Agent Installation.
Step 4: Verify the Installation
Confirm that the Tetra Chromeleon Agent was installed on the local drive by verifying the following:
- The TetraScience Chromeleon Agent is installed under the
C:\\TetraSciencedirectory by default. - Under the TetraScience folder,
TetraScience.Agent.Chromeleon.v2.2.xappears. - The following subfolders appear under the
TetraScience.Agent.Chromeleon.v2.2.xfolder:- bin
- bin64
- db
- logs
- The TetraScience folder is added to the Windows Start Menu, which includes the TetraScience Agent Chromeleon application.
NOTETo launch the TetraScience Chromeleon Agent Management Console, select the TetraScience Agent Chromeleon link in the Windows Start menu.
Step 5: Verify the Data Connection
To verify that the Agent can connect to the TDP and the Chromeleon Data Vault, do the following.
Verify Agent Configuration Settings
To verify that the Agent can communicate with the TDP, do the following:
- From the Tetra Chromeleon Agent Management Console, in the left navigation menu, under Menu, choose Configuration.
- Verify that the S3 Direct Upload toggle is set to active (the default setting). For more information, see S3 Direct Upload (Recommended).
- Verify that the Receive Commands toggle is set to active (the default setting). Activating this setting allows the Agent to receive commands from the TDP.
- (Optional) To reset the default settings for data connection status checks, Agent log file uploads, and proxy, select Advanced Settings. The Agent Configuration Advanced Settings dialog appears. In the dialog, you can edit the following settings:
- Data Connection status check every: Indicates how often the software checks the status of the connection (heartbeat) between the TDP and the Agent. If the TDP doesn't receive a heartbeat message for more than five minutes, the TDP assumes that the Agent is offline. The default value is
30seconds. - Agent log files upload every: Indicates how often the Agent uploads log files to the Data Lake. The default value is
300seconds. - Proxy Settings: Indicates what type of proxy the Agent is using (System or Custom), or if it's not using a proxy (None).
- System (default setting): Uses the system proxy specified in Windows for the service user. If basic authentication is required, you can specify a username and password for the proxy.
- Custom: Makes all of the Agent's proxy options configurable, regardless of any other settings. This proxy takes precedence over any existing system proxy or L7 proxy.
- None: Explicitly configures the Agent service to not use any proxies for web requests.
- Data Connection status check every: Indicates how often the software checks the status of the connection (heartbeat) between the TDP and the Agent. If the TDP doesn't receive a heartbeat message for more than five minutes, the TDP assumes that the Agent is offline. The default value is
NOTEIf a system proxy requires credentials, make sure that you enter them in the Proxy Username and Proxy Password fields.
- To keep the recommended settings, or to save the new values you entered, choose OK. Only consider changing these values if connection checks (heartbeat) frequency needs to be changed, or if log files need to be uploaded to the TDP at a different frequency.
-
For Agent Id, enter the Agent ID (you can find this on the Agents page in the TDP).
-
For the Connection Url field, enter the complete URL of the Tetra Hub, Generic Data Connector (GDC) attached to a Data Hub, or No Connector, based on your connection type.
-
(For “TDP (No Connector)” setups only) If you’re using an Agent without a Connector, make sure that you do the following:
- For Org Slug, enter your organizational slug. To get your organizational slug, see Viewing Organization Details. The organizational slug is required when using a JSON Web Token (JWT). Adding the slug to this field attaches it to the Agent’s API request headers.
- For Authorization, select Add/Edit. Then, enter your JWT in the dialog that appears. To get a JWT, see Generate a JWT for a Service User . Then, choose Save to encrypt and save the JWT. The Agent validates the connection immediately and displays the updated connection status next to the Connection Url field.
-
(Optional) To specify the Destination Id for allowing the files to be uploaded to the same Amazon S3 location from multiple agents. Destination Id is a UUID. This feature helps to split the load into multiple Agents for scaling horizontally.
-
(Optional) To configure additional Agent settings, choose Advanced Settings. The Agent Configuration Advanced Settings dialog appears and displays the following configuration options:
- Data Connection status check every: Indicates how often the software checks the status of the connection (heartbeat) between the TDP and the Agent. If the TDP doesn't receive a heartbeat message for more than five minutes, the TDP assumes that the Agent is offline. The default value is
30seconds. - File Upload Job runs every: Indicates how often the Agent uploads files to the Tetra Data Lake.
- Agent log files upload every: Indicates how often the Agent uploads log files to the Data Lake. The default value is
30seconds. - To keep the recommended settings, or to save the new values you entered, choose OK. Only consider changing these values if connection checks (heartbeat) frequency needs to be changed, or if log files need to be uploaded to the TDP at a different frequency.

- Data Connection status check every: Indicates how often the software checks the status of the connection (heartbeat) between the TDP and the Agent. If the TDP doesn't receive a heartbeat message for more than five minutes, the TDP assumes that the Agent is offline. The default value is
Verify Agent Group User
The Agent Group User is the Windows user that the Agent service runs as locally. It is recommended that you create a service user account specifically for the Tetra Chromeleon Agent.
To verify the Agent Group Account credentials, do the following:
- On the host server, open the Tetra Chromeleon Agent Management Console. Then, in the left navigation menu, under Menu, choose Configuration.
- For User Name, enter the Windows User Name where the Agent service is run locally.
- For Password, enter the user password.
After focus leaves the password field, the Tetra Chromeleon Agent validates the account immediately.

NOTEIf you're using a Windows local account, add
.\\at the front of the user name. For example, if the user name is Tetra, enter .\Tetra.
Verify Agent Common Service Settings
To confirm the Tetra Chromeleon Agent Service Settings, do the following:
- In the Agent Management Console, open the Configuration. Under Service Settings, select the Common Settings tab.
- (If User Mode is activated only) Enter values for *User Name, Password, and Role. Make sure that you enter the credentials of a Chromeleon local user or a Lightweight Directory Access Protocol (LDAP) authenticated user. This configuration allows the Agent to access Chromeleon through a specific user account. The credentials you enter must be for a valid Chromeleon user account. A busy indicator appears while the user account is being verified. The Chromeleon User must be verified before you can start the Agent.
IMPORTANTIf Chromeleon User Mode is activated, User Name, Password, and Role are required fields. The Agent validates the account before the Agent starts.
If Chromeleon User Mode is turned off, the User Name, Password, and Role fields are deactivated in the console.
- For Ignore Recycle Bin, check the box to skip the generation of any deleted sequences and injections in data vaults.
- For Decode Injection URL, check the box to escape URL encoding in the injections and/or report generation path created in Amazon S3.
IMPORTANTIf you're upgrading from a previous version of the Tetra Chromeleon Agent, selecting the Decode Injection URL option can result in new RAW JSON files for changed injections in the new Amazon S3 path. For more information, see What is the impact of changing the Decode Injection URL setting in Agent UI?.
- For Output Folder, enter the directory where you want the Agent to temporarily output RAW files. When the files are uploaded to TDP, the RAW files are deleted from this output folder.
- For Required Free Disk Space (GB), enter the minimum required free disk space required for the Agent to process an injection. The default setting is 10 GB.
- For Command Processing Interval (seconds), enter the frequency for processing commands from TDP if Receive Commands is enabled. The default setting is 25 seconds.
- For Sequence Scan Batch Size, enter the setting for the size of the batch for detecting new sequences or changes to sequences. The batch sizes that you choose need to balance the application’s footprint and overall throughput. The number can be adjusted based on the data type. Injections with 3D data fields will generate large RAW JSON files. The default setting is 10.
- For Process Timeout (Hours), enter the maximum time before timing out to prevent hanging in the scan process due to unhandled exceptions or unknown errors. The default is 3 Hours.
- For Max Parallel Update Existing Sequences Jobs, enter the setting for maximum parallel processes to scan and update changes to sequences previously detected and uploaded by the Agent. The default is 10.
- For Max Parallel Scan Sequences for Injections Jobs, enter the setting for maximum parallel processes to scan for new sequences generated in the Data Vault using the Chromeleon SDK. The default is 15.
- For Update Existing Sequences Job Delay (Seconds), enter the wait time between scans for changes in the existing sequences. If you do not suspect to have many changes or updates to already ingested Sequences, this delay can be set longer such that the scan happens less frequently. The default is 10 seconds.
- For Scan Sequences For Injections Job Delay (Seconds), enter the wait time between scans for new sequences in the Data Vault. If you want the Agent to scan less frequently, you can increase the delay. The default is 10 seconds.
- For Retry limit for Upload, enter the number of retry attempts for a file upload before it stops trying to reupload to TDP. The default is 40.
- Use the Set Performance Recommendations to preset defaults for these optimal settings based on your compute resources.
Verify Agent Report Generation Service Settings
To confirm the Tetra Chromeleon Agent Report Generation Service Settings, do the following:
- In the Agent Management Console, open the Configuration page. Under Service Settings, select the Report Generation Service tab.
- For Report Batch Size, enter the size of the batch for Report Generation. The batch sizes that you choose need to balance the application’s footprint and overall throughput. The default setting is 2.
- For Report Generation Max Parallel, enter the setting for maximum parallel processes to Generate Reports. The default is 5.
- For Report Generation Job Delay (Seconds), enter the wait time between when report generation. The default is 10 seconds.
- For Report Generation Max Retry Limit, enter the number of maximum retries before the Agent should fail to generate the report. The default is 40 attempts.
Verify Agent Injection Generation Service Settings
To confirm the Tetra Chromeleon Agent Injection Generation Service Settings, do the following:
- In the Agent Management Console, open the Configuration page. Under Service Settings, select the Injection Generation Service tab.
- For Injection Generation Batch Size, enter the size of the batch for Injection Generation. The batch sizes that you choose need to balance the application’s footprint and overall throughput. The default setting is 2.
- For Injection Generation Max Parallel, Enter the setting for maximum parallel processes to Generate Injections. The default is 10.
- For Injection Generation Job Delay (Seconds), enter the wait time between when injections are generated. The default is 10 seconds.
- For Max Retry Count: enter the number of maximum retries before the Agent should fail to generate an injection. The default is 2.
Save and Start the Agent
To save and start the Agent, do the following:
- In the Agent Management Console, select the Save button at the top of the page.
- Select the Start button.
- Verify that the Agent Status displays as Running.
Verify Data Vault
To confirm the correct Data Vault is configured to acquire data into the TDP, do the following:
- In the Agent Management Console, under Menu, select Data Vault.
- Verify the list of Servers and Data Vault URL. Enable the Data Vault URLs for the Agent to monitor.
- If the Server or URL is not populated, select Refresh and the list of available Servers, Data Vaults accessible by the User Name, Password, and Role specified in Agent Configuration will populate.
- Modify advanced settings per Data Vault using Edit Settings as needed.
- Choose Save to save changes made to your Data Vault configuration.
Next Steps
To configure and use the Agent after it's installed, see the Tetra Chromeleon Agent User Manual (v2.2.x).
NOTEWhen configuring the Agent, you can use a Windows task script to automatically restart the Tetra Chromeleon Agent each day at a specific time. This setup ensures that the Agent remains online without having to check it each day. For instructions, see Windows Scheduled Task Settings in the Tetra Chromeleon Agent User Manual (v2.2.x).
Documentation Feedback
Do you have questions about our documentation or suggestions for how we can improve it? Start a discussion in TetraConnect Hub. For access, see Access the TetraConnect Hub.
NOTEFeedback isn't part of the official TetraScience product documentation. TetraScience doesn't warrant or make any guarantees about the feedback provided, including its accuracy, relevance, or reliability. All feedback is subject to the terms set forth in the TetraConnect Hub Community Guidelines.
Updated about 2 months ago