Legacy IDBS E-Workbook Connector - Admin Configuration
Setting up the connector requires work on both the IDBS side and within the connector itself. These two parts are IDBS configuration and connector configuration.
IDBS Configuration
Administrator Credentials NeededIDBS E-Workbook Admin credentials is needed to perform the custom action creation.
Step 1: Create custom action
The IDBS E-Workbook admin needs to enable and create the custom action so that it can be inserted into spreadsheets as a button. The new action requires the following information:
name: this is how the action will appear in the IDBS Spreadsheet Designer.description: this gives additional explanation for what the action achieves.detectTabClose: this should be set totrue. When the user closes the TetraScience IDBS E-Workbook Connector tab, this will close the modal that appears in the IDBS E-Workbook indicating that work is occurring.oauthClientId: allows for the Connector to communicate with the IDBS E-Workbook using OAuth. The IDBS Admin must register a new OAuth client and provide the associatedclient_id,client_secret, and theOAuth Redirect URIfor the Connector’s configuration.serverUrl: this is the address (including port) of the TetraScience IDBS E-Workbook Connector (ie.https://tdp-idbs-connector.local:3004/)
Step 2: Launch IDBS Spreadsheet Designer
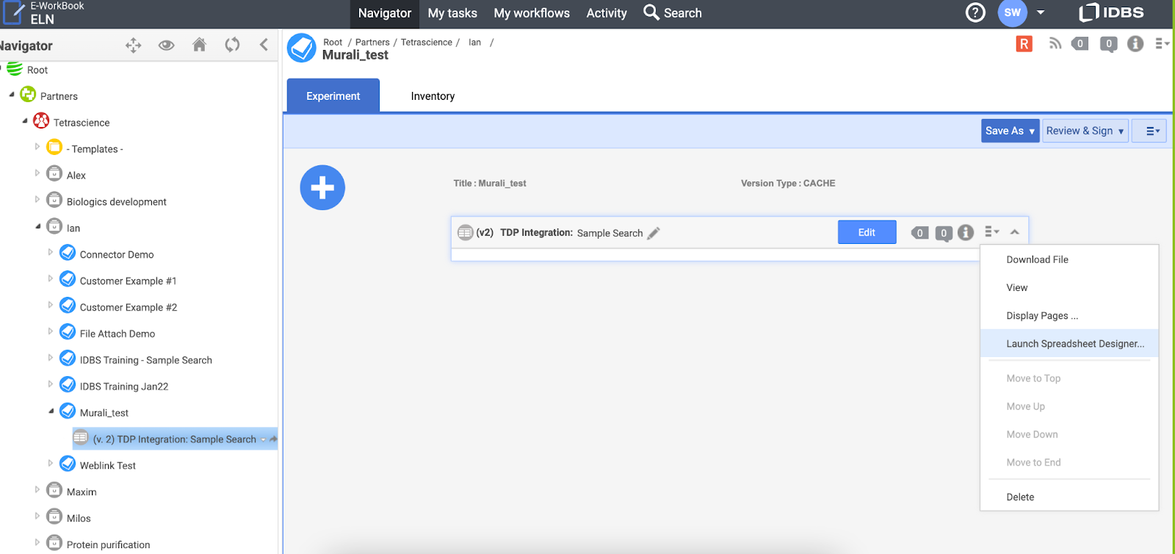
Figure 1. IDBS Spreadsheet Designer
-
Access the Spreadsheet Designer from the Hamburger menu on the right side of the spreadsheet bar.
-
Click Launch Spreadsheet Designer.
- If this is your first time using the spreadsheet designer, you will be prompted to install it on your local machine.
Step 3: Design the spreadsheet
For details on how the Spreadsheet Designer works, consult the IDBS Knowledge Center.
Spreadsheet Table Naming and DimensionsThe DataWeave transforms used in the connector will take into account table and dimension names.
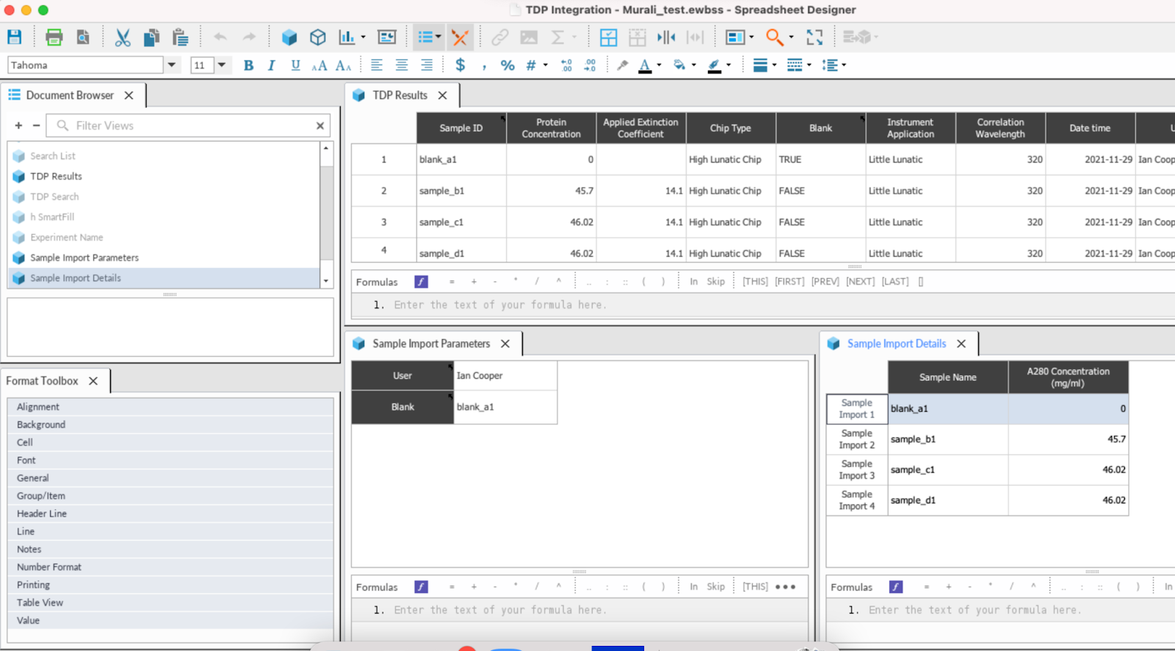
Figure 2. Designing the IDBS E-Workbook Spreadsheet
Step 4: Add custom action to spreadsheet
-
In the Spreadsheet Designer, using the menu at the top, navigate to Tools > Instruction Set Designer.
-
Choose the custom action defined in Step 1 above. If you do not have admin privileges, contact your IDBS admin to obtain the custom action option value.
-
For this custom action, there are two additional fields for you to fill in:
Data to pass to Action: IDBS passes this information to the TetraScience IDBS E-Workbook Connector to define what action the connector should take. These are documented in within the Connector Action Configuration section. For example, aretrieveaction would requireretrieve <dataweave-template-key>, where the<template-key>is obtained from the DataWeave Settings page within the Connector Settings.Label: Custom label for what the action name will be displayed as on the button within the spreadsheet. For example, in the screenshot below, the label is Retrieve from TDP.
Connector Admin Configuration
Connector Network PortIf you've launched your connector to tunnel access through a port different than
3003, remember to change the example endpoints provided below to reflect the proper port.
Step 1: Access the Connector
- In a web browser, connect to your Connector by entering the following:
http://<hostname>:3003/
NOTE
<hostname>is the hostname that the Connector runs on.3003is the default incoming traffic port that's configured when the container is created.
- Choose Settings. Then, choose Connector. The Connector Settings page appears.
Connector Settings Page Options
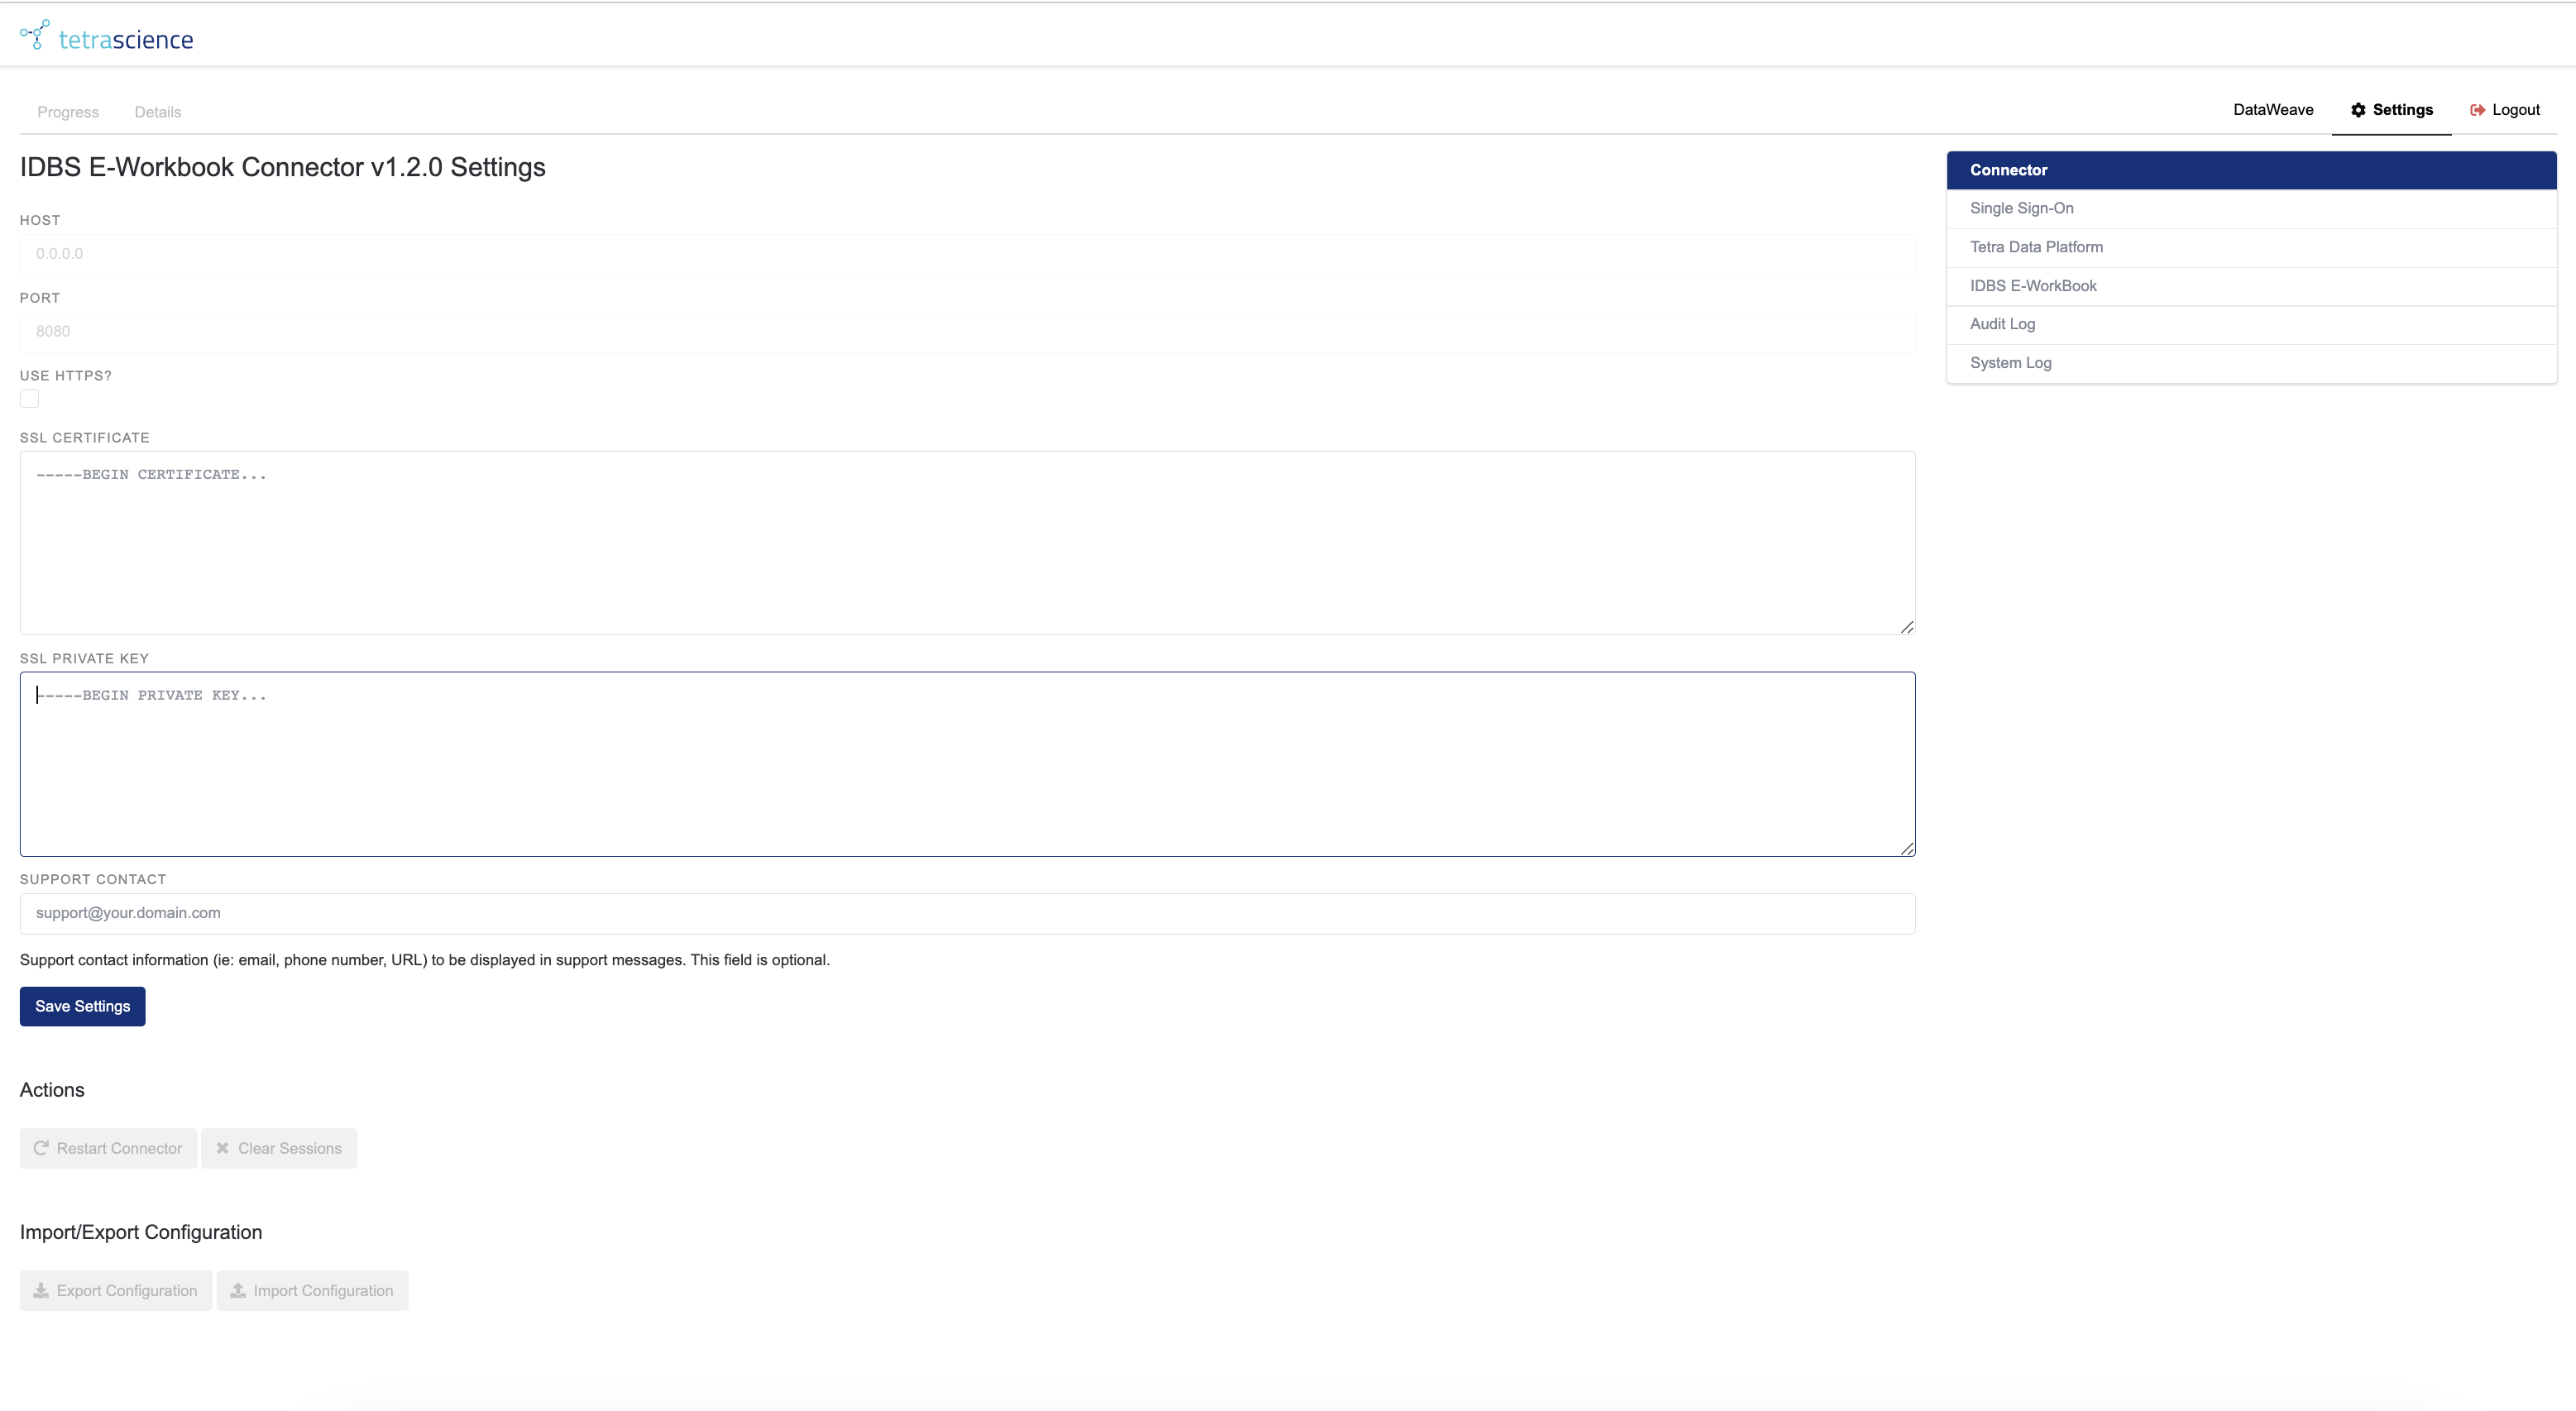
Figure 3. The Connector Settings Page
- HOST and PORT: These options are preconfigured and read-only.
- USE HTTPS: (Optional) A fresh install of the Connector will not have SSL set up. To run the Connector using HTTPS, check this option and provide SSL certificates and keys. To take effect, you must save the settings and restart the Connector. After activating HTTPS, you must access the Connector by using the following URL:
https://<hostname>:3003/ - SUPPORT CONTACT: (Optional) Enter the contact information (for example, email, phone number, URL) that you want to be displayed in Connector support messages.
- EXPORT CONFIGURATION: (Optional) Select this button to export the configuration as a JSON document. The exported document doesn't contain sensitive information, such as private keys or authentication secrets.
- IMPORT CONFIGURATION: (Optional) Select this button to import a previously saved configuration.
Step 2 (Optional): Configure SSO and role mapping
The SSO Configuration screen (available to users with the admin role) shows the details required to use single sign-on (SSO) via Amazon Cognito.
- If configured and enabled, SSO will authorize you to use the connector after authenticating with your identity provider.
- If SSO is not fully configured and enabled, the connector requires you to authenticate directly with TDP.
- Authenticating through TDP grants you permissions that reflect your TDP role (read-only, member, admin).
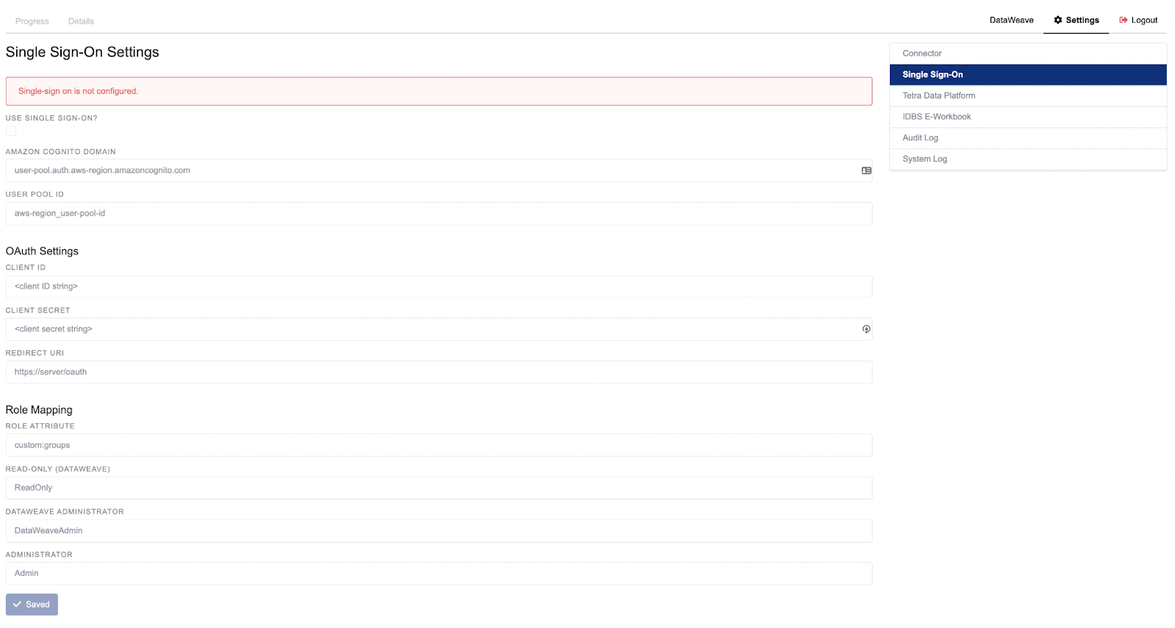
Figure 4. The SSO Configuration Screen
The following settings are updated from this screen:
- Use single sign-on? When this box is checked and all of the other fields are completed, the SSO authentication is enabled.
- Amazon Cognito Domain: The domain used to reach the Amazon Cognito endpoints. It is configured in the Cognito user pool settings, by navigating to App integration > Domain name.
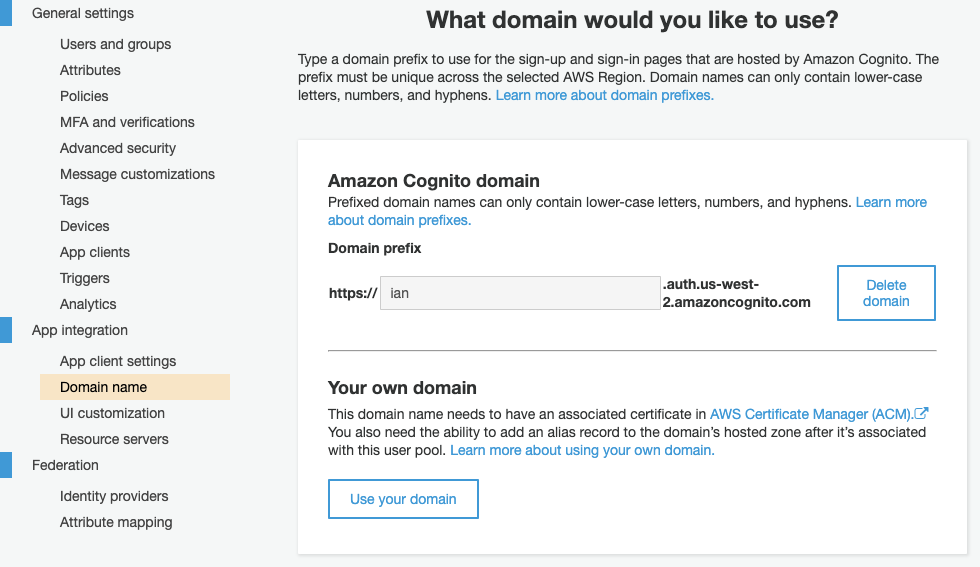
Figure 5. Domain Name Settings in AWS Cognito
- User Pool ID: The ID of the user pool in Amazon Cognito, used to download the public keys for user token verification. It can be found in the Cognito user pool settings, under General settings.

Figure 6. User Pool ID in AWS Cognito
- OAuth Settings: These settings are used to securely perform the authentication handshake with Amazon Cognito.
- Client ID: The client ID can be found in the Cognito user pool settings, under General settings > App clients. It is automatically generated when the app client is added to the Cognito user pool.
- Client Secret: The client secret can also be found in the same place as the client ID. The secret is like a password; it is also automatically generated when the app client is added to the Cognito user pool.
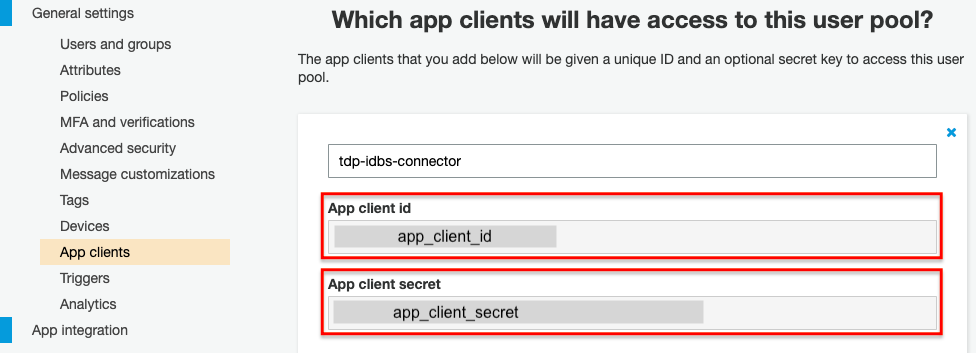
Figure 7. OAuth Settings in AWS Cognito
- Redirect URI: The URL to which Amazon Cognito redirects you after a successful third-party authentication. This should always be using HTTPS and must match what is configured in the Cognito user pool settings under App integration > App client settings.
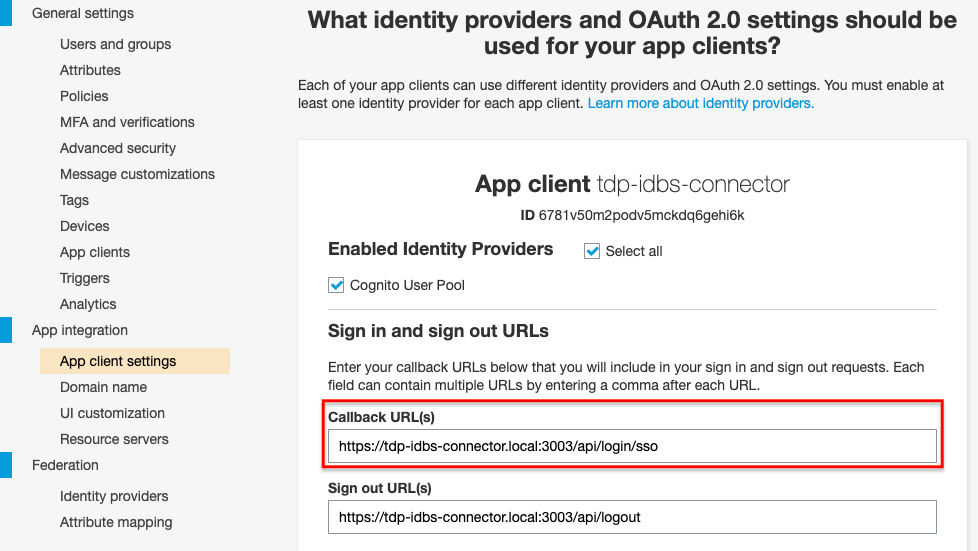
Figure 8. App Client Settings in AWS Cognito
- Role Mapping: This defines how the connector determines which groups in Cognito map to which roles within the connector. Currently, only a one-to-one mapping is possible. Users who have multiple groups will map to the highest level of access that any of their groups give them (readonly < member < admin). Groups are configured in the Cognito user pool settings under General settings > Users and groups.
- Read-Only (DataWeave): Users in this group will be assigned the readonly role in the connector.
- DataWeave Administrator: Users in this group will be assigned the dataweave-admin role in the connector.
- Administrator: Users in this group will be assigned the admin role in the connector.
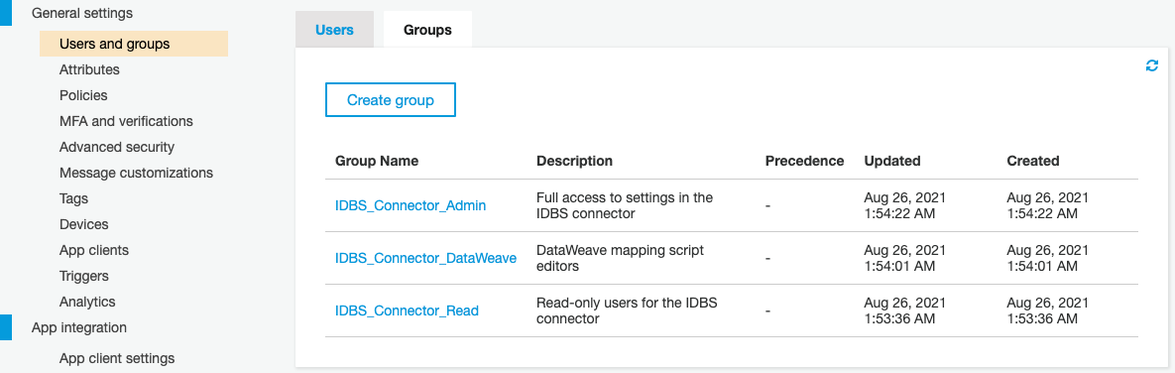
Figure 9. User and Groups Settings in AWS Cognito
Click Save Settings on the Connector Settings page to save any changes.
If you are currently logged in using TDP authentication and you enable SSO authentication, you will remain logged in until you manually log out or your session expires.
Step 3: Setup TDP connection
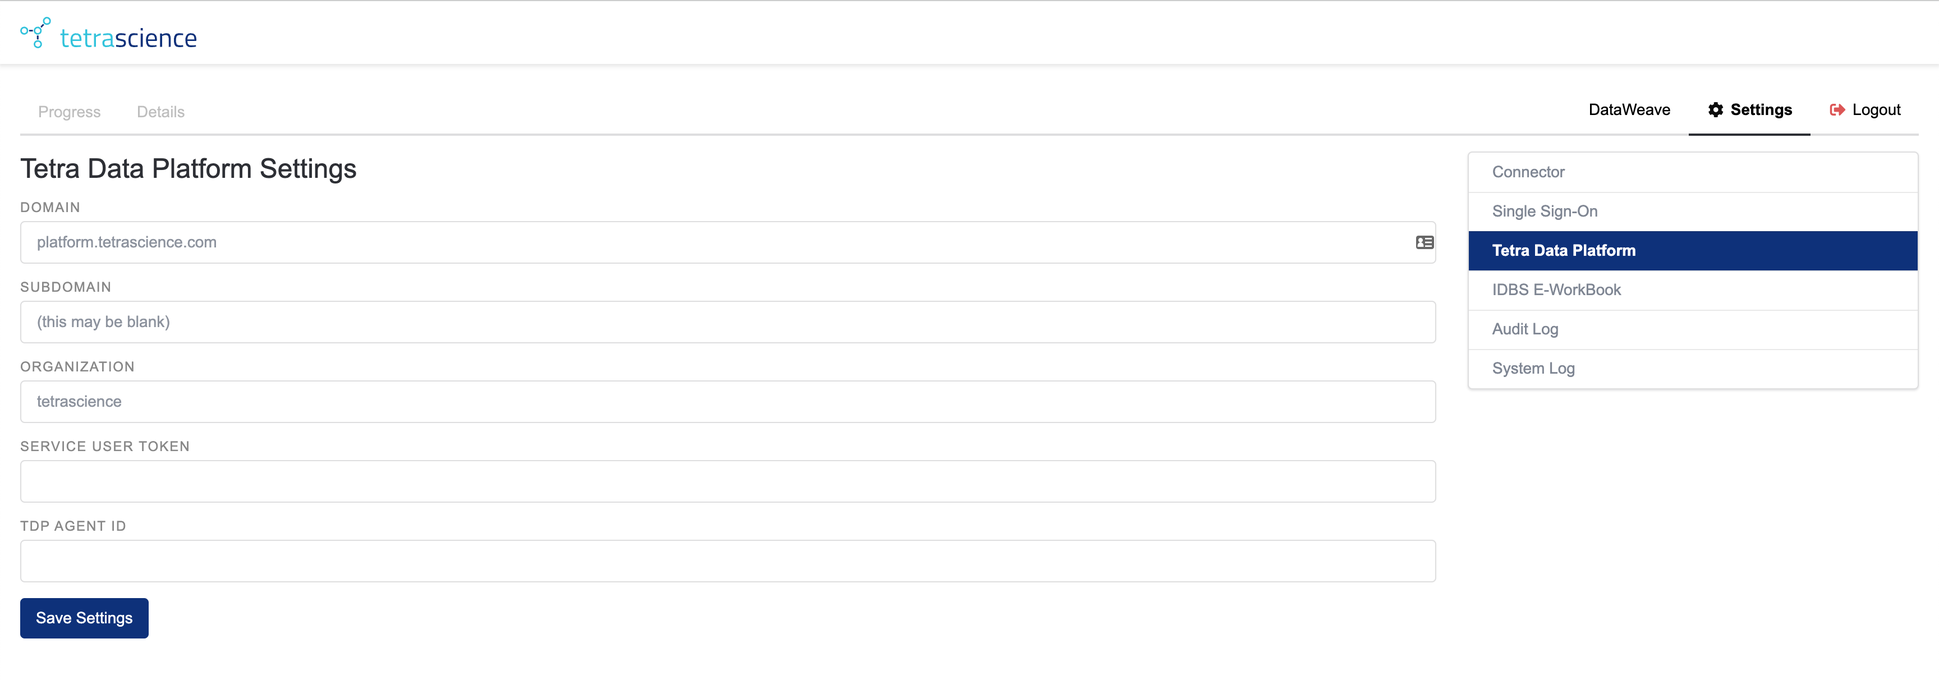
Figure 10. The Tetra Data Platform Settings Screen
The TDP Configuration screen shows the details required to connect to and authenticate with the Tetra Data Platform. This screen is only available to users with the admin role.
The following settings can be updated from this screen:
- Domain: This is the root domain for the Tetra Data Platform instance to which the connector should connect. Make sure to leave off any "
api." prefix or "https://", these are added automatically when needed. - Subdomain: For multi-tenant deployments of TDP, you may have an assigned “subdomain” for your tenant. This can be entered here. If you do not have one, leave this field blank.
- Organization: This is the “slug” of the organization within the Tetra Data Platform that this connector is associated with. This is used for connecting to Tetra Data Platform for data lake queries as well as authenticating users to the connector and determining their role when SSO is not being used.
- Service User Token: A token that the Connector uses when sending Elasticsearch queries to the Data Lake, and when downloading files from the Data Lake. To upload data to the TDP, this token must be associated with a service user that has at least a Member role with both read and write permissions. To pull data from the TDP only, the associated service user must have at least read-only access. It’s recommended that you grant least privilege access, based on your use case.
Service User TokenA normal user token will work, but the short time before expiration makes them impractical for use here. For details on how to create a TDP service user and obtain a token, see how to Manage Service Users .
- TDP Agent ID: This is only used when the connector performs an upload action to TDP. If you are using the connector purely for retrieve actions, you can leave this blank. To use this feature, from the Data Sources > Agents page on TDP, create a new user-defined agent. The agent ID associated with this user-defined agent – available from the Agents page – is what you should enter in this connector setting field.
Click Save Settings to save any changes.
Step 4: Signing in
There are two options to sign in: single sign-on, or TDP Username and password.
Option 1: Use of single sign-on (SSO)
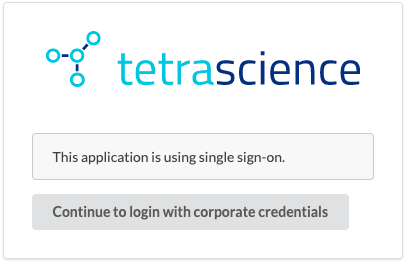
Figure 11. Signing into the Connector with SSO.
If you are using this option, the dialog box associated with your SSO provider will appear here.
Option 2: Use of TDP Username and password
- When using TDP authentication, the User Login screen prompts for an email and password and attempts to authenticate the user to the Tetra Data Platform using the supplied credentials, via the connector backend. No communication from the browser directly to the Tetra Data Platform is initiated.
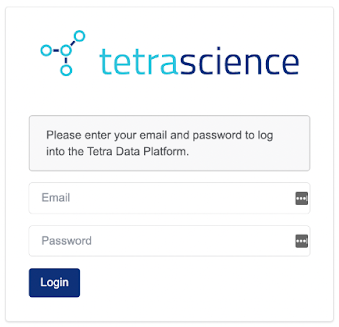
Figure 12. Signing into the Connector with TDP Username/Password.
- If there is an error connecting to the Tetra Data Platform or the credentials are not valid, a relevant error message is displayed on the login form.
- If successful, the user information, including the user's role in the appropriate TetraScience organization, is stored in the session.
- The content of the page will automatically update based on the user’s role as described above.
Step 5: Setup e-Workbook connection
The IDBS Configuration screen shows the details required to connect to and authenticate with the IDBS E-Workbook Server.
Administrator Credentials NeededThis screen is only available to users with the admin role.
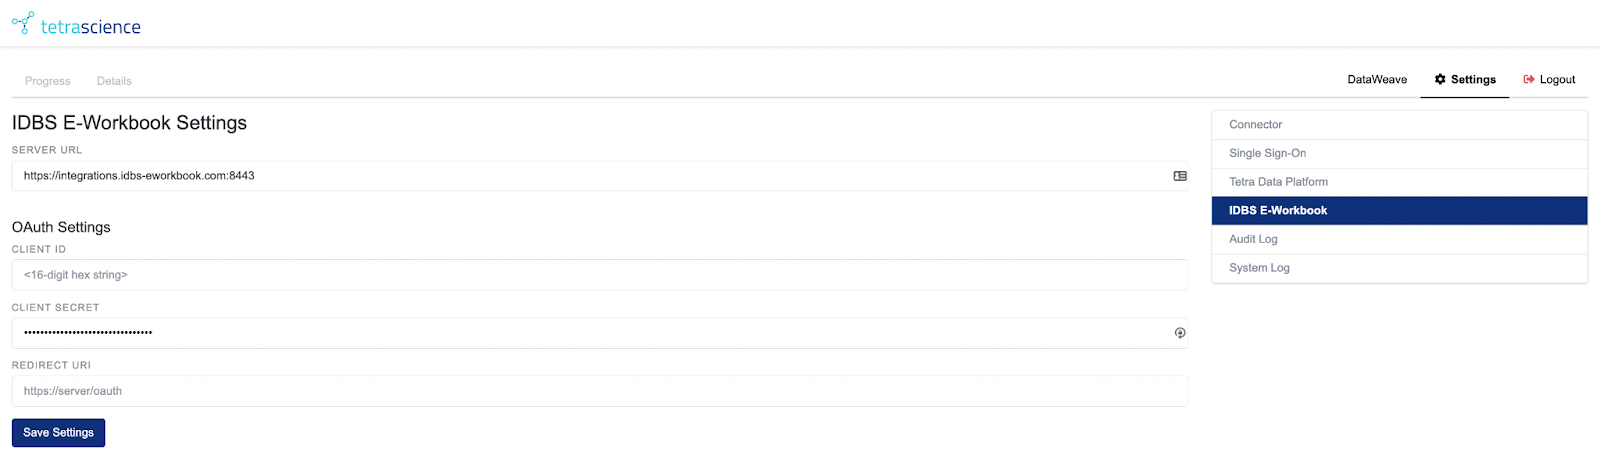
Figure 13. The IDBS Connection Configuration Screen
The following settings can be updated from this screen:
- Server URL: This is the root URL (including port number, if not
443) that is used to access the IDBS E-Workbook API. The address should be reachable from the server on which the connector container is hosted. - OAuth Settings: These settings are used when authenticating with the IDBS E-Workbook server on behalf of the user who has initiated the data transfer process.
- Client ID: The client ID can be found as the
oauthClientIdfield on the form within the central IDBS E-Workbook catalog when creating the custom spreadsheet action used to launch the connector. - Client Secret: The client secret is like a password, created when the client ID is created in the central IDBS E-Workbook catalog.
- Redirect URI: This is also created when the client ID is created in the central IDBS E-Workbook catalog. Although it is not actually used as a redirection URI, it must be present and match exactly what is configured in the catalog.
- Client ID: The client ID can be found as the
As soon as you begin editing any of the settings, the button at the bottom will switch from a disabled Saved button to an enabled Save Settings button. Click Save Settings to save the change.
Step 6: Configure DataWeave buffer size
NOTEThis setting is available in Legacy Tetra IDBS E-Workbook Connector v1.4.1 and higher.
The DataWeave section on the Settings page includes a Max stdout / stderr buffer dropdown that controls the maximum amount of output that DataWeave scripts can produce during execution. If your DataWeave scripts process large data payloads (for example, large Elasticsearch JSON from IDBS views), you may need to increase this value to prevent buffer limit errors.
The following preset values are available: 1 MiB, 2 MiB, 4 MiB, 8 MiB (default), 16 MiB, and 32 MiB.
Memory ConsiderationsIncreasing the buffer size increases the memory used by the Connector during DataWeave script execution. If you set a high buffer value, make sure that the Connector's Docker container has sufficient memory allocated (see the container memory limit setting in Step 4: Create the Docker Container).
To configure the DataWeave buffer size, do the following:
- In the Connector Settings page, go to the DataWeave section.
- From the Max stdout / stderr buffer dropdown, select the buffer size that meets your requirements.
- Click Save Settings to apply the change.
NOTEThe buffer size can also be set through the Connector's configuration API (
GET /api/config/dataweaveandPOST /api/config/dataweave) or by importing a configuration file. If a non-preset value is set through the API or config import, it appears in the dropdown as a "(current)" option.
Documentation Feedback
Do you have questions about our documentation or suggestions for how we can improve it? Start a discussion in TetraConnect Hub. For access, see Access the TetraConnect Hub.
NOTEFeedback isn't part of the official TetraScience product documentation. TetraScience doesn't warrant or make any guarantees about the feedback provided, including its accuracy, relevance, or reliability. All feedback is subject to the terms set forth in the TetraConnect Hub Community Guidelines.
Updated 21 days ago