Hello, World! SSP Example
This topic provides an example of the minimum files needed to create a self-service Tetra Data pipeline (SSP).
For more information about example SSP use cases, see Example Use Cases for SSPs. For best practices, see Data Engineering and Tooling and Automation in the TetraConnect Hub. For access, see Access the TetraConnect Hub.
Architecture
The following diagram shows an example “Hello, World!” SSP workflow:
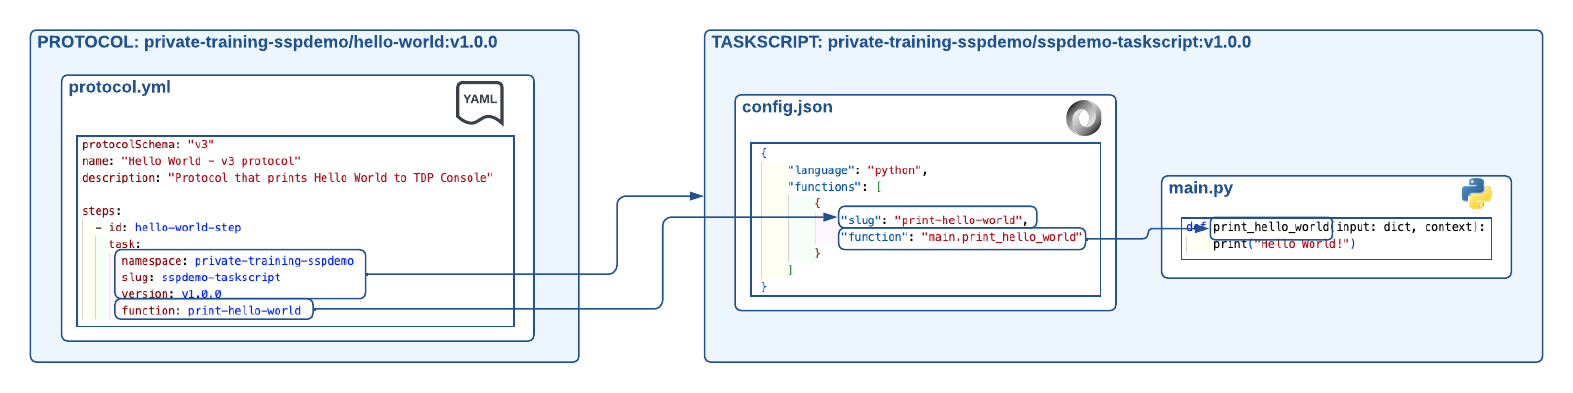
"Hello, World!" SSP workflow example
The diagram shows the following workflow:
- A task script named
sspdemo-taskscript (v1.0.0)is created. Theconfig.jsonfile has one exposed function named print-hello-world (main.print_hello_world), which is theprint_hello_worldfunction found in themain.pyfile. - A protocol named
hello-world (v1.0.0)is created. Theprotocol.ymlfile provides the protocol name, description, and outlines one step:hello-world-step. This step points to thesspdemo-taskscripttask script and the exposed function,print-hello-world.
Prerequisites
Before you can create a self-service pipeline (SSP), you must complete the SSP Setup and Prerequisites.
Create an SSP
To create a basic SSP, do the following.
Create the SSP Folder Structure
Create the following basic SSP folder structure on your local machine in the directory where you want to keep your artifact code:
- A protocol folder that contains the following files:
protocol.yml- (Optional, but recommended)
manifest.json
- A task script folder that contains the following files:
config.jsonmain.py- (Optional, but recommended)
manifest.json requirements.txt
SSP Folder Structure Example
protocol
└── protocol.yml
└── manifest.json
task-script
├── config.json
└── main.py
└── manifest.json
└── requirements.txt
For more information about each file type, see Task Script Files, Protocol YAML Files, and SSP Artifact manifest.json Files.
Create and Deploy a Task Script
Task scripts are the building blocks of protocols, so you must build and deploy your task scripts before you can deploy a protocol that uses them.
Task scripts require the following:
- A
config.jsonfile that contains configuration information that exposes and makes your Python functions accessible so that protocols can use them. - A Python file that contains python functions (
main.pyin the following examples) that include the code that’s used in file processing. - A
requirements.txtfile that either specifies any required third-party Python modules, or that is left empty if no modules are needed. - (Optional) A
manifest.jsonfile that contains metadata, configuration, and specifications for the artifact.
To create and deploy a task script that prints Hello World! to the TDP console, do the following.
NOTEFor more information about creating custom task scripts, see Task Script Files. For information about testing custom task scripts locally, see Create and Test Custom Task Scripts.
Create a config.json File
Create a config.json file in your code editor by using the following code snippet:
{
    "language": "python",
    "runtime": "python3.11",
    "functions": [
        {
            "slug": "print-hello-world",
            "function": "main.print_hello_world"
        }
    ]
}
NOTEYou can choose which Python version a task script uses by specifying the
"runtime"parameter in the script'sconfig.jsonfile. Python versions 3.7, 3.8, 3.9, 3.10, and 3.11 are supported currently. If you don't include a"runtime"parameter, the script uses Python v3.7 by default.
Create a main.py File
Create a main.py file in your code editor by using the following code snippet:
from ts_sdk.task.__task_script_runner import Context

def print_hello_world(input: dict, context):
    print("Hello World!")
    return "Hello World!"
(Optional) Create a manifest.json File for Your Task Script
While not required, it's recommended that you create a manifest.json file in your code editor by using the following code snippet:
{
  "type": "task-script",
  "namespace": "private-{TDP ORG}",
  "slug": "sspdemo-taskscript",
  "version": "v1.0.0"
}
NOTEIf you create a
manifest.jsonfile for your artifact, you don't need to specify any of the required configuration fields in yourts-cli publishcommand arguments. The command pulls the required artifact configuration fields from each artifact'smanifest.jsonfile automatically if one is present in the artifact's root directory.
Create a Python Package (requirements.txt)
requirements.txt)Within the task script folder that contains the config.json, main.py, and manifest.json files, use Python Poetry to create a Python package and the necessary files to deploy them to the TDP.
The following Poetry export command example produces this package as a requirements.txt file.
Poetry Command Example
poetry init
[import packages with "poetry add"]
poetry export --without-hashes --format=requirements.txt > requirements.txt
NOTEIf no packages are added, this poetry export command example produces text in
requirements.txtthat you must delete to create an emptyrequirements.txtfile. Arequirements.txtfile is required to deploy a task script to the TDP.
Test the Task Script Locally
Before deploying your task script, you can test it locally using the ts-sdk 2.6.0+ testing submodule. This helps catch issues early and reduces development time.
The following example test script is simplified for the purposes of this Hello, World! SSP setup. For more information about testing artifacts locally, see Test SSP Artifacts Locally.
Create a Local Test Script
Create a test file (for example, test_local.py) in your project directory:
from ts_sdk.testing.models import *
from pathlib import Path
import json

def test_hello_world_function():
    """Test the hello world function locally."""

    # Create test input data
    test_input = {"message": "Testing locally"}

    # Create a workflow trigger with sample file content
    workflow_trigger = Trigger(
        file=InlineFile(
            labels=[Label(name="test-label", value="test-value")],
            contents='Sample file content for testing'
        )
    )

    # Create task script (adjust path as needed)
    task_script = TaskScript(
        namespace="private-test",
        slug="sspdemo-taskscript",
        version="v1.0.0",
        path=Path('./task-script')  # Path to your task script folder
    )

    # Set up testing context and run the task
    with workflow_trigger, task_script:
        task = Task(function='print-hello-world')
        result, error = task.run(test_input)

        assert error is None
        print("Task execution results:")
        print(json.dumps(result, indent=2))

        return result

if __name__ == "__main__":
    print("Testing task script locally...")
    test_hello_world_function()
    print("Local testing completed!")
Run the Local Test
Execute your test script by running the following command:
python test_local.pyYour task script function runs locally and displays the results, allowing you to verify the behavior before deployment.
Deploy the Task Script
After successful local testing, deploy the task script by doing the following:
- Make sure that the local
auth.jsonfile you created while completing the SSP Setup and Prerequisites is formatted correctly.
Exampleauth.json File
{
    "api_url":"<TDP API endpoint base URL>",
    "auth_token":"<service token you generated>",
    "org":"<your organization slug name>",
    "ignore_ssl": <true to allow invalid SSL certificates>
}- Run the following command from your command line (for example, bash):
For Task Scripts that have a manifest.json file
ts-cli publish {task-script-folder} -c {auth-folder}/auth.jsonFor Task Scripts without a manifest.json file
ts-cli publish --type task-script --namespace private-{TDP ORG} --slug sspdemo-taskscript --version v1.0.0 {task-script-folder} -c {auth-folder}/auth.json
NOTETo add the artifact to more than one organization, see Add Artifacts to Multiple Organizations.
Create and Deploy a Protocol
Protocols define the business logic of your pipeline by specifying the steps and the functions within task scripts that execute those steps. For more information about how to create a protocol, see Protocol YAML Files.
In the following example, there’s one step: hello-world-step. This step uses the print-hello-world function that’s in the sspdemo-taskscript task script.
Create a protocol.yml File
protocol.yml FileCreate a protocol.yml file in your code editor by using the following code snippet:
protocolSchema: "v3"
name: "Hello World - v3 protocol"
description: "Protocol that prints Hello World to TDP Console"

steps:
  - id: hello-world-step
    task:
      namespace: private-training-sspdemo
      slug: sspdemo-taskscript
      version: v1.0.0
      function: print-hello-world
(Optional) Create a manifest.json File for Your Protocol
While not required, it's recommended that you create a manifest.json file in your code editor by using the following code snippet:
{
  "type": "protocol",
  "namespace": "private-{TDP ORG}",
  "slug": "hello-world",
  "version": "v1.0.0"
}
NOTEIf you create a
manifest.jsonfile for your artifact, you don't need to specify any of the required configuration fields in yourts-cli publishcommand arguments. The command pulls the required artifact configuration fields from each artifact'smanifest.jsonfile automatically if one is present in the artifact's root directory.
Deploy the Protocol
To the deploy the protocol, do the following:
-
Make sure that the local
auth.jsonfile you created while completing the SSP Setup and Prerequisites is formatted correctly. For an exampleauth.jsonfile, see Configure TDP Dependencies and Authentication. -
Run the following command from your command line (for example, bash):
** For Protocols that have a manifest.json file**
ts-cli publish {protocol-folder} -c {auth-folder}/auth.json** For Protocols without a manifest.json file**
ts-cli publish --type protocol --namespace private-{TDP ORG} --slug hello-world --version v1.0.0 {protocol-folder} -c {auth-folder}/auth.json
NOTETo add the artifact to more than one organization, see Add Artifacts to Multiple Organizations.
To redeploy the same version of your code, you must include the
-fflag in your deployment command. This flag forces the code to overwrite the file. The following are example protocol deployment command examples:
ts-cli publish --type protocol --namespace private-xyz --slug hello-world --version v1.0.0 ./protocol -f -c auth.jsonts-cli publish --type task-script --namespace private-xyz --slug hello-world --version v1.0.0 ./task-script -f -c auth.jsonFor more details about the available arguments, use the following command on the command line:
ts-cli publish --help
Create a Pipeline by Using the Deployed Protocol
To use your new protocol on the TDP, create a new pipeline that uses the protocol that you deployed. Then, upload a file that matches the pipeline’s trigger conditions.
Unpublish Self-Service Artifacts
To unpublish a self-service artifacts in the private namespace, run the following command:
For artifacts that have a manifest.json file
ts-cli unpublish {artifact-folder} -c {auth-folder}/auth.jsonFor artifacts without a manifest.json file
ts-cli unpublish --type {task-script or protocol} --namespace private-{TDP ORG} --slug {artifact-slug} --version {vx.x.x} {artifact-folder} -c {auth-folder}/auth.json
NOTEUnpublished artifacts will no longer appear in the Artifacts menu options in the TDP user interface.
Documentation Feedback
Do you have questions about our documentation or suggestions for how we can improve it? Start a discussion in TetraConnect Hub. For access, see Access the TetraConnect Hub.
NOTEFeedback isn't part of the official TetraScience product documentation. TetraScience doesn't warrant or make any guarantees about the feedback provided, including its accuracy, relevance, or reliability. All feedback is subject to the terms set forth in the TetraConnect Hub Community Guidelines.
Updated 2 months ago