Tetra Empower Agent User Manual (Version 5.2.x)
This page describes how to use and configure the Tetra Empower Agent Management Console. You can use the Management Console to do the following:
- Configure Tetra Empower Agent settings
- Select which Empower Projects will be extracted
- Monitor Injections and non-experiment summary and processing
- Troubleshoot issues
The Management Console has the following menu options:
- Configuration
- Injection Service
- Project
- Injection Summary
- Non-Experiment Summary
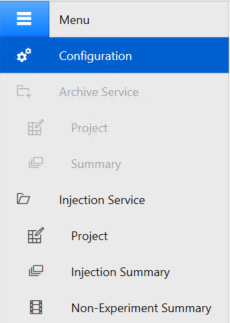
Management Console menu
The following sections describe each of these menu options along with their features and settings.
Configuration Tab
This screen provides settings to save, start, and stop the agent along with its connectivity settings to Waters Empower software and the Tetra Data Platform (TDP). This tab also provides settings to manage the Injection service as well as non-experiment data ingestion.
Agent Status Section

Configuration tab - Agent Status
This section indicates the Agent's running status using the following statuses:
- Agent Not Started
- Running
When you finish configuring the required parameters, choose Save to save the settings.
Choose Start to start the Agent. This action sets the status to Running.
To stop the Agent from running, choose Stop. This action sets the status to Agent Not Started.
Windows Scheduled Task settings

Configuration tab - Windows Scheduled Task
You can increase the Agent's reliability by ensuring that it remains online without having to manually check it each day. If you enable this option, the Tetra Empower Agent creates a Windows Task that checks the status of Agent service daily at the time you specify. Enter the time in the Run Time field.
- If the Agent is stopped, then the scheduled Windows task automatically restarts the Agent service.
- If the Agent is running, nothing else happens.
- If you manually stop the Tetra Empower Agent, then the Windows task is removed, and the Windows task that you create runs under the Local System account.
Empower Database Settings

Configuration tab - Empower Database
The Empower Database section contains the following required fields:
- Database Name: Empower database name used to login to Empower
- User Name: Empower user name
- Password : Empower user’s password
- Oracle Host Name: Oracle Host name as it appears in the
tnsnames.orafile on the Empower client machine where the agent is running - Service Name: Oracle Service name as it appears in the
tnsnames.orafile on the Empower client machine where the agent is running - Port : Oracle Port as it appears in the
tnsnames.orafile on the Empower client machine where the agent is running
You must enter information in all of the fields to access Empower Oracle. The Agent accesses the Oracle database directly to fetch the date time values.
Make sure that the Empower account used in User Name has the correct privileges to extract the projects. If the agent will be used to create a Sample Set Method in Empower, more privileges may be required. Refer to the FAQ section for details on what privileges the Empower user needs for various data ingestion and sample set method creation functions.
The Oracle Host Name, Service Name and Port information can be found in the tnsnames.ora file in the Empower client machine. The file is typically present in the following folder:
<Oracle Client Install folder>\\network\\admin\\
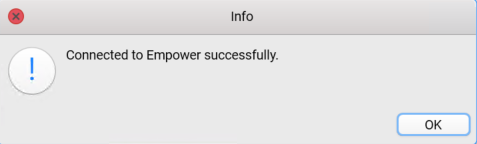
Choose Test Connection to test the connection to the Empower Database.
Empower Group User Settings

Configuration tab - Empower Group User
The Empower Group User section contains the following required fields:
- User Name
- Password
This is the user account (typically a Windows service account) running the Tetra Empower Agent. If this section is left blank, then the Local System user is used. The user defined in this section is used to run the agent service when the agent is running. This user will also be used to access the Empower File Server to fetch raw data.
The user account can be located in the same Organization Unit as Empower, so that it has the privileges required to access the Empower File Server to fetch raw data.
Connector Settings
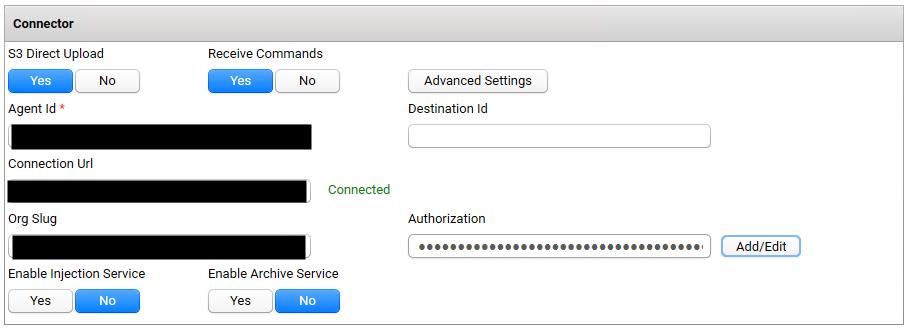
Configuration tab - Connector
This section provides settings to connect to the TDP and either activate or deactivate the Injection Service. You can use the Connector section to do the following:
- Upload the files directly to the Amazon Simple Storage Service (Amazon S3) bucket
- Add an Agent ID and connection URL to set up a Tetra Empower Agent from a Tetra Hub or by using the TDP (No Connector) option. For more information, see Agent Deployment Options.
- Specify the Destination Id, it allows files from multiple agents to be uploaded to the same S3 location. Usually, it helps to split the load into multiple agents for scaling horizontally.
- Enable Injection and Archival services
Set the S3 Direct Upload Option
To have the Tetra Empower Agent directly upload files to the Amazon S3 bucket, set the S3 Direct Upload option to Yes. Yes is the default setting for new installs. When upgrading the agent, the setting from the previous version of the agent is retained. If you choose this option, keep in mind the following:
- If you use the S3 Direct Upload option with a Tetra Data Hub that uses a Generic Data Connector (GDC), you must add an L7 Proxy Connector in the same Hub where you set up the GDC. The port of the L7 Proxy Connector must also be open. For more information, see GDC Connections.
SQLite Database File BackupsTo have the Tetra Empower Agent automatically perform regular backups of the SQLite database file, set the S3 Direct Upload option to Yes. When you enable this option, the SQLite database file (which stores agent configuration data) is uploaded to the backup bucket in the Tetra Data Lake. If a Tetra Empower Agent failure occurs, you can restore the database file from the backup bucket and continue processing.
If you don't use the S3 Direct Upload option, it's recommended that you create periodic backups of the Tetra Agent database, which is typically stored in the installation folder under
C:\\TetraScience\<agent>\\db. In the event of a failure (for example, if the host server drive is lost), this would enable the data extraction to continue from where it left off, without having to re-upload all of the data.
Receive Commands Option
The agent may receive TetraScience API requests to enable bidirectional communication with Empower and the TDP. In Agent 5.1 and higher, there are TetraScience APIs available that allow you to do the following:
- Fetch a Sample Set Method from Empower into TDP
- Create a Sample Set Method in Empower from TDP
To be able to use these APIs, the Receive Commands setting must be set to Yes. The default setting is No.
Advanced Settings
You can configure the following in the Advanced Settings section:
- The Data Connection status check every setting has a default value of 30 seconds.The agent pings ( heartbeats) the TDP after this specified duration to check connectivity status.
- The Agent log files upload every setting has a default value of 300 seconds. The agent creates local logs and uploads them to the TDP after the time specified.
To keep the recommended settings, or to save the new values you entered, choose OK. Only consider changing these values if connection checks (heartbeat) frequency needs to be changed, or if logs files are needed to be uploaded to the TDP at a different frequency
TDP Connectivity
Before you set up a Tetra Empower Agent from a Tetra Hub or by using the TDP (No Connector) option, you must enter the following information:
- An Agent ID. The Agent ID (a UUID) is used to connect the agent to the TDP. You can retrieve the Agent ID from the TDP when you set up the Tetra Hub or use the TDP (No Connector) option. To create an agent on the platform, see Cloud Configuration of Tetra Agents.
- A full connection URL from the connection option you've chosen, as shown in the following URL examples:
- GDC URL:
<http://10.100.1.1:8888/generic-connector/v1/agent> - Hub:
http://10.100.1.2:8443/generic-connector/v1/agent - TDP (No Connector) URL:
<https://api.tetrascience-dev.com/v1/data-acquisition/agent/>
- GDC URL:
If you use the no connector, keep in mind the following:
- The Org Slug field is required. Enter the Org Slug to attach it to the header.
- The JSON Web Token (JWT) is also required. Enter the JWT in the Authorization field to attach it to the header. You can use a service user to generate a JWT token. For more information, see Generate a JWT for a Service User.
- Choose Add/Edit to open a dialog and enter the JWT token.
- Choose Save to close the dialog and encrypt and save the JWT. The agent validates the connection immediately and displays the updated connection status next to the Connection URL field.
IMPORTANTIf the Upload Raw Files to TDP setting in the Agent Run Time section (this is described later in this page) is set to No, the agent will not connect to the TDP to upload files. The status here will still show Connected.
Enable Services
The Tetra Empower Agent contains two services:
- Injection Service
- Archive Service
Choose Yes to enable a service. You can enable either service, or both services.
NOTE:This Tetra Empower Agent User Manual describes the Injection Service only.
Injection Settings
The following sections describe the settings for injection and non-experiment data ingestion.

Batch Size Settings
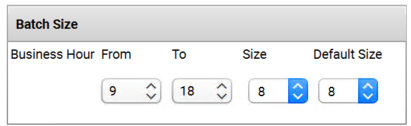
Injection - Batch Size
Use the Batch Size section to set the number of Injections being processed simultaneously. The default size is 8. As a System Administrator, you can adjust it based on the hours of the day. You can set the number up to 10 or 12, if the host server has robust hardware specifications. You can also adjust the number lower, if the Agent consumes more CPU and memory than the host server allows.
Error Handling Settings
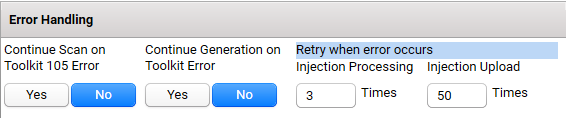
Injection - Error Handling
- Continue Scan on ToolKit 105 Error - 105 Error is the abbreviation of an unhandled ToolKit error, 0x80010105. This setting is to determine if the Agent should continue scanning when encountering this error. The default is No.
- The Continue Generation on Toolkit Error indicates whether the agent should stop or continue to generate the RAW JSON for an Injection if certain Empower SDK Toolkit errors are encountered.
- The default is No, it stops RAW JSON generation if the errors occur.
- Click Yes to allow the Tetra Empower Agent to continue with RAW JSON generation, even if the errors occur. Please note, that this may result in incomplete RAW JSON data. Some of the errors that may be encountered by the toolkit during Injection generation are:
Error 105 - Error fetching Channel Chromatography dataError 214 - Could not fetch requested methodError 408 - Method could not be opened in the ProjectError 429 - LCCalibration: the requested calibration could not be fetchedError 42F - An option is required in order to access this interfaceError 267 An option is required to open this method. Please make sure this option is enabled in the projectError 40e Cannot open Method because it is being edited by another user
- If the RAW JSON is generated, the Agent will add metadata indicating the encountered error codes to that RAW JSON.
WARNINGIf you choose Yes for Continue on Toolkit Error, it is possible that, even if the errors listed above (and there may be other toolkit errors) are present, incomplete data could be copied to the RAW JSON files.
If any unhandled errors occur, use this section to set the retry policies for both injection RAW file generation and injection upload.
- If errors occur during extracting the Injection data from Empower, the agent will retry to extract the injection for the number of times specified in the Injection Processing field (or fewer times, if successful). The default value is 3.
- If errors occur during upload of the Injection RAW JSON to the TDP, the agent will retry to upload the the file for the number of times specified in the Injection Upload field (or fewer times, if successful). The default value is 50.
Agent Run Time Settings

Injection - Agent Run Time
You can use the Agent Run Time section to do the following:
- Set the Agent to upload the RAW files to the TDP.
- Set to keep RAW files in the local drive after the files are uploaded successfully.
- Set the Empower Injection RAW file output folder. (This must be a valid path.)
- Set the scan interval in minutes for how often the Tetra Empower Agent periodically scans Empower projects to detect new or reprocessed injections.
- Set the minimum required free disk space needed for the Tetra Empower Agent to process an injection.
- Set advanced properties, such as the number of processors you want to use to generate injections, scan time interval, and generation timeout.
To configure Agent Run Time settings, do the following:
- If you set the Upload Raw Files to TDP field to Yes, then the Keep Local RAW File After Upload field is automatically set to Yes. If you set the Upload Raw Files to TDP field to No, the agent will not connect to the TDP and only generate files to store them locally.
- If you set the Keep Local RAW File After Upload field to No, then the RAW files are deleted from the output folder after the RAW files have been successfully uploaded to the TDP.
- The Required Free Disk Space setting allows you to set the minimum required free disk space required for the Tetra Empower Agent to process an injection. The default setting is 10 GB (changed from 1 GB in version 4.1.0). The free disk space refers to the output disk. When the Tetra Agent processes an injection, it first checks if the machine meets, or exceeds, the minimum required free disk space value. If the machine meets the required free disk space, then it processes the injection. If it does not, then the machine writes a log message while the Tetra Empower Agent pauses and waits for other injections in progress to finish processing. The Tetra Empower Agent then waits for files to finish uploading to the TDP before it attempts to process the new injection again.
RAW Files May Use a Large Amount of Disk SpaceIf you decide to retain the RAW files, be aware that RAW files may use most of the disk space. If the available disk space is less than what you've indicated in the Required Free Disk Space setting, then the Agent will pause the Injection generation. Use the Injection Summary page to check the available disk space.
- Empower Agent Output Folder is the directory where the RAW JSON files are outputted locally before uploading them to TDP. The Empower Group User (or Local System user) should have read/write access to this directory.
Advanced Settings
The Advanced Settings option in the Agent Run Time section provides settings to manage scan, generation, and upload throughput. These are advanced tweaks and the recommended settings are included as default values.
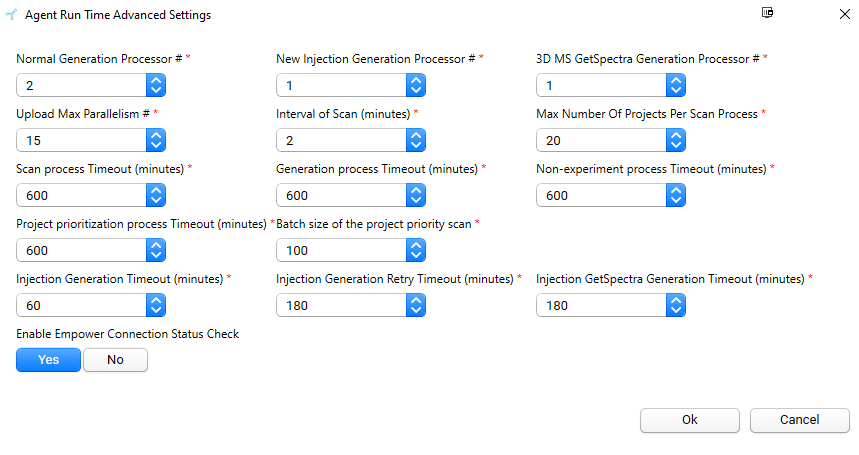
- Normal Generation Processor #: The agent can prioritize injections based on when they have been created/modified (more details in the next section). This setting provides the number of processes the agent will allocate to injections that are assigned Normal priority. This setting leverages the hardware of machines that have multiple cores, which allows you to specify how many processes you want the Tetra Empower Agent to use to generate Empower injections. Each process handles one project at a time; specifying several processes allows the Tetra Empower Agent to process several projects in parallel and expedite processing time. The default value is 2.
- New Injection Generation Processor #: The agent can prioritize injections based on when they have been created/modified (more details in the next section). This setting provides the number of processes the agent will allocate to injections that are assigned High priority (these are recently created or modified injections that will be generated before historical/older injections). This setting leverages the hardware of machines that have multiple cores, which allows you to specify how many processes you want the Tetra Empower Agent to use to process Empower injections. Each process handles one project at a time; specifying several processes allows the Tetra Empower Agent to process several projects in parallel and expedite processing time. The default value is 1.
- 3D MS GetSpectra Generation Processor #: The agent provides an option to specify how 3D MS data cubes will be generated for every project (see Project tab settings later in this document for more details). If for a selected project, the 3D MS Method is specified as GetSpectra, then any injection in that project (irrespective of priority) will be processed by processes defined here. This setting leverages the hardware of machines that have multiple cores, which allows you to specify how many processes you want the Tetra Empower Agent to use to generate Empower injections. Each process handles one injection, which contains 3D MS channel, at a time; specifying several processes allows the Tetra Empower Agent to process several 3D MS injections in parallel and expedite processing time. the default value is 1.
Optimize for Your Empower InfrastructureThe ability of the processes from these three generation processor settings, along with the injection scan, injection upload, and non-experimental generation processes (if configured), to perform optimally will depend on the virtual machine (VM) that is setup for the agent. During testing, six or 10 processors were adequate when running Empower Services on a small instance, t2.large. However, that may depend on your Empower Services needs (for example, how many concurrent sessions it should support, the load of each session, and so on).
Make sure that the instance(s) running the EmpowerDB and Empower file server can sustain the load from the set Generation Processes. Using too many processes may increase the risk of overloading the instance(s) and reduce their service availability.
- Interval of Scan (minutes): Provides the frequency for the agent to scan Empower again after the time defined here. If the previous scan is still continuing, then the next scan cycle will wait for it to finish and then start the scan after the time defined here. The default value is 2 minutes.
- Upload Max Parallelism #: Provides the setting for maximum parallel processes for upload. The upload continuously processes generated RAW files and this instructs the agent how many processes to use. The default value is (total CPU cores available -1).
- Max Number of Projects Per Scan Process - Instead of scanning all of the projects in one process, the Agent separates the whole list into multiple batches with a default size of 20. This size may be set to 1 to improve reliability, but it will introduce some overhead.
- Scan process Timeout (minutes) -This setting is to prevent the scan process from hanging due to unhandled Empower ToolKit errors. The default is 600 minutes. If you change the setting of Max Number of Projects Per Scan Process, you might need to adjust this setting as well. Please consult your Tetra support engineer.
- Generation process Timeout (minutes) - This setting is to prevent the injection generation process from hanging due to unhandled Empower ToolKit errors. The default is 600 minutes.
- Non-experiment process Timeout (minutes) -This setting is to prevent the Non-experiment data extract process from hanging due to unhandled Empower ToolKit errors. This setting is applied for all four types of Non-Experiment data extraction, “Extract System Audit Trail“, “Extract Project Audit Trail“, “Extract Message Center“ and “Extract Project/User Access Permission“.
- Project prioritization process Timeout (minutes) - The Tetra Empower Agent has a dedicated process to determine the project priority. This setting specifies a timeout value to restart the process to reduce the impact of the unhandled Empower ToolKit errors.
- Batch size of the project priority scan - Similar to other scan processes, the Tetra Agent tries to process the project scan in batches to reduce the potential impact of ToolKit unhandled errors. The default size is 100.
- Injection Generation Max Timeout (minutes): This setting is used for injections where there are no 3D MS data cubes or has 3D MS data cubes but 3D MS generation method is not GetSpectra at the project level. This is the maximum time the agent will use to generate an injection (once it has started the generation process for the injection). If the injection cannot be generated in the specified time, an error is logged (consider increasing the time if there are such errors). The default value is 60 minutes.
- Injection Generation Retry Timeout (minutes) - This setting is applied when injection generation fails and the Tetra Empower Agent needs to retry the generation. The default value is 180 minutes.
- Injection GetSpectra Generation Max Timeout (minutes): This setting is used for injections where there are 3D MS data cubes and 3D MS generation method is GetSpectra at project level. This is the maximum time the agent will use to generate an injection (once it has started the generation process for the injection). If the injection cannot be generated in the specified time, an error is logged (consider increasing the time if there are such errors). The default value is 180 minutes.
- Enable Empower Connection Status Check - The default is Yes. The Agent checks the Empower connection periodically. If it doesn’t connect successfully, the Agent will terminate the processes to scan or generate the injection. It improves the reliability by avoiding processes hanging due to Empower errors.
Injection Generation Boundary Parameters Settings

Injection - Injection Generation Boundary Parameters
The Injection Generation Boundary Parameters section, which was introduced in Tetra Empower Agent version 4.2.0, was designed as backstop/fail-safe should Empower indicate that the injection processing hangs in the incomplete state, even though it actually is complete.
Two new fields were added for the Tetra Empower Agent 4.2.0: Maximum Acquisition Duration and Run Time Tolerance. The Prioritize Injections created/modified in last (hours) has been added in Tetra Empower Agent v5.1.0.
- Maximum Acquisition Duration: Indicates how long the Tetra Agent should wait before uploading an incomplete injection processed file. If the injection remains incomplete, the agent will keep scanning and waiting until the injection reaches complete status or reaches the Maximum Acquisition Duration hours after the Last Modified Date of the Channel RAW data file.
NOTEThe default value for the Maximum Acquisition Duration is 72 hours, which is the maximum amount of time that the LAC/E can hold the data in buffering mode. You can adjust this number to accommodate needs specific for your infrastructure. This value can be configured to be any integer from 1 to 150, but we strongly recommend that this value not be less than 72 hours to match the LAC/E buffering duration.
- Tolerance Percentage: Is set in a new field called Run Time Tolerance that was added in the Tetra Empower Agent. Run Time Tolerance is used when comparing the injection run time with the range of timestamps in the injection data. This comparison is used to determine whether an injection has completed or is still in progress, and is only used in versions of Empower where the injection completion status is not available. The actual duration of data collected may not exactly match the planned injection run time, so this configurable tolerance is used in the comparison. If the difference between the last timestamp and the injection run time is in the range of the tolerance percentage, the injection is considered complete. The default value of Run Time Tolerance is 1% and can be set up to 50%. This field is used for Empower 3 Pre-SR3 implementations only.
NOTETo avoid Data Integrity issues, the agent will not generate the RAW JSON file until the acquisition process is finished.
- For Empower SR3 and above, we use the injection status and channel status to determine when injection information is complete.
- Pre-SR3, we use the injection runtime and the datacube timestamp to determine when injection information is complete.
- Prioritize Injections created/modified in last (hours) provides the option to specify the number of hours, which the agent will use to identify any injections that have been created or modified in that window back from now. These injections will be assigned high priority and will be generated before other injections with normal priority are generated. The number of processes used to generate these injections (and the project containing those injections) is defined in Agent Run Time → Advance Settings. The default value is 72 hours. We recommend keeping this value the same as the Maximum Acquisition Duration setting.
Non-Experiment Settings

For Tetra Empower Agent v4.0.0 and higher, you can extract and review processing summaries for non-experiment data. The Empower Agent can generate RAW files from the following Empower data streams:
- System Audit trails
- Project Audit trails
- Message Center logs
- Empower Project/User Access permission
Choose Yes for the data stream you want to extract. Non-experiment data shares the same configuration settings as Injection data for uploading to the TDP, and retaining generated data locally.
The Time Interval (minutes) setting can be configured to specify the frequency of generating the non-experiment data. The default value is 60 minutes.
NOTEStarting with Empower Agent v5.2.3, we have introduced an option to include Project methods in the Project/User Access Permission data output. This setting is activated and set to Yes by default.
Injection Service
The Injection Service section contains the following tabs:
- Project
- Injection summary
- Non-Experiment Summary
Project Tab
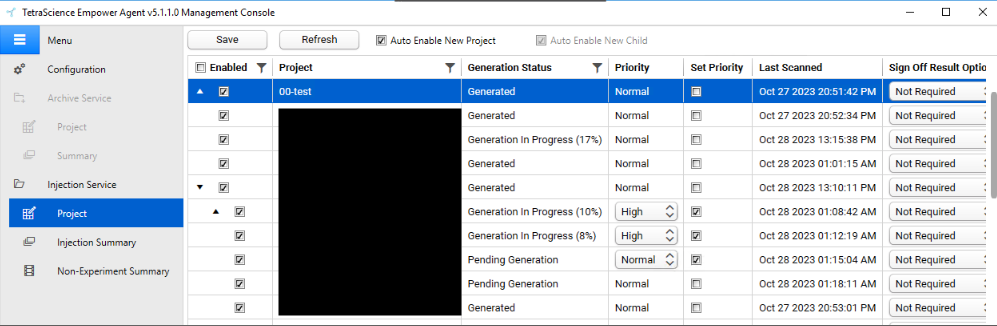
Injection Service - Project
This tab provides configuration to manage which projects from Empower will be scanned and generated by the agent. The project list display contains all the projects the Empower User can access in Empower and is arranged in alphabetical order, maintaining the parent-child relationship that is set up in Empower for these projects. When new Empower projects are added to Empower System, the Agent detects them from its periodical scan job and adds those new projects to the Project list automatically.
One Empower Database can contain hundreds to thousands of projects. You can select the projects you want to process. As a System Administrator, you can select which projects the Agent uses to generate the RAW files. Additionally, the Agent constantly monitors any project changes to detect new and updated Injections. To save any changes, choose Save.
IMPORTANTIf the Agent scans an Empower project that has a path with more than 260 characters (the
MAX_PATHlimitation for the Windows API), the Agent won't record that the file upload succeeded. This behavior results in a race condition that causes the Agent to continue re-uploading the same file, without recognizing that each following upload attempt is also successful. Please contact TetraScience support if you encounter this issue.
You can do the following in the Project tab:
- Save : After making any configuration changes, remember to save settings.
- Refresh : Refreshes the list of projects manually.
- Auto Enable New Project: Select the Auto Enable New Project check box to have the Agent extract the Injections automatically from the projects added to Empower. This feature applies only to those projects that were added or imported to the Empower Agent after you changed and saved the check box setting.
- Auto Enable New Child: When this option is selected, the newly added project will be enabled automatically if its parent project is enabled. Also, the newly added project will inherit the Sign Off Result Option and 3D MS Method from its parent project. When the Auto Enable New Project is selected, the Auto Enable New Child option is selected automatically.
- Enabled : This selection box allows you to manually select or unselect which projects the agent should scan and extract data from. If a project is unselected which injections from it are being generated, the agent will complete generating all injections from it at that time. Subsequently the project will not be scanned and any new or modified injections will not be generated.
- Project : Shows the Empower project name.
- Generation Status: Shows the generation status of the project. The Generation Status has the following possible states:
- No Injection—Project is not selected.
- Pending Generation—Project is selected but has not been processed yet.
- Generation In Progress ( x )—Injections in the project are processing. The X percentage is calculated from the count of total injections and the number of injections have been generated.
- Generated—Injections in the project have been processed completely. If it is in the middle of processing, it will show how many percentages of total Injections have been processed.
- There can also be other error messages which are returned from ToolKit during injection scanning.
- Priority : Shows the scan priority assigned to the project. If there are any injections for a project that have been modified within the time provided in Prioritize Injections created/modified in last (hours) setting, the priority is High, else the priority is Normal. Based on the priority, there are dedicated processes to generate the injections (see Configuration → Agent Run Time → Advanced Settings for details).
- Set Priority - As a System Administrator, you can explicitly set the project priority. When this checkbox is checked, the associated Priority field will turn into a dropdown with values as High and Normal. It overwrites what is calculated by the Agent. When the user unchecks this field, the Agent will use the priority calculated by the Agent.
- Last Scanned: Shows the date and time when the project was last scanned by the agent.
- Sign Off Result Option: Provides settings to manage if injection data will be generated by an agent based on sign offs performed in Empower. These are the available options that you can select for the Sign Off Result Option for a project (default is Not Required):
- Not Required
- Level 1 Required
- Level 2 Required
- 3D MS Method: Provides settings to configure which toolkit method will be used to generate 3D MS data cubes, if any injection for the selected project has them. The options are (default is Get3D):
- None : No 3D MS data cubes will be generated by an agent even if an injection contains that data in Empower
- Get3D : Will use Get3D toolkit method to generate the 3D MS data cubes. This may result in data that is not precise as Get3D “bins” the results and rounds them.
- GetSpectra : Will use the GetSpectra toolkit method to generate 3D MS data cubes. This will provide the most precise data from Empower for 3D MS. However, please note this method will be slower to generate the injection. Dedicated process(es) will generate 3D MS with GetSpectra method. The number of processes used for this is defined in 3D MS GetSpectra Generation Processor # setting. Refer to FAQs to know more about the difference between Get3D and GetSpectra methods for 3D MS data cubes.
Injection Summary Tab
This section provides ability to re-upload project data, shows summary of injection processing, injection processing errors and system health metrics.
View Project Data and re-Upload

The dropdown shows All Projects option as well individual project names, which the agent has scanned and found injections to be generated. The Processing Summary (see next section for details) shows the injection processing summary for the selected project. If All Projects is selected, then Processing Summary will show data for all projects the agent has processed.
The Rerun Project(s) button allows you to re-upload data for selected projects. This will open a project tree to select one or more projects. The projects displayed here are those which are selected in the Project tab and the agent has already generated injections for. The projects list is alphabetically ordered and will have parent-child tree similar to how it is displayed in the Project tab. Choose OK to re-upload all the injections for the selected projects. All projects may be re-uploaded using this option.

Popup to select projects for Rerun
Processing Summary
The Processing Summary shows the scan, generation, and upload status of injections for a selected project (or all projects).
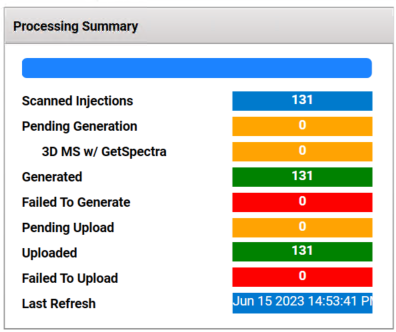
Example Processing Summary
- Scanned Injections: Number of Injections scanned by the agent
- Pending Generation: Number of Injections that have been scanned but not generated yet by the agent
- 3D MS w/ GetSpectra: Number of Injections which have 3D MS data cubes, and corresponding 3D MS Method in project is GetSpectra, that have been scanned but not generated yet by the agent
- Generated : Number of scanned Injections for which that RAW files generated
- Failed to Generate: Number of scanned Injections that failed to generate a RAW file
- Pending Upload: Number of generated Injections waiting to be uploaded to the agent
- Uploaded : Number of Injections that have been uploaded to TDP successfully
- Failed to Upload: Number of Injections that the agent failed to upload to TDP
- Last Refresh: Timestamp of latest Injection processing summary displayed in local time
Injection Generation Error and Injection Upload Error tabs

Injection Generation Error tab

Injection Upload Error tab
Injection Generation Error: This section will display any injections which were scanned but could not be generated due to any error.
Injection Upload Error: This section will display any injections that were generated but could not be uploaded to TDP. The Agent will retry the failed errors multiple times based on Injection Upload (Times) setting you specified in the Management Console before displaying the information here.
For both grids, the fields displayed are Project name, SampleSet Name, Injection Id, Error Message from toolkit, whether the injection Has 3D MS data cubes and the selected 3D MS Generation Method at the project level, in the agent, to which this injection belongs.
To regenerate and re-upload the failed injections manually, select a row in the grid and click Regenerate failed injections or Reupload failed injections in the appropriate grid.
System Message
The Empower Agent generates host server system metrics every minute and provides these metrics:
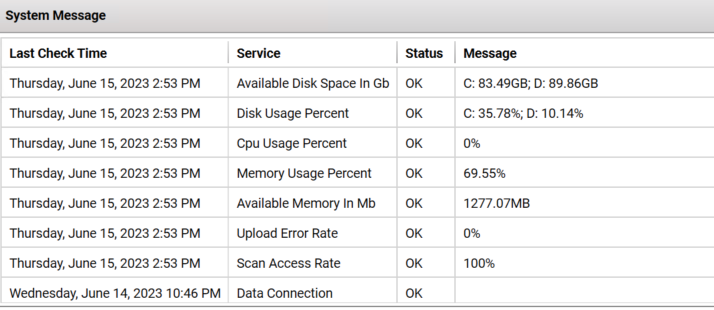
- Available Disk Space (in GB)
- Disk Usage (as a % of the total)
- CPU Usage (as a % of the total)
- Memory Usage (in MB)
- Available Memory (in MB)
- Upload Error Rate
- Scan Access Rate
- Data Connection (connection status between the Agent and the TDP)
CPU Usage Percent is 0%If the CPU Usage Percent shows 0%, then the user account that was defined as an Empower Group User was not included in either the Administrators group or the Performance Monitor Users group.
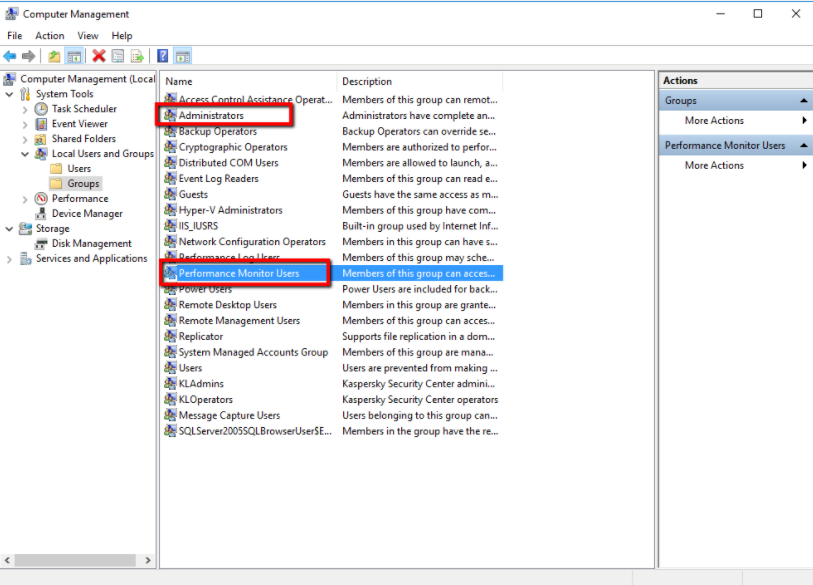
User Groups
Non-Experiment Summary Tab
The Non-Experiment Summary section has two tabs.
- the Audit Trail tab displays the details audits the agent has extracted.
The project name is applied to ProjectAuditTrail type. For SystemAuditTrail and MessageCenter, the Agent uses the Empower Database Name.
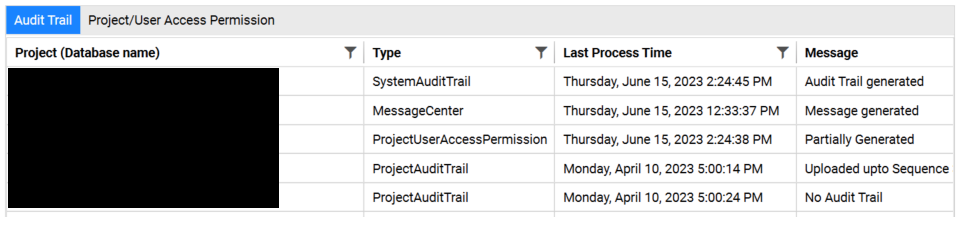
Additional data fields include the following:
- Type
- Message
- Total Generated Records
- Last Process Time
- Latest log (in JSON format)
- Project/User Access Permission has its own summary page where you can review its Project Status, Last Process Time and any Messages.
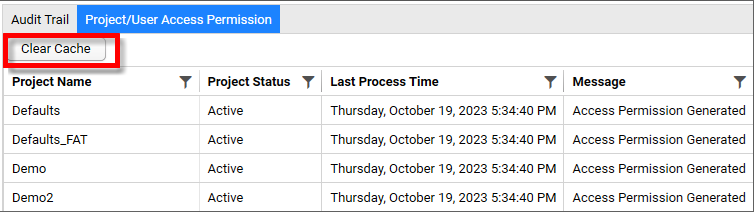
Empower Agent scans projects periodically. When the Agent detects any changes from Empower Project, User, User group, User type, or the methods, the Agent generates a JSON file containing all of the Empower users, user types, and projects and method names with their associated user groups.
The Empower Agent now has a Clear Cache button to clean up the local cache of Project User Permission data. This causes the agent to generate the data from scratch rather than incrementally. It is useful when the local state is in an invalid state and is preventing the agent from extracting the data from Empower.
As of Tetra Empower Agent 4.2.0, project names are displayed in alphabetical order.
You can find which events trigger file regeneration and reupload in this section of the FAQ.
If you store Non-Experiment data in the local drive, it is moved to an Archive folder under this directory: <Output_Folder><Stream><Archive>\
Troubleshooting Issues
The following table includes a list of common issues and suggested actions to take to resolve the issues.
| Issue | Details and/or Action to Take |
|---|---|
| Missing result and chromatogram data | May occur if the Group User Account running the Tetra Empower Agent is not part of the Empower User Group. |
| Injection JSON is not generated | From the Management Console, determine if the Agent is up and running. If it stops unexpectedly, restart the Agent. |
| Previous version of an Empower Project is not generated | Empower V3 can automatically upgrade a Project with the Previous version. However, you must verify the upgraded version by opening the Project from Empower Client application and ensuring that Empower can access it. You may need to perform a manual upgrade. |
| Channel data is missing from the output | May occur because the account running the Tetra Empower Agent is not part of the Empower User Group in Active Directory when Empower Software was installed initially. |
| Error Code 105 in the Project page | The Agent is running, however no Injection is generated, and the status shows
This is an undocumented error. The root cause is unknown. To fix this, restart the Agent. |
Learn More About the Tetra Empower AgentTo learn more about Tetra Empower Agent, see the Tetra Empower Agent FAQs or contact your customer success manager (CSM).
Updated 2 months ago