Manage Your Account
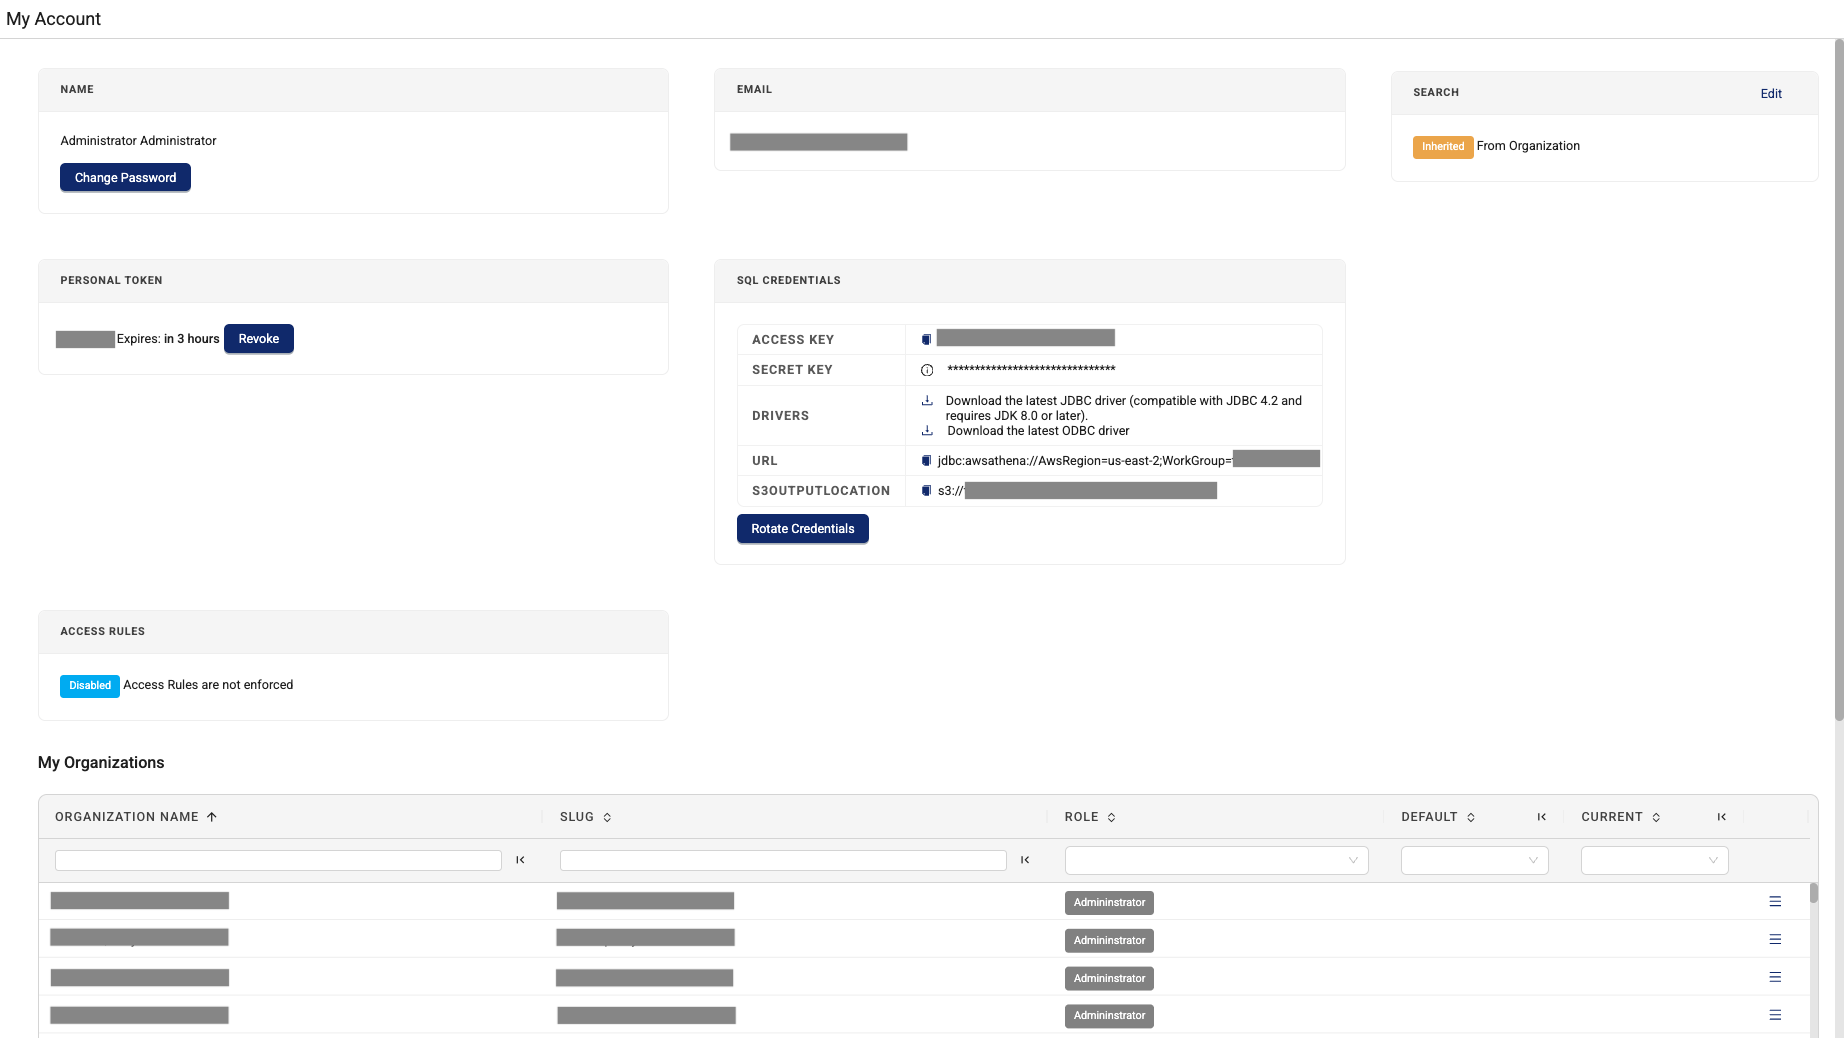
The My Account page allows you to view and manage details about your Tetra Data Platform (TDP) account.
You can use the My Account page to do the following:
- Change your password
- Create a personal token for authentication
- Get credentials to query SQL tables in third-party applications
- Rotate your SQL credentials
- Update your default search filters
- Filter your organizations
- Switch to another organization or set your default organization
NOTEYou can also access information about your organizations and manage them on the Organization Settings page.
Access the My Account Page
To view the My Account page, do the following:
- Sign in to the Tetra Data Platform (TDP).
- In the left navigation menu, choose My Account. The My Account page opens.

Change Your Password
To change your password, do the following:
- Open the My Account page.
- In the Name section, choose the Change Password button. A Change Password dialog appears.
- For CURRENT PASSWORD, enter your current password. For NEW PASSWORD, enter a new password that conforms to the level of complexity required by your organization.
- For RETYPE PASSWORD, re-enter the new password.
- Choose OK.
NOTEIf you don't have access to your current password, see Reset a Forgotten Password.
Copy a Personal Token for Authentication
The TDP uses a personal JSON Web Token (JWT) to authenticate users. To access your organization's Tetra Data outside of the TDP user interface, you can make a copy of your personal token. For example, you can access your data through the TetraScience API or the SDK by using a copy of your personal token. For more information, see Authentication.
To copy your personal token for authentication, do the following:
- Open the My Account page.
- In the PERSONAL TOKEN section, select the Generate Token button. A Personal Access Token dialog appears that prompts you to copy your token to a secure location.
- Copy the personal token by selecting the copy icon next to the token value.
- Choose OK.
IMPORTANTYou can't access the full token value again after you close the Personal Access Token dialog. If you lose access to the token value after closing the dialog, you must generate a new personal token.
Get Credentials to Query SQL Tables in Third-Party Applications
NOTEAdmin users must generate SQL credentials on the Organizations Settings page in the SQL Access tab. For instructions, see Get Org-Level Credentials to Query SQL Tables in Third-Party Applications.
To generate your own SQL credentials to query Amazon Athena SQL tables in third-party applications, do the following:
- Open the My Account page.
- In the SQL CREDENTIALS section, select the Generate Credentials button to create SQL credentials. This option appears only if you haven't created SQL credentials before. Otherwise, the button displays as Rotate Credentials. A Created New SQL Credentials dialog appears that displays your ACCESS KEY and SECRET KEY along with a dropdown that lists the following additional connection parameters:
- Drivers: Provides the option to download either the latest JDBC or ODBC driver. For more information, see What Driver Should I Use?.
- URL: Shows the URL to your TDP organization's instance.
- S3OUTPUTLOCATION: Shows the location in Amazon Simple Storage Service (Amazon S3) where query results will be stored.
- Copy each credential value to a secure location by selecting the copy icon next to each value.
- Choose Close.
IMPORTANTIf you're using third-party tools to connect to Athena SQL tables, make sure that you configure your driver's
WorkGroupconnection parameter as your organization's slug (the same as your<orgSlug>value). SQL queries fail if theWorkGroupconnection parameter isn't configured as a validorgSlugvalue, even though it's listed as an optional parameter in the AWS documentation.
Rotate SQL Credentials
IMPORTANTYou can have one set of SQL credentials active at a time only. If you choose Rotate Credentials, the new set of generated credentials will cause the previous set of credentials to stop working.
To rotate your existing SQL credentials to querySQL tables in third-party applications, do the following:
- Open the My Account page.
- In the SQL CREDENTIALS section, select the Rotate Credentials button. New SQL credentials appear.
Update Your Default Search Filters
You can configure your personal default search filters and columns that appear when you use the Search page. These settings override any organization-level default search settings and allow you to customize your search experience.
NOTEIf the SEARCH section on your My Account page displays Inherited, you're currently using the organization's default search settings.
To update your default search filters, do the following:
- Open the My Account page.
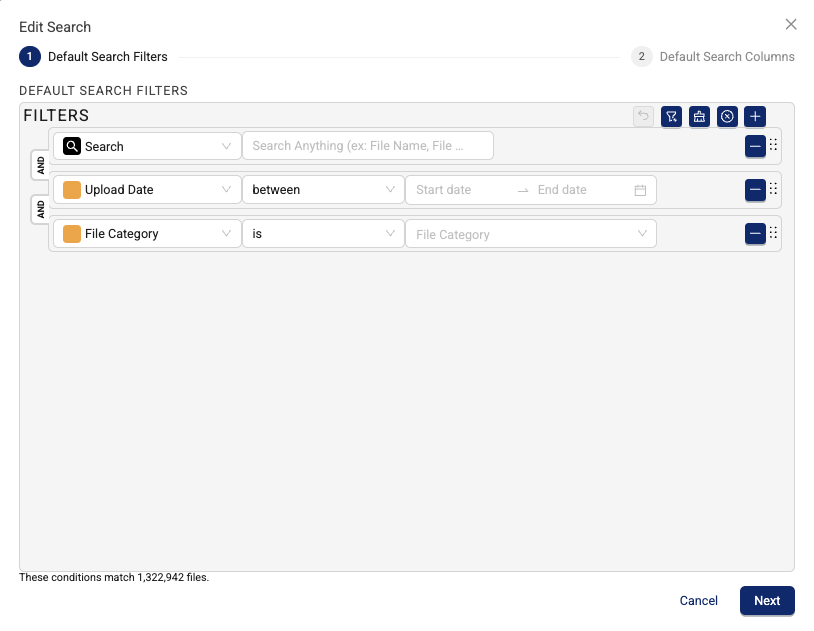
- In the SEARCH section on the right side of the page, select the Edit button. The Edit Search dialog appears.

-
In the Default Search Filters step, configure the filters that you want to appear by default on the Search page:
- To add a filter, select the plus (+) icon. Then, select a filter type from the dropdown list.
- To add the most commonly used filters (Upload Date and File Category), select the Add the most commonly used filters icon.
- To remove a filter, select the minus (-) icon next to that filter's row.
- To reorder filters, select the drag handle icon on the right of a filter's row and drag it to the desired position.
For more information about filter options, see Filter Options for Search.
-
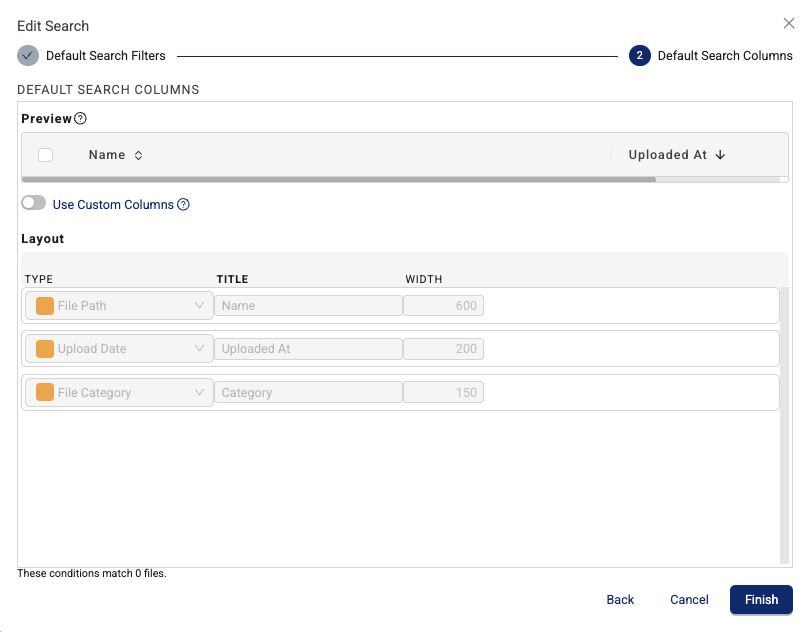
Choose Next. The Default Search Columns step appears.

- In the DEFAULT SEARCH COLUMNS step, configure how columns display in your search results:
- For TITLE, enter the name that you want the column to display.
- For WIDTH, enter how wide you want the column to be in pixels.
- (Optional) To use custom columns instead of recommended columns, select the Use Custom Columns check box. Custom columns allow you to manually add or remove columns and specify custom column headings.
- To reorder columns, select the drag handle icon on the right of a column's row and drag it to the desired position.
- Choose Finish.
NOTEWhen you use recommended columns, the system will automatically generate columns based on the filters you're using. New columns will be automatically added or removed when the filters are changed. You can adjust the order and width of the columns, but you can not add or remove columns. When you use custom columns, you must manually add or remove columns. Columns will remain unchanged when filters are changed. You can specify the text of the column heading as well as modify the columns' order and widths.
Filter Your Organizations
To filter the list of your organizations by name, slug, and role, do the following:
- Open the My Account page.
- In the My Organizations section, enter the information that you want to filter for in the associated text field at the top of each column (NAME, SLUG, ROLE, DEFAULT, CURRENT). The list filters itself as you enter text or select any of the drop-down list options.
- (Optional) To refine your list by applying filter operators, select the filter icon next to each text field. For more information, see Organization Filters and Organization Filter Operators.
NOTEFor filter fields with a drop-down list, the filters listed are the only filter options that you can apply to that field. Text fields contain a standard set of operators that are listed in the following Organization Filter Operators table.
Organization Filters
| Field | Description |
|---|---|
| Name | Name of the organization |
| Slug | Unique identifier for the organization |
| Role | User account role |
| Default | The organization that’s configured as the default organization when you log in |
| Current | Indicates which organization is currently shown |
Organization Filter Operators
| Filter Operator | Description |
|---|---|
| Contains | Includes matches for characters you enter |
| Not Contains | Excludes matches for characters you enter |
| Equals | Includes exact matches for characters you enter |
| Not Equal | Excludes exact matches for characters you enter |
| Starts With | Includes matches that start with the characters you enter |
| Ends With | Includes matches that start with the characters you enter |
| Blank | Includes blank matches |
| Not Blank | Excludes blank matches |
Switch to Another Organization or Set Your Default Organization
To switch between organizations or to set your default organization, do the following:
- Open the My Account page.
- In the My Organizations section, find the name of the organization that you want to either switch to or make your default organization. For instructions, see Filter Your Organizations.
- In the far right column of the organization’s row, select the menu icon. Then, choose from one of the following options:
- To switch to the organization, choose Switch to this Organization.
-or- - To set the organization as your default organization, choose Set as Default Organization.
- To switch to the organization, choose Switch to this Organization.
NOTEYou can have one default organization at a time only. After you configure a new default organization, you are automatically placed into the newly designated default organization the next time you sign in to the TDP.
Documentation Feedback
Do you have questions about our documentation or suggestions for how we can improve it? Start a discussion in TetraConnect Hub. For access, see Access the TetraConnect Hub.
NOTEFeedback isn't part of the official TetraScience product documentation. TetraScience doesn't warrant or make any guarantees about the feedback provided, including its accuracy, relevance, or reliability. All feedback is subject to the terms set forth in the TetraConnect Hub Community Guidelines.
Updated 3 months ago
