Tetra Data Capture App

The early adopter program (EAP) version of the Tetra Data Capture App provides scientists the ability to capture readings from balances. It then automatically uploads those measurements to the Tetra Scientific Data and AI Cloud, where they're accessible through the Tetra Data Platform (TDP) and any preconfigured electronic lab notebook (ELN) or laboratory information management system (LIMS).

🚧

IMPORTANT

The Tetra Data Capture App is available through an EAP release currently and is activated for customers through coordination with TetraScience. For more information, or to activate the app in your environment, contact your customer success manager (CSM) or account executive.

Workflow

The following diagram shows an example Tetra Data Capture App workflow.

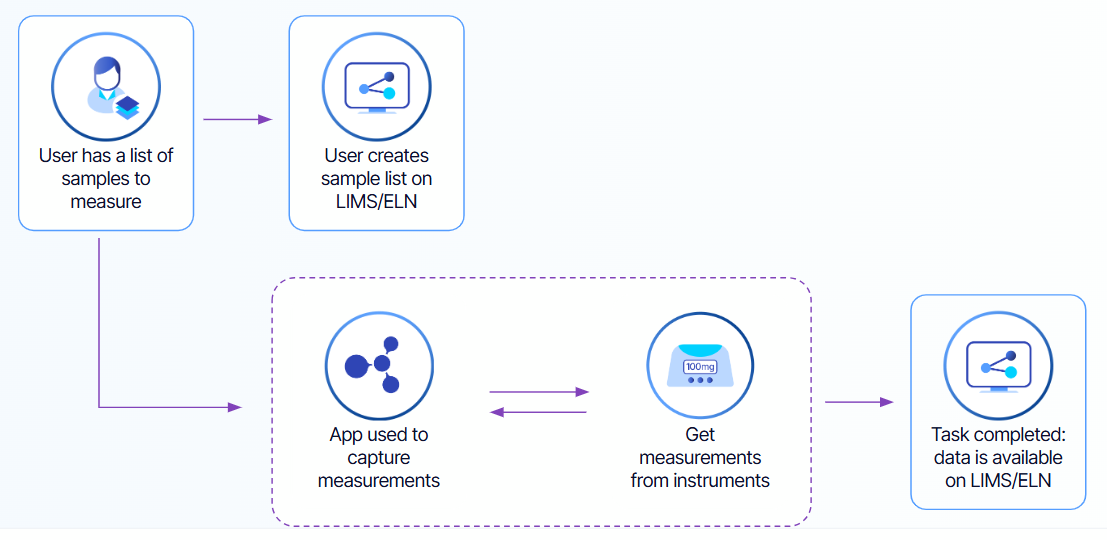
The diagram shows the following process:

  1. A scientist identifies samples to weigh on a balance.
  2. The scientist creates a sample list in their organization's LIMS or ELN system, which is integrated with the TDP.
  3. The scientist takes photos of the balance readings for each sample on an iOS device by using the Tetra Data Capture App. A QR code placed on the balance helps the app automatically identify the instrument.
  4. The scientist reviews each captured reading in the app to make sure that they're accurate before confirming that the data is ready to be uploaded.
  5. The readings are automatically uploaded to the TDP, where the data is immediately accessible through the preconfigured LIMS or ELN system, and the TDP user interface.

Prerequisites

Tetra Data Capture App requires the following:

  • Tetra Data Platform (TDP) v4.0.0 or higher.

  • One of the following supported iOS devices:

    • iPad 6th generation (Recommended) or higher with Apple A10 or higher, at least 2 GB memory, and running iPadOS 13.4 or higher.
    • iPad mini 5th generation or higher with Apple A10 or higher, at least 2 GB memory, and running iPadOS 13.4 or higher.
    • iPhone 6th generation or higher with Apple A8 or higher, at least 2 GB memory, and running iOS 13.4 or higher.
  • QR codes that encode each instrument's identification information. Make sure that you place the QR code close to the instrument display. The QR code must be captured in the same image frame as the displayed reading. For more information, see Creating QR Codes.

Set Up the Tetra Data Capture App

To set up the Tetra Data Capture App, do the following.

Step 1: Connect Your LIMS or ELN System to the TDP

If your organization hasn't already, make sure that the LIMS or ELN system that you're using can communicate with the TDP by setting up the required Tetra Integration for that system.

Step 2: Download the App

To download the Tetra Data Capture App on an iOS device, do the following:

  1. On the iOS device that you want to use, open the App Store.
  2. In the App Store Search bar, enter TetraScience. The TetraScience mobile app appears.
  3. Choose Get to download the app.

Use the Tetra Data Capture App

You can use the Tetra Data Capture App to do the following:

Sign in

To sign in to the Tetra Data Capture App after it's downloaded on your device, do the following:

  1. On your iOS device, select the Tetra Data Capture APP icon. The Get Started screen appears.

  1. For TDP server, enter your TDP server URL (for example, tdp.tetrascience-demo.com). Don't include the https:// portion of the URL.
  2. Choose Submit. The sign-in screen appears.

  1. Enter your TDP credentials (email and password). Then, choose Login. You can choose SSO instead if your organization has single sign-on configured. The Threads screen appears.

📘

NOTE

To reset your password, see Reset a Forgotten Password. To change the TDP URL that you're using, select "Need to customize your settings? Click here".

  1. (For initial setup only) Choose Settings to open the Settings view. Then, choose Organization to select the organization that you want to join.

Capture Readings

To capture readings through the Tetra Data Capture App, do the following:

  1. Create a sample list in your organization's LIMS or ELN system.
  2. Perform the required action in the LIMS or ELN system to transfer the list to the TDP.
  3. Sign in to the Tetra Data Capture App. Your sample list(s) appear as threads.

  1. Select the thread that you want to capture readings for. A list of the experiment ID, a description of the task, its current status, who it's assigned to, and the list of samples appears.

  1. Select Get Weight — [X] for the reading (task) that you want to capture. The task's data capture fields appear.

  1. Choose Capture. The Image Capture screen appears.

  1. Position the camera so that both of the following are visible in the camera frame:
    • Device QR code
    • Instrument reading (make sure the reading is visible within the onscreen rectangle)

📘

NOTE

You can adjust the size and placement of the onscreen rectangle by tapping Settings.

  1. Choose Capture Image.
  2. The task's reading appears, including an image of the reading and the details of the sample.

  1. (Optional) To recapture the reading, choose Retake.
  2. Choose Complete. Then, capture other readings (tasks) as needed.
  3. After all tasks in the thread are complete, choose Close. Each completed task is marked with a blue checkmark. You can now access the data in your organization's preconfigured LIMS or ELN system, or the TDP user interface.

View Completed Readings

To view completed readings (threads) in the app, do the following:

  1. Sign in to the Tetra Data Capture App.
  2. In the upper right filter dropdown on the Threads screen (default All), select Completed. Then, select the completed thread that you want to review.

Creating QR Codes

The Tetra Data Capture app identifies specific instruments by using QR codes. The following procedure shows how to create a QR code that includes relevant metadata for a specific instrument.

  1. Install the following GitHub packages on the computer you're using:

  2. Create and save a .txt file locally that includes the device's metadata on separate lines. Format each value as a key-value pair (for example, name:Balance04). You can use the following clear text as a template:

name:Balance04
type:mass balance
location:Lab123
brand:Mettler Toledo
serialNo:235AD254
assetTag:UY5623653
  1. Run the following bash script. Make sure that you replace the input file ($filename) with the name of the .txt file that you created in step 2. The output returns a QR code that includes the information that you entered in your .txt file.
#!/bin/bash

filename="$1"
basename=$(basename "$filename" .txt)
echo -e $(cat "$filename" | awk '{printf "%s\\n", $0}') | \
qrencode s10 -o - -t PNG | \
convert - -gravity South -background White -splice 0x10 -pointsize 30 -annotate +0+2 "$basename" "${basename}_qr.png"

QR Code Example

🚧

IMPORTANT

When creating QR codes to use with the Tetra Data Capture App, keep in mind the following:

  • It's recommended that you include a label at the bottom of each QR code. The label can help users and data reviewers quickly identify the device.
  • Make sure that you place the QR code close to the instrument display. To work, the QR code must be captured in the same image frame as the value in the instrument display.