Tetra File-Log Agent Installation Guide (Version 4.3.x)
NOTETo restrict access to the local Tetra Agent Management Console, you can edit the Agent’s installation folder’s permissions to grant least privilege access. For more information, see Restrict Access to Agent Installation.
This guide shows how IT Administrators can install and configure Tetra File-Log Agent versions 4.3.x.
To set up the Tetra File-Log Agent, you must do the following:
- Install the Tetra File-Log Agent
- Configure the Tetra File-Log Agent
- Configure the FileWatcher Tetra File-Log Agent
- Start and Stop the Tetra File-Log Agent
- Monitor Tetra File-Log Agent Progress and Metrics
For instructions, see the procedures in each of the following sections.
NOTE:The File-Log Agent can only retrieve files stored on the NTFS file system. Other file systems are not supported. Also, when using NTFS, do not make any directory you want to watch case-sensitive.
Install the Tetra File-Log Agent
Verify File-Log Agent RequirementsBefore you install the File-Log Agent, verify that you meet the requirements.
TetraScience provides a Windows Installation Package (.msi) file. To access the server and run the installation package, you must log in as an Administrator.
To install the Tetra File-Log Agent, do the following:
- Double-click the installation package file to start the installation wizard.

Tetra File-Log Agent Installation Wizard
- Click Next > and follow the prompts. The default Tetra File-Log Agent installation path is:
C:\Tetrascience\Tetrascience.Agent.File-Log.v4.3.0. - When you complete the Wizard, click Close to exit.
- After the Tetra File-Log Agent is successfully installed on the server, you can access its Windows-based Management Console under the TetraScience folder from the Windows Programs.
Configure the Tetra File-Log Agent
After you have successfully installed the Tetra File-Log Agent, use the Windows-based Management Console to continue the Agent configuration.
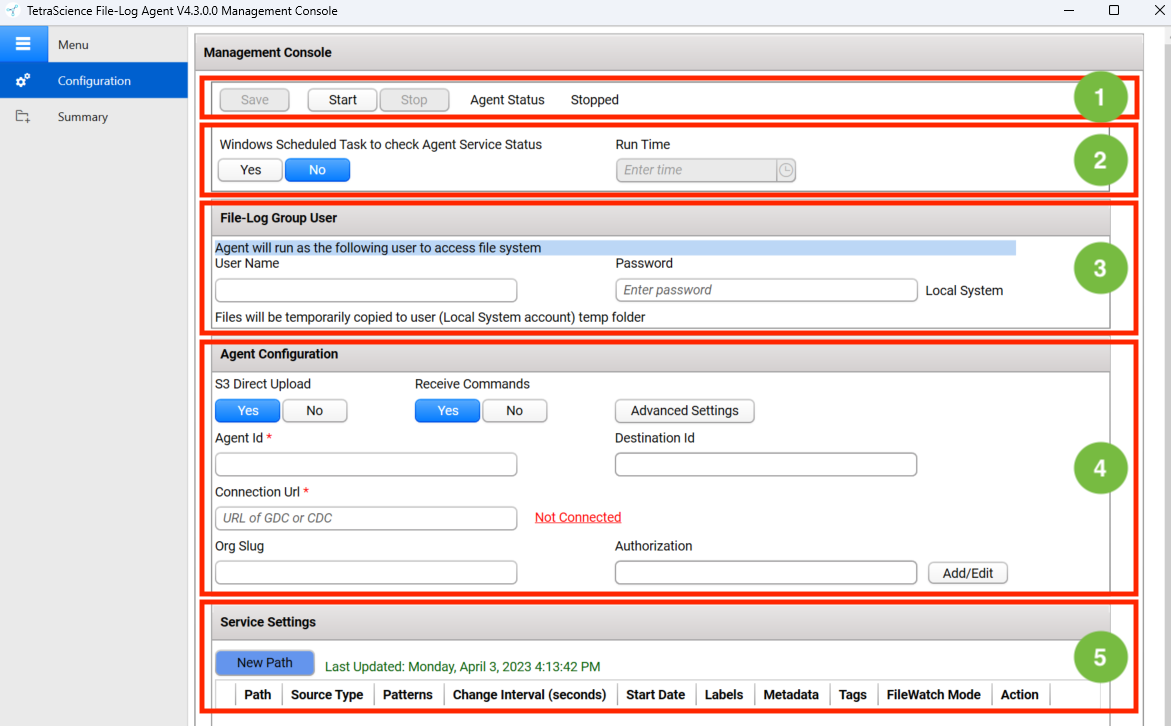
Management Console
The Management Console is divided into five sections:
- (1) Agent Status
- (2) Windows Task Scheduler
- (3) File-Log Group User
- (4) Agent Configuration
- (5) Service Settings
Section 1: Configure the Agent Status
The Agent Status section indicates the current state of the Agent's processing status, which can be any of the following:
- Agent Service Not Installed
- Stopped
- Running
To save, start, or stop the Agent, do the following:
- To save the Agent configuration, choose Save.
- To start the Agent after configuring new settings, choose Start. When the Agent starts, the status indicator shows Running.
- To stop a running Agent, choose Stop. The Stop button can be selected only if the Agent is running.

Agent Running status
Section 2: Set a Windows Scheduled Task
You can increase the Agent's reliability by ensuring that the windows service is always running without having to manually check.
- Select Yes to enable the Windows Scheduled Task to check Agent Service Status option on a daily basis. The Windows Task that you create runs under the LocalSystem account.
- Specify the time in the Run Time field when you want the scheduled Windows task to check on the status of the Tetra File-Log Agent windows service.
How it works
- If the Agent windows service is stopped, then the scheduled Windows task automatically restarts the Agent windows service.
- If the Agent windows service is running, nothing will happen.
- If you manually stop the Tetra File-Log Agent, then the scheduled Windows task is removed.

Windows Scheduled Task
Section 3: File-Log Group User
The File-Log Group User is the service account that runs the Tetra File-Log Agent.
- If you leave the User Name field blank, then the Tetra File-Log Agent runs using the Windows predefined LocalSystem account.
| Note |
|---|
| When the File-Log Group User is left blank the Tetra File-Log Agent can only access local folders. If you want to access remote folders you MUST provide a File-Log Group User. |
- If the Tetra File-Log Agent monitors the network's shared folders, then we suggest that you provide a dedicated service account that:
- Has at least read and List folder content permission of the network shared folders (including the subfolders and files contained in those folders).
- Is part of the local user group of the host server.
- Has no account expiration date. If an account expires, then the Tetra File-Log Agent cannot extract data and data acquisition is interrupted.
- Requires the log on as service permission.
When you enter the File-Log Group User Name and Password, the Agent validates the account immediately. If the user name and password are correct, then the Tetra File-Log Agent displays a Valid status next to the field. If the user account does not have the proper permissions, then the word Invalid displays.

Account validation
Section 4: Agent Configuration
Use this section to configure the Agent connection to the Tetra Data Platform. TetraScience provides several options to connect the Tetra Data Platform. To select the best option for your company's needs, see Agent Deployment Options.
S3 Direct Upload
Files that are larger than 500 MB must use the S3 Direct Upload option. Activating this setting tells the Tetra File-Log Agent to directly upload files to the Amazon S3 bucket.
- Set the S3 Direct Upload option to Yes.
- When you set this option to Yes, you can upload a maximum file size of 5 TB.
- Yes is the default setting for new 4.3 installs.
- For agents getting upgraded, the existing setting for this will be preserved.
For more information, see Agent Deployment Options.
SQLite Database File BackupsTo enable the Tetra File-Log Agent to automatically perform regular backups of the SQLite database file, set the S3 Direct Upload option to Yes. When you enable this option, the SQLite database file (which stores agent configuration data) is uploaded to the backup bucket in the TDP. If a Tetra File-Log Agent failure occurs, you can restore the database file from the backup bucket and continue processing.
If you do not use the S3 Direct Upload option, then we recommend that you create periodic backups of the Tetra Agent database, which is typically stored in the installation folder under C:\TetraScience<agent>\Bin\Database. In the event of a failure (for example, if the host server drive is lost), this would enable the data extraction to continue from where it left off without having to re-upload all of the data.
Receive Commands/Enable Queue
The Tetra File-Log Agent can receive commands from the Tetra Data Platform when setting the Receive Commands option to Yes. (If you do this, you'll need to enable the queue in TDP via the UI or via an API endpoint command.) When you set this option to Yes, the Tetra File-Log Agent keeps polling the queue messages sent from the Tetra Data Platform. The messages provides instructions to the Tetra File-Log Agent. In version 4.0.0 and above, the TDP can push the folder path configuration. In version 4.2.0 and above, the TDP can push a file to File-Log Agent. No is the default setting.
TDP Commands and Queue SecurityAlthough queues enable TDP to send commands to the Tetra Agent, the command execution request process is secured.
- TDP does not send actual commands, but rather messages that request commands for execution.
- The Tetra Agent has its own queue to receive messages from TDP and is not shared by any other agent.
- When queues are enabled, the Tetra Agent proactively reads the queue for messages containing command execution requests and determines whether to initiate the command execution. You can control whether to enable local command execution by toggling the Receive Commands option for the Tetra Agent.
- The Tetra Agent can only execute certain a limited set of pre-built commands. As of Tetra File-Log Agent version 4.0, the only available command for execution is to update its configuration based on cloud configuration. For details about cloud configuration, click here.
Advanced Settings
- Click Advanced Settings to open the Agent Configuration Advanced Settings pane.
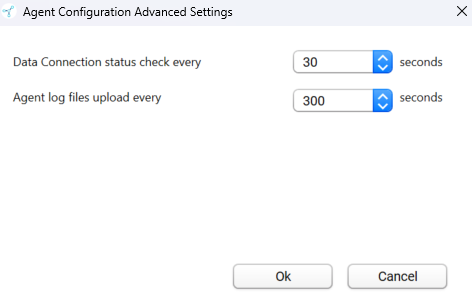
Agent Configuration Advanced Settings
You can specify the time intervals for these fields (default value for each field is 30 seconds):
- Data Connection status check every - Indicates how often the software checks the status of the connection (heartbeat) between the Tetra Data Platform and the Tetra File-Log Agent. If the Tetra Data Platform does not receive a message indicating that the Tetra File-Log Agent is "alive" for more than 5 minutes, it assumes that the Agent is offline.
- Agent log files upload every - Indicates how often to upload log files to the TDP.
Agent ID, Destination ID, and Connection URL
Before you set up a Tetra File-LogAgent, you must enter the following:
- (Required) An Agent ID. The Agent ID (a UUID) is used to connect the Tetra Data Platform. You can retrieve Agent ID from the Tetra Data Platform when you set set up either a Tetra Hub or TDP (No Connector) option.
- Destination ID - if Destination Id is set from the programmatic API, the value in read-only mode will be displayed here, when using agent version 4.3.0. In agent version 4.3.1 and above Destination ID is editable in management console.
- For the Connection Url field, enter the complete URL of the Tetra Hub, Generic Data Connector (GDC) attached to a Data Hub, or No Connector, based on your connection type.
Verify the Agent ID and Connection URL
- Agent ID is required. The Connection URL is required if you are uploading RAW files to the Tetra Data Platform; optional if you are not.
- Before you use the Agent ID and URL with the Tetra Data Platform, we strongly suggest that you verify both with your TetraScience Customer Success Team.
Destination IDDestination ID is editable in management console from agent version 4.3.1 and above.
If you use the "No Connector" agent, then you must do the following:
- When using the JWT token, the Org Slug field is required. Enter the Org Slug to attach it to the header.
- Enter the JWT token in the Authorization field to attach it to the header. To learn how to get the JWT token, see Configure the "TDP (No Connector)" Option.
- Click Add/Edit to open a dialog and enter the JWT token.
- Click Save to close the dialog and encrypt and save the JWT token. The Agent validates the connection immediately and displays the updated connection status next to the Connection URL field.
Section 5: Configure Tetra File-Log Agent FileWatcher Service
NOTE:The File-Log Agent can only retrieve files stored on the NTFS file system. Other file systems are not supported. Also, when using NTFS, do not make any directory you want to watch case-sensitive.
The Tetra File-Log Agent has a FileWatcher Service that provides the path to monitor the file or folder, file source type, glob pattern, file metadata, and tags.
Functionality Change Introduced in Software Version 3.4When the Tetra File-Log Agent sends data to the TDP, the data is stored in the AWS S3. The Tetra File-Log Agent sends data from the Windows file storage (which is not case sensitive) and uploads it to the S3 storage, which is case sensitive. To avoid unintentional duplication of data based on case, the Tetra File-Log Agent normalizes all file path information to lower case. This ensures a behavior similar to one that users would expect from their Windows file storage.
Use the Tetra File-Log Agent FileWatcher Service to provide the path to monitor the file or folder, file source type, glob pattern, file metadata, and tags. When you set the Receive Commands option to Yes, in the Agent Configuration section, the Tetra File-Log Agent will be able to receive the path configuration sent from Tetra Data Platform.
You can also add paths in the Tetra File-Log Agent. To do this, complete the following steps.
- Click the New Path button.
- Enter the following in the table.
- Change Interval (seconds)—Indicates the minimum amount of time that a file in the path must remain unchanged before it is uploaded, and determines the minimum time between the scans of each path. The Agent scans two paths in parallel.
Change Interval File Scanning Example Scenario
The following table shows how file scanning works when three paths are configured with different Change Interval settings.
| Time | Path 1 (20-Second Change Interval) | Path 2 (30-Second Change Interval) | Path 3 (60-Second Change Interval) |
|---|---|---|---|
| 0:00 | Start scanning path 1 | Start scanning path 2 | Waiting... |
| 0:10 | Scan for files updated since path1_lastScanDateTime+20s | Scan for files updated since path2_lastScanDateTime+20s | Waiting... |
| 0:20 | Scan for files updated since path1_lastScanDateTime+20s | Scan for files updated since path2_lastScanDateTime+20s | Waiting... |
| 0:30 | - Scan completes - New record Last Scan time in database - New enqueue Path 1 for next scan | Scan for files updated since path2_lastScanDateTime+20s | Waiting... |
| 0:40 | Waiting... | - Scan completes - New record Last Scan time in database - New enqueue Path 2 for next scan | Start scanning path 3 |
| 0:50 | Start scanning Path 1 | Waiting... | Scan for files updated since path3_lastScanDateTime+20s |
| 1:00 | Scan for files updated since lastScanDateTime+20s | Waiting... | Scan for files updated since path3_lastScanDateTime+20s |
| 1:10 | Scan for files updated since lastScanDateTime+20s | Waiting... | Scan for files updated since path3_lastScanDateTime+20s |
| 1:20 | - Scan completes - New record Last Scan time in database - New enqueue Path 1 for next scan | Waiting... | Scan for files updated since path3_lastScanDateTime+20s |
| 1:30 | Waiting... | Start scanning path 2 | - Scan completes - New record Last Scan time in database - New enqueue Path 3 for next scan |
| 1:40 | Start scanning Path 1 | Scan for files updated since path2_lastScanDateTime+20s | Waiting... |
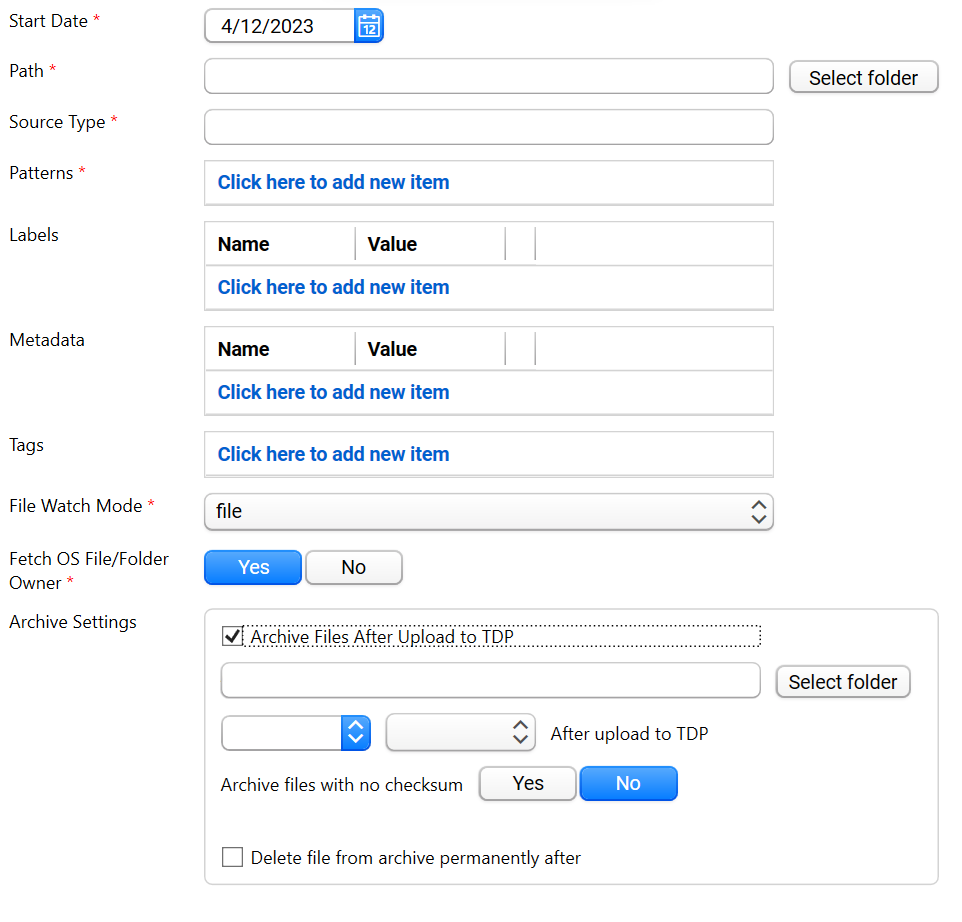
- Start Date
- Path(required)
- Source Type (required)
- Patterns (required)
- Labels—Read-only view of name/value pairs will be displayed, if they are configured through the programmatic API, when using agent version 4.3.0. For File-Log Agent version 4.3.1 onwards, labels are editable in management console
IMPORTANT
The Tetra File-Log Agent doesn’t support backslashes (
\) in labels, even though the TDP supports them. For more information, see Label Formatting. - Metadata
- Tags
- File Watch Mode (required)—File or Folder
- Fetch OS File/Folder Owner—Only available from agent version 4.3.1 and above. When this is Yes, agent will fetch the OS file (or folder, depending the File Watch Mode) creator and add as a metadata to the file during upload
Archive file
IMPORTANTDo not configure the Archive to settings for Tetra File-Log Agent v4.3.4. While the settings are still configurable in the Agent Management Console, the Archive feature is temporarily deactivated in the TDP until we can be sure it meets the necessary data integrity standards in all supported scenarios. For more information, see the Tetra File-Log Agent v4.3.4 Release Notes.
If File Watch Mode is set to File, the Archive to section displays the following options:
- Archive checkbox - if checked, archive settings are enabled
- Archive to - the root folder for inside where the archived files will be stored
- Archive time and unit - time from successful upload after which the file will be eligible to be archived from source folder
Delete file
IMPORTANTDo not configure the Delete settings for Tetra File-Log Agent v4.3.4. While the settings are still configurable in the Agent Management Console, the Delete feature is temporarily deactivated in the TDP until we can be sure it meets the necessary data integrity standards in all supported scenarios. For more information, see the Tetra File-Log Agent v4.3.4 Release Notes.
- Delete checkbox - if checked, delete settings are enabled
- Delete time and unit - time from successful archive after which the file will be eligible to be deleted from archived folder
- You can specify which Path folder to monitor and the glob pattern used to select the files or folders.
You can add, edit, or delete a path. To create a new path, click New Path, or double-click the existing path in the table open the Watcher Path Editor pane:
NOTE
- Glob patterns are a set of wildcard characters. For more information on glob patterns, including examples, see Common Glob Patterns.
- Labels are editable in the Tetra File-Log Agent management console in version 4.3.1 and higher.
- Archive/Delete settings in File mode are configurable in the TDP user interface for TDP v3.5.0 and higher, and in the TetraScience API for Tetra File-Log Agent v4.3.0 and higher.
- Archive/Delete settings in File mode are configurable in the Tetra File-Log Agent management console for agent v4.3.1 and higher.
Additional File Path Specification
Path Specification
- The Tetra File-Log Agent supports absolute paths for local folders and UNC paths for Network Folders. The Agent doesn't support mapped drives or relative paths.
- You can specify up to 500 paths in FileWatcher.
- After you complete configuring the path, you can save the changes and start the Tetra File-Log Agent. After the Tetra File-Log Agent starts, the path configuration changed in the local is uploaded to the S3 bucket. A copy of that path configuration will be available on the Tetra Data Platform. You can then modify the path and push a new path configuration to the Tetra File-Log Agent.
Metadata and TagsTo learn more about metadata and tags, including which characters you can use, see this topic.
- You can click Re-upload to regenerate and re-upload the result files for a file path. From the dialog, set the Reupload Start Date and Reupload End Date. If you leave the Reupload End Date blank, then the Agent uses the current date as the end date. Click OK to save the date range.
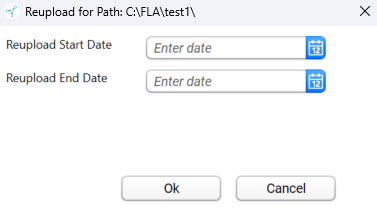
Reupload result files within specified date range
As of v3.5.0, the Agent verifies the folder path and the user permission when iterating the folder paths during scanning. The Agent displays an icon in front of every folder path to indicate whether the folder path is valid. For example, these two folders are invalid:
\\tsempowercli2.tsempower.local\Shared-Folder\Performance_Test_01\folder3\\\tsempowercli2.tsempower.local\Shared-Folder\Performance_Test_01\folder4\

Invalid folder paths
The Agent keeps checking the folder paths at each scan interval, and updates the status if there are any changes.
Monitor Tetra File-Log Agent Progress and Metrics
To review the Tetra File-Log Agent's run time progress and host server's system metrics, select Summary to open the Summary dashboard:
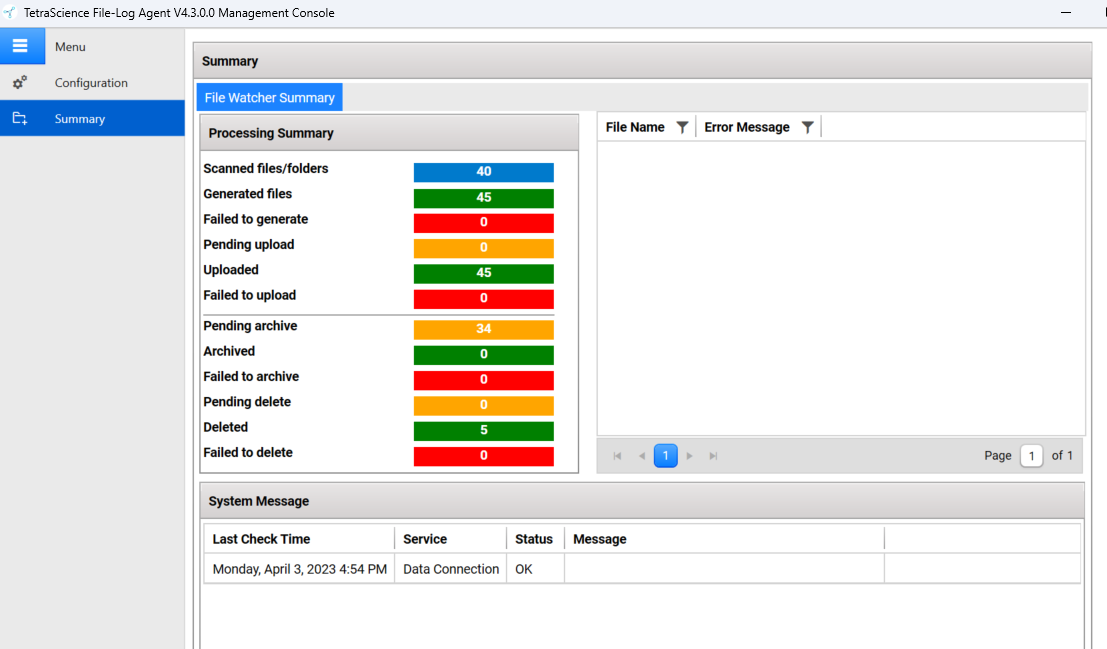
File-Log Agent Summary Dashboard
Processing Summary
You can review how many File-Log result files were detected, generated, and uploaded. If a failure occurs, the numbers display here.
The Processing Summary dashboard displays this information:
- Scanned files/folders - Total number of files or folders detected by the agent across all paths.
- Generated files - Number of file versions* generated.
- Failed to generate - Number of files that failed to generate.
- Pending upload - A pending state representing files which have been scanned and saved to the database, awaiting upload. When the Tetra File-Log Agent stops, the To upload state is maintained. Any file that was not completely uploaded is retained in the Tetra File-Log Agent's database. When the Tetra File-Log Agent restarts, it may resume uploading files which were previously scanned.
- Uploaded - Number of file or folder versions* that have been uploaded by the agent successfully.
- Failed to upload - Number of files that failed to upload to the agent
- Pending archive - If there are paths in file mode with archive setting enabled, and files uploaded are eligible for archive, this will show the total number of files waiting to be archived.
- Archived - If there are paths in file mode with archive setting enabled, this will show the total number of files that have been archived from such paths.
- Failed to archive - If there are paths in file mode with archive setting enabled, and any file from those paths encounter errors in the archival process, this will show the total number of such files that could not be archived.
- Pending delete - If there are paths in file mode with archive/delete setting enabled, and archived files from such paths become eligible for delete, this will show the total number of files waiting to be deleted from archive folder.
- Deleted - If there are paths in file mode with archive/delete setting enabled, and files have been deleted based on the setting, this will show the total number of files deleted from archive folder.
- Failed to delete - If there are paths in file mode with archive/delete setting enabled, and any file from the archived folder encounter errors during the delete process, this will show the total number of such files that could not be deleted from archive folder.
* - If a single file/folder is scanned and uploaded, then later modified and uploaded again, this will result in the generated and upload counts having a count higher than the Scanned count.
Additional File Properties Uploaded
File Properties, such as file creation date, last modified date and file size are sent with files when uploading to TDP. These become part of the S3 object. These properties provide file context. See the table below for details.
| Metadata when uploaded from agent | Format | Description |
|---|---|---|
| ts_os_createdtime | TIMESTAMP | From FLA or source system. The creation date and time of the current FileSystemInfo object FileSystemInfo.CreationTime Property (System.IO). |
| ts_os_lastmodifiedtime | TIMESTAMP | File: The time the current file was last written. FileSystemInfo.LastWriteTime Property (System.IO) Folder mode in FLA: the last modified time of the last modified file, as recorded by the FLA. This avoids some windows filesystem quirks. |
| ts_os_sizeondisk | BIGINT | Size on the original source system in Bytes. |
| ts_raw_md5_checksum | STRING | In file mode, this is the base 64 encoded MD5 checksum of the file. In folder mode, this is the base 64 encoded MD5 checksum of the compressed file representing the folder. |
| ts_os_createduser | STRING | The OS user who created the file (in file mode) or the folder (in folder mode). |
| ts_os_file_path | STRING | In file mode, the complete path of the file. |
| ts_os_folder_path | STRING | In folder mode, the complete path of the folder. |
Error Messages
This section displays any detailed error messages, such as when a file has failed to upload or has been copied to the temp folder in the Agent host machine.
System Messages
This section displays the host server system metrics and messages every minute and provides these metrics:
- Data Connection (connection status between the Agent and the Tetra Data Platform)
- Available Disk Space (in GB)
- Disk Usage (as a % of the total)
- CPU Usage (as a % of the total)
- Memory Usage (in MB)
For help with any issues, review the Troubleshooting Issues and Solutions section.
To learn more about the Tetra File-Log Agent, please review the FAQ section or please contact the TetraScience Customer Success team.
Documentation Feedback
Do you have questions about our documentation or suggestions for how we can improve it? Start a discussion in TetraConnect Hub. For access, see Access the TetraConnect Hub.
NOTEFeedback isn't part of the official TetraScience product documentation. TetraScience doesn't warrant or make any guarantees about the feedback provided, including its accuracy, relevance, or reliability. All feedback is subject to the terms set forth in the TetraConnect Hub Community Guidelines.
Updated 2 months ago