Threads App User Guide (Beta)
The Threads App is a Tetra Data App that enables users to manage threads — a way to capture work-to-be-done by one or more individuals. The app integrates with the Tetra Data Platform (TDP) to create, manage, and track threads and their associated templates and blocks.
The Threads App provides a dashboard for managing scientific workflows through the concept of threads. A thread represents a unit of work that can be assigned to users and tracked through completion. Each thread is composed of blocks, which are individual tasks or data capture steps within the thread.
The application supports the following:
-
Threads: View, create, and manage individual threads and thread templates. Assign threads to users and track their completion status. Reusable templates that define the structure of threads, including metadata fields and blocks
-
Blocks: Task definitions within threads, such as image capture, serial port readings, or review steps
-
QR Codes: Generation and management of QR codes for instrument identification
NOTEThe Threads App is available in beta release currently and is activated for customers through coordination with TetraScience. For more information, or to activate the app in your environment, contact your customer account leader.
Prerequisites
To use the Threads App, the following is required:
- Tetra Data Platform (TDP) v4.4.1 or higher
- AI Services v1.1 or higher activated in your TDP environment (required for AI-powered image capture blocks)
- Access to the Tetra Data & AI Workspace
- Appropriate user permissions to create and manage threads within your organization
Access the Threads App
To access the Threads App, do the following:
- Sign in to the Tetra Data Platform (TDP) .
- Navigate to the Tetra Data & AI Workspace.
- Select the Threads app from the available Data Apps.
Key Features
The Threads App provides four main tabs for managing your workflow:
| Tab | Description |
|---|---|
| Threads | View, create, and manage individual threads. Assign threads to users and track their completion status. |
| Thread Templates | Create and manage reusable templates that define the structure of threads. |
| Blocks | Create and manage reusable block templates for image capture and serial port data collection. |
| QR Codes | Generate QR codes from CSV/Excel files for instrument identification. |
Create and Manage Threads
From the Threads tab, you can:
- Create Thread: Create a new thread from an existing template
- Refresh Threads: Reload the threads list to see the latest updates
- View Thread Details: Select a thread to view its blocks and metadata
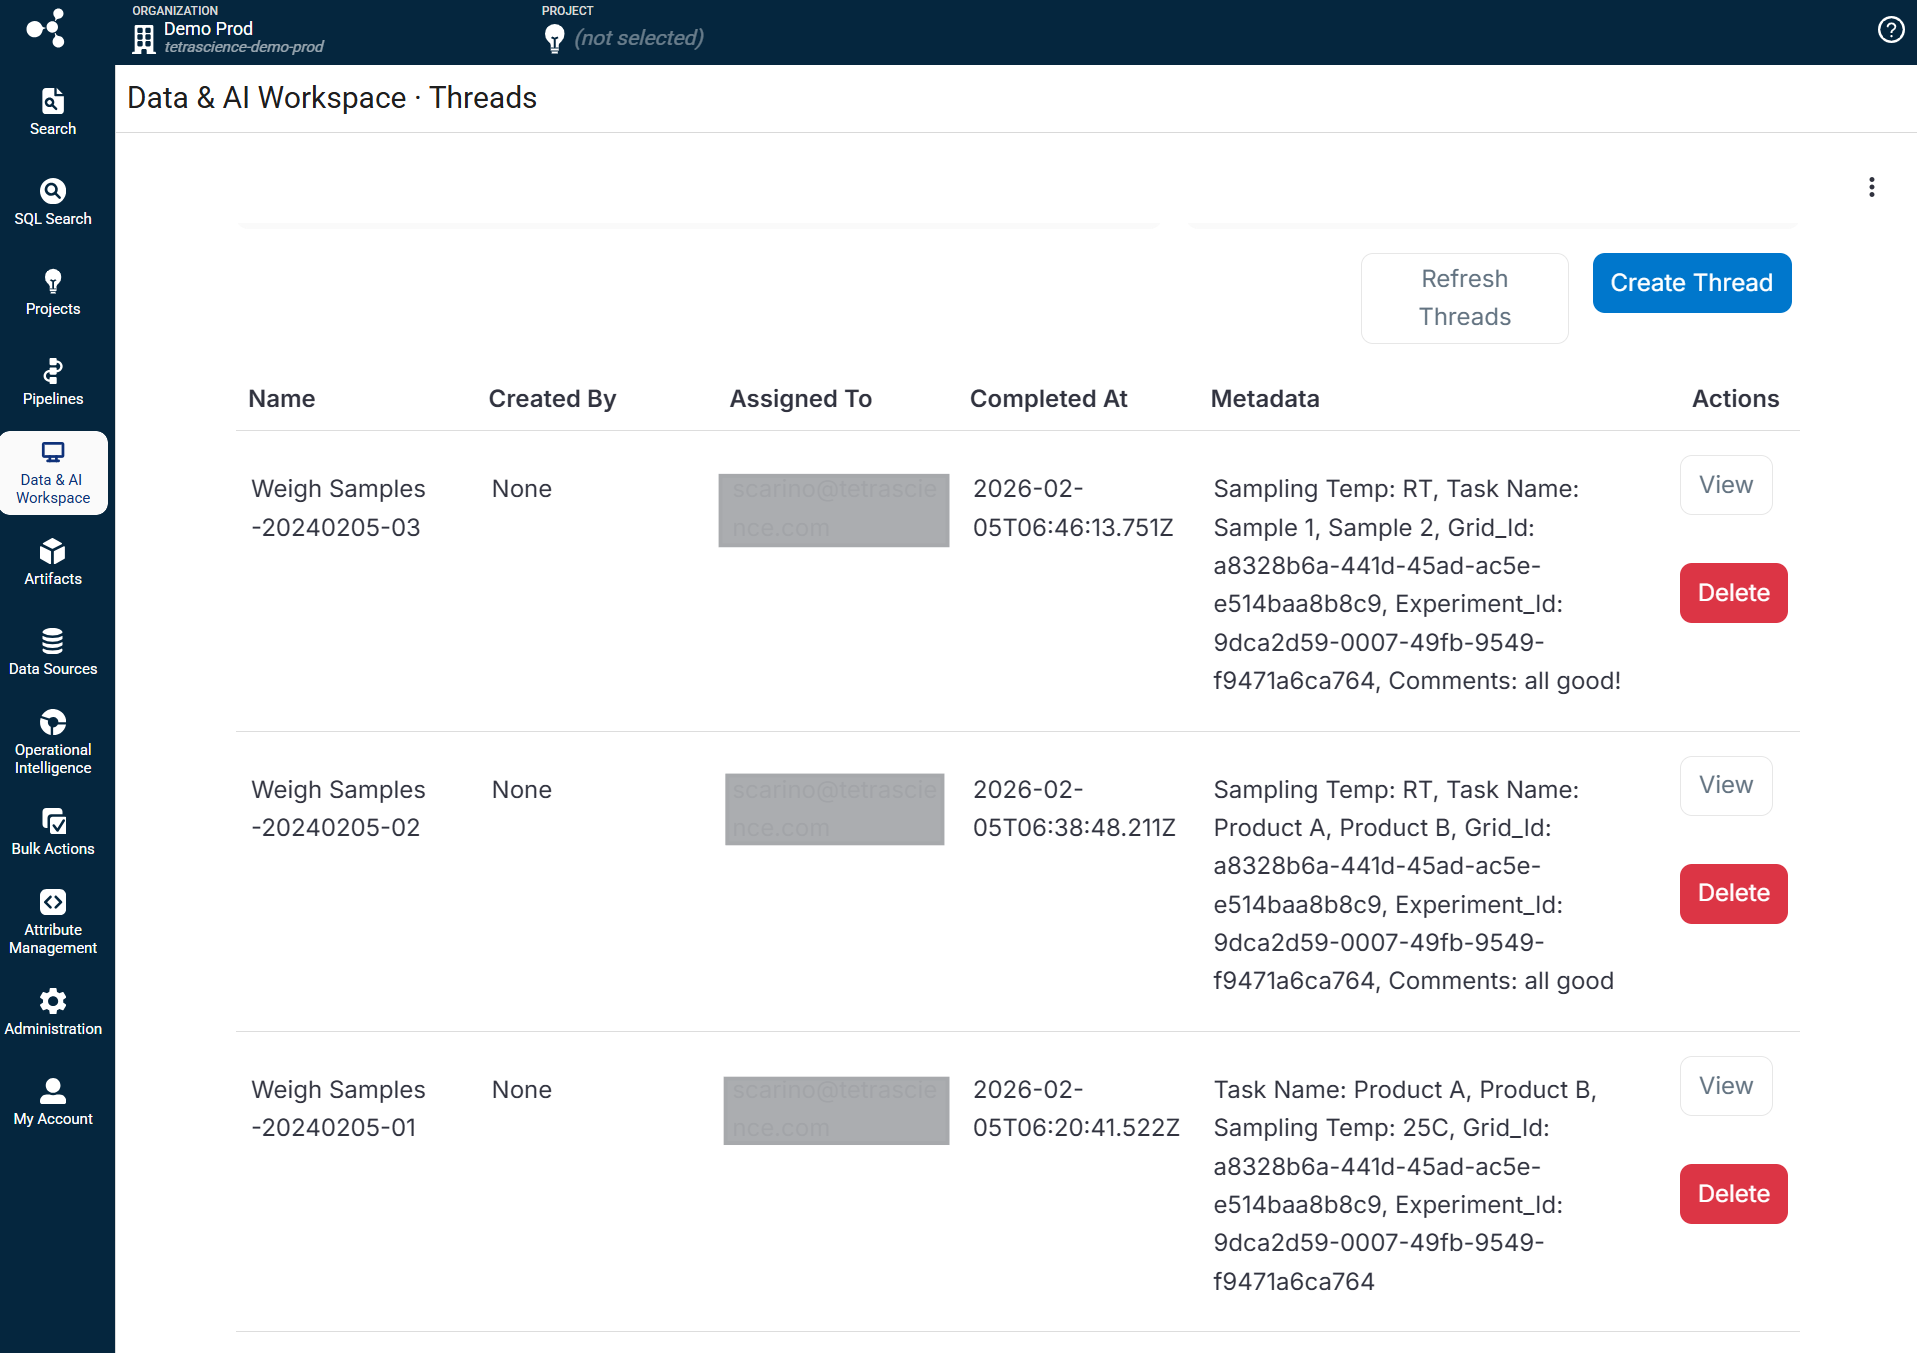
The Threads tab displays a list of all threads in your organization with the following information:
- Name: The name of the thread
- Created By: The user who created the thread
- Assigned To: The user assigned to complete the thread
- Completed At: Timestamp when the thread was completed
- Metadata: Additional metadata associated with the thread
Create a New Thread from a Template
To create a new thread from an existing template:
- Open the Threads tab.
- Choose Create Thread.
- In the dialog that appears, do the following:
- Select a template: Choose the thread template to use
- Assign to: Select the user who will complete the thread
- Enter the Thread Name and any required metadata fields.
- Choose Create Thread. The new thread appears in the Threads list and the assigned user can begin working on its blocks.
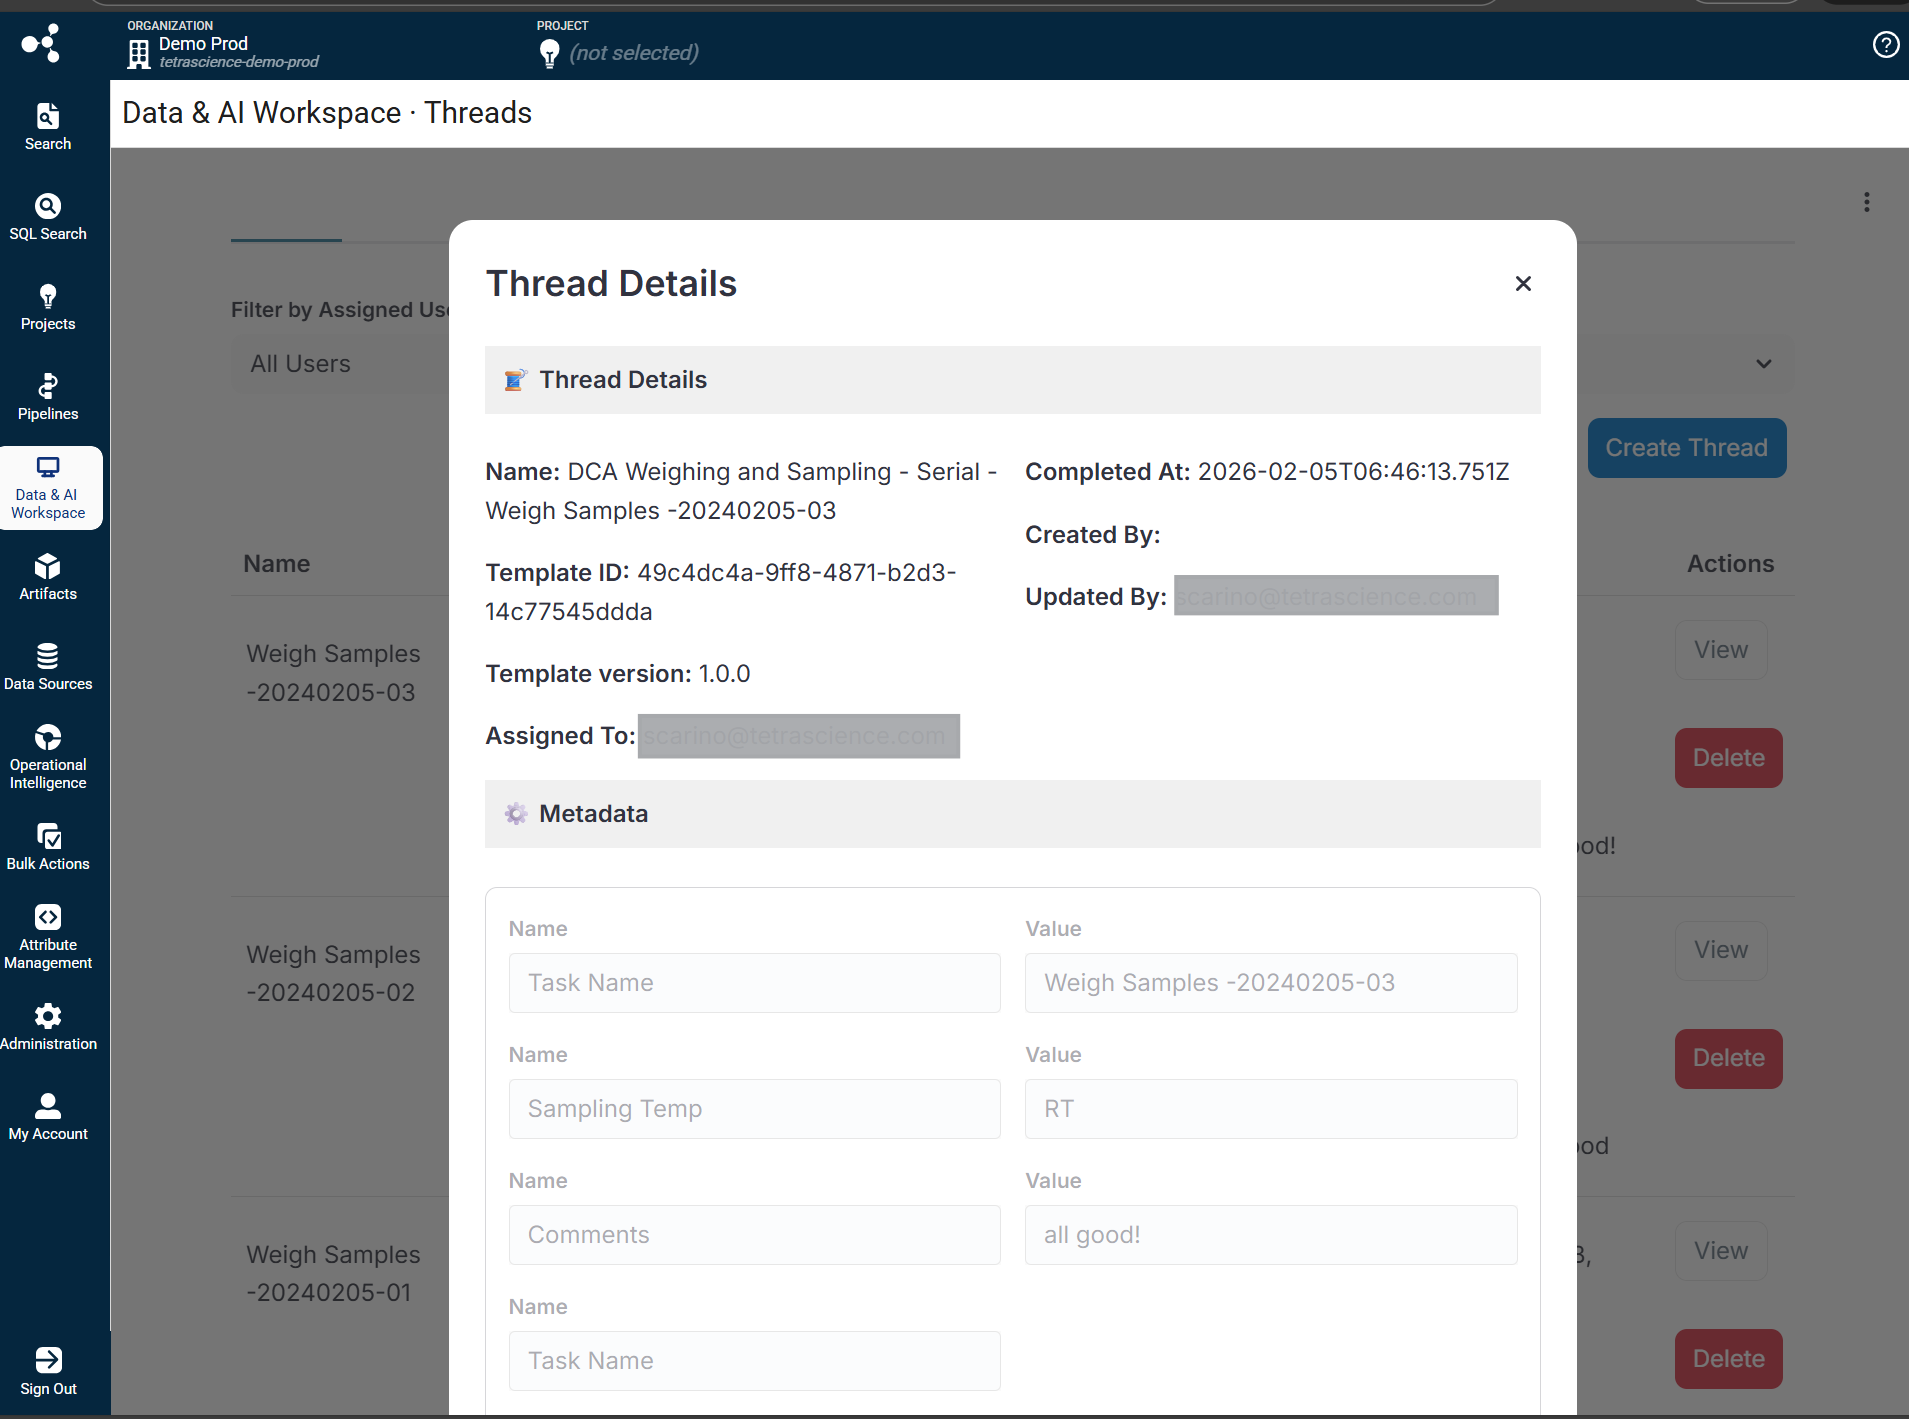
View Thread Details
To view the details of a thread, do the following:
- Open the Threads tab.
- Select the thread you want to view.
- The thread details page displays the following information:
-
Thread metadata fields and values
-
List of blocks with their completion status
-
Associated files and captured data
-
Filter Threads
Use the filter dropdown on the Threads tab to filter by status:
- All: Show all threads
- Open: Show threads that are in progress
- Completed: Show threads that have been fully completed
Create and Manage Thread Templates
Thread templates on the Thread Templates tab define the structure and workflow for threads. Each template includes the following:
- Template Name: A unique name for the template
- Template Version: Semantic versioning (for example, 1.0.0) to track template changes
- Metadata Fields: Custom fields that capture information at the thread level
- Blocks: The individual tasks or steps within threads created from this template
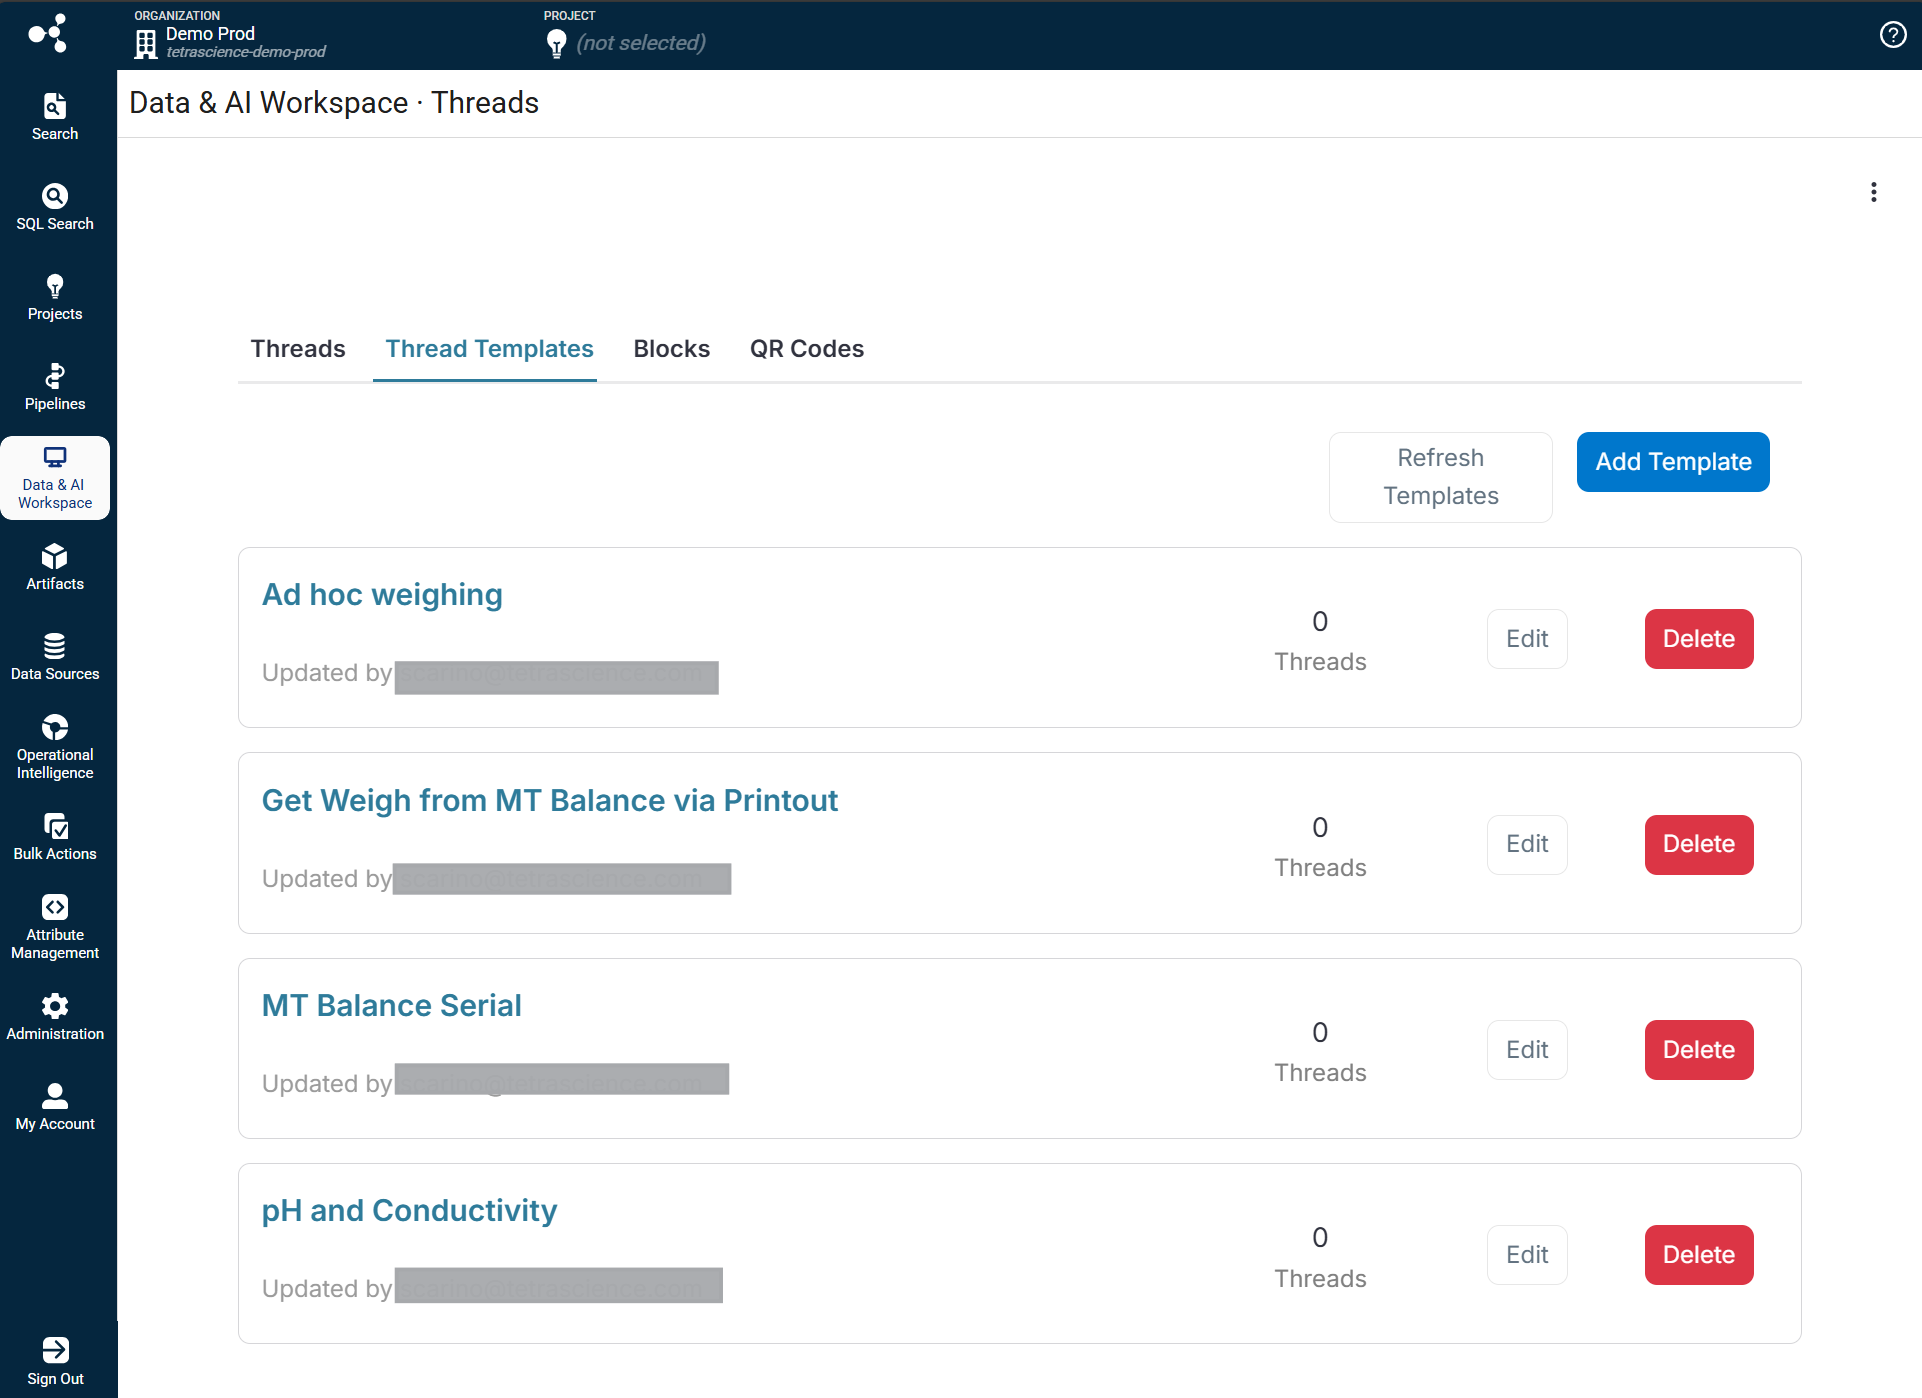
Create a Thread Template
Thread templates define the structure for your workflows. To create a new thread template:
- Open the Thread Templates tab.
- Choose Add Template.
- Enter the the following template information:
- Template Name: A unique identifier for the template
- Template Version: Use semantic versioning (for example, 1.0.0)
- Add Metadata Fields to capture thread-level information by doing the following:
- Choose Add Field
- Enter the field Name and select the Type (text, single-option, or multi-option)
- (Optional) Configure validation patterns, required status, and editability.
- Add Blocks to define the workflow steps by doing the following:
- Choose Add Block
- Select the block type and configure its properties
- For image capture blocks, select a pre-configured block template
- Choose Create Template.
Block Configuration Options
When adding blocks to a template, you can configure any of the following:
- Block Name: Display name for the block
- Block ID: Link to a pre-configured block template
- Duplicate For Each: Create multiple instances based on a metadata field option
- Read QR Code: Enable QR code scanning for instrument identification
- Retake Interval: Allow retaking captures within a specified time window
Metadata Field Types
Thread templates support the following field types:
| Field Type | Description |
|---|---|
| Text | Free-form text input with optional regex validation |
| Single-option | Dropdown selection where users choose one option |
| Multi-option | Multiple selection where users can choose multiple options |
Create and Manage Tasks (Blocks)
Blocks on the Blocks tab are reusable task definitions that can be added to thread templates. The Threads App supports the following block types:
| Block Type | Icon | Description |
|---|---|---|
| Image Capture | 📷 | Capture images using AI-powered OCR to extract readings from instruments |
| Review | ✅ | Require authorized reviewers to approve work before proceeding |
| Serial Port | 🔌 | Collect data from instruments connected via serial port. Introduced in Tetra Data Capture App v0.2.0 as a feature‑flagged capability. |
| Serial Connection | 🔗 | Define serial connection configurations for data collection. Introduced in v0.2.0 as a feature‑flagged capability. |
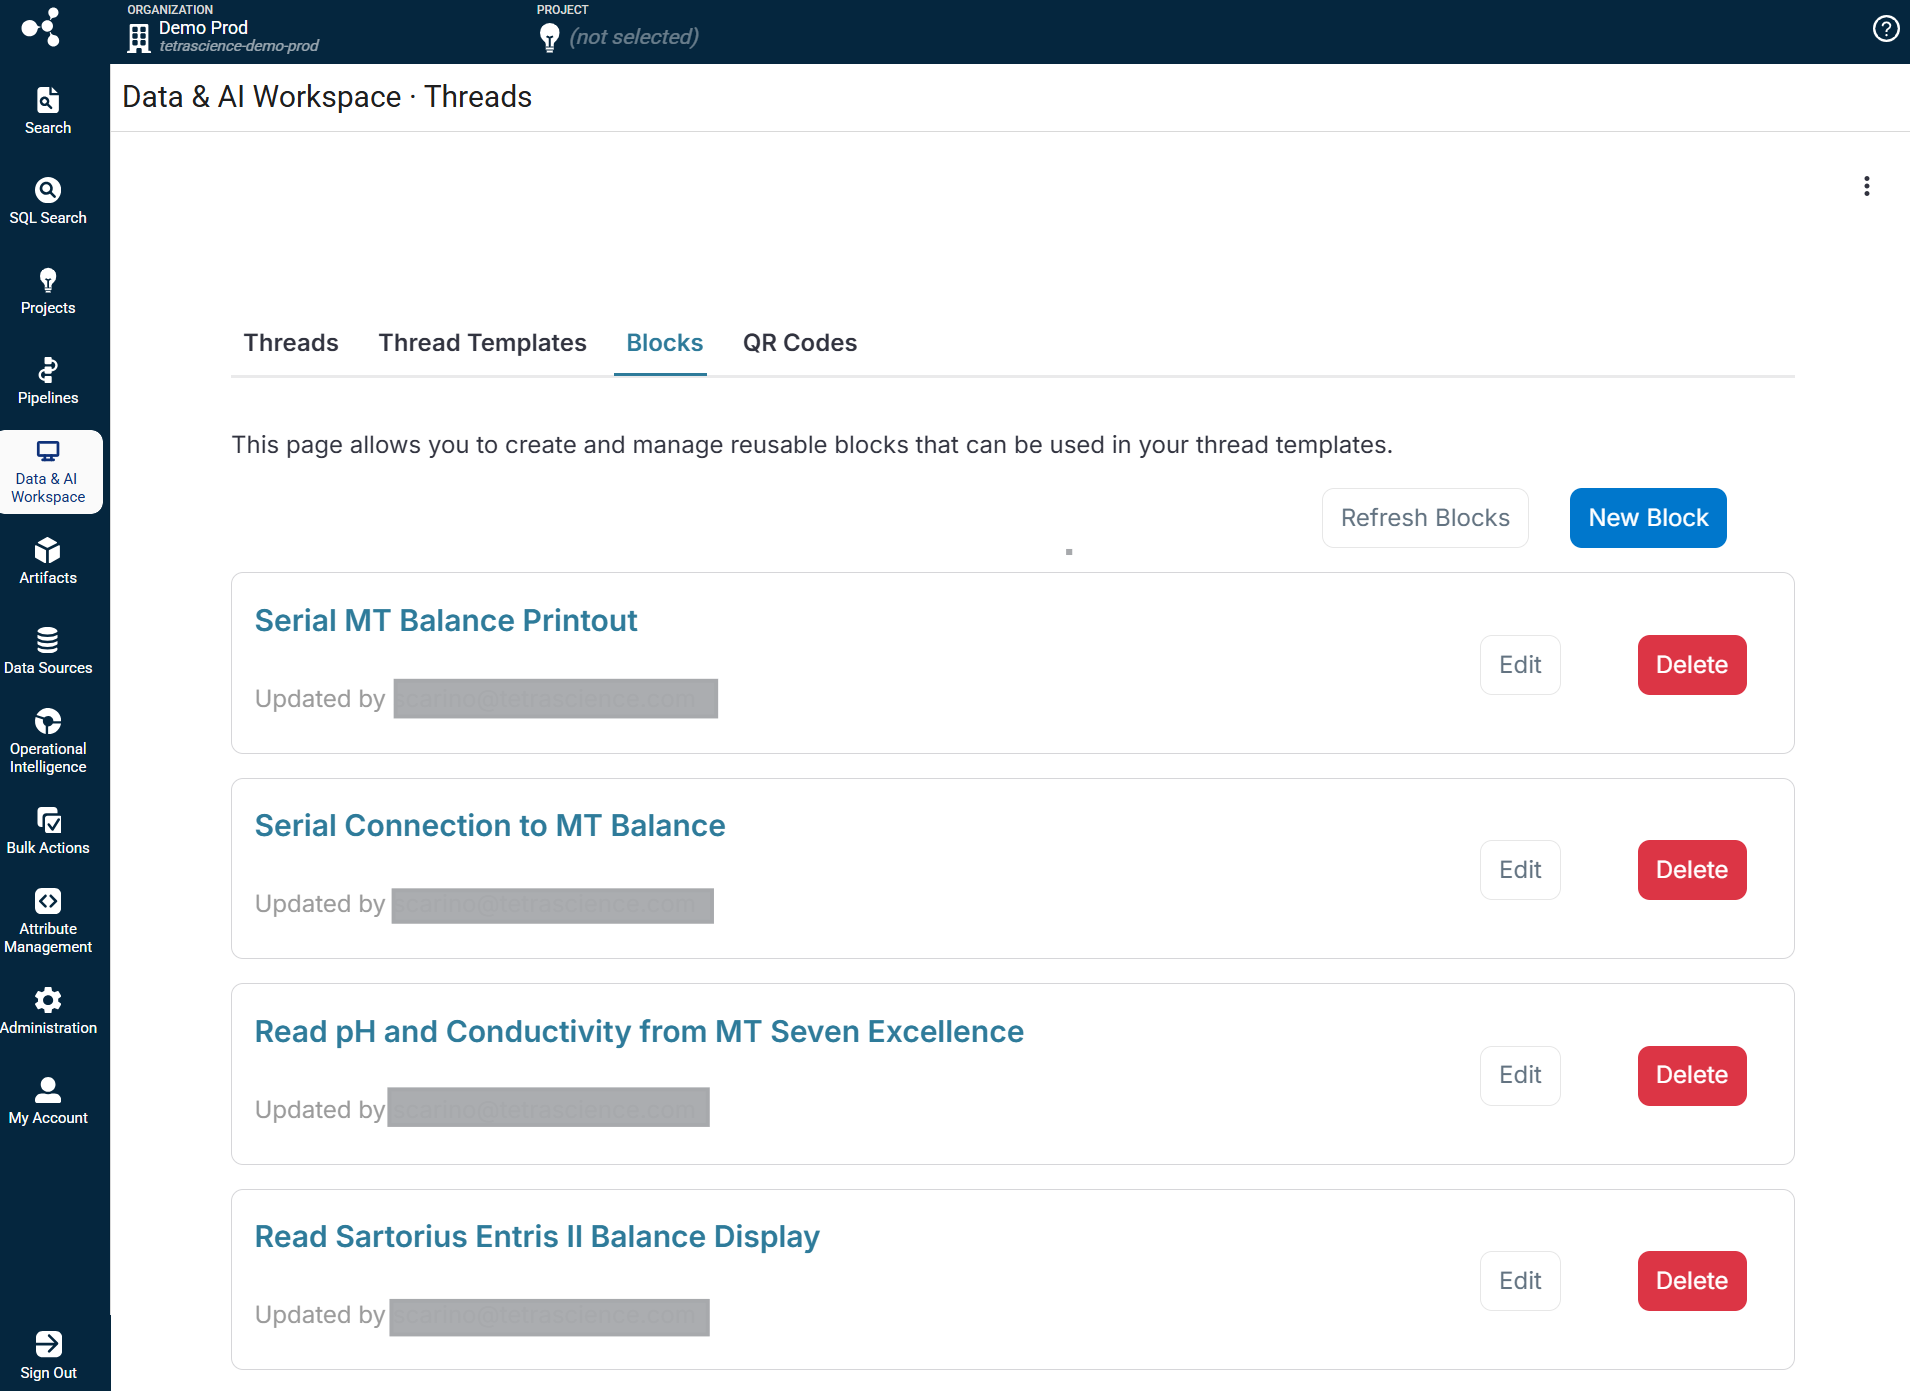
Image Capture Blocks
Image capture blocks use AI models to analyze captured images and extract data from instruments. These blocks are ideal for capturing readings from displays, gauges, and other visual indicators.
Image Capture Block Properties
| Property | Description |
|---|---|
| Name | A unique identifier for the block |
| Description | Purpose and usage instructions for the block |
| Model | The AI model used for image analysis |
| System Instructions | Guidance for the AI model on how to interpret images |
| Reference Images | Example images to help the AI understand expected inputs |
| Input Specification | JSON schema defining expected input structure |
| Output Specification | JSON schema defining the structure of extracted data |
Supported Models
The following AI models are available for image capture blocks. These models support image analysis and can extract data from captured instrument readings:
| Model ID | Description |
|---|---|
| databricks-gpt-5 | GPT-5 base model with image analysis capabilities |
| databricks-gpt-5-1 | GPT-5.1 model with enhanced image understanding |
| databricks-gpt-5-2 | GPT-5.2 model with improved accuracy |
| databricks-gpt-5-mini | Lightweight GPT-5 model for faster processing |
| databricks-gpt-5-nano | Ultra-lightweight model for simple image tasks |
NOTE
Only models that support image inputs are available for selection in image capture blocks. The available models are fetched dynamically from the AI Platform and filtered to include only verified image-capable models.
Create an Image Capture Block
To create a new image capture block, do the following:
-
Open the Blocks tab.
-
Choose New Block.
-
Select Image Capture as the block type.
-
Enter the following information:
- Name: A descriptive name for the block
- Description: Purpose and usage instructions
- Model: Select an AI model for image analysis
-
Configure the block details by doing the following:
- Enter System Instructions to guide the AI model on how to interpret captured images.
- (Optional) Add Reference Images to provide context and examples.
- Define Input specifications in JSON format.
- Define Output specifications in JSON format.
-
(Optional) Use the Chat Playground tab to test your block configuration.
-
Choose Create Block.
NOTEThe Chat Playground allows you to test your block configuration by simulating image capture and AI analysis before deploying the block in production threads.
Serial Connection Blocks
Serial connection blocks define shared connection configurations that can be reused by serial port blocks in thread templates. This allows users to define connection settings once and reference them across multiple serial port blocks, ensuring consistency and simplifying workflow. This block type is supported as a feature-flagged capability in the Tetra Data Capture App v0.2.0 release.
Serial Connection Block Properties
| Property | Description |
|---|---|
| Name | A unique identifier for the connection block |
| Description | Purpose and usage notes for the connection configuration |
| Connection Config | Serial port communication parameters |
| Commands | Predefined commands that can be sent to the instrument |
Connection Configuration Parameters
The connection configuration defines how the application communicates with the serial device:
| Parameter | Description | Default Value |
|---|---|---|
| baud | Baud rate for serial communication | 9600 |
| bits | Number of data bits | 8 |
| parity | Parity checking mode (none, odd, even) | none |
| stop | Number of stop bits | 1 |
| timeout_sec | Connection timeout in seconds | 20 |
| eom | End-of-message marker | (empty) |
| delimiter | Message delimiter character | \n (newline) |
Commands Configuration
Commands define the actions that can be sent to the instrument. Each command includes:
| Field | Description |
|---|---|
| label | Display name shown to users |
| value | The actual command string sent to the instrument |
Create a Serial Connection Block
To create a new serial connection block, do the following:
-
Open the Blocks tab.
-
Choose Add Block.
-
Select Serial Connection as the block type.
-
Enter the following information:
- Name: A descriptive name for the connection
- Description: Purpose and usage notes
-
Configure the Connection Config parameters by doing the following:
- Adjust baud rate, data bits, parity, and other settings to match your instrument
- Configure the Commands based on your instrument's protocol.
-
Choose Create Block.
NOTESerial connection blocks do not include output specifications. They define only the connection parameters. Use serial port blocks when you need to capture and extract data from instrument readings.
Serial Port Blocks
Serial port blocks collect data from instruments connected through a serial port. They include connection configuration, commands, and output specifications that define how to extract readings from the instrument's response. This block type is supported as a feature-flagged capability in the Tetra Data Capture App v0.2.0 release.
Serial Port Block Properties
| Property | Description |
|---|---|
| Name | A unique identifier for the block |
| Description | Purpose and usage instructions |
| Connection Config | Serial port communication parameters (same as serial connection blocks) |
| Commands | Predefined commands that can be sent to the instrument |
| Output | JSON specification defining how to extract and format data from responses |
Output Specification
The output specification defines the expected structure of extracted data. This is configured as a JSON object that describes:
- Field names and types for captured data
- Validation rules for extracted values
- Formatting requirements for output
NOTE
When adding a serial port block to a thread template, you can either define connection settings inline or reference an existing serial connection block for shared configuration.
Create a Serial Port Block
To create a new serial port block, do the following:
- Open the Blocks tab.
- Choose Add Block.
- Select Serial Port as the block type.
- Enter the following information:
- Name: A descriptive name for the block
- Description: Purpose and usage instructions
- Configure the Connection Config parameters by doing one of the following:
- Adjust baud rate, data bits, parity, and other settings to match your instrument
-or- - Reference a pre-configured serial connection block.
- Adjust baud rate, data bits, parity, and other settings to match your instrument
- Configure the Commands based on your instrument's protocol.
- Define the Output specification by specifying the JSON structure for extracted data.
- Choose Create Block.
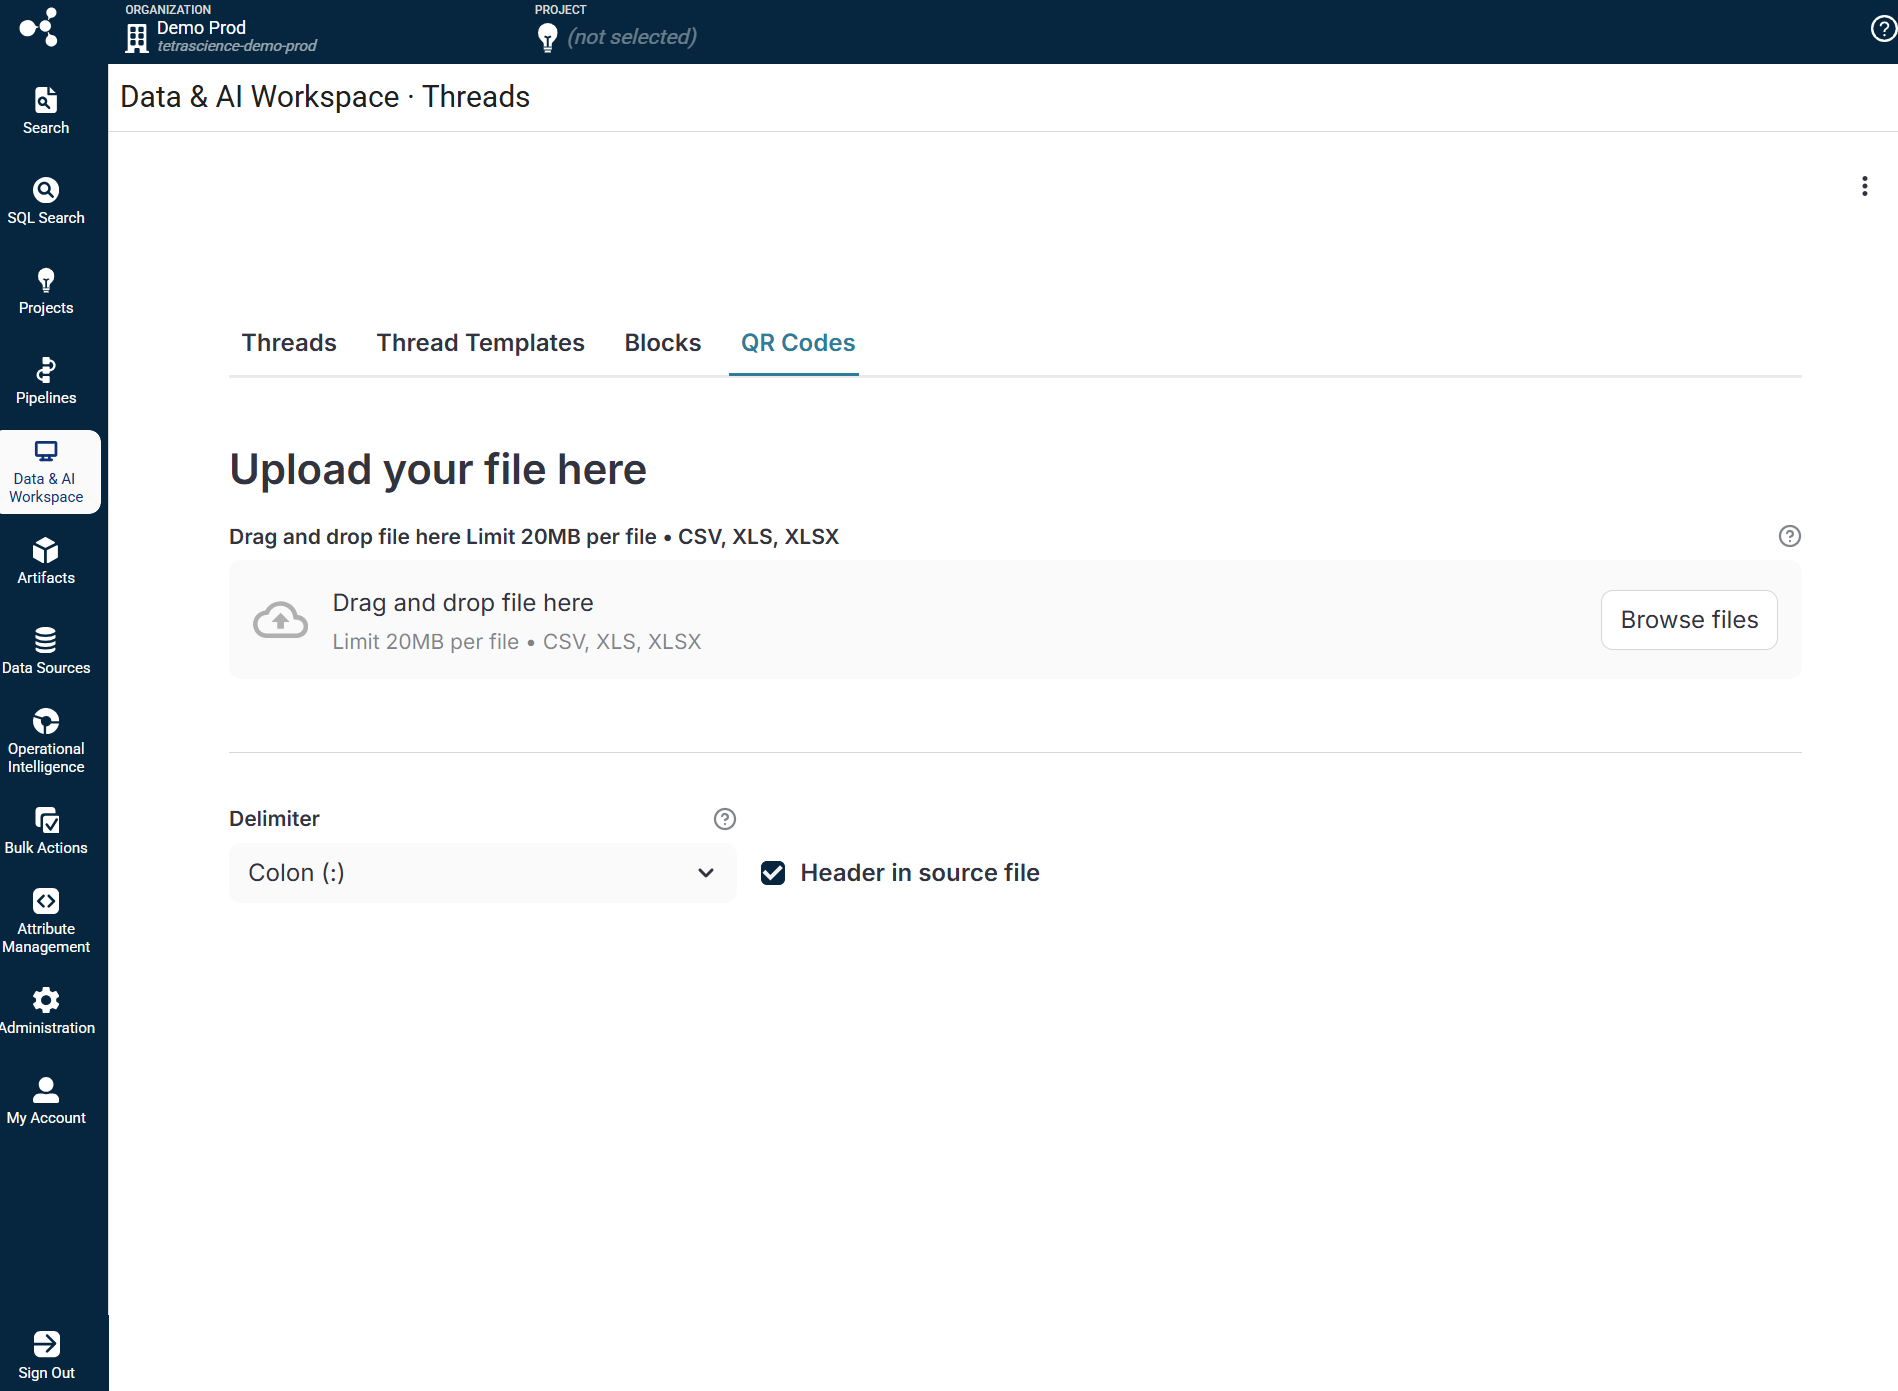
Create and Manage QR Codes
The QR Codes tab allows you to generate QR codes in bulk from uploaded CSV or Excel files. These QR codes can be used to identify instruments during data capture.
Supported file formats
-
CSV (comma, semicolon, tab, or pipe delimited)
-
XLS and XLSX (Excel files)
Create QR Codes
To generate QR codes for instrument identification, do the following:
- Open the QR Codes tab.
- Upload a CSV or Excel file containing your device information. Keep in mind the following:
- Each row represents one device
- The first column is used as the device identifier/label
- Additional columns provide metadata encoded in the QR code
- Make sure that you configure the delimiter (for CSV files) and header options.
- Review the Data Preview to verify correct parsing.
- View the generated QR codes in the Generated QR Codes section.
- Choose Download All QR Codes (ZIP) to download all codes, or download individual codes.
IMPORTANT
When using QR codes, make sure that you do the following:
- Place the QR code close to the instrument display
- The QR code must be captured in the same image frame as the instrument reading
- It's recommended to include a descriptive label below each QR code
QR Code File Format
Your CSV or Excel file should include columns for device metadata. Example format:
name,type,location,brand,serialNo,assetTag
Balance04,mass balance,Lab123,Mettler Toledo,235AD254,UY5623653
pH_Meter_01,pH meter,Lab456,Thermo Fisher,PH98765,UY1234567
The QR code will encode each column as a key-value pair (for example, name:Balance04).
Troubleshooting
If you encounter any of the following issues, follow the troubleshooting steps provided.
Thread Templates aren't Loading
- Check your network connection to the TDP.
- Verify that you have the appropriate TDP version and AIS is enabled.
- Verify you have the appropriate permissions to view thread templates.
- Choose Refresh Templates to reload the template list.
- If the issue persists, contact your system administrator.
Can't Create a New Thread
- Ensure at least one thread template exists.
- Verify you have permission to create threads.
- Check that all required metadata fields are completed.
- If using a template with blocks, ensure the block templates are accessible.
Block Template Not Appearing in Template Editor
- Open the Blocks tab and verify the block exists.
- Choose Refresh Blocks to reload the available blocks.
- Check that the block type matches the template block requirement.
Can't Create or Edit Blocks
- Verify that AI Services are activated in your TDP environment.
- Check the AI service health status indicator in the app.
- If you see "The AI service is currently unavailable," contact your administrator to enable the AI service.
- You can still view existing blocks while the AI service is unavailable.
Image Capture Block Validation Fails
- Make sure that the Block name field is not empty.
- Verify that Instructions are provided for the AI model.
- Select a valid Model from the dropdown.
- Check that Input and Output specifications are valid JSON objects
- For output specifications, ensure each item includes
name,value, andtypefields. Valid output types are:stringorboolean.
Serial Port Block Validation Fails
- Make sure that the Block name field is not empty.
- Verify the Connection configuration is a valid JSON object with
commandsandconfigkeys. - Check that
commandsis a list of objects withlabelandvaluefields. - Check that
configis a list of parameter objects. - Make sure that the Output specification is a list of objects with
name,value, andtypefields.
Chat Playground Isn't Working
- Select a model before using the Chat Playground.
- If uploading an image, ensure you're using a model that supports image analysis (see Supported Models ).
- Check that the AI service is available and healthy.
- Verify your block has valid instructions configured.
Can't Upload Reference Images
- Ensure the block has a name before adding images.
- Check that the image file format is supported (PNG, JPG, JPEG).
- Verify the file size is within acceptable limits.
- If upload fails, check your network connection and try again.
QR Code Doesn't Work
- Verify your CSV or Excel file is properly formatted.
- Check that the correct delimiter is selected for CSV files.
- Ensure the file contains valid data in the expected columns.
- Review the Data Preview to confirm correct parsing before generating codes.
Can't Assign a Thread
- Verify the user exists in your organization.
- Check that the user has the appropriate role to be assigned threads.
- Refresh the user list by reloading the page.
Error Messages
| Error Message | Meaning | Resolution |
|---|---|---|
| "Missing TDP credentials" | Authentication failed | Re-enter your TDP credentials and sign in again |
| "You do not have access to [org]" | Insufficient permissions | Contact your administrator to grant access |
| "No thread templates found" | No templates exist | Create a thread template before creating threads |
| "Block name is required" | Missing required field | Enter a name for the block |
| "Instructions are required" | Missing AI instructions | Enter system instructions for the AI model |
| "Model is required" | No model selected | Select an AI model from the dropdown |
| "Input spec must be a valid JSON object" | Invalid input format | Correct the JSON syntax in the input specification |
| "Output spec must be either a valid JSON object or an array" | Invalid output format | Correct the JSON syntax in the output specification |
| "Connection must contain both 'commands' and 'config' keys" | Incomplete connection config | Add both commands and config sections to the connection |
| "The AI service is currently unavailable" | AI service offline | Contact your administrator to enable the AI service |
| "Failed to retrieve the selected block" | Block access error | Refresh the blocks list and try again |
| "Failed to upload image" | Image upload error | Check file format and size, then retry the upload |
Documentation Feedback
Do you have questions about our documentation or suggestions for how we can improve it? Start a discussion in TetraConnect Hub . For access, see Access the TetraConnect Hub .
NOTE
Feedback isn't part of the official TetraScience product documentation. TetraScience doesn't warrant or make any guarantees about the feedback provided, including its accuracy, relevance, or reliability. All feedback is subject to the terms set forth in the TetraConnect Hub Community Guidelines.
Updated 2 months ago