Visual Pipeline Builder User Guide (v1.1.x)
This guide shows how to use Visual Pipeline Builder versions 1.1.x. The Visual Pipeline Builder helps customers create automated data flows with drag-and-drop simplicity. It can help users quickly connect lab systems, add data transformations, and route results where they need them—all through a visual interface that requires no programming knowledge.
Prerequisites
Visual Pipeline Builder requires the following:
- TDP v4.2.0 or higher (v4.3.1 or higher is recommended)
- Amazon Bedrock Access: Contact your customer account leader to obtain access. For more information about Amazon Bedrock, see the Amazon Bedrock User Guide.
- Customers must contact their customer account leader to activate the app in the TDP user interface
- App users must have the following TDP functionality permissions:
- Pipelines: Full Access
- Artifacts: Full Access
Access Visual Pipeline Builder
After coordinating with TetraScience to activate the Visual Pipeline Builder, you can access the app by doing the following:
- Sign in to the TDP.
- In the left navigation menu, choose Pipelines.
- Select Visual Pipeline Builder. The app appears.
Build a Pipeline
To create a Tetra Data Pipeline in the Visual Pipeline Builder, do the following:
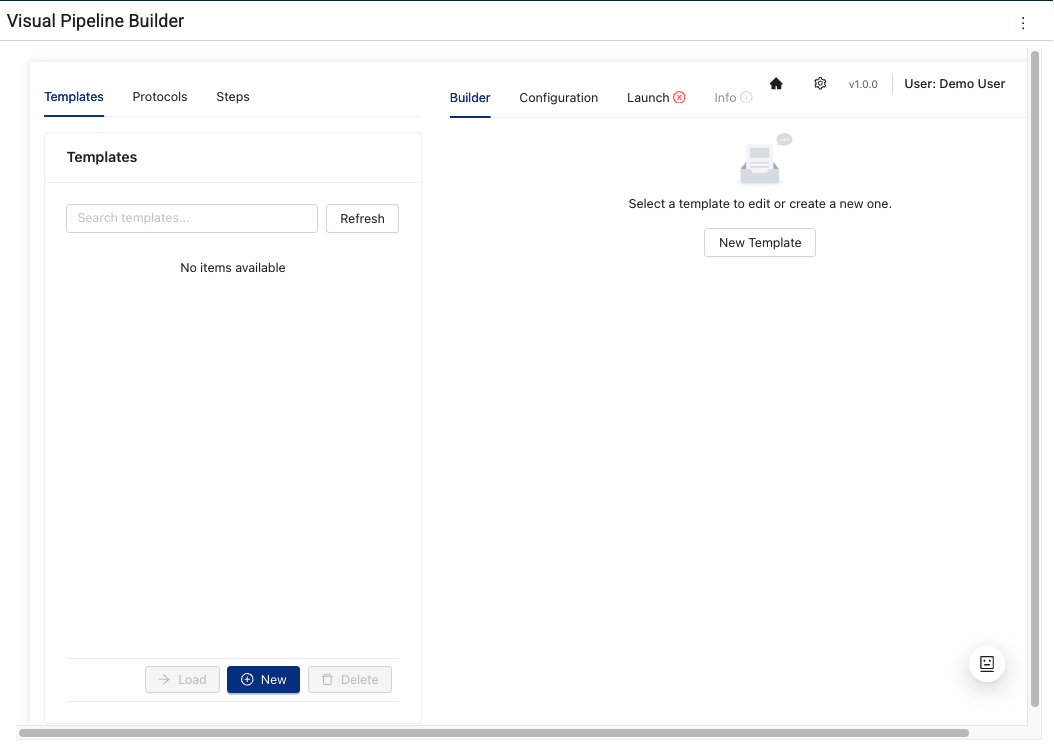
Step 1: Select a Template or Create a New One
Start from either an existing pipeline template or create a new one by doing the following:
-
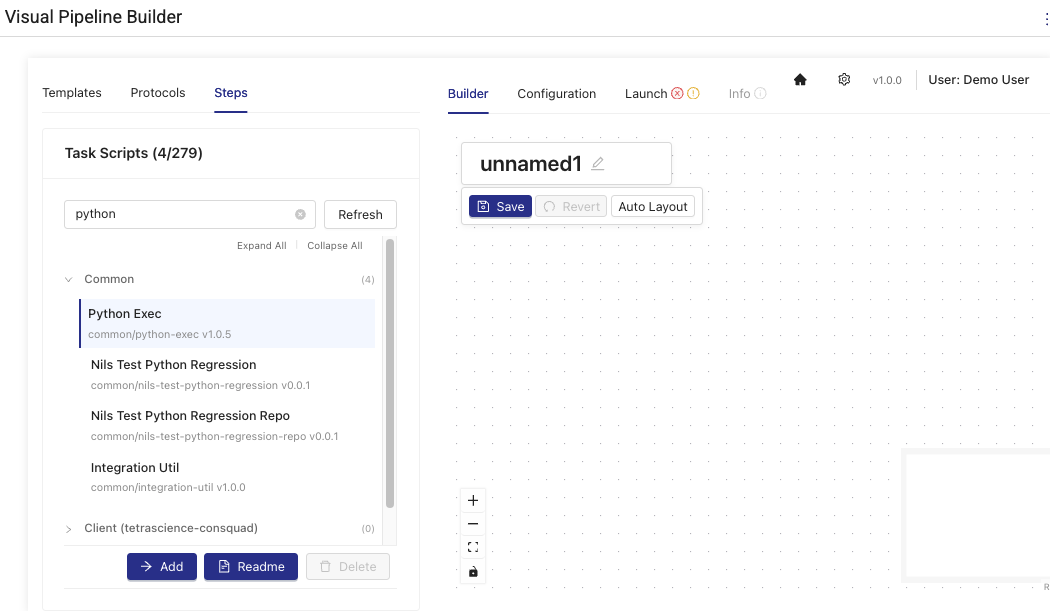
Select the Builder tab.
-
To use an existing pipeline template, select one from the Templates list. Then, choose Load.
-or-
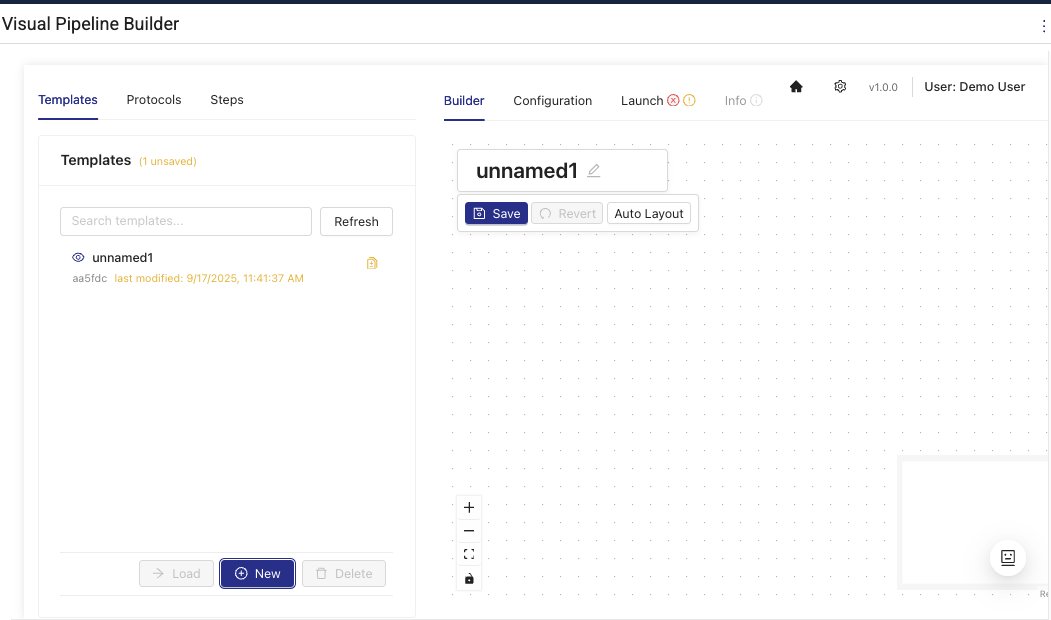
To create a new template, click New at the bottom of the Templates list.
Step 2: Add Pipeline Components
Configure pipeline components to parse your RAW data into harmonized Intermediate Data Schema (IDS) data. You can build and modify pipeline steps by dragging-and-dropping preconfigured components onto the page in the following ways:
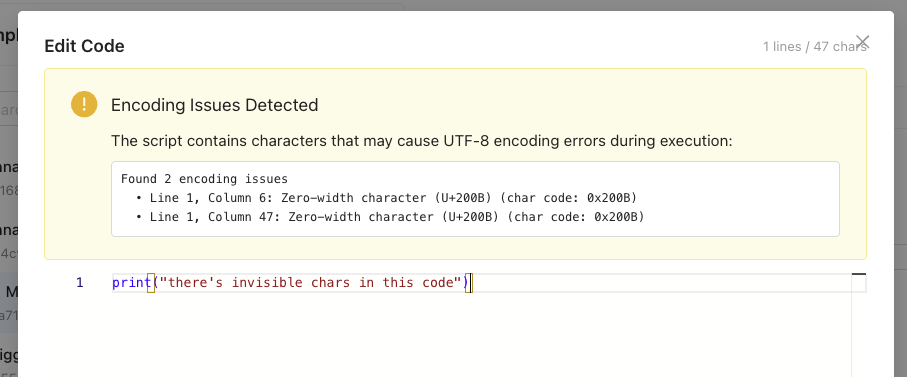
IMPORTANTPython scripts copied into Visual Pipeline Builder from certain code editors may result in pipeline failures that return an error message similar to the following:
"'utf-8' codec can't decode byte 0xa0 in position 10: invalid start byte"This error occurs because of hidden characters (such as carriage return/line feed CRLF characters) in the copied scripts that aren't Linux compatible. Visual Pipeline Builder v1.1.0 includes UTF-8 encoding validation and sanitization utilities that detect and warn about invisible characters to help prevent these issues. However, customers should still verify that scripts don't contain hidden characters such as CRLF (
\r\n). Online tools like View non-printable unicode characters can help identify hidden characters quickly.
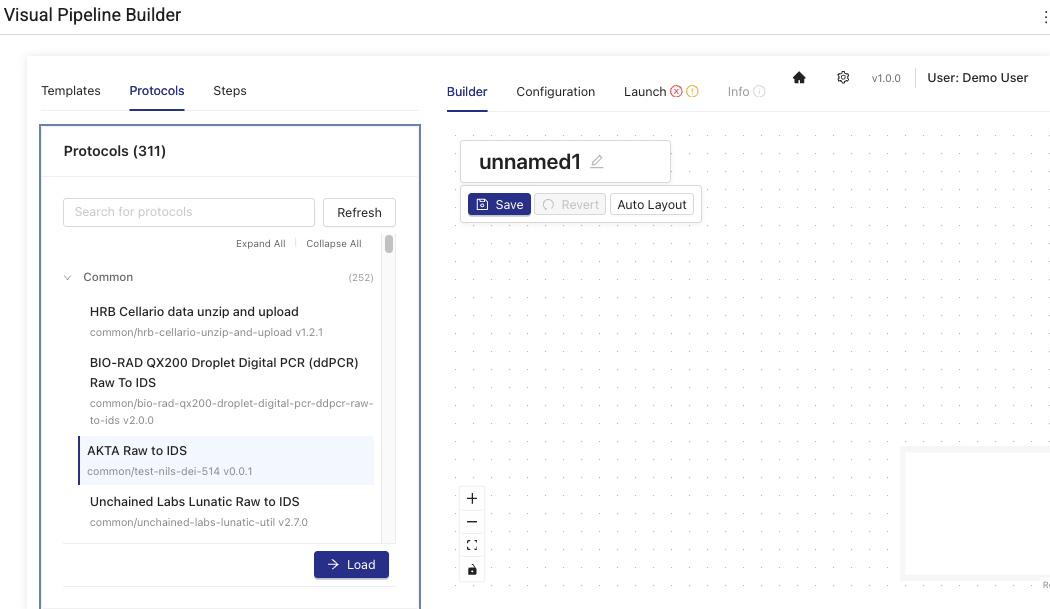
- In the Builder tab, do one of the following:
To select a protocol with preexisting pipeline steps, choose Protocols. Then, select a protocol and choose Load. The protocol's tile appears on the layout section of the page.
Protocols are searchable by their name or slug in the search bar.
-or-
To add specific pipeline steps (task scripts) individually, choose Steps. Then, select a task script and choose Add. The step's tile appears on the layout section of the page. Task scripts are searchable by their name or slug in the search bar.
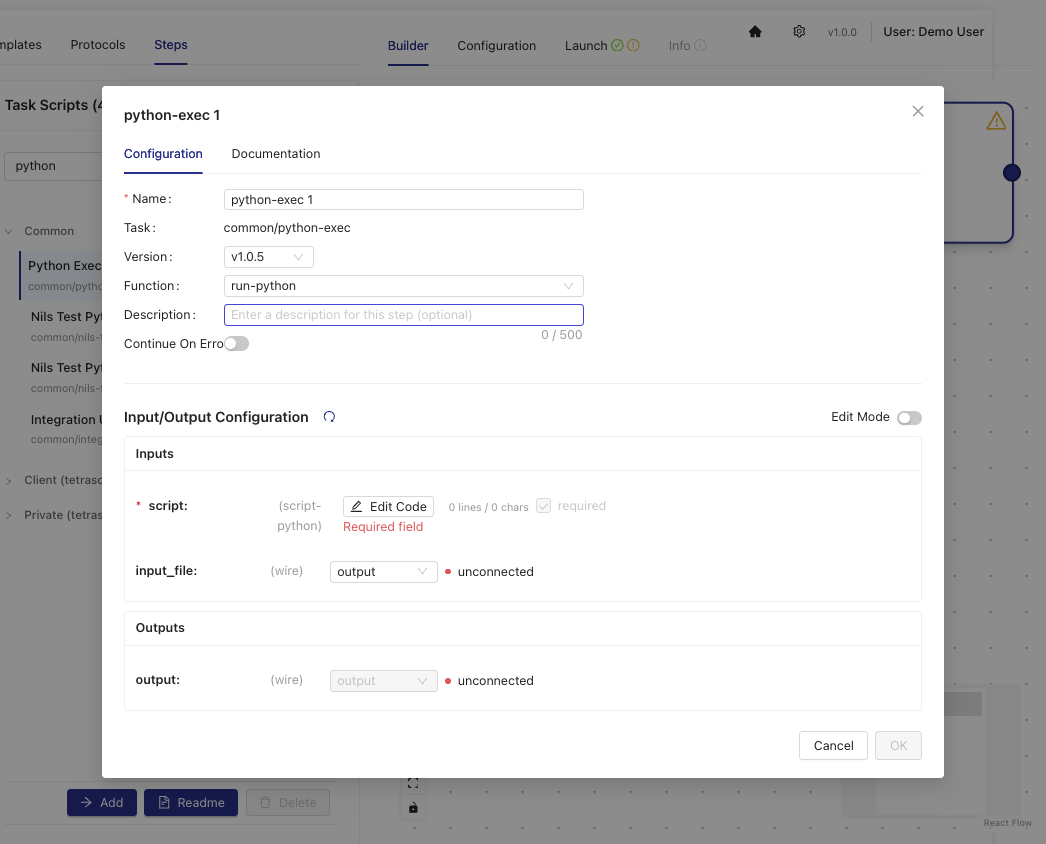
- (Optional) To see and edit configuration details for each component, including its data inputs and outputs, double click the component tiles. For more information, see Step Configuration Actions.
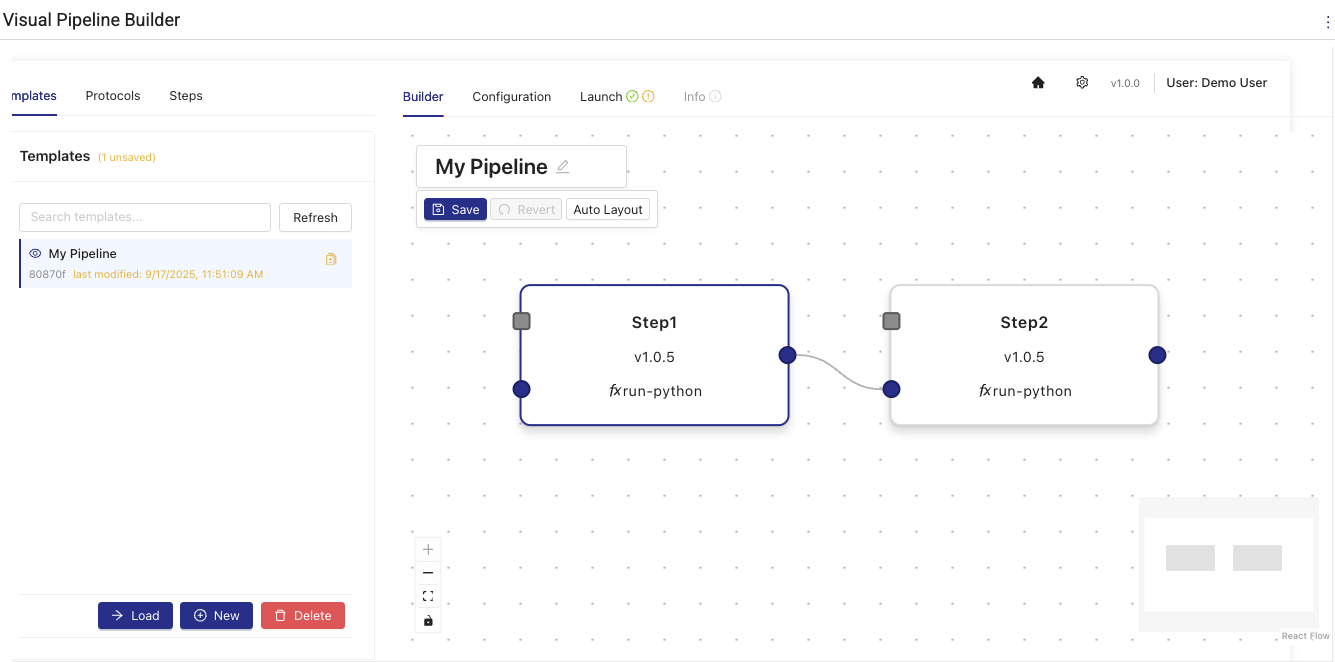
- Use the visual connectors (wires) to link components by selecting one of the gray squares at the edge of a component's tile, and then dragging it to the edge of another component that you want to connect it to.
-
(Optional) Choose Auto Layout to automatically align the components on the layout page after you've connected them in the order that you want.
-
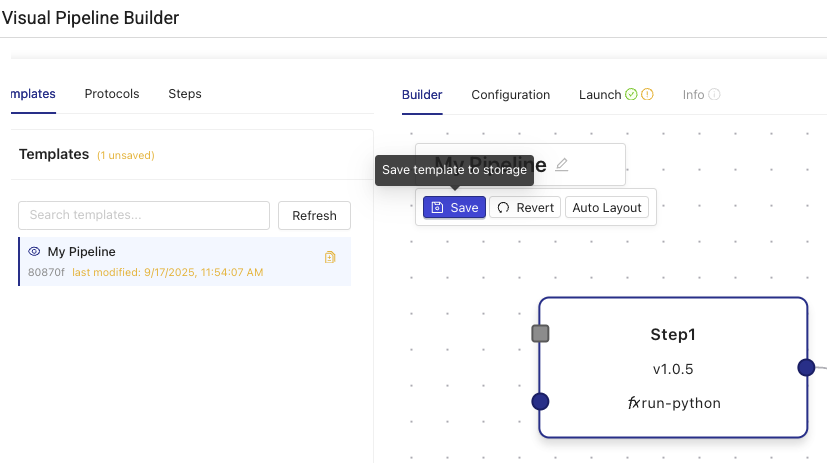
While editing the template, you can save the changes to storage by selecting Save. Saved changes persist between browser sessions. Unsaved changes won't. Choose Revert to revert to the last previously saved changes.
Builder Tab Actions
| Action | Description |
|---|---|
| Double-click Configure | Open node configuration modal |
| Steps | Add new step (task script) tiles from side panel |
| Edit Template Name | Modify the pipeline template name |
| Auto Layout | Automatically arrange nodes using dagre algorithm |
Step Configuration Actions
The Step Configuration modal opens when you double-click any pipeline step in the Builder tab, allowing you to configure individual step properties and parameters.
| Action | Description |
|---|---|
| Edit Step Name | Modify the display name of the pipeline step |
| Edit Step Description | Add or modify the step description for documentation |
| Select Function Version | Choose the version of the task script to use |
| Select Function | Choose which function to execute from the available task script functions |
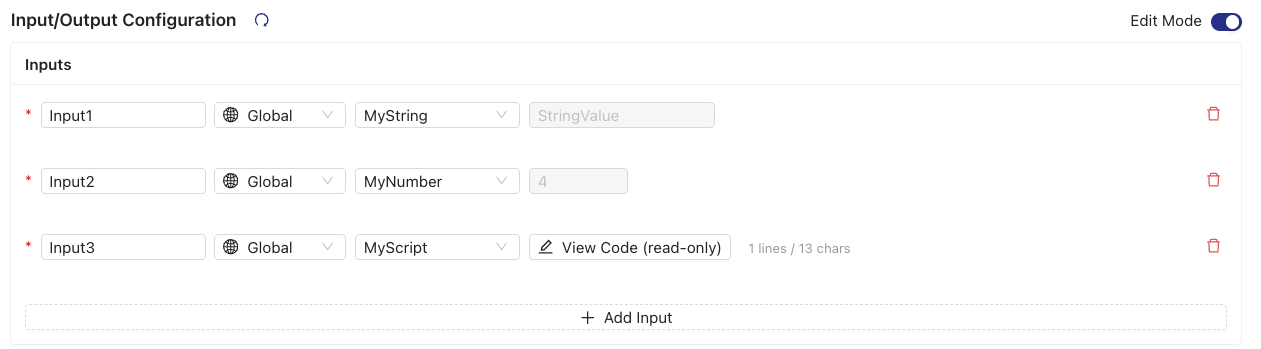
| Configure Step Inputs | Define input parameters and their values for the step. Inputs that reference global configuration values display the resolved value. Script fields populated from global configuration are displayed as read only. |
| Set Continue On Error | Configure whether the pipeline should continue if this step fails |
| Restore Defaults | Reset step configuration to default values |
| View Documentation | Access task script documentation and usage examples |
| Copy Step Configuration | Duplicate the current step configuration (when enabled) |
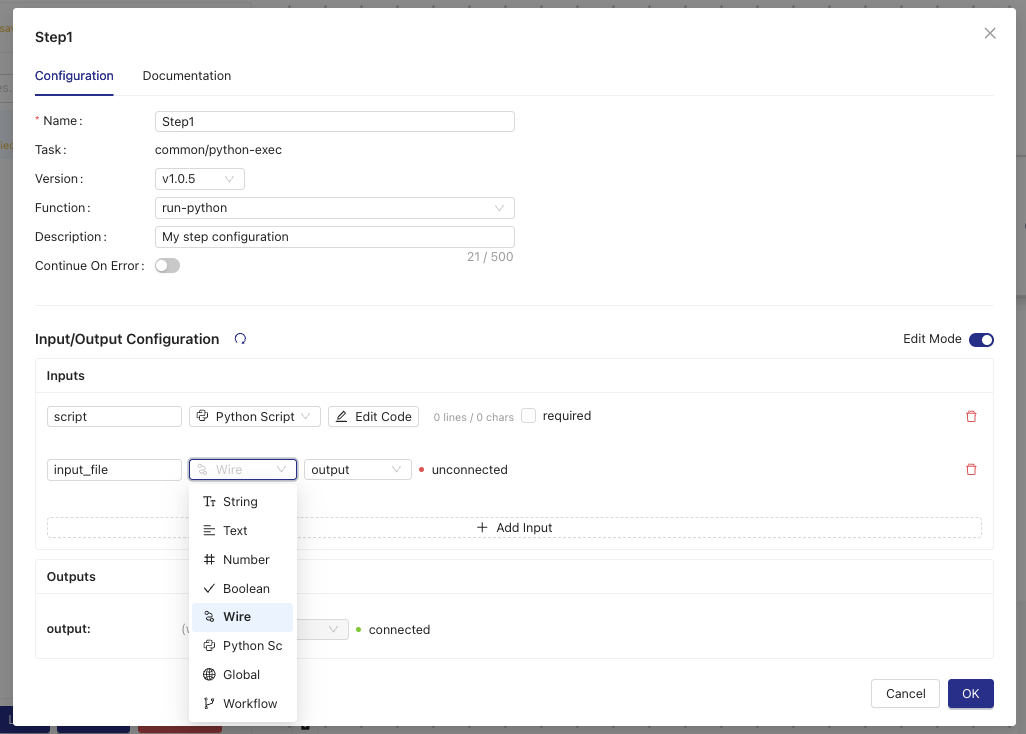
NOTEStep inputs that reference global configuration values display the resolved value in the configuration modal. Script fields populated from global configuration are shown as read only.
Configuring Step Execution Options
You can optimize pipeline step performance by selecting the appropriate execution environment for your use case. You can choose between the AWS Lambda (Instant Start) execution environment that's ideal for latency-sensitive lab data automation use cases (~1 second pipeline startups) and the default Amazon Elastic Container Service (Amazon ECS) (Classic) execution environment, which provides one minute-plus pipeline startups and is ideal for use cases that don't require low data latency. Each execution environment has its own memory allocation options.
To configure step execution environment options, do the following:
- Double-click a pipeline step tile in the Builder tab to open the Step Configuration modal.
- Select the Options tab.
- Configure the execution environment:
- Lambda Execution (Instant Start): Select the Run in Lambda check box. Lambda provides faster cold starts (~1 second pipeline startups) and is ideal for latency-sensitive lab data automation use cases.
- Amazon ECS Execution (Classic): Leave the Run in Lambda checkbox unchecked. Amazon ECS is ideal for use cases that don't require low data latency (one minute-plus pipeline startups).
- Select the appropriate Memory allocation from the dropdown menu based on your step's requirements. For available memory and compute settings, see Memory and Compute Settings.
- Choose Save to apply the configuration.
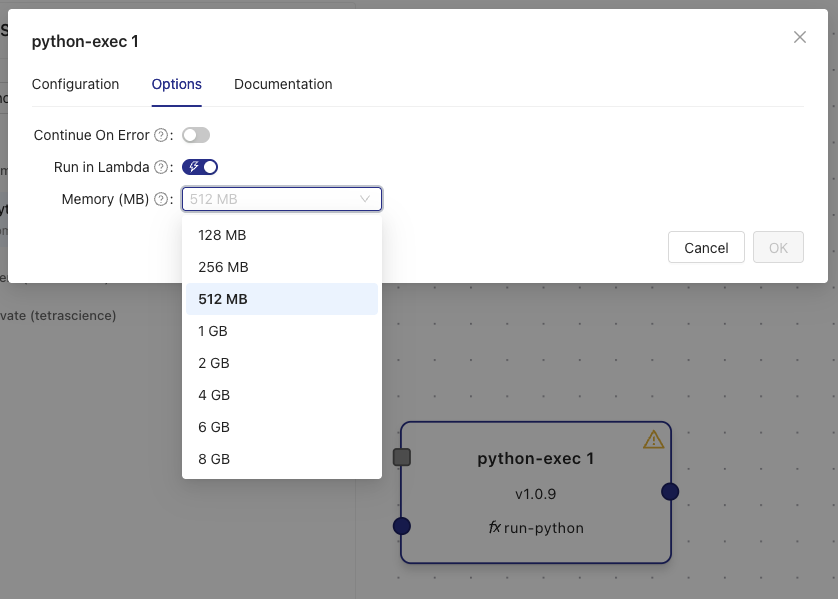
NOTEThe default memory allocation for
python-execsteps is 512 MB. Choose higher memory allocations for steps that process large files or perform memory-intensive operations.
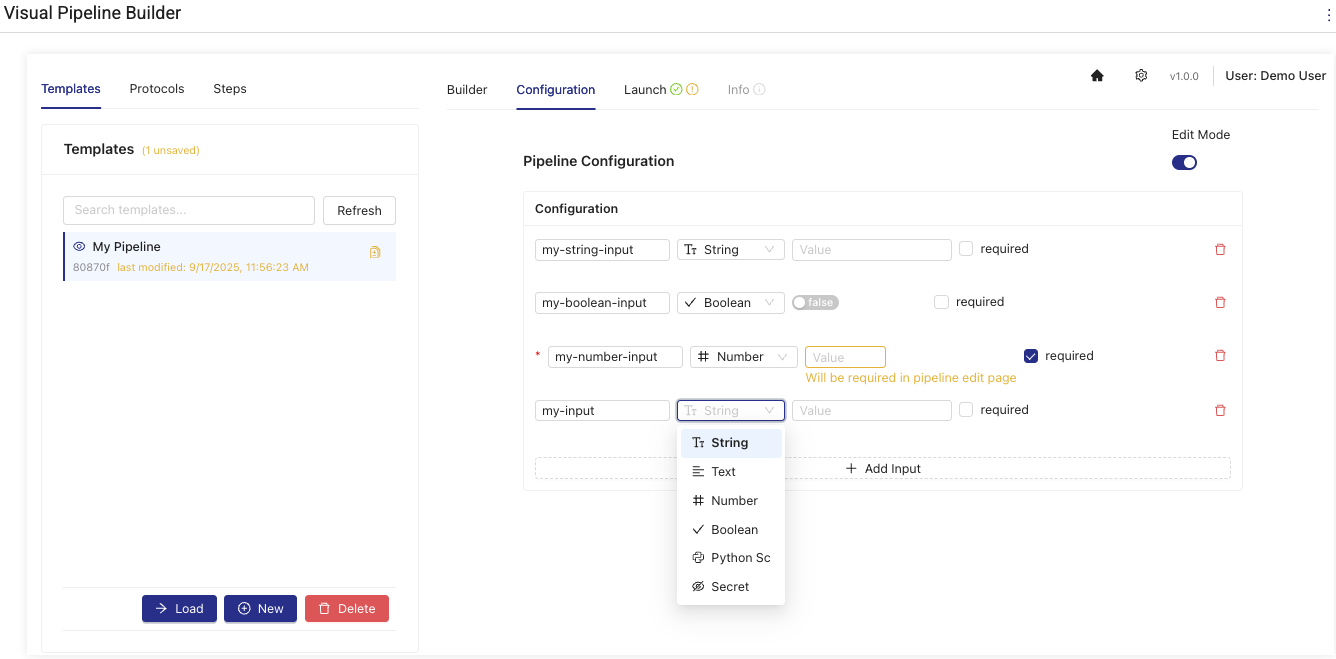
Step 3: Configure Pipeline Settings
Set up the pipeline's configuration settings by doing the following:
- Select the Configuration tab.
- Activate the Edit Mode toggle.
- Configure the values required for your pipeline based on the components you selected. The required fields appear on the Configuration tab automatically. For more information about each component's required configuration details, see the Artifact README file for that component in the TDP. For instructions, see View Artifact Information. The Artifact README file is also viewable from within Visual Pipeline Builder by going to Steps, selecting the Task Script and choosing Readme or from within the Step configuration.
Configuration Tab Actions
| Action | Description |
|---|---|
| Edit Mode Toggle | Switch between view-only and edit modes using a toggle switch |
| Add Configuration Item | Add new pipeline configuration parameters (only available in edit mode) |
| Edit Configuration Item | Modify existing configuration parameters including name, type, value, and required flag |
| Remove Configuration Item | Delete configuration parameters from the list |
| Change Field Type | Select from available field types: string, text, number, boolean, python script |
| Set Required Flag | Mark configuration items as required or optional using checkboxes |
Step 4: Deploy the Pipeline
Deploy the new pipeline or pipeline version to the TDP by doing the following:
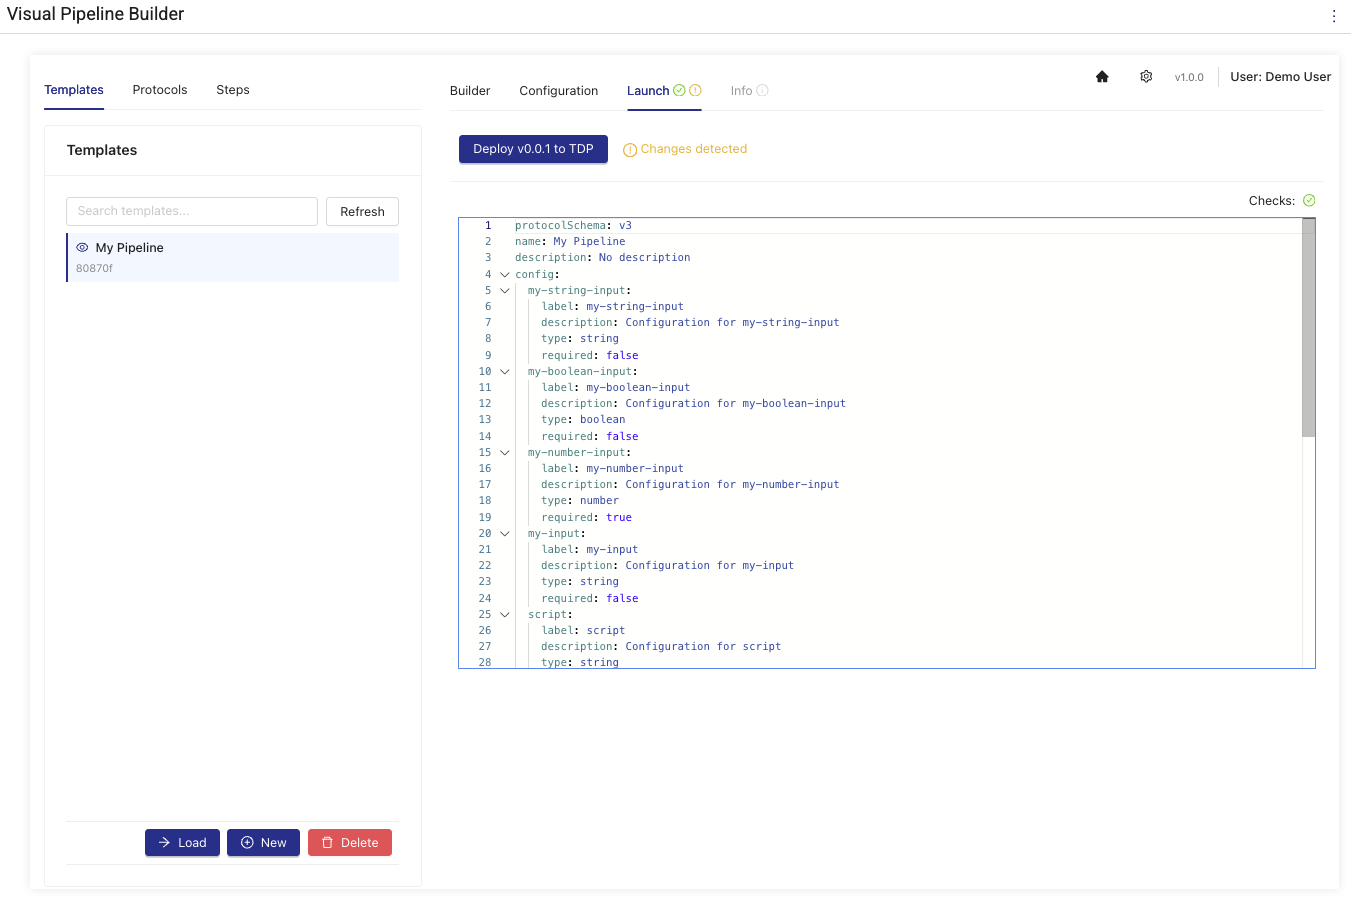
- Select the Launch tab. The code for your pipeline appears and a validation check runs automatically.
- Make sure that the Checks: value appears as a green checkmark. If not, review your configurations on the Builder and Configuration tabs and make sure that all components are connected correctly.
- After the pipeline code is validated, choose Deploy. The pipeline is deployed to the TDP, where other users in your organization can access it through the Pipeline Manager and Pipeline Edit pages.
Launch Tab Actions
| Action | Description |
|---|---|
| Deploy Pipeline | Deploy the current pipeline template to TDP with automatic version incrementing |
| Verify Protocol | Real-time verification of the generated protocol YAML with error highlighting |
| View Protocol YAML | Display the auto-generated protocol YAML in a read-only editor with syntax highlighting |
| Change Detection | Visual indicator showing when changes have been made since last deployment |
| Deployment Status Tracking | Real-time status updates during the deployment process with progress indicators |
| Version Management | Automatic calculation and display of the next protocol version to be deployed |
Step 5: Activate the Pipeline
To activate the pipeline in the TDP after you've deployed it, do the following:
- Open the Pipeline Edit page for the pipeline you created by following the instructions in Edit a Pipeline.
- Configure the pipeline's trigger conditions.
- Move the upper right ENABLED toggle to the right to activate the pipeline.
- Select Save Changes to apply the changes.
Pipeline Deployment Behavior
The Visual Pipeline Builder applies the following default configurations and naming conventions when deploying pipelines to the TDP:
-
Default Pipeline Triggers: Deployed pipelines are automatically configured with a default trigger condition that filters for files that include the label
visual-pipeline-builder='change_me'andFileCategory=RAW. This trigger uses an AND operator to ensure both conditions are met before pipeline execution. -
Disabled by Default: Pipelines are deployed in a disabled state by default and must be manually enabled after reviewing and editing the trigger condition, which helps avoid processing unwanted files. You can find them in the Disabled section of the Pipeline Manager, Workflow Processing, and File Processing pages. The pipeline will be disabled every time a new version is deployed, and must be re-enabled after verifying the configuration.
-
Private Protocol Artifacts: All protocols generated by the Visual Pipeline Builder are deployed as
privatenamespace artifacts within your organization's namespace (for example,private-{orgSlug}). This behavior ensures that the protocols are accessible only within your organization. -
Automatic Naming Convention: The system automatically generates names using the following patterns:
- Protocol Slug:
vpb-{templateId-first8chars}(for example,vpb-a1b2c3d4) - Pipeline Name: Uses the template name if available, otherwise it defaults to
vpb-{protocolSlug}-{version} - Protocol Namespace:
private-{organizationSlug}
- Protocol Slug:
Managing Protocols
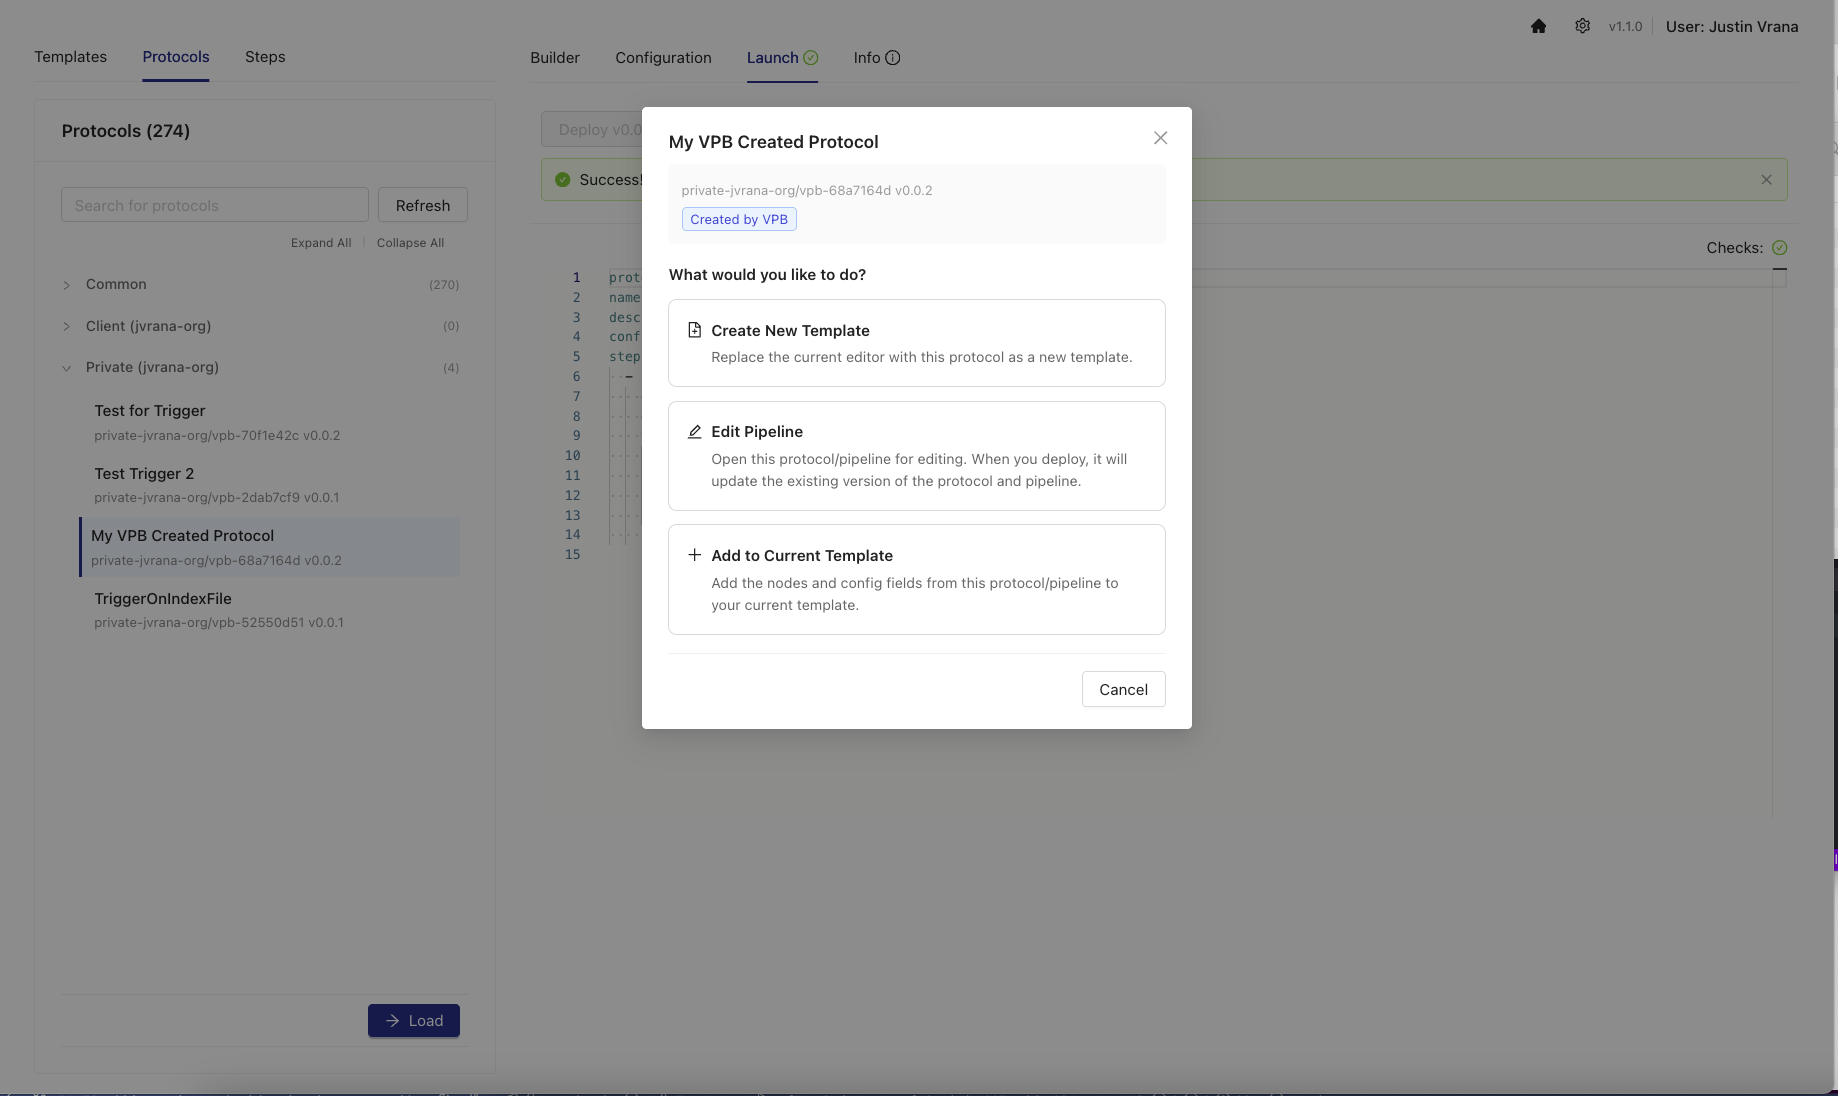
To manage protocols that have been deployed to the TDP, you can select a protocol from the Protocol List. A Protocol Action Modal appears with three options:
- Load: loads a protocol into a new template with global configuration values automatically populated from the pipeline configuration
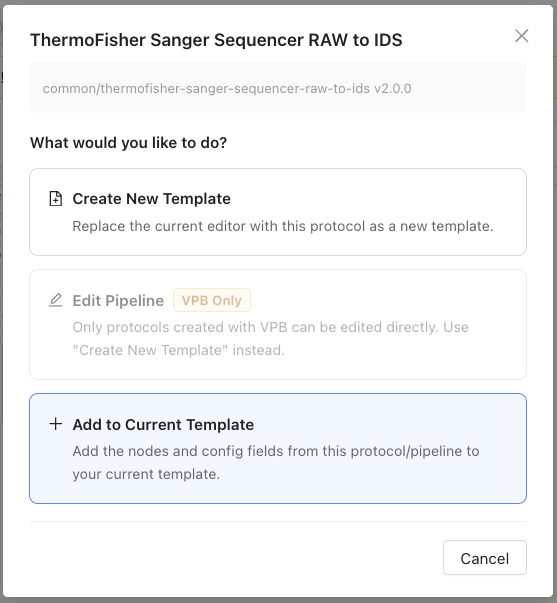
- Edit: loads the protocol and its associated pipeline into a template for editing, then deploy changes back to the original protocol and pipeline (only available for protocols created in Visual Pipeline Builder; externally managed protocols, such as self-service or GitHub-based protocols, must be updated through their original management system)
- Add to Current Template: merges a protocol's steps into the current working template while automatically handling naming conflicts
Access the Protocol Action Modal
To access the Protocol Action modal, do the following:
- Select the Builder tab.
- Choose Protocols from the side panel.
- Search for the protocol by name or slug in the search bar (if needed).
- Click on a protocol from the list. The Protocol Action Modal appears with the following options:
Load
To load a protocol into a new template, do the following:
- In the Protocol Action Modal, choose Load.
- The protocol's steps and configuration appear as a new template. When you load a protocol created by Visual Pipeline Builder, the global configuration values are automatically populated from the pipeline configuration, preserving the original default values.
Edit
To load a protocol and its associated pipeline into a template, which allows you to make changes and deploy updates back to the original protocol and pipeline, do the following:
- In the Protocol Action Modal, choose Edit.
- Review the confirmation message and choose Confirm to load the protocol and pipeline into a template for editing.
- Make your changes in the Builder and Configuration tabs.
- Deploy the updated protocol and pipeline using the Launch tab. This action updates the existing protocol and pipeline in the TDP.
NOTEThe Edit option is only available for protocols created in Visual Pipeline Builder. Protocols managed externally (such as self-service protocols or those maintained in GitHub repositories) cannot be edited in Visual Pipeline Builder and must be updated through their original management system.
Add to Current Template
To merge a protocol's steps into your current working template, do the following:
- While working on a template in the Builder tab, select a protocol from the Protocols side panel.
- In the Protocol Action Modal, choose Add to Current Template (if available). The protocol's steps are merged into your current template. If there are naming conflicts with global configuration items, the app automatically ensures unique names by appending suffixes.
IMPORTANTWhen adding protocols to an existing template, review the merged configuration carefully to make sure that all global configuration items have the correct values and unique names.
AI Chat Assistant
The Visual Pipeline Builder includes an integrated AI Chat Assistant that helps users automatically build pipelines from existing TetraScience components using natural language descriptions.
IMPORTANTTo use the AI Chat Assistant, your TDP environment must have access to Amazon Bedrock Access. For access, contact your customer account leader. For more information about Amazon Bedrock, see the Amazon Bedrock User Guide.
To use the Visual Pipeline Builder AI Chat Assistant, do the following:
- Open the Settings page by clicking the upper right gear icon.
- Select the Advanced tab.
- Click the Enable AI Chat toggle.
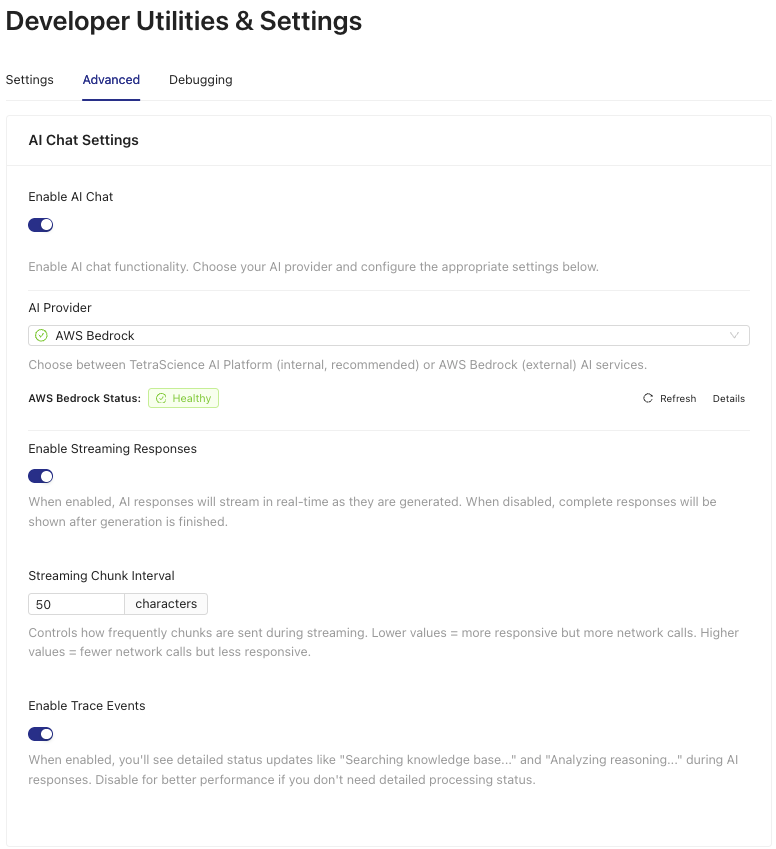
- In the AWS Credentials for Bedrock Access section, enter your Amazon Bedrock credentials.
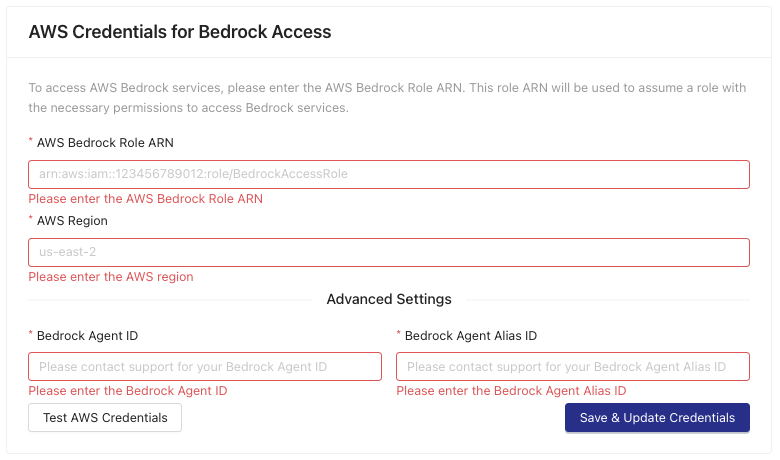
- Click Save & Update Credentials. The AI Chat Assistant appears in the lower left corner of the app.
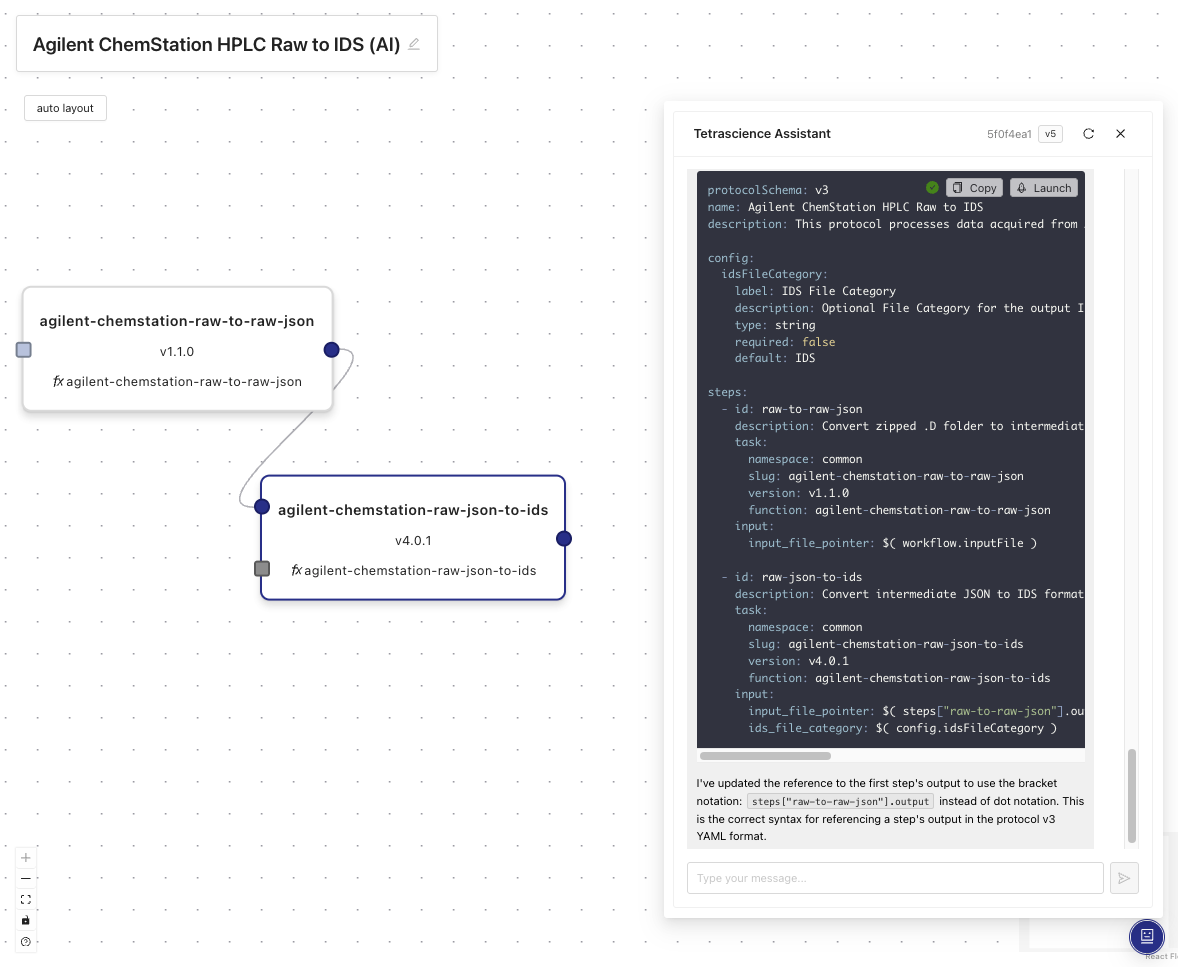
- Provide the assistant prompts to help you build pipelines. For examples, see Usage Examples.
AI Chat Assistant Capabilities
- Pipeline/Protocol Generation: generate complete pipelines from natural language descriptions
- Self-Service Guidance: get recommendations for task scripts, protocols, and pipeline patterns
- Instrument Support: query which laboratory instruments are supported by TetraScience components
- Template Creation: generate pipeline templates based on specific requirements
- Launch Integration: deploy AI-generated pipelines directly through the Launch tab
Usage Examples
- Generate a pipeline for processing HPLC data from Agilent instruments.
- Find out what task scripts are available for parsing chromatography data.
- Learn what TetraScience components support Thermo Fisher instruments.
Documentation Feedback
Do you have questions about our documentation or suggestions for how we can improve it? Start a discussion in TetraConnect Hub. For access, see Access the TetraConnect Hub.
NOTEFeedback isn't part of the official TetraScience product documentation. TetraScience doesn't warrant or make any guarantees about the feedback provided, including its accuracy, relevance, or reliability. All feedback is subject to the terms set forth in the TetraConnect Hub Community Guidelines.
Updated 2 months ago