Tetra OpenLab Agent Installation Guide (v1.0.x)
This guide shows how a system administrator can install and run Tetra OpenLab Agent versions 1.0.x.
To configure and use the Agent after it's installed, see the Tetra OpenLab Agent User Manual (v1.0.x).
UpgradesTo upgrade an Agent from a previous version, see Upgrade an Agent.
To install and run the Tetra OpenLab Agent, do the following:
- Verify the prerequisites.
- Create an Agent and select a data connection type.
- Install the Agent.
- Verify the installation.
- Verify the data connection.
Step 1: Verify the Prerequisites
Hardware and Software Requirements
You must install the Tetra OpenLab Agent on the same machine as the OpenLab client. To install and run the Agent, the following hardware and software is required.
Software Requirements
The Tetra OpenLab Agent requires access to the following software through the OpenLab client:
- Agilent OpenLab CDS Software 2.7.9 or higher (v2.8.0 or higher is recommended)
- Agilent OpenLab CDS Software Data Analysis Module v2.7.9 or higher (v2.8.0 or higher is recommended)
- TDP v4.3.3 or higher
- One of the following Microsoft Windows versions:
- Microsoft Windows 10 or 11, 64-bit editions
- Microsoft Windows Server 2016, 2019, or 2022 64-bit Standard or Datacenter
- .NET Framework 4.8
IMPORTANTYou must install the Agent at the workstation that the OpenLab Data Analysis module is installed, and where it can access OpenLab Common Services.
Hardware Requirements
- 16 GB RAM minimum (32 GB RAM is recommended)
- 4 Core CPU (8 cores is recommended)
- 2 x 500 GB or 1 TB of free disk space minimum
User Account Credentials
To run the Tetra OpenLab Agent, you must have the following valid user account credentials.
OpenLab User Account
If the OpenLab CDS is configured to use either Internal or Windows Domain Authentication providers, a valid OpenLab User Account is required to access the OpenLab server.
Required Permissions
The OpenLab Account must have at least View project or Project group permissions.
For instructions on how to update OpenLab account permissions, see the OpenLab CDS tutorial - Add or modify user privileges.
Step 2: Create an Agent and Select a Data Connection Type
Create a Tetra OpenLab Agent in the TDP by following the instructions in Create a New Agent. For AGENT TYPE, make sure that you select OpenLab Agent.
When you create the Agent, you must also select a data connection type so that the Agent can communicate with the TDP.
Selecting a Data Connection Type
The Tetra OpenLab Agent generates RAW JSON files that are uploaded to the TDP either directly or through a Data Connector. Before you install the Tetra OpenLab Agent, you must set up the Agent's data connection to the TDP by using one of the following methods:
-
TDP (No Connector): Connects Agents directly to the TDP and AWS APIs, or through a proxy that you configure in the Agent host server's settings. For instructions, see TDP (No Connector) Connections.
-or-
-
Tetra Hub: Uses an on-premises Tetra Hub to proxy connections to TDP and AWS APIs. For instructions, see Tetra Hub Connections.
For more information, see Agent Deployment Options.
Step 3: Install the Agent
TetraScience provides a Microsoft Installation Package (.msi) file to install the Tetra OpenLab Agent on the host server.
To get the installation package and install the Agent, do the following:
IMPORTANTTo access the server and run the installation package, you must sign in as an Administrator.
- On the host server, download the latest OpenLab Agent installation package from the Tetra Agent & Connector Installers page in the TetraConnect Hub. For access, see Access the TetraConnect Hub.
- Move the downloaded files to a local folder.
- Run the installer by opening the installation package and follow the guided wizard to complete the installation.
Default Installation Folder Location
C:\TetraScience\TetraScience.Agent.OpenLab.vx.x.x\
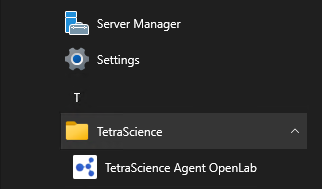
After the Agent is installed, the TetraScience Agent OpenLab shortcut is added to the Windows All Program Group menu. To initialize the Agent, you must add the configuration settings.
NOTETo restrict access to the local Tetra Agent Management Console, you can edit the Agent’s installation folder’s permissions to grant least privilege access. For more information, see Restrict Access to Agent Installation.
Step 4: Verify the Installation
Confirm that the Tetra OpenLab Agent was installed on the local drive by verifying the following:
- The TetraScience OpenLab Agent is installed under the
C:\\TetraSciencedirectory by default. - Under the TetraScience folder, TetraScience.Agent.OpenLab.vx.x.x appears.
- The bin subfolder appears under the TetraScience.Agent.OpenLab.vx.x.x folder.
- The TetraScience folder is added to the Windows Start menu, which includes the TetraScience Agent OpenLab application.
NOTETo launch the TetraScience OpenLab Agent Management Console, select the TetraScience OpenLab Agent link in the Windows Start Menu.
Step 5: Verify the Data Connection
To verify that the Agent can connect to the OpenLab software and the TDP, do the following.
Verify the Connection to OpenLab
To verify that the Agent can connect to the OpenLab software, do the following:
-
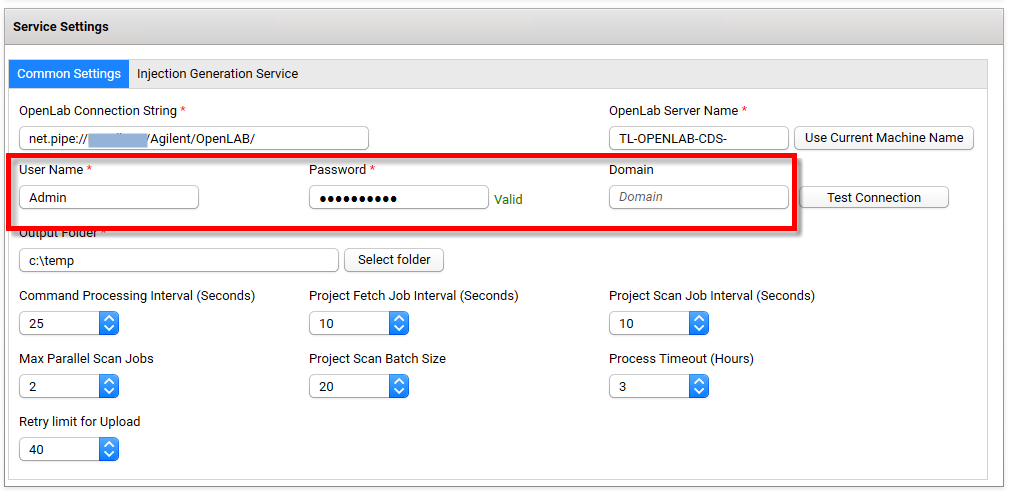
On the host server, open the TetraScience OpenLab Agent Management Console. Then, in the left navigation menu, under Menu, choose Configuration.
-
Populate the the following fields in the Common Settings section:
- For OpenLab Connection String, enter the connection string (for example,
"net.pipe://10.176.1.241/Agilent/OpenLab"). - For User Name, enter your OpenLab User Account.
- For Password, enter your OpenLab User password.
- For Domain, enter OpenLab User Windows Domain if OpenLab authentication is set to Windows Domain.
- Select Test Connection. Then, do one of the following based on if the connection test is successful or not:
-
If the connection was successful, a dialog appears. Select OK to confirm the connection to the OpenLab system.
-or-
-
If the connection was not successful, then verify that the connection details you entered in the above are accurate. Then, repeat the steps in this section to verify the connection.
Verify the Agent Group Account
The Agent Group User is the Windows service user account that the Agent service runs as locally. It is recommended that you create a service user account specifically for the Tetra OpenLab Agent. If the Agent Group User account isn't specified, the Agent uses the Windows LocalSystem account by default.
NOTEIf you make any updates to a Tetra Agent Group User (Windows service user account) or TDP service user, you must restart the Agent for the changes to take effect.
To verify the Agent Group Account credentials, do the following:
- On the host server, open the Tetra OpenLab Agent Management Console. Then, in the left navigation menu, under Menu, choose Configuration. Enter the following information in the Agent Group User section:
- For User Name, enter the Windows User Name where the Agent service is run locally.
- For Password, enter the user password.
After focus leaves the password field, the Agent validates the account immediately.

Verify the TDP Connection
To verify that the Agent can communicate with the TDP, do the following:
- From the Tetra OpenLab Agent Management Console, in the left navigation menu, under Menu, choose Configuration.
- Verify that the S3 Direct Upload toggle is set to active (the default value is set to active). For more information, see S3 Direct Upload (Recommended).
- Select the Receive Commands toggle so that it's set to active (the default value is set to inactive).
- (Optional) To reset the default settings for data connection status checks and Agent log file uploads, select Advanced Settings. The Agent Configuration Advanced Settings dialog appears, which includes the following settings:
- Data Connection status check every: Indicates how often the software checks the status of the connection (heartbeat) between the TDP and the Agent. If the TDP doesn't receive a heartbeat message for more than five minutes, the TDP assumes that the Agent is offline. The default value is
30seconds. - Agent log files upload every: Indicates how often the Agent uploads log files to the Data Lake. The default value is
300seconds. - To keep the recommended settings, or to save the new values you entered, choose OK. Only consider changing these values if connection checks (heartbeat) frequency needs to be changed, or if log files need to be uploaded to the TDP at a different frequency.
- Data Connection status check every: Indicates how often the software checks the status of the connection (heartbeat) between the TDP and the Agent. If the TDP doesn't receive a heartbeat message for more than five minutes, the TDP assumes that the Agent is offline. The default value is
- For Agent Id, enter the Agent ID (you can find this on the Agents page in the TDP).
- For the Connection Url field, enter the complete URL of the Tetra Hub, Generic Data Connector (GDC) attached to a Data Hub, or No Connector, based on your connection type.
- (For “TDP (No Connector)” setups only) If you’re using an Agent without a Connector, make sure that you do the following:
- For Org Slug, enter your organizational slug. To get your organizational slug, see Viewing Organization Details. The organizational slug is required when using a JSON Web Token (JWT). Adding the slug to this field attaches it to the Agent’s API request headers.
- For Authorization, select Add/Edit. In the dialog that appears, enter the JWT of the TDP service user you configured when creating the Agent. To get the TDP service user's JWT, see Generate a JWT for a Service User. Then, choose Save to encrypt and save the JWT. The Agent validates the connection immediately and displays the updated connection status next to the Connection Url field.
- (Optional) To specify the Destination Id for allowing the files to be uploaded to the same S3 location from multiple Agents. Destination Id is a UUID. This feature helps to split the load into multiple agents for scaling horizontally.
After you enter the information, the Agent immediately validates the TDP connection status.
Save and Start the Agent
To save and start the Agent, do the following:
- In the Agent Management Console, select the Save button at the top of the page.
- Select the Start button.
- Verify that the Agent Status displays as Running.

Verify that the Agent Can Retrieve OpenLab Data
When the Agent is running, you can validate the detection, generation, and upload of an Agent RAW JSON file by doing the following:
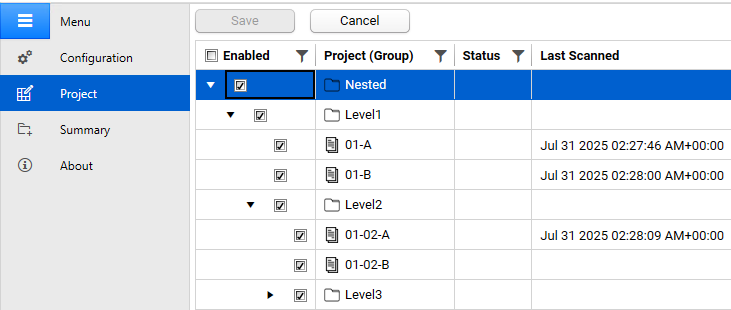
- Open the Tetra OpenLab Agent Management Console. Then, under Menu in the left navigation menu, select Project.
- Confirm that a list of projects appears. These are the projects that the Agent can access.
- Click the Edit button to enable the project selection.
- Select the projects you want to have processed.
- Choose Save.
Verify Processing Status
To check the file processing status, do the following:
- From the Tetra OpenLab Agent Management Console, navigate to the Summary tab and review the Agent status.
- After the Agent completes its routine scan and generates a RAW file, validate the following tasks listed in the Processing Summary section:
- Total Scanned: number of files the Agent detected for the selected projects
- Total Generated: number of files the Agent retrieved for the selected projects
- Uploaded: number of files the Agent uploaded to the Tetra Data Platform
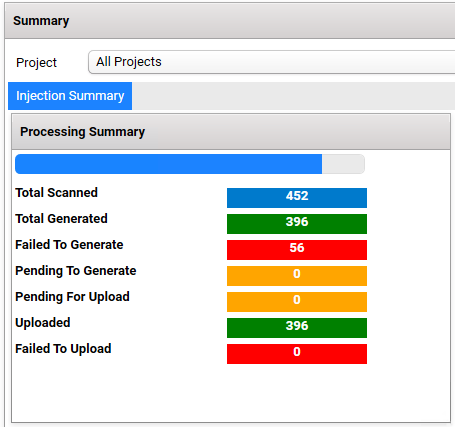
The count for each step listed in the Processing Summary section should match the total injection count in the OpenLab client.
Verify That the Generated RAW Files are Uploaded to the TDP
To confirm that the RAW files are uploaded to the TDP, do the following:
- Open the Search page in the TDP.
- Run a search for the RAW files the Agent generated. The files should appear in the search results.
Next Steps
To configure and use the Agent after it's installed, see the Tetra OpenLab Agent User Manual (v1.0.x).
NOTEWhen configuring the Agent, you can use a Windows task script to automatically restart the Tetra OpenLab Agent each day at a specific time. This setup ensures that the Agent remains online without having to check it each day.
Documentation Feedback
Do you have questions about our documentation or suggestions for how we can improve it? Start a discussion in TetraConnect Hub. For access, see Access the TetraConnect Hub.
NOTEFeedback isn't part of the official TetraScience product documentation. TetraScience doesn't warrant or make any guarantees about the feedback provided, including its accuracy, relevance, or reliability. All feedback is subject to the terms set forth in the TetraConnect Hub Community Guidelines.
Updated 2 months ago