Tetra UNICORN Agent User Manual (v3.8.x)
This guide shows how to configure and useTetra UNICORN Agent versions 3.8.x after an Agent is installed by using the local Agent Management Console.
To install the Agent, see the Tetra UNICORN Agent Installation Guide (v3.8.x).
Agent Management Console Configuration
You can use the Agent Management Console to do any of the following:
- Configure the TDP connection settings.
- Set up the UNICORN classic OPC HDA Service.
- Set up the UNICORN classic OPC Alarm and Events (AE) Service.
To get started, do the following.
Open the Agent Management Console
To open the Agent Management Console on the host server, do the following:
- On the Agent's host server, open Windows Programs.
- In the Windows Programs menu, choose TetraScience Unicorn Agent. The Agent Management Console appears.
Configure the Agent
To configure the Tetra Unicorn Agent after it's installed, do the following:
- In the Agent Management Console, select the menu icon in the left navigation menu. Then, choose Configuration. The Agent configuration page appears.
-
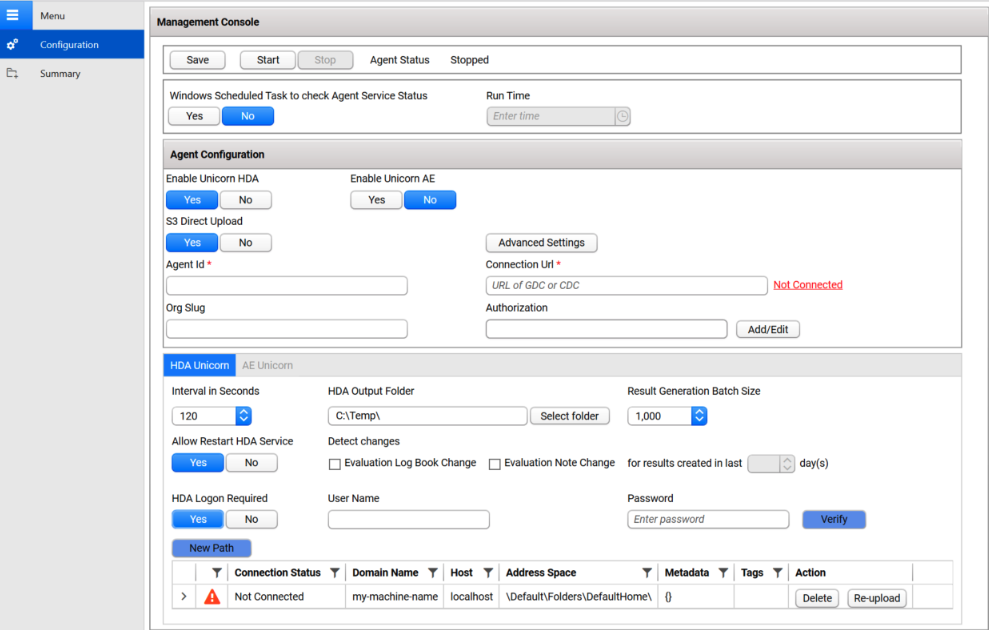
Configure the Agent by filling out the fields in the following sections on the Agent Configuration page:
- Agent Status
- Windows Task Scheduler
- Agent Configuration
- HDA Unicorn
- AE Unicorn
Configure the Agent Status
The Agent Status section indicates the current state of the Agent's processing status, which can be either of the following:
- Agent Not Started
- Running
To save, start, or stop the Agent, do the following:
- To save the Agent configuration, choose Save.
- To start the Agent after configuring new settings, choose Start. When the Agent starts, the status indicator shows Running.
- To stop a running Agent, choose Stop. The Stop button can be selected only if the Agent is running.

Automate Status Checks by Using Windows Task Scheduler
To avoid needing to check the Agent’s service status manually, it’s recommended that you create a Windows task to perform daily status checks.
To create a Windows task, do the following:
- Under Windows Scheduled Task to check Agent Service Status, choose Yes.
- For Run Time, enter the time that you want the status check to run each day. If the Agent is stopped, then the scheduled Windows task restarts the Agent service automatically. If the Agent is running, it continues to run, and the Windows task will run at the time you selected.

NOTEIf you manually stop the Agent, the task is removed from Windows Task Scheduler. When you run the Agent without specifying an Agent Group User account, the task runs under the LocalSystem account.
Configure the Agent Group User
The Agent Group User is the Windows service account that runs the Tetra UNICORN Agent.
To configure the Agent Group User, do the following:
- In the Agent Group User section, for User Name, enter the user name.
- For Password, enter the password.
The Agent then validates the account. If the user name and password are correct, the Agent displays a Valid status in the console.

NOTEIf you're using a Windows local account, add *.* at the front of the user name. For example, if the user name is Tetra, enter .\Tetra.
Edit Agent Configuration Settings
The Agent Configuration section on the Configuration tab provides settings to do any of the following:
- Set the S3 Direct Upload option (activated by default).
- Configure Proxy Settings.
- Establish a data connection between the Agent and the TDP.
- Specify the Destination Id so that files from multiple Agents can be uploaded to the same Amazon S3 bucket. (Usually, it helps to split the load into multiple Agents for scaling horizontally.)
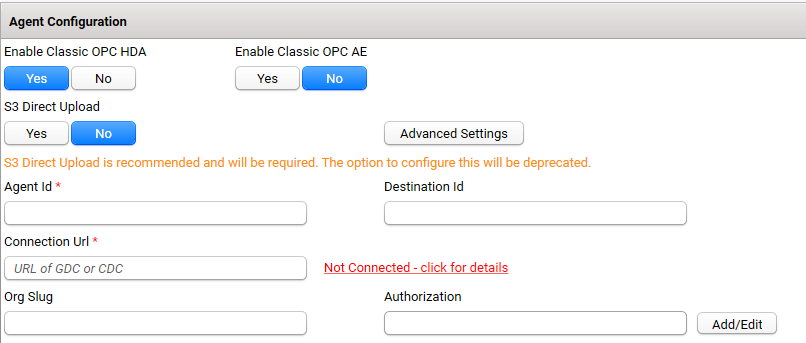
Set the S3 Direct Upload Option
To have the Agent upload files directly to your Amazon Simple Storage Service (Amazon S3) bucket, set the S3 Direct Upload option to Yes. For new installs, Yes is the default setting. When upgrading the Agent, the S3 Direct Upload setting from the previous version of the Agent is retained.
For more information, see S3 Direct Upload.
If you choose this option, keep in mind the following:
- If you use the S3 Direct Upload option with a Tetra Data Hub that uses a Generic Data Connector (GDC), you must add an L7 Proxy Connector in the same Hub where you set up the GDC. The port of the L7 Proxy Connector must also be open. For more information, see GDC Connections.
SQLite Database File BackupsTo have the Agent automatically perform regular backups of the SQLite database file, set the S3 Direct Upload option to Yes. When you enable this option, the SQLite database file (which stores agent configuration data) is uploaded to the backup bucket in the Tetra Data Lake. If an Agent failure occurs, you can restore the database file from the backup bucket and continue processing.
If you don't use the S3 Direct Upload option, it's recommended that you create periodic backups of the Agent database, which is typically stored in the installation folder under
C:\\TetraScience\<agent>\\db. In the event of a failure (for example, if the host server drive is lost), this would enable the data extraction to continue from where it left off, without having to re-upload all of the data.
Establish a Data Connection Between the Agent and the TDP
To set up a data connection between the Agent and the TDP, enter the following information in the Agent Configuration section on the Configuration tab:
IMPORTANTWhen establishing a connection between the Agent and the TDP, keep in mind the following:
- Agent ID is required.
- The connection URL is required only if you're uploading RAW files to the TDP.
- Before you use your Agent ID and connection URL, it’s strongly recommended that you verify both with your TetraScience Customer Success Team.
- For Agent Id, enter the Agent’s ID. The Agent ID is a Universal Unique Identifier (UUID) value that’s used to connect the Agent to the TDP. To find your Agent ID, do the following:
- Sign in to the TDP.
- In the left navigation menu, choose Data Sources. Then, choose Agents. The Agents page opens.
- In the AGENT column, find the name of the Agent that you’re configuring. The Agent ID is listed below the Agent name.
- For Connection Url, enter the complete connection URL of the Connector or integration type that you’re using:
- TDP (No Connector) URL:
<https://api.tetrascience-dev.com/v1/data-acquisition/agent/> - Hub:
http://10.100.1.2:8443/generic-connector/v1/agent - Generic Data Connector (GDC) URL:
<http://10.100.1.1:8888/generic-connector/v1/agent>
- (For “TDP (No Connector)” setups only) If you’re using an Agent without a Connector, make sure that you do the following:
- For Org Slug, enter your organizational slug. To get your organizational slug, see Viewing Organization Details. The organizational slug is required when using a JSON Web Token (JWT). Adding the slug to this field attaches it to the Agent’s API request headers.
- For Authorization, select Add/Edit. In the dialog that appears, enter the JWT of the TDP service user you configured when creating the Agent. To get the TDP service user's JWT, see Generate a JWT for a Service User. Then, choose Save to encrypt and save the JWT. The Agent validates the connection immediately and displays the updated connection status next to the Connection Url field.
- (Optional) To specify the Destination Id for allowing the files to be uploaded to the same S3 location from multiple agents. Destination Id is a UUID. This feature helps to split the load into multiple agents for scaling horizontally.
NOTEIf you make any updates to a Tetra Agent Group User (Windows service user account) or TDP service user, you must restart the Agent for the changes to take effect.
Configure Advanced Settings
You can configure the following options by selecting Advanced Settings on the Configuration page:
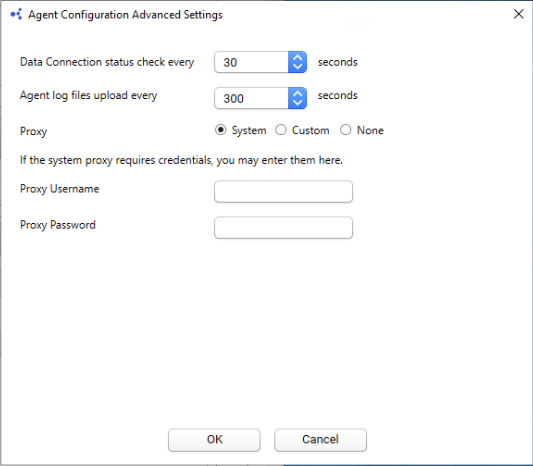
- Data Connection status check every: Indicates how often the software checks the status of the connection (heartbeat) between the TDP and the Agent. If the TDP doesn't receive a heartbeat message for more than five minutes, the platform assumes that the Agent is offline. The default value is
30seconds. - Agent log files upload every: Indicates how often the Agent uploads log files to the Data Lake. The default value is
300seconds. - Proxy Settings: Indicates what type of proxy the Agent is using (System or Custom), or if it's not using a proxy (None).
- System (default setting): Uses the system proxy specified in Windows for the service user. If basic authentication is required, you can specify a username and password for the proxy.
- Custom: Makes all of the Agent's proxy options configurable, regardless of any other settings. This proxy takes precedence over any existing system proxy or L7 proxy.
- None: Explicitly configures the Agent service to not use any proxies for web requests.
NOTEIf a system proxy requires credentials, make sure that you enter them in the Proxy Username and Proxy Password fields.
To keep the recommended settings, or to save the new values you entered, choose OK. Only consider changing these values if connection checks (heartbeat) frequency needs to be changed, or if logs files are needed to be uploaded to the TDP at a different frequency.
Configure Tetra UNICORN Agent Services
The Tetra UNICORN Agent provides two optional services:
- HDA Service: Detects the UNICORN result files through OPC Historical Data Access.
- Alarms and Events (AE) Service: Detects the alarm and events raised from the UNICORN Instrument service.
IMPORTANTThe Alarms and Events (AE) Service is in beta release currently and may require changes in future Tetra UNICORN Agent releases. For more information, or to activate this feature in your TDP environment, contact your customer success manager (CSM).
Configure HDA Service Settings
The Tetra UNICORN Agent HDA Service is used to detect the UNICORN result files through OPC Historical Data Access.
To activate and configure the HDA Service, do the following:
- When you select Yes for the Enable Unicorn HDA field, the HDA Unicorn information displays at the bottom of the Management Console pane.
- Set the Interval in Seconds field to indicate how often the Tetra Agent scans UNICORN to detect the new result files.
- Select the HDA Output Folder to where you want to temporarily store the generated RAW files before uploading. You can use the default (
C:\\Temp) location, or provide a different folder. If the folder does not exist, then the Agent creates the folder. - The Result Generation Batch Size specifies how many result files will be batched together for generation. The default value is 1000. For each batch there will be one HDA connection to UNICORN. To learn more about how this and other settings can be used to tweak latency and number of HDA connections, see here.
- Select Yes to Allow Restart HDA Services to allow the Agent to restart the HDA service, if required. For details, click here.
- Set Detect changes for Result files using:
- Evaluation Log Book Change
- Evaluation Note Change
- Results created in the last x number of days.
- If you want to control the access to UNICORN using a specific, local user account, you need to turn on the HDA logon required option from UNICORN and, in the UNICORN Agent, select Yes for HDA Logon Required. You'll also need to add a username and password. For more information on this security feature, see the HDA Logon Required section later in this topic.
NOTE
UNICORN domain user accounts aren't supported currently. You can configure HDA Logon Required for local user accounts only.
- The table specifies the UNICORN path containing: Domain Name, Host, and the Address Space of the Result File folder. If required, a UNICORN Agent can monitor multiple addresses spaces. To create a new path, click New Path, or double-click the existing path in the table to open the Unicorn Path Editor window.
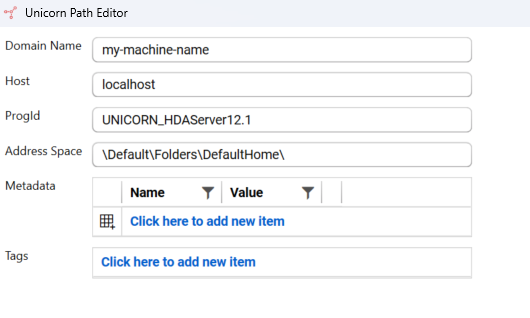
UNICORN Path Editor

Unicorn HDA Service configuration
To define a valid path, you must enter:
- Domain Name - Must be a unique name that identifies the UNICORN Host. This value is used to differentiate different UNICORN servers by prepending it to the UNICORN file path when files are uploaded to the TDP. We recommend using the UNICORN server name as Domain Name. This server is not used to access the OPC HDA service.
- Host - Local server name or IP address. When the Tetra UNICORN Agent is installed on the same server as the Unicorn client, the value must be either
LocalHostor127.0.0.1. This value is one of the parameters used to access the UNICORN OPC HDA service. - ProgId - Static value UNICORN_HDAServer12.1 is used to identify UNICORN OPC HDA service. It is used by the OPC protocol. (Currently this value cannot be changed. This value is valid for UNICORN 6.x and 7.x.)
- Address Space - UNICORN HDA folder path. To learn how to find the address, click here. The folder name is case-sensitive.
- Metadata - A key/value pair that specifies the metadata associated with the output files uploaded to TDP. You can add or edit metadata as needed.
- Tags - Specifies tags associated with the files uploaded to TDP. Tags are comma-delimited strings that are associated with output files uploaded to TDP.
Metadata and TagsTo learn more about metadata and tags, including which characters you can use, see this topic. There's also more information about Metadata and Tags near the end of this topic.
Regeneration
Regeneration options (by detecting changes) enable you to automatically upload new versions of data when the Evaluation Log Book or Evaluation Notes change.
For more control over data management, you can enable or disable the rules for the Tetra UNICORN Agent to determine file change:
- Evaluation Log Book Change
- Evaluation Note Change
Click the check box next to the Evaluation change (s) you want to include. If these changes are excluded, then no automatic reuploads are generated when an evaluation log book or evaluation note changes.
Experimental FeatureThe Detect changes feature is an experimental feature because the integration with UNICORN does not provide a native API to detect Evaluation Notes or Evaluation Log Book changes. The Agent infers those changes by parsing the UNICORN logs (and in some cases, it is not accurate), resulting in unnecessary re-uploads. Use this feature if you need the latest version of the Evaluation Log Book or Evaluation Notes, but be aware that you will have multiple versions of the same file, and that new version of data may re-trigger pipelines.
To re-upload the result files, do the following:
- Click Re-upload from the Action column in the address path.
- Set the Reupload Start Date and Reupload End Date. The Tetra Agent will upload any files that were created or updated where the "Result Creation Date" is within this date timeframe. The "Result Creation Date" in UNICORN is the original testing date or the date when the result file was imported into a UNICORN system from another UNICORN system.
- Click OK.

Re-upload result files within specified date range
The Agent verifies the folder path and the user permission when iterating the folder paths. It reuploads the result files using the Result Creation Date within the selected time range.
The Agent also displays an icon in front of every folder path to indicate whether the folder path is valid; a green checkmark for valid, or an orange warning triangle for invalid. The Agent keeps checking the folder paths at each interval, and updates the status if there are any changes.
Configure AE Service Settings
IMPORTANTThe Alarms and Events (AE) Service is in beta release currently and may require changes in future Tetra UNICORN Agent releases. For more information, or to activate this feature in your TDP environment, contact your customer success manager (CSM).
The AE service detects the Alarm and Events generated from the UNICORN Instrument service.
To enable and configure the AE Service, do the following:
- When you select Yes for the Enable Unicorn AE field, the AE Unicorn information displays at the bottom of the Management Console pane:

UNICORN AE Service configuration
Similar to the HDA Service, the Agent can detect the Alarms and Events from multiple paths. When necessary, you can delete an existing path.

AE Path Editor
- To define a valid path, you must enter:
- Host - Local server name or IP address hosting the UNICORN Agent. We recommend that you use a real machine name or IP address as the host.
- ProgId - Static value UNICORN_AEServer11.System1.1 is used by OPC to identify the UNICORN AE service.
- Metadata - A key/value pair that specifies the metadata associated with the files uploaded to TDP. You can add or edit metadata as needed.
- Tags - Specifies tags associated with the files uploaded to TDP.
- Click Save to save the configuration and start the Agent.
Daily Agent Run ScheduleAfter you complete the initial installation and configuration, you can use a Windows Task script to re-start the Tetra UNICORN Agent (for example, you can set it to run at 1:00 AM) and ensure that it runs constantly. For details, see link.
The Tetra UNICORN Agent does two account verifications automatically in the following two scenarios.
- When the Windows Configuration UI launches for the first time.
- When the user clicks the Start button to start the service.
To avoid unexpected behavior from OPC, please create a dedicated user account to restrict the OPC access from Tetra UNICORN Agent.
Passing User Credentials (HDA Logon Required)
Dedicated User AccountWe recommend you use a dedicated local user account instead of using a normal user account with Evaluation Logbook change turned on to detect the Result File change. UNICORN domain user accounts aren't supported currently. You can configure HDA Logon Required for local user accounts only.
You can pass user credentials by using the Tetra UNICORN Agent when extracting UNICORN Result files through the UNICORN OPC HDA Service. Using this feature allows the Tetra UNICORN Agent to only access resources that the local user account has permissions for.
To configure this please contact your customer account leader for the detailed steps.
Potential Issues and Limitations
Data Integrity Risks
Since you can switch to a different user, it can lead to potential data duplication.
This approach could cause the Tetra UNICORN Agent to extract and generate the Result files from UNICORN again. Because the user account name is part of the Result File OPC Address space, Result files can have a different OPC address even though both OPC addresses point to the same result file in the UNICORN database.

For example, when the user switches the user account from “Administrator” to “UNICORN_Test”, it can lead to the following:
- The files in the folder of
Administrator\\Folders\\Defaulthomeare not accessible anymore. - The files under the folder of
Administrator\\Folders\\Testwill be regenerated, because the files have different OPC address space after the account is switched. For example,- When logging in as Administrator, the Result file,
Test\\UNICORN_Test2\\EXPORT TEST 2, has the following OPC address:Administrator\\Folders\\Test\\UNICORN_Test2\\EXPORT TEST 2. - When the UNICORN_Test user logs in, its OPC Address becomes the following:
UNICORN_Test\\Folders\\Test\\UNICORN_Test\\EXPORT TEST 2.
- When logging in as Administrator, the Result file,
NOTEThis could cause the same result to be uploaded multiple times. In the example above, EXPORT TEST 2 would be uploaded twice. You should be fully aware of this risk before you start to use this feature.

Method Run Issues
To determine if the Method run completes, the Agent checks the pattern using a regular expression. A date time stamp needs to be evaluated. However, the date-time format is based on the hosting machine. Currently, the supported Date time format is MM/dd/yyyy. When the Agent is deployed to new clients, it is better to check the Date time format in the host machine. The Agent might need to include an additional date time format.
There have been situations that the Method run finishes with errors. The event log looks like this: An error occurred that caused the run to end and the result to be saved. Error description: Instrument network connection lost during run (System). If it happens that the Result file is not generated by the UNICORN Agent, a potential solution for the end-user is to open the Result file from UNICORN Evaluation Module, which will add a new entry to Evaluation Log. With that, the Agent can generate the Raw file
Monitor Agent Progress and Server System Metrics
To review the UNICORN Agent's run time progress and host server's system metrics, select Summary to open the Summary dashboard:

Summary Dashboard
Section 1: HDA Processing Summary
This section displays the HDA Service status where you can review how many UNICORN HDA result files were detected, generated, and uploaded. If any failure occurs, the numbers display here.
Section 2: Error Messages
This section displays any detailed error messages that occurred during the result file generation and file upload. It displays the file name and error messages.
Section 3: Host Server System Metrics
This section displays the host server system metrics and messages every minute and provides these metrics:
- Data Connection (connection status between the Agent and TDP.)
- Available Disk Space (in GB)
- Disk Usage (as a % of the total)
- CPU Usage (as a % of the total)
- Memory Usage (in MB)
Documentation Feedback
Do you have questions about our documentation or suggestions for how we can improve it? Start a discussion in TetraConnect Hub. For access, see Access the TetraConnect Hub.
NOTEFeedback isn't part of the official TetraScience product documentation. TetraScience doesn't warrant or make any guarantees about the feedback provided, including its accuracy, relevance, or reliability. All feedback is subject to the terms set forth in the TetraConnect Hub Community Guidelines.
Updated 2 months ago