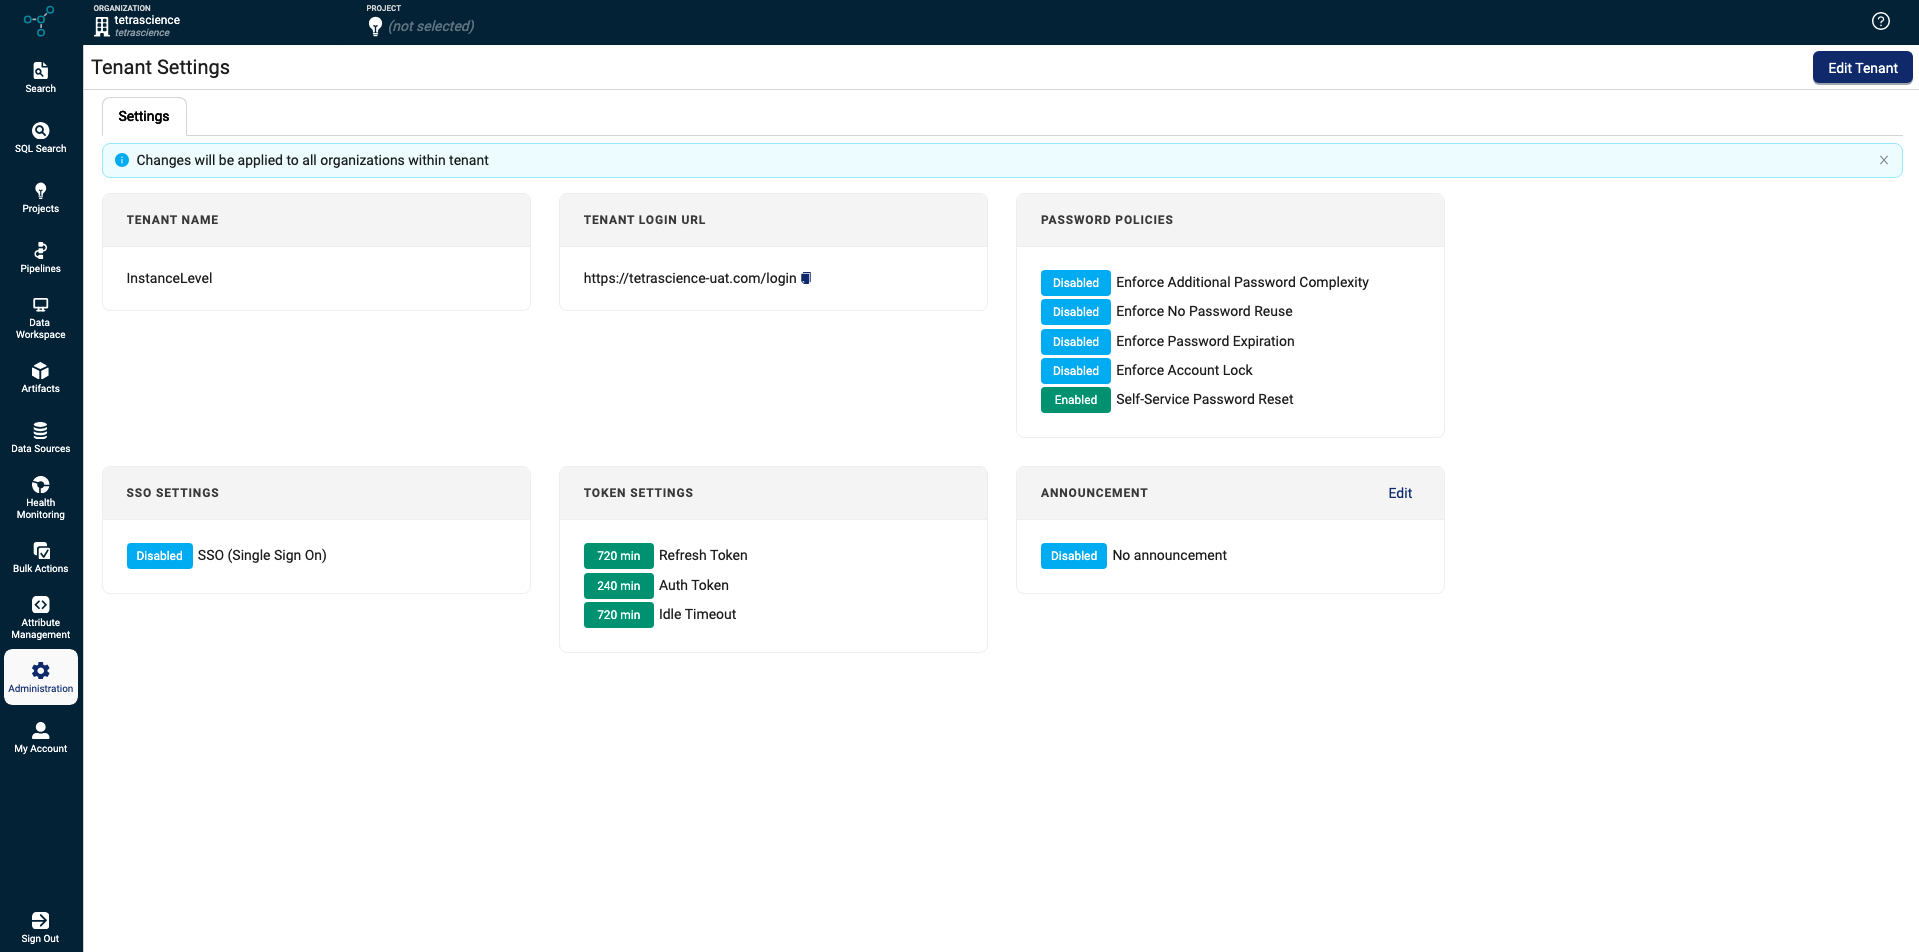
Tenant Settings
Tenants are the highest level entity in the Tetra Data Platform (TDP). Each TetraScience customer is represented by one tenant that is made up of one or more organizations.
Organization administrators can configure the following actions at the tenant level on the Tenant Settings page:
- Configure timeout settings
- Set password policies
- Configure single sign-on (SSO) settings
- Create an announcement to display to all users in your tenant when they log in
For information about organization-level settings, see Organization Settings.
IMPORTANTData can't be shared across organizations. Each organization's data is only accessible to user accounts within that organization.
Access Tenant Settings
To view the Tenant Settings page, do the following:
- Sign in to the Tetra Data Platform (TDP) with an Org Admin role.
- In the left navigation menu, choose Administration.
- Choose Tenant Settings. The Tenant Settings page appears and displays your tenant's current settings.
Configure Timeout Settings
IMPORTANTOrganizations within the same tenant must use the same timeout settings.
To configure refresh and access token timeout settings, or to set an idle timeout period for users, do the following:
- Open the Tenant Settings page.
- Choose Edit Tenant. The Edit Tenant dialog appears.
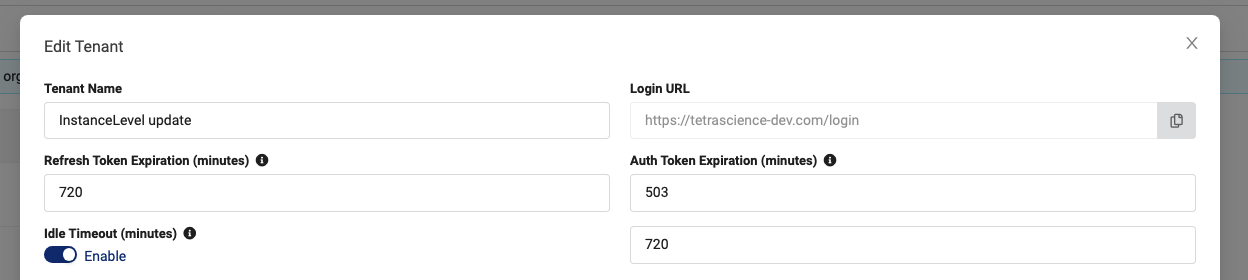
- For Refresh Token Expiration (minutes), enter a timeout period in minutes for users' refresh tokens (minimum 60 minutes, maximum 720 minutes).
- For Auth Token Expiration (minutes), enter a timeout period in minutes for users' access tokens (minimum 15 minutes, maximum 719 minutes).
- (Optional) For Idle Timeout (minutes), move the Enable toggle to the right to turn on an inactivity timeout period for TDP users. Then, enter a timeout period for inactive users (minimum 1 minute, maximum 720 minutes.
- Choose Save.
NOTEAccess tokens are used to securely authenticate users into the TDP through OAuth 2.0 Authorization Code Flow. Refresh tokens are used to obtain new access and refresh token pairs when a TDP user's existing access token expires.
Set Password Policies
IMPORTANTOrganizations within the same tenant must use the same password policies.
To enforce more rigorous password requirements for all TDP users within your tenant, do the following:
- Open the Tenant Settings page.
- Choose Edit Tenant. The Edit Tenant dialog appears.
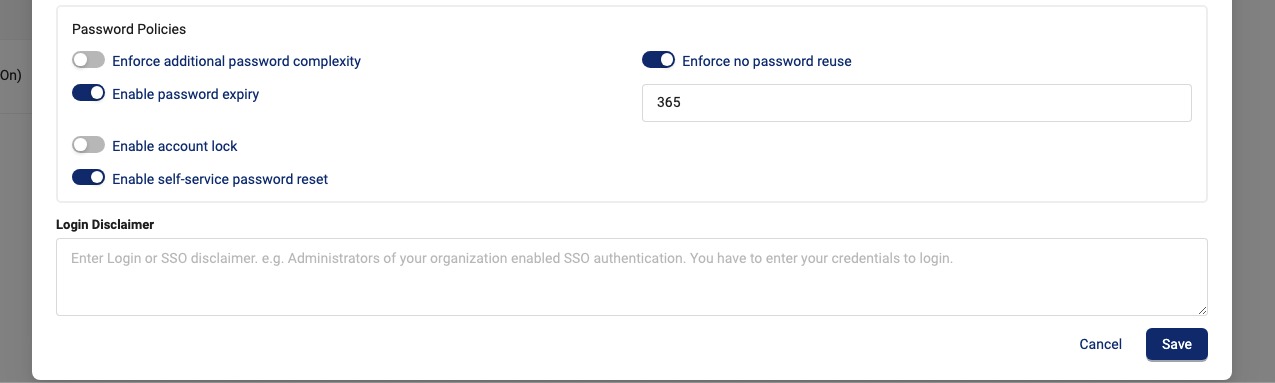
- Under Password Policies, move any of the following toggles to the right to activate each password policy:
- Enforce additional password complexity: Requires passwords to not start or end with a number, and to include at least one upper and lower case letter, a number, and a special character.
- Enforce no password reuse: Prevents users' new passwords from matching their current passwords, or any of their previous five passwords.
- Enable password expiry: Makes users' passwords expire after a configured number of days, and then requires users to update their passwords on their first user login attempt after that time period. After you activate this option, make sure that you enter an expiration period in days in the text field that appears (default value is 365 days).
- Enable account lock: Locks users' accounts after a configured number of failed login attempts. After you activate this option, make sure that you enter the maximum number of failed login attempts in the text field that appears (default value is 3 attempts).
- Enable self-service password reset: Allows users to reset their own passwords on the My Account page in the TDP user interface.
- For Login Disclaimer, enter the text that you want displayed on the TDP login dialog to alert users that they must enter their credentials to log in.
- Choose Save.
Configure SSO Settings
IMPORTANTIf your tenant uses single sign-on (SSO) for authentication, keep in mind the following:
- Organizations within the same tenant must use the same SSO settings. If SSO is activated for your tenant, you will not be able to add users by using their email.
- TDP users authenticated through SSO are managed through your identity provider (IdP), not the TDP. If you're using SSO for authentication, you must manage users through your IdP directly.
- If you remove users from your IdP, those users are not removed from the Login Users tab on the Organization Settings page. Deleted IdP users will still appear on the Login Users tab; however, they don't have access to the TDP after you delete them from your IdP.
To configure SSO settings for all organizations within your tenant, do the following:
NOTEThe following procedure applies to Customer-hosted TDP deployments only. For Tetra-hosted TDP deployments, contact your customer account leader. They will activate your tenant's SSO settings for you.
- Open the Tenant Settings page.
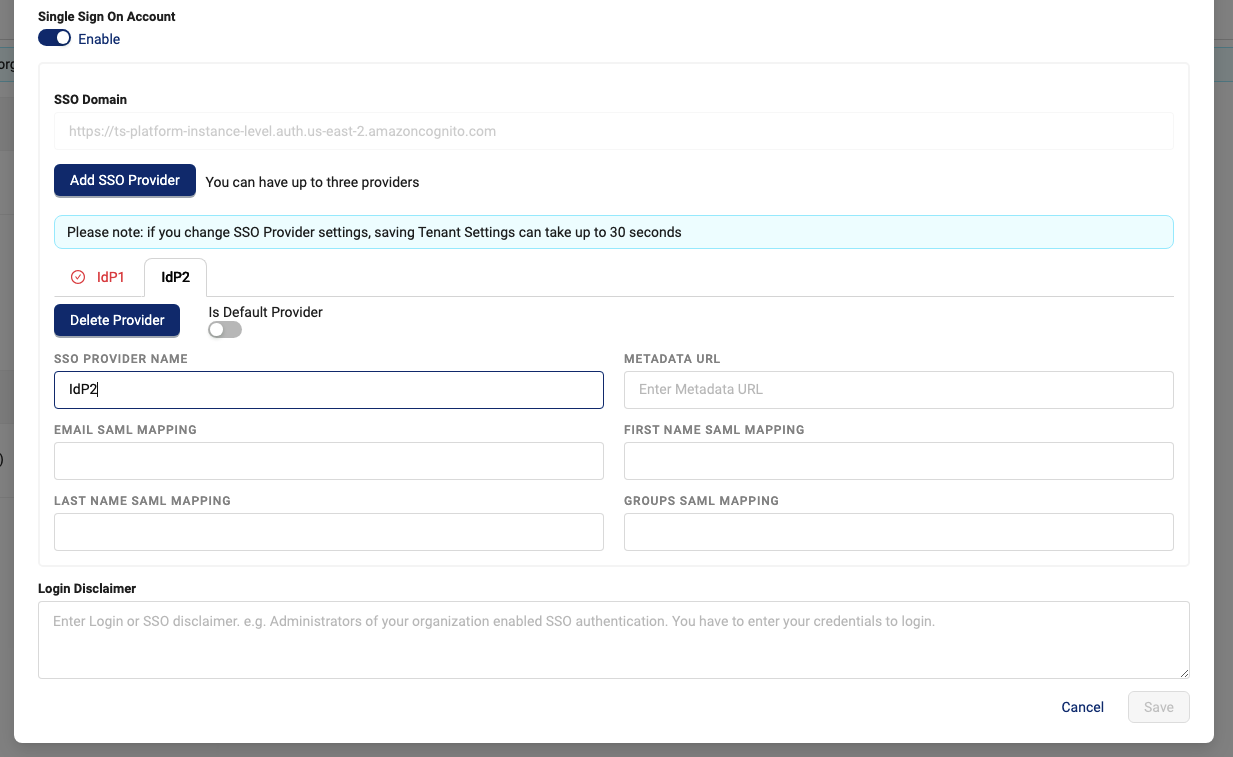
- Choose Edit Tenant. The Edit Tenant dialog appears.
- For Single Sign On Account, move the Enable toggle to the right. Fields for configuring SSO settings for up to three identity providers (IdPs) appear.
-
For each IdP, enter the following:
- For SSO Domain, enter the identifying Amazon Cognito domain prefix previously entered in the App Integration section of Cognito. The following is an example Cognito domain:
https://acme-demo.auth.us-east-2.amazoncognito.com - For SSO Redirect URL, enter the sign-in and sign-out URL previously entered in Cognito. The following is an example sign-in URL:
https://tetrascience-dev.com/acme-demo/login/sso - For SSO Provider Name, enter the provider name from Cognito (for example,
SAML). - For Metadata URL, enter the metadata URL provided by your IdP.
- For Email SAML Mapping, enter the email SAML mapping provided by your IdP.
- For First Name SAML Mapping, enter the first name SAML mapping provided by your IdP.
- For Last Name SAML Mapping, enter the last name SAML mapping provided by your IdP.
- For Groups SAML Mapping, enter the groups SAML mapping provided by your IdP.
- For Login Disclaimer, enter the text that you want displayed on the TDP login dialog to alert users that SSO is activated.
- For SSO Domain, enter the identifying Amazon Cognito domain prefix previously entered in the App Integration section of Cognito. The following is an example Cognito domain:
-
(Optional) To add more than one IdP, choose the Add SSO Provider button. Then, repeat step 5 to configure the new IdP's SSO settings. You can configure up to three IdPs.
-
Choose Save.
Turn Off SSO Settings
To turn off SSO settings after they're activated, submit a support ticket asking to turn off your SSO settings. Do not turn off the Single Sign On Account > Enable toggle yourself. After your SSO settings are updated, you'll then need to create new login passwords for existing users.
IMPORTANTIf you deactivate your SSO settings without updating the tenant's database
"authType"property to"authType": "password", then any users with special characters in their user names won't be able to be added to a new TDP organization. Those users accounts also won't be able to be edited through the TDP UI. Instead, they must be updated through the TetraScience API.
Create Tenant-Level Announcements
NOTEIf you create an ANNOUNCEMENT at the tenant level, the message is cascaded to all users across all of your tenant's organizations. Announcements are shown one time for each user login.
To create an announcement for all users in a single organization, see Create Organization-Level Announcements.
To create an announcement to display to all users in your tenant when they log in, do the following:
- Open the Tenant Settings page.
- In the ANNOUNCEMENT tile, choose Edit. An Edit Announcement dialog appears.
- In the Markdown section, enter your message using standard Markdown syntax. A preview of the display message appears in the Preview section.
- Choose Save.
Turn Off Tenant-Level Announcements
To turn off a tenant-level announcement after it's created, do the following:
- Open the Tenant Settings page.
- In the ANNOUNCEMENT tile, choose Edit. An Edit Announcement dialog appears.
- In the Markdown section, delete the existing message.
- Choose Save. The Announcement tile on the Tenant Settings page displays a Disabled button and says No announcement.
Documentation Feedback
Do you have questions about our documentation or suggestions for how we can improve it? Start a discussion in TetraConnect Hub. For access, see Access the TetraConnect Hub.
NOTEFeedback isn't part of the official TetraScience product documentation. TetraScience doesn't warrant or make any guarantees about the feedback provided, including its accuracy, relevance, or reliability. All feedback is subject to the terms set forth in the TetraConnect Hub Community Guidelines.