Organization Settings
Each tenant's data and user accounts are segmented into one or more organizations on the Tetra Data Platform (TDP). User accounts within each organization are configured with specific roles and policies. Users can also be assigned specific data access rules to limit what data within an organization each user can see.
Organization administrators can configure the following actions at the organization level on the Organization Settings page:
- Rename an organization
- Configure default search settings
- Configure compliance settings
- Configure access rules
- Create custom roles
- Manage user accounts
- Manage service users
- Create an announcement to display to all users in your organization when they log in
Organization administrators can also Create and manage organizations by using the Manage Organizations page.
IMPORTANTData can't be shared across organizations. Each organization's data is only accessible to user accounts within that organization.
Organization Attributes
All TDP organizations have the following attributes:
- Organization name
- Organization slug (orgslug: A unique identifier used to call an API endpoint or to create a self-service Tetra Data pipeline)
- Associated user accounts, including user account names, emails, roles, and statuses
View and Manage Your Organization Membership
Your user account's organization (for example, TetraScience) displays at the top left of the TDP user interface under ORGANIZATION. If you belong to more than one organization, you can select the organization name to open a search dialog that allows you to search for and switch to the other organizations that you belong to by entering either their orgslug or name.
To view and manage your membership in one or more organizations, see Manage Your Account.
Access Organization Settings
To view your organization's current settings, do the following:
IMPORTANTTo configure organization settings, you must sign in to the TDP as an Administrator user.
- Sign in to the TDP as a user with an Administrator role.
- In the left navigation menu, choose Administration. Then, choose Organization Settings. The Organization Settings page appears.
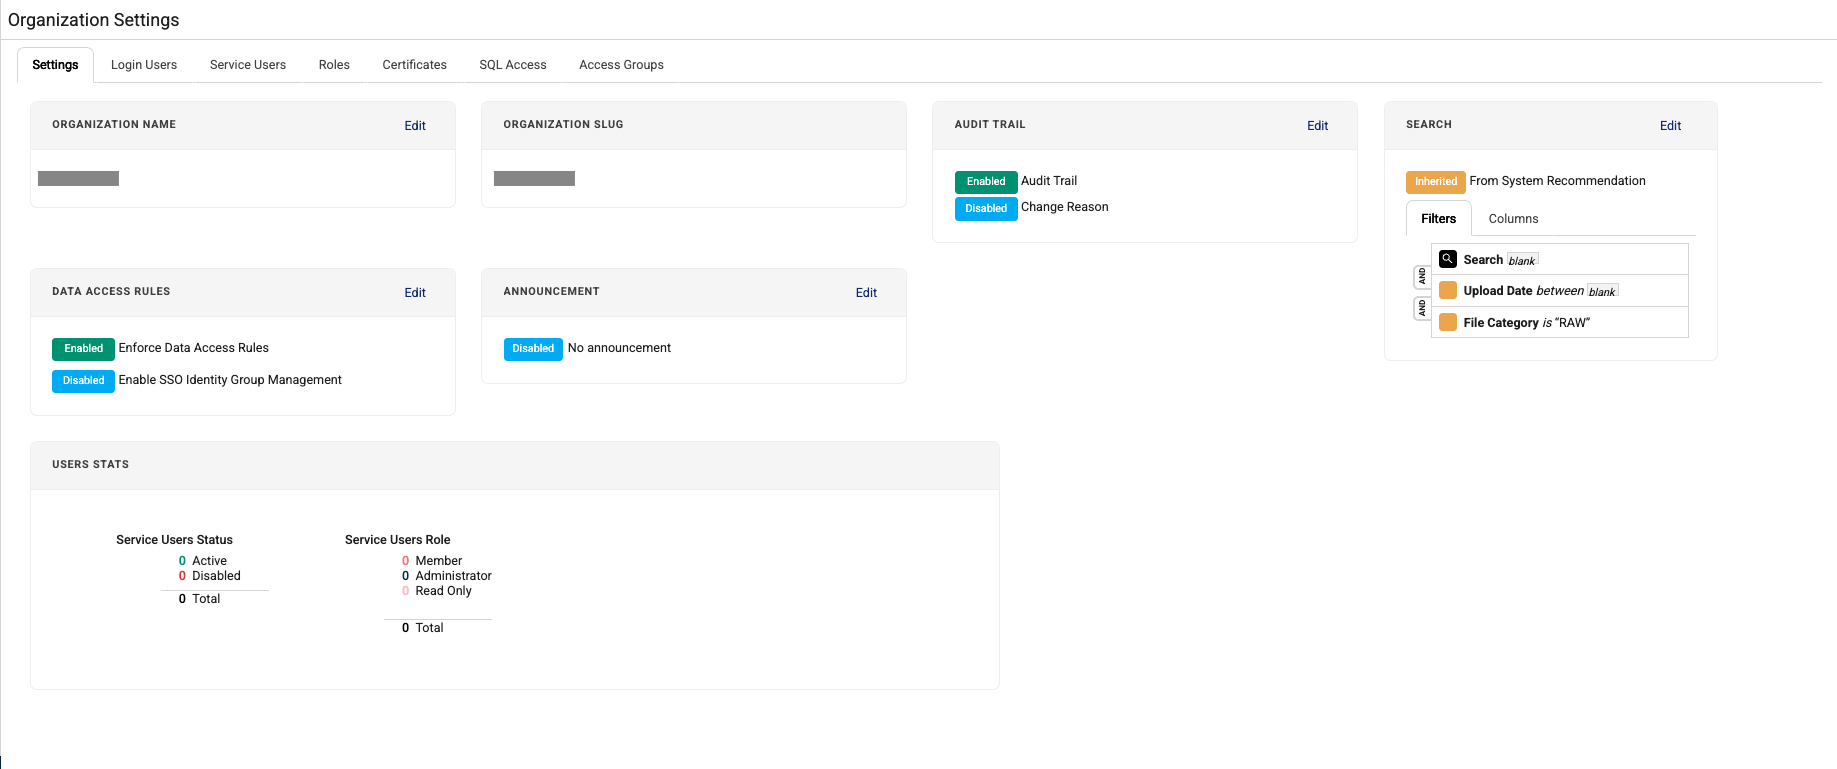
NOTEThe organization's name, compliance settings, and slug display at the top of the page. Login Users and Service Users are listed in separate tabs, which include information about their roles, statuses, and JSON Web Tokens (JWTs).
Rename an Organization
To rename an existing organization, do the following:
- Open the Organization Settings page as a user with an Administrator role.
- On the Settings tab, in the ORGANIZATION NAME section, select the Edit button. A Rename Organization dialog appears.
- For ORGANIZATION NAME, enter the organization's new name.
- Choose Rename.
Configure Default Search Settings for an Organization
To configure default Search settings for your organization, do the following:
- Open the Organization Settings page as a user with an Administrator role.
- On the Settings tab, in the SEARCH section, select the Edit button. An Edit Search dialog appears.
-
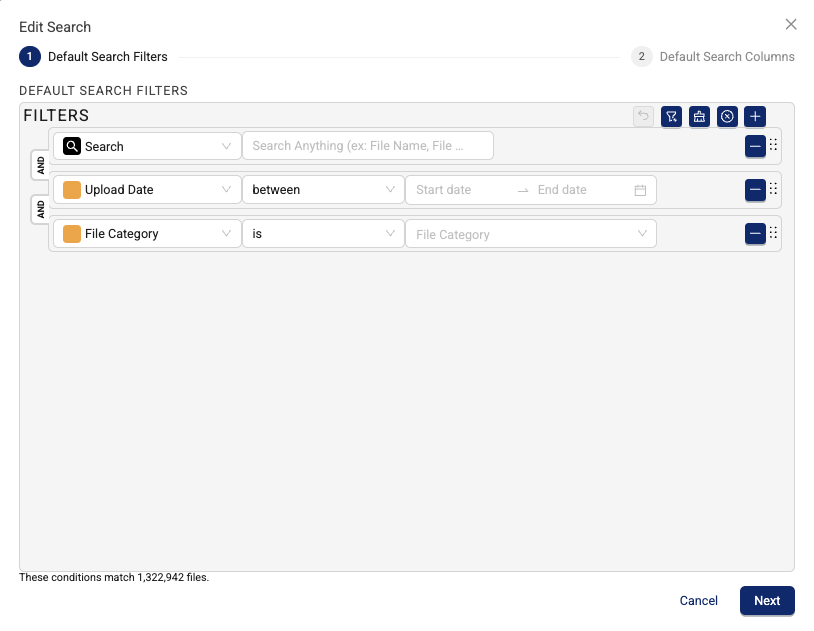
In the Default Search Filters step, configure the filters that you want to appear by default on the Search page:
- To add a filter, select the plus (+) icon. Then, select a filter type from the dropdown list.
- To add the most commonly used filters (Upload Date and File Category), select the Add the most commonly used filters icon.
- To remove a filter, select the minus (-) icon next to that filter's row.
- To reorder filters, select the drag handle icon on the right of a filter's row and drag it to the desired position.
For more information about filter options, see Filter Options for Search.
-
Choose Next. The Default Search Columns step appears.
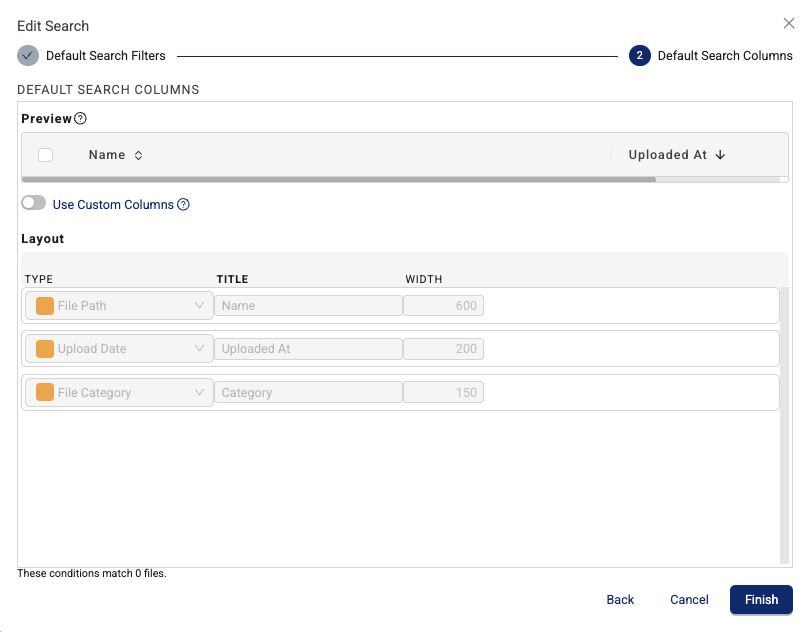
- In the DEFAULT SEARCH COLUMNS step, configure how columns display in your search results:
- For TITLE, enter the name that you want the column to display.
- For WIDTH, enter how wide you want the column to be in pixels.
- (Optional) To use custom columns instead of recommended columns, select the Use Custom Columns check box. Custom columns allow you to manually add or remove columns and specify custom column headings.
- To reorder columns, select the drag handle icon on the right of a column's row and drag it to the desired position.
- Choose Finish.
NOTEWhen you use recommended columns, the system will automatically generate columns based on the filters you're using. New columns will be automatically added or removed when the filters are changed. You can adjust the order and width of the columns, but you can not add or remove columns. When you use custom columns, you must manually add or remove columns. Columns will remain unchanged when filters are changed. You can specify the text of the column heading as well as modify the columns' order and widths.
Configure Compliance Settings for an Organization
IMPORTANTMake sure that you deactivate the Audit Trail for development environments only. If you deactivate the Audit Trail for production environments, you may not be able to satisfy GxP quality guidelines and regulations.
To activate or deactivate Audit Trail settings for an organization, or to require users to enter a reason for changes to your organization's Audit Trail, do the following:
- Open the Organization Settings page as a user with an Administrator role.
- On the Settings tab, in the AUDIT TRAIL section, select the Edit button. An Edit Audit Trail Settings dialog appears.
- Configure the following settings:
- To reactivate the Audit Trail feature for an organization, move the Audit Trail toggle to the right. (The Audit Trail feature is activated for all organizations by default when they're created.)
- To deactivate the Audit Trail feature for an organization, move the Audit Trail toggle to the left.
- To require users to enter a reason for changes to the organization's Audit Trail in the TDP user interface, move the Change Reason Enabled in Audit Trail (Requires GxP license) toggle to the right.
- Choose Save.
For more information, see Compliance Settings.
NOTEThe Audit Trail feature is activated for each organization by default. Requiring a Change Reason for Audit Trail changes is an optional setting that requires a GxP license through TetraScience, and isn't activated by default.
Configure Access Rules for an Organization
To provide more control over who has access to specific data sets as well as Tetra Data Apps and pipelines within a TDP organization, Organization Admins can define metadata-driven Access Rules through Access Groups. By activating Access Rules, Admins can then configure access permissions for multiple users through Access Groups based on specific attributes.
Access Rule Types
There are two types of Access Rules available through Access Groups:
- Data Access Rules: define data access permissions for multiple users based on specific file attributes.
- Entity Access Rules (Limited Availability Release): define access permissions for Tetra Data Pipelines and/or Tetra Data Apps for multiple users based on specific attributes assigned to either the pipeline or the data app.
Customers can configure Entity Access Rules in addition to, and separately from, the existing Data Access Rules. All Access Groups and their associated Access Rules can also be managed through a third-party identity provider (IdP) by using SSO Identity Groups.
To start using entity access rules, you must contact your customer account leader.
Activate or Deactivate Access Rules for an Organization
IMPORTANTData, app, and pipeline access remains open to all TDP users within an organization until an Organization Admin activates Access Rules. After Access Rules are activated for an organization, all users within that organization must be assigned to an Access Group; otherwise, they won’t have access to the TDP. If you deactivate Access Rules once they're activated, all login users within your TDP organization regain access to all data sets, apps, and pipelines within your organization.
To activate or deactivate Access Rules for an organization, do the following:
-
Open the Organization Settings page as a user with an Administrator role.
-
On the Settings tab, in the DATA ACCESS RULES section (ACCESS RULES if you have Entity Access Rules activated), select the Edit button. The Edit Data Access Rules Settings (or Edit Access Rules) dialog appears.
-
To activate Access Rules, move the Enforce Data Access Rules (or Enforce Access Rules) toggle to the right. The toggle turns blue.
-or-
To deactivate Access Rules, move the move the Enforce Data Access Rules (or Enforce Access Rules) toggle to the left. The toggle turns gray.
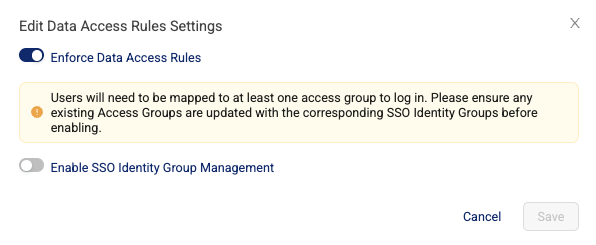
-
(Optional for Tenants that havesingle sign-on (SSO) configured) To manage access group members through a third-party identity provider (IdP), move the Enable SSO Identity Group Management toggle to the right. The default setting is deactivated. If your Tenant has SSO configured and the Enable SSO Identity Group Management setting is deactivated (the default setting), you can still manage named access group users directly through the TDP. If you activate the Enable SSO Identity Group Management setting, then you must manage named users for any Access Groups that have SSO IDENTITY GROUPS configured through your IdP(s).
IMPORTANTFor Customers That Have SSO Configured and Access Rules Activated Before Upgrading to TDP v4.2.3 or Higher
If your tenant has SSO configured and access rules activated before upgrading to TDP v4.2.3 or higher, first configure SSO identity groups for each of your access groups that have at least one user in the group. Then, turn on the Enable SSO Identity Group Management setting. This prevents locking out existing SSO users.
- Choose Save.
- Configure Access Groups by following the instructions in Create Access Groups.
Create Access Groups
To create an Access Group and configure Access Rules for its members, do one of the following based on whether or not you have Entity Access Rules activated:
Create an Access Group With Data Access Rules Only (Without Entity Access Rules Activated)
To create an access group and configure its Data Access Rules without the limited availability release Entity Access Rules activated in your environment, do the following.
Step 1: Create an Access Group and Configure Its Data Access Rules
-
Open the Organization Settings page as a user with an Administrator role.
-
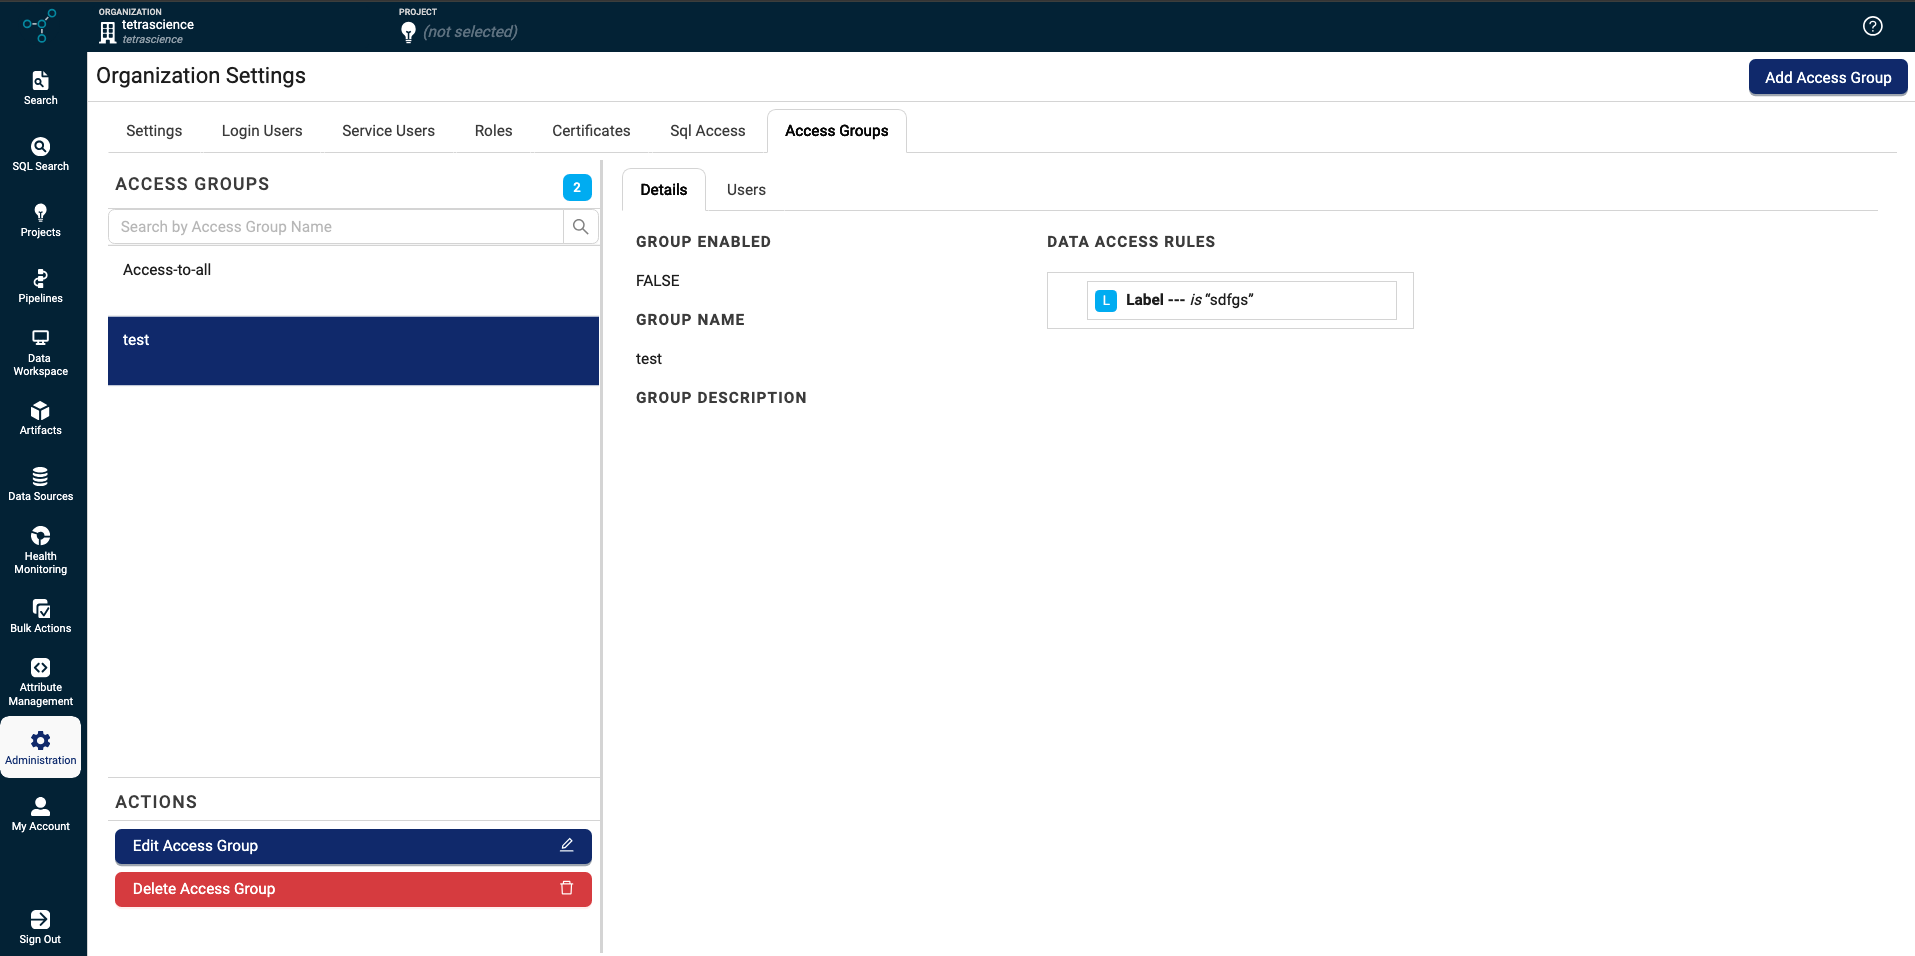
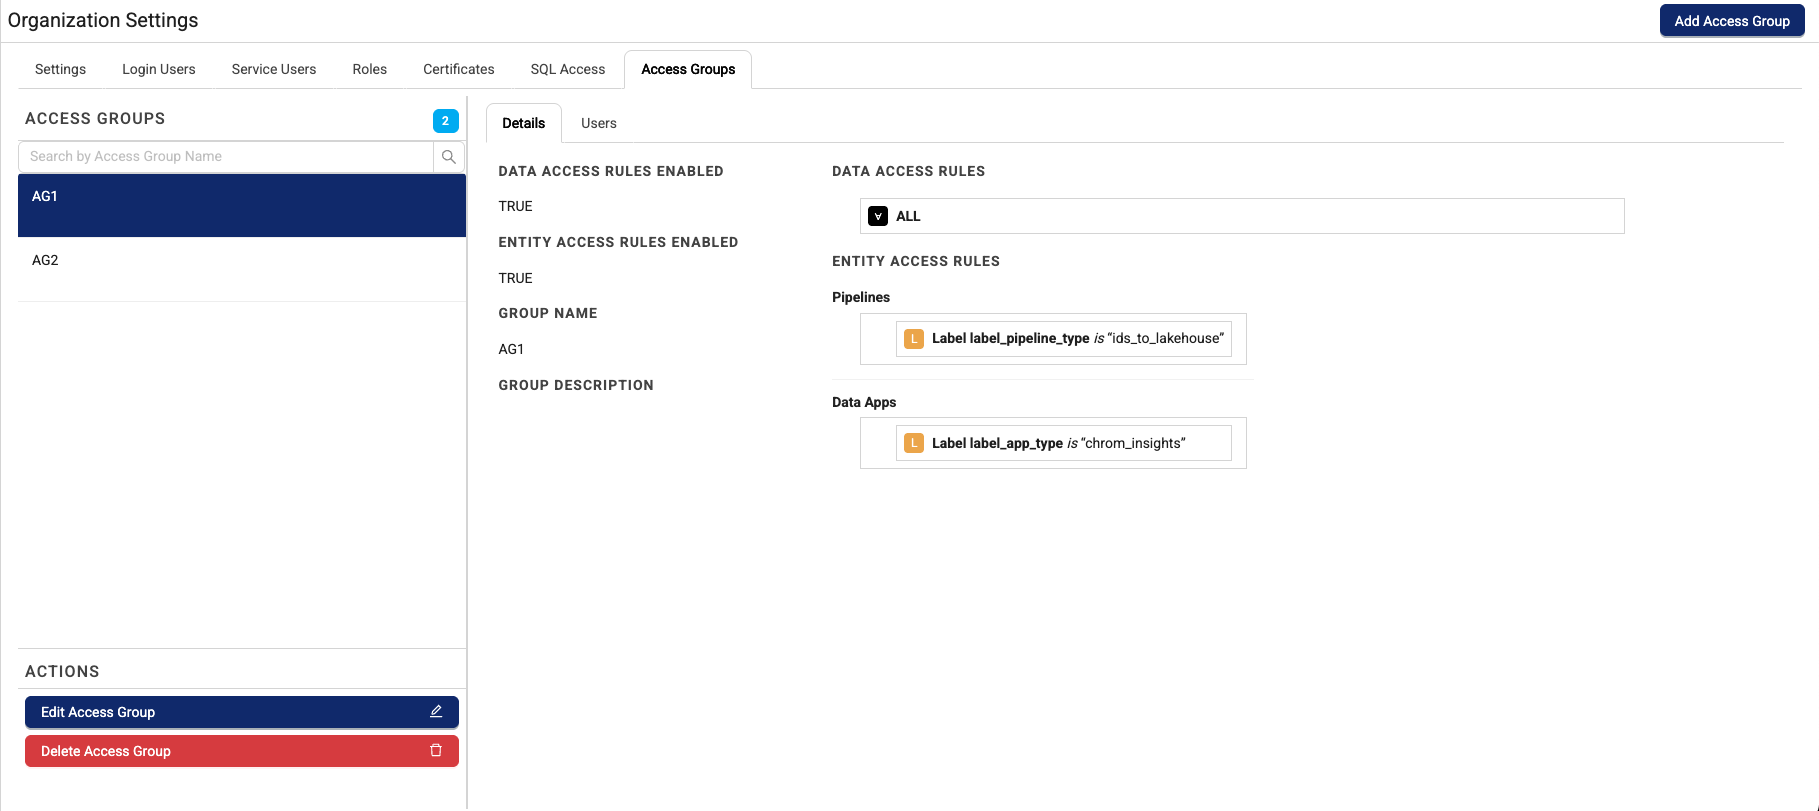
Choose the Access Groups tab. The Access Groups tab appears.
-
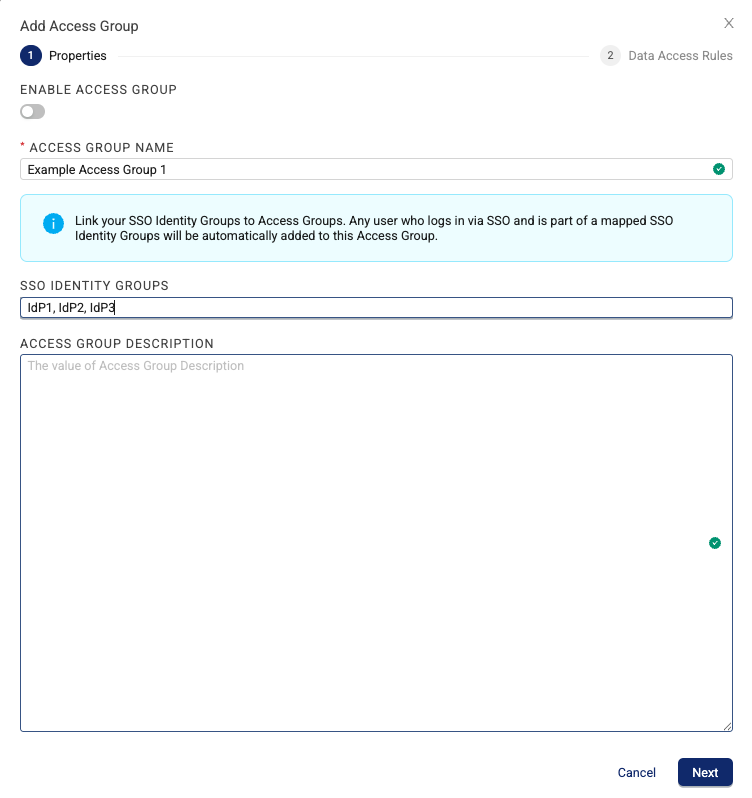
Choose Add Access Group. The Add Access Group dialog appears and displays a Properties section.
-
(Optional) To have the new access group activated immediately after it's created, move the ENABLE ACCESS GROUP toggle to the right.
-
For ACCESS GROUP NAME, enter a name for the access group.
-
(Optional) For SSO IDENTITY GROUPS, enter the name(s) of one or more identity providers (IdPs) that you want to assign to the access group. For each IdP, make sure that you enter the SSO Provider Name that's configured for it in your Tenant-level SSO settings. You can enter multiple IdPs as a comma separated list (for example,
IdP1, IdP2, IdP3). To apply SSO identity groups to your access groups, your organization must have single sign-on (SSO) configured. You must also activate the Enable SSO Identity Group Management setting in the Edit Data Access Rules dialog to apply SSO identity groups to an access group.IMPORTANTFor Customers That Have SSO Configured and Access Rules Activated Before Upgrading to TDP v4.2.3 or Higher
If your tenant has SSO configured and access rules activated before upgrading to TDP v4.2.3 or higher, first configure SSO identity groups for each of your access groups that have at least one user in the group. Then, turn on the Enable SSO Identity Group Management setting. This prevents locking out existing SSO users.
- Submit a support ticket and ask to have your organization’s SSO identity groups turned on. TetraScience must manually activate SSO identity groups in your TDP environment before you can use them.
-
For ACCESS GROUP DESCRIPTION, enter a brief description of the access group.
-
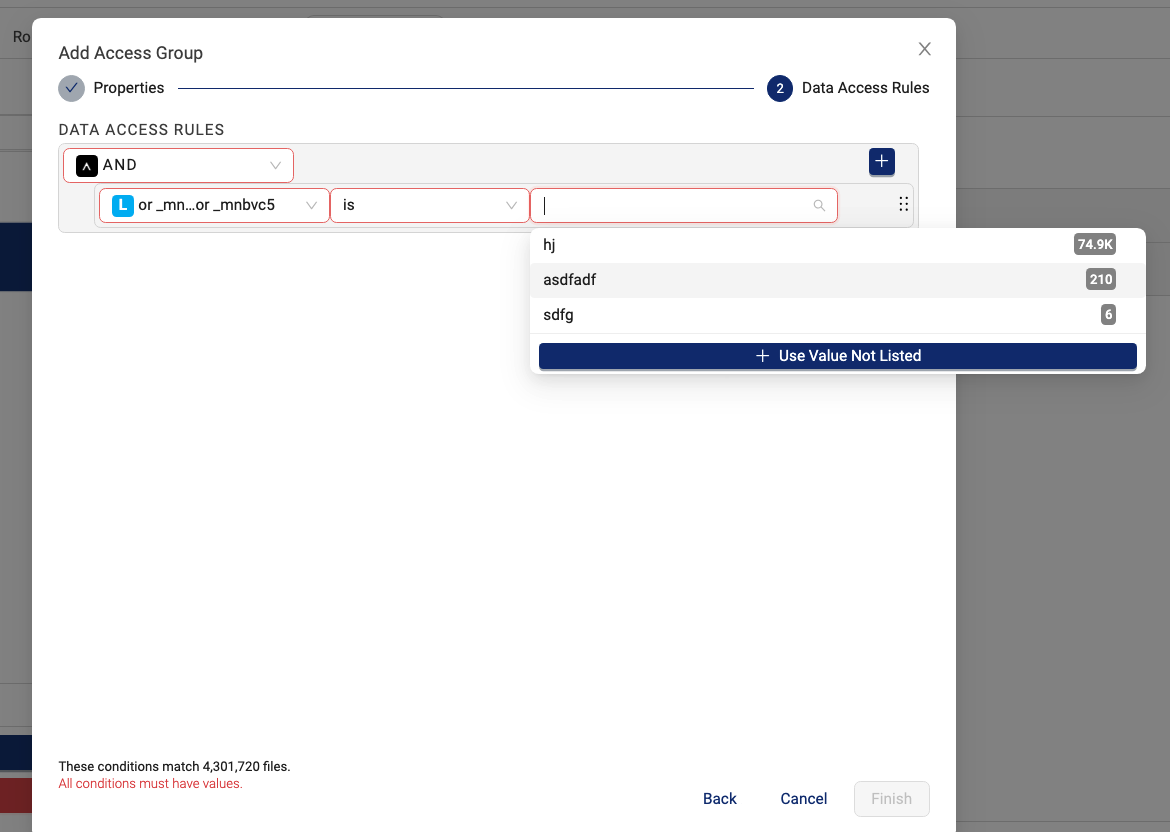
Choose Next. The Access Rules section appears.
-
Configure ACCESS RULES for the access group by doing the following:
- In the AND field, either select the Boolean operator that you want to apply to the data access rule (AND or OR), or choose ALL to grant the access group access to all of the organization's data.
IMPORTANT
It's recommended that organization administrators do the following:
- First create an Access Group for your own Administrator account that includes the ALL access rule. This ensures that you aren't locked out of any of your organization's data after Data Access Rules are activated.
- Add all service tokens that your organization's Agents, Connectors, or applications use to either an access group that includes the ALL access rule or other groups so that they continue to have access to data.
- In the Select a filter type field, select an attribute filter type for the rule. Two additional fields appear to the right of the filter type.
- In the is field, select if you want the rule to match the filter value (is), or if you want the rule to exclude group users from viewing files that include the filter value (is not).
- In the blank field that appears to the right, select a value for the filter.
- In the AND field, either select the Boolean operator that you want to apply to the data access rule (AND or OR), or choose ALL to grant the access group access to all of the organization's data.
-
(Optional) To add more access rules, select the plus (+) icon. Then, configure the new rule(s) by repeating step 9.
-
Choose Finish.
Step 2: Add Users to the Access Group
- Open the Organization Settings page as a user with an Administrator role.
- Choose the Access Groups tab. The Access Groups tab appears and displays the new access group that you created.
- Select the new access group. Then, select the Users tab.
- Choose Add Users. A list of all of the login users within the organization appears.
- Select the check box next to the login users that you want to add to the access group.
- Choose Save.
Create an Access Group with Entity Access Rules or Data Access Rules
> 📘 NOTE
Entity Access Rules are available as part of a limited availability release. To activate Entity Access Rules in your environment, contact your customer account leader.
To create an access group and configure its Data and Entity Access Rules, do the following.
Step 1: Create an Access Group and Configure Its Access Rules
-
Open the Organization Settings page as a user with an Administrator role.
-
Choose the Access Groups tab. The Access Groups tab appears.
-
Choose Add Access Group. The Add Access Group dialog appears and displays a Properties section.

-
For ACCESS GROUP NAME, enter a name for the access group.
-
(Optional) For SSO IDENTITY GROUPS, enter the name(s) of one or more identity providers (IdPs) that you want to assign to the access group. For each IdP, make sure that you enter the SSO Provider Name that's configured for it in your Tenant-level SSO settings. You can enter multiple IdPs as a comma separated list (for example,
IdP1, IdP2, IdP3). To apply SSO identity groups to your access groups, your organization must have single sign-on (SSO) configured. You must also activate the Enable SSO Identity Group Management setting in the Edit Data Access Rules dialog to apply SSO identity groups to an access group.IMPORTANTFor Customers That Have SSO Configured and Access Rules Activated Before Upgrading to TDP v4.2.3 or Higher
If your tenant has SSO configured and access rules activated before upgrading to TDP v4.2.3 or higher, first configure SSO identity groups for each of your access groups that have at least one user in the group. Then, turn on the Enable SSO Identity Group Management setting. This prevents locking out existing SSO users.
- Submit a support ticket and ask to have your organization’s SSO identity groups turned on. TetraScience must manually activate SSO identity groups in your TDP environment before you can use them.
-
For ACCESS GROUP DESCRIPTION, enter a brief description of the access group.
-
Choose Next. The Data Access Rules section appears.

-
(Optional) To have the new access group's Data Access Rules activated immediately after it's created, move the ENABLE DATA ACCESS RULES toggle to the right.
-
Configure DATA ACCESS RULES for the access group by doing the following:
- In the AND field, either select the Boolean operator that you want to apply to the data access rule (AND or OR), or choose ALL to grant the access group access to all of the organization's data.
IMPORTANT
It's recommended that organization administrators do the following:
- First create an Access Group for your own Administrator account that includes the ALL access rule for both Data Access Rules and Entity Access Rules (Pipelines and Data Apps). This ensures that you aren't locked out of any of your organization's data, pipelines, or apps after Access Rules are activated.
- Add all service tokens that your organization's Agents, Connectors, or applications use to either an access group that includes the ALL access rule or other groups so that they continue to have access to data, pipelines, and apps.
- In the Select a filter type field, select an attribute filter type for the rule. Two additional fields appear to the right of the filter type.
- In the is field, select if you want the rule to match the filter value (is), or if you want the rule to exclude group users from viewing files that include the filter value (is not).
- In the blank field that appears to the right, select a value for the filter.
-
(Optional) To add more access rules, select the plus (+) icon. Then, configure the new rule(s) by repeating step 10.
-
Choose Next. The Entity Access Rules section appears.
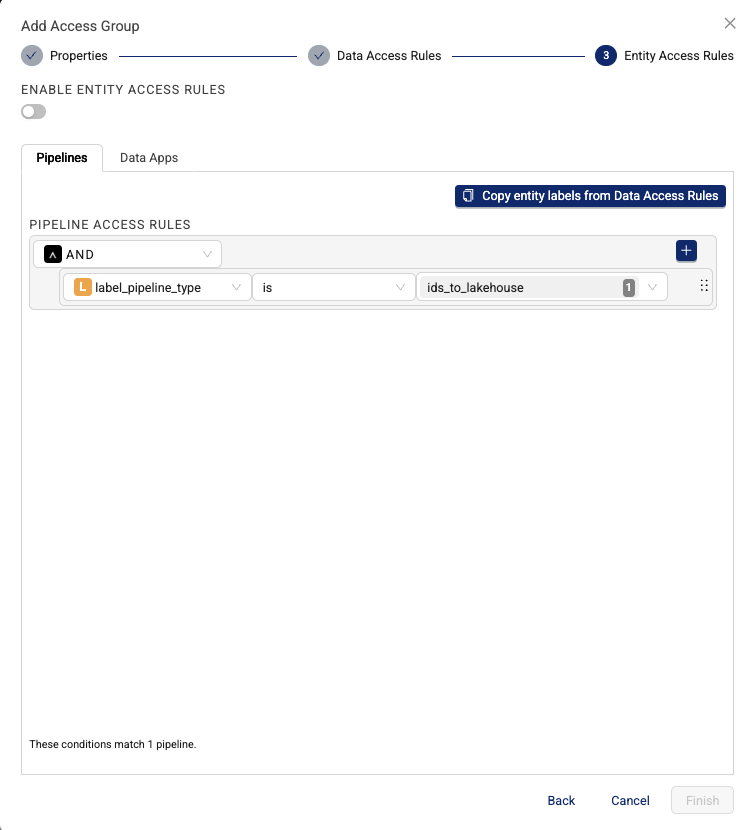
-
(Optional) To have the new access group's Entity Access Rules activated immediately after it's created, move the ENABLE ENTITY ACCESS RULES toggle to the right.
-
Configure Pipeline Entity Access Rules for the group by doing the following:
- Select the Pipelines tab.
- In the AND field, either select the Boolean operator that you want to apply to the access rule (AND or OR), or choose ALL to grant the access group access to all of the organization's pipelines.
IMPORTANTIt's recommended that organization administrators do the following:
- First create an Access Group for your own Administrator account that includes the ALL access rule for both Data Access Rules and Entity Access Rules (Pipelines and Data Apps). This ensures that you aren't locked out of any of your organization's data, pipelines, or apps after Access Rules are activated.
- Add all service tokens that your organization's Agents, Connectors, or applications use to either an access group that includes the ALL access rule or other groups so that they continue to have access to data, pipelines, and apps.
- In the Select a filter type field, select an attribute filter type for the rule. Two additional fields appear to the right of the filter type.
- In the is field, select if you want the rule to match the filter value (is), or if you want the rule to exclude group users from accessing pipelines that include the filter value (is not).
- In the blank field that appears to the right, select a value for the filter.
-
Configure the Data Apps Access Rules for the group by doing the following:
- Select the Data Apps tab.
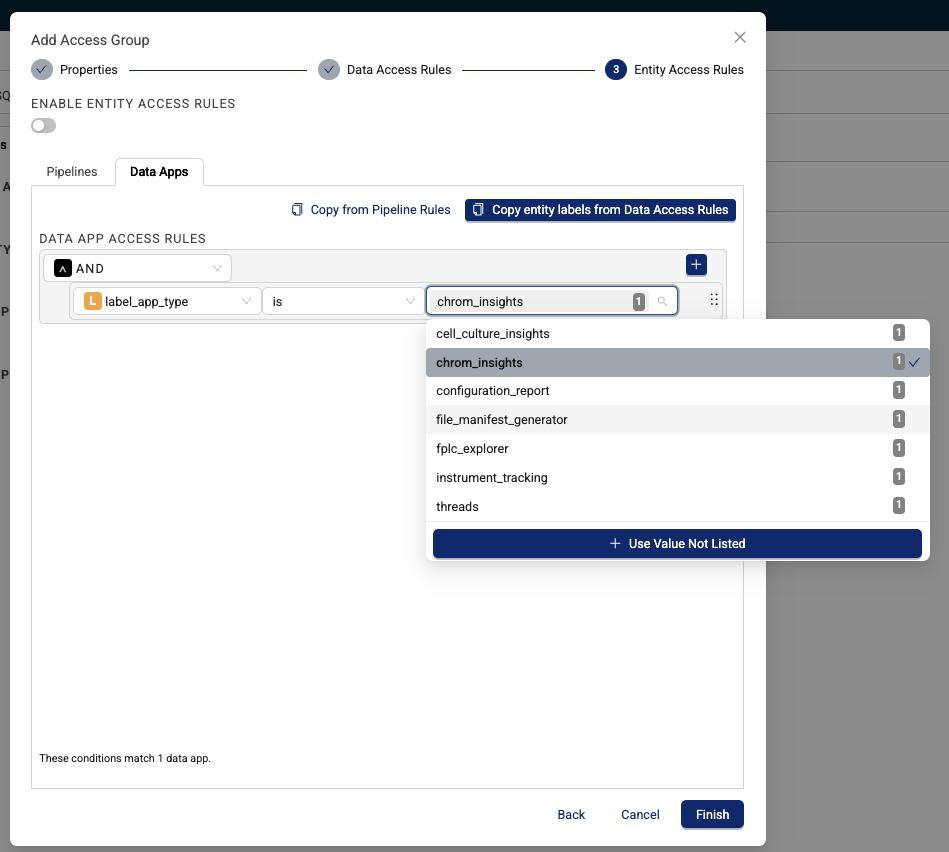
- In the AND field, either select the Boolean operator that you want to apply to the access rule (AND or OR), or choose ALL to grant the access group access to all of the organization's data apps.
IMPORTANTIt's recommended that organization administrators do the following:
- First create an Access Group for your own Administrator account that includes the ALL access rule for both Data Access Rules and Entity Access Rules (Pipelines and Data Apps). This ensures that you aren't locked out of any of your organization's data, pipelines, or apps after Access Rules are activated.
- Add all service tokens that your organization's Agents, Connectors, or applications use to either an access group that includes the ALL access rule or other groups so that they continue to have access to data, pipelines, and apps.
- In the Select a filter type field, select an attribute filter type for the rule. Two additional fields appear to the right of the filter type.
- In the is field, select if you want the rule to match the filter value (is), or if you want the rule to exclude group users from accessing Data Apps that include the filter value (is not).
- In the blank field that appears to the right, select a value for the filter.
- Select the Data Apps tab.
-
Choose Finish.
Step 2: Add Users to the Access Group
- Open the Organization Settings page as a user with an Administrator role.
- Choose the Access Groups tab. The Access Groups tab appears and displays the new access group that you created.
- Select the new access group. Then, select the Users tab.
- Choose Add Users. A list of all of the login users within the organization appears.
- Select the check box next to the login users that you want to add to the access group.
- Choose Save.
Edit an Access Group
To edit an Access Group and configure Data Access Rules for its members, do the following:
- Open the Organization Settings page as a user with an Administrator role.
- Choose the Access Groups tab. Then, in the ACCESS GROUPS section, select the access group that you want to edit.
- In the ACTIONS section, choose Edit Access Group. The Edit Access Group dialog appears.
- Edit the access group's name, SSO access groups (if any), and description. Then, choose Next.
- Edit the access group's data access rules. For instructions, see step 8 in Create Access Groups.
- Choose Finish.
NOTENon-admin users can view the Data Access Rules for the Access Groups they belong to under My Account in the TDP user interface.
Delete an Access Group
To delete an Access Group, do the following:
- Open the Organization Settings page as a user with an Administrator role.
- Choose the Access Groups tab. Then, in the ACCESS GROUPS section, select the access group that you want to delete.
- In the ACTIONS section, choose Delete Access Group. A dialog appears that asks you to confirm that you want to delete the access group.
- Choose OK.
Create Custom Roles
By assigning TDP users and groups custom roles that have specific Policies attached to them, you can grant granular permissions based on common user personas and the Functionality access each requires.
To create a custom role, do the following:
- Open the Organization Settings page as a user with an Administrator role.
- Choose the Roles tab. The Roles tab appears.
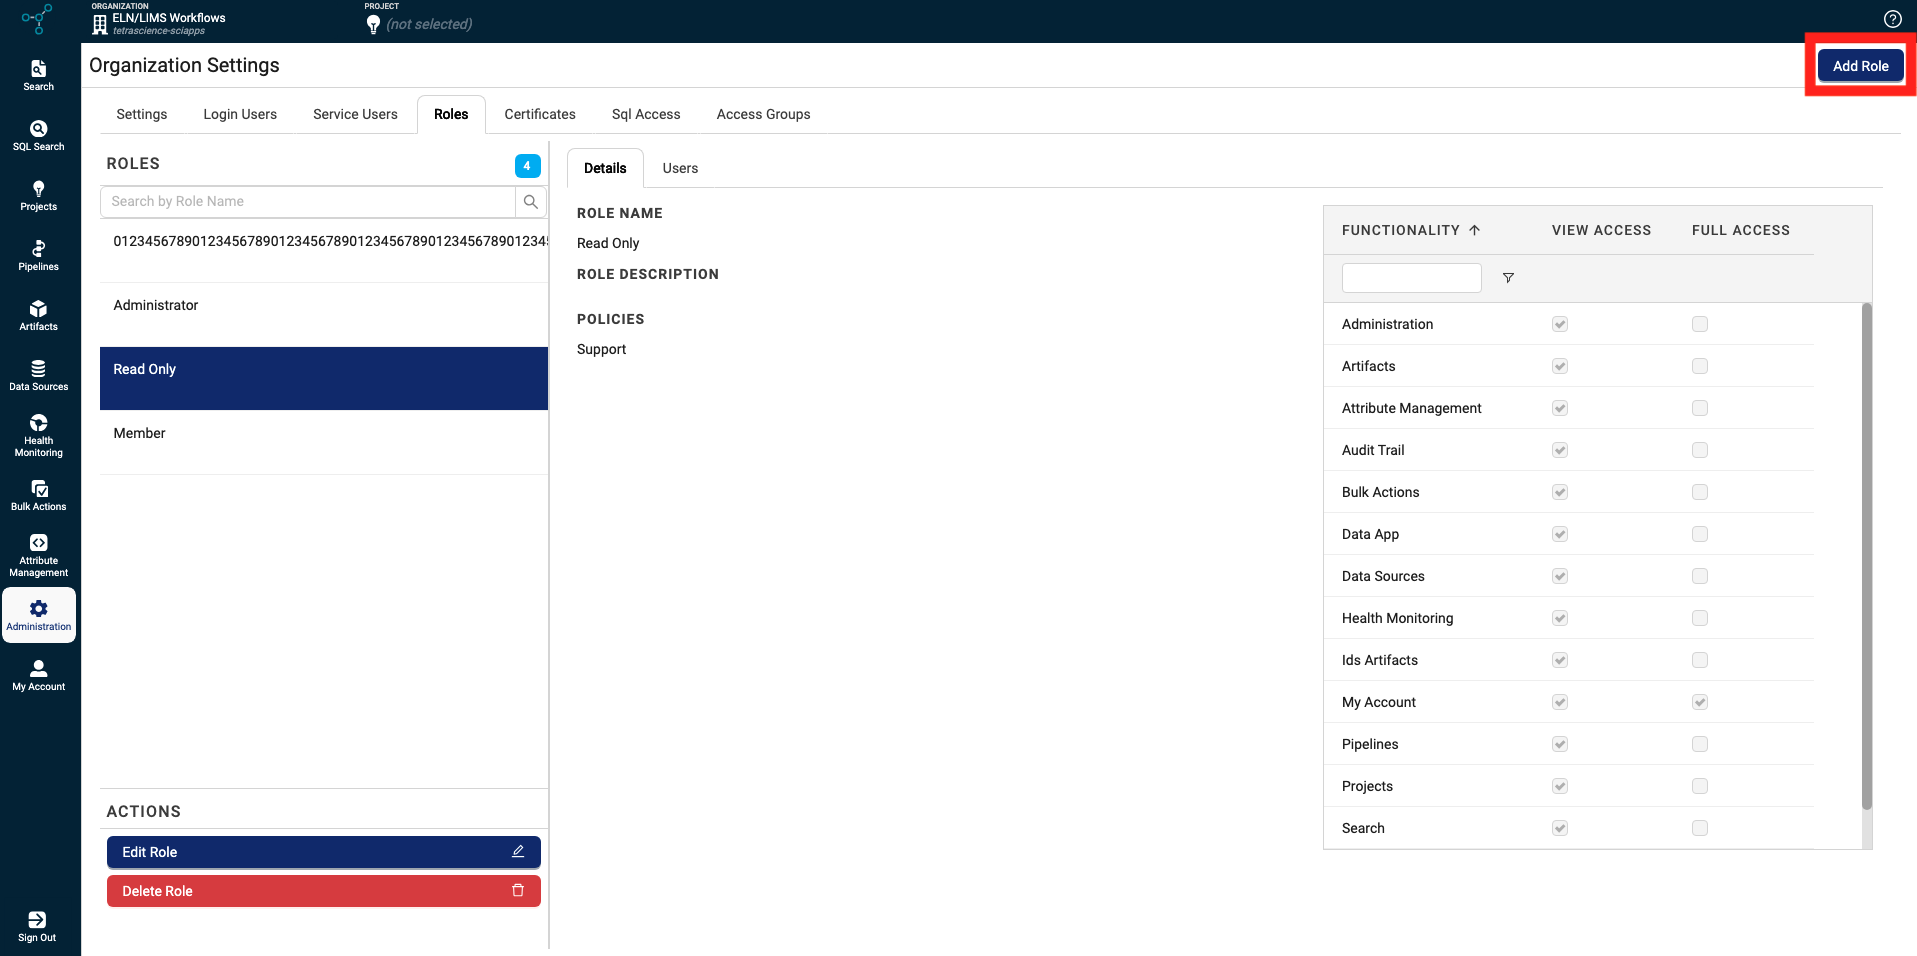
- Choose Add Role. The Add Role dialog appears and displays a Properties section.
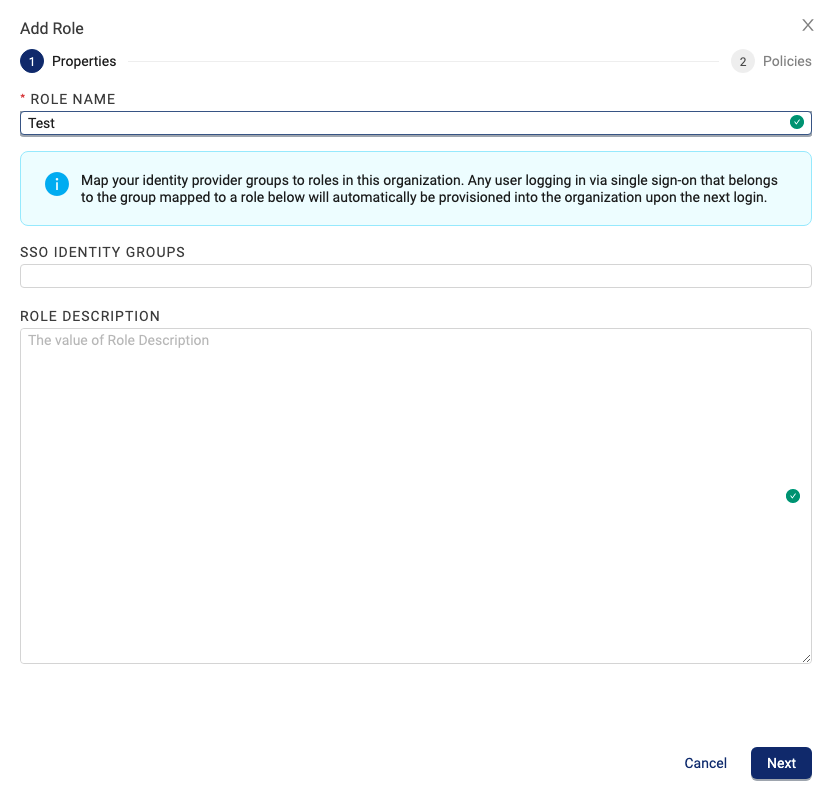
-
For Role Name, enter a name for the role.
-
(Fortenants with single sign-on configured) For SSO Identity Groups, enter your identity provider groups that you want to assign the custom role to. The SSO Identity Groups field doesn't appear in the dialog if your tenant doesn't have SSO configured. To set up multiple IdPs with custom roles, see Add Multiple IdPs with Custom Roles to the TDP in the TetraConnect Hub. To request access, see Access the TetraConnect Hub.
NOTEAny user logging in through SSO that belongs to the mapped IdP group will automatically be assigned the custom role you create during their next login. Keep in mind that TDP users authenticated through SSO are managed through your identity provider (IdP), not the TDP. If you're using SSO for authentication, you must manage users through your IdP directly.
-
For Role Description, enter a brief description of the role.
-
Choose Next. The Policies section appears.
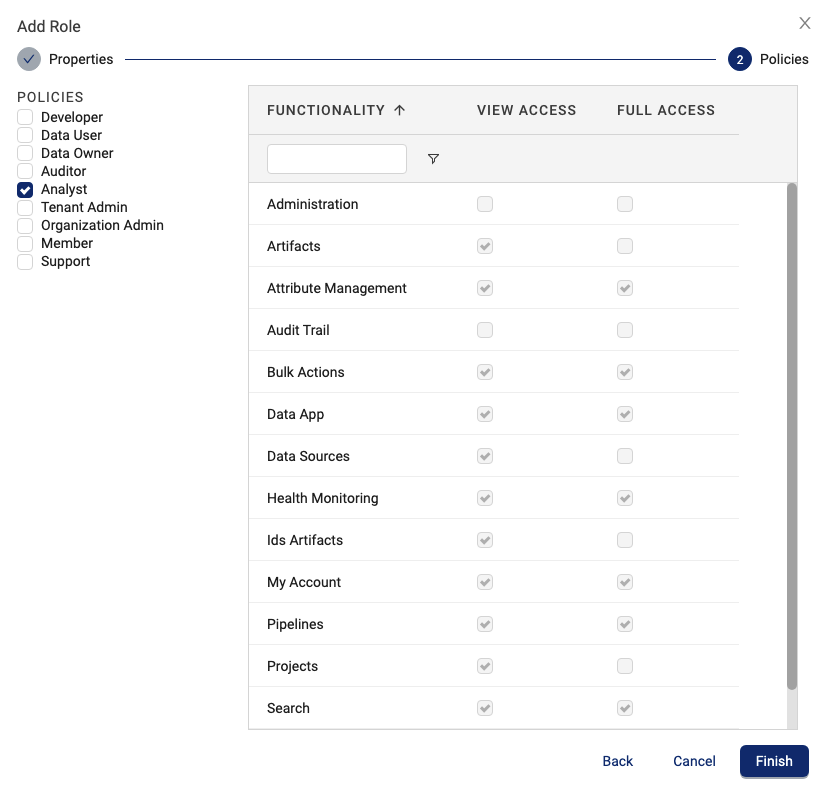
- From the left Policies list, choose one or more policies to assign the role. Permissions for each platform Functionality displays in the right table. For a complete list of policies and their permissions, see Policies.
- Choose Finish.
To assign a custom role to a user, see Edit a user role.
Manage User Accounts
IMPORTANTIf your tenant uses SSO for authentication, keep in mind the following when managing TDP user accounts:
- TDP users authenticated through SSO are managed through your identity provider (IdP), not the TDP. If you're using SSO for authentication, you must manage users through your IdP directly.
- If you remove users from your IdP, those users are not removed from the Login Users tab on the Organization Settings page. Deleted IdP users will still appear on the Login Users tab; however, they don't have access to the TDP after you delete them from your IdP.
Organization administrators can manage User accounts through the following actions on the Organization Settings page in the Login Users tab:
- Add a new user
- Edit a user role
- Deactivate or delete a user account
- Activate a deactivated user account
- Reset user account passwords
- Log out an active user
- Manage SQL access for login users
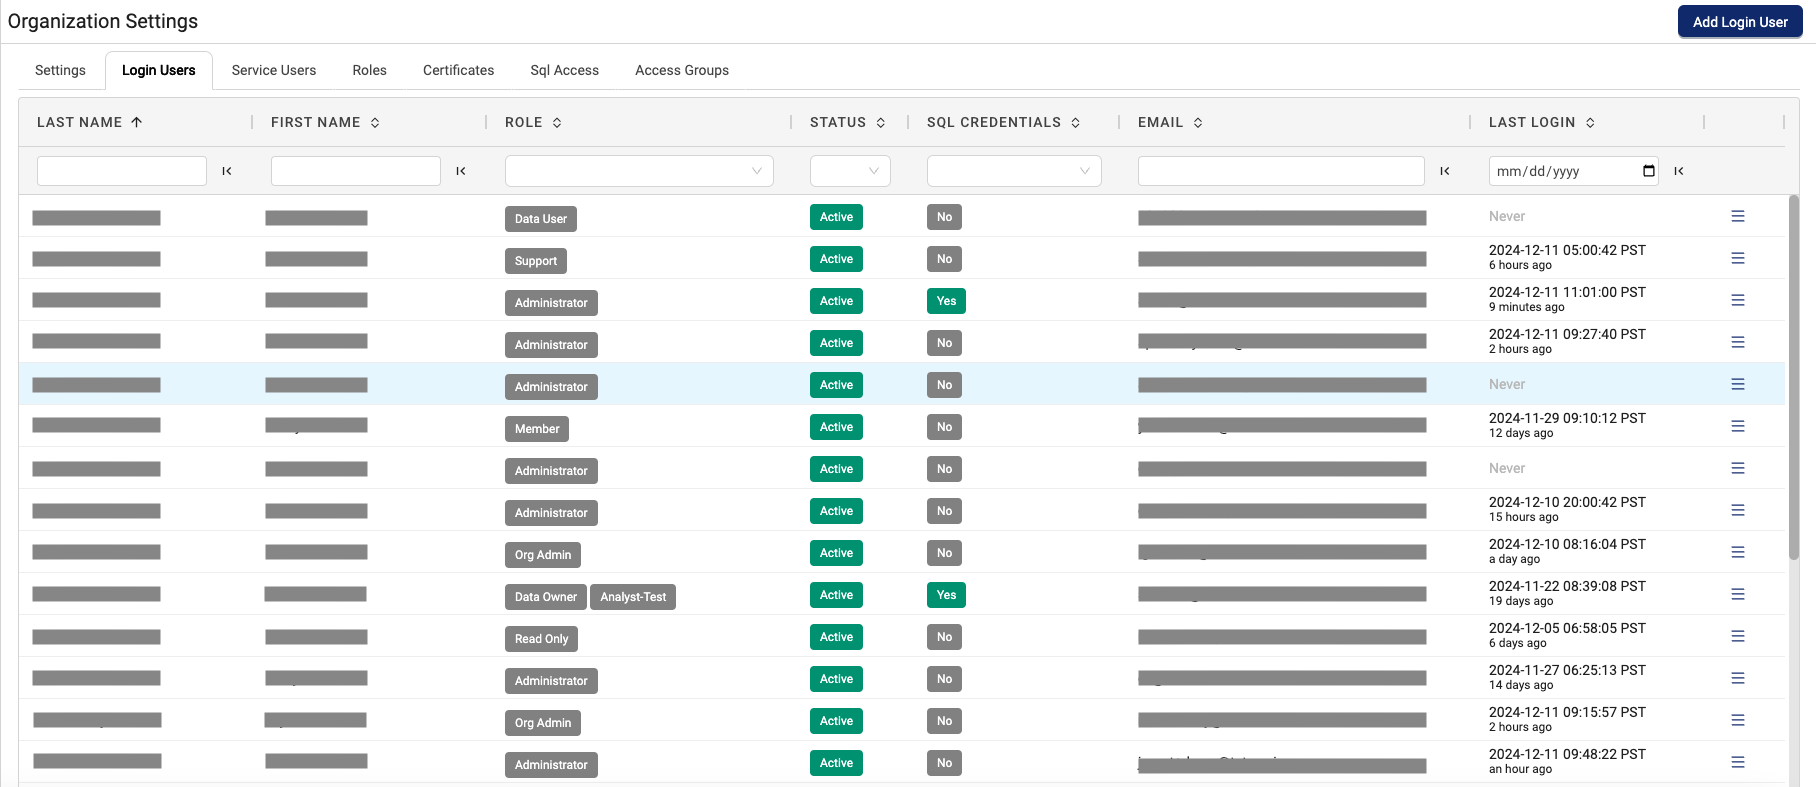
Filter User Accounts
To filter the list of user accounts on the Organization Settings page, you can do any of the following:
- To search for a specific user, enter their username in the USER column search box.
- To display users by their role type, select the role type that you want to filter by from the USER ROLE column drop-down list.
- To display either active or inactive users on the list only, chose either Active or Disabled from the USER STATUS column drop-down list.
- To display users by their personal JSON Web Token (JWT) status, select the token status that you want to filter by from the TOKEN STATUS column drop-down list.
- To display users by the date that their personal JWT was created, select the date that you want to filter by from the TOKEN CREATED column drop-down list.
- To display users by the date their personal JWT expired, select the date that you want to filter by from the TOKEN EXPIRY column drop-down list.
Add a New User
To create a new user within an organization, do the following:
- Open the Organization Settings page as a user with an Administrator role.
- On the Login Users tab, choose Add Login User. The Create Login User dialog appears.
- Add the first name, last name, email, and password for the new user. Then, assign an organization role to the user.
- Choose Create.
NOTEAs an Administrator, you can allow users to be members of multiple organizations with different permissions. You can also customize access to the TDP for sensitive projects and teams specific to your company. When a user first logs in to the TDP, the user defaults to the organization with the highest level of access. If multiple organizations exist with the same level of access, then their access defaults to one of the listed organizations, based on alphabetical order.
Edit a User Role
To edit a login user's organizational role, do the following:
- Open the Organization Settings page as a user with an Administrator role.
- Select the Login Users tab. A list of all of the current organization's login users appears.
- Locate the user that you want to edit. Then, on the right of that user's row, select the hamburger menu icon. A menu appears.
- Choose Edit User. The Edit Login User dialog appears.
- Select an organizational role for the user.
- Choose Save.
Deactivate or Delete a User Account
NOTEYou can deactivate a user's account to a particular organization. If the same user has access to multiple organizations, then their access to those other organizations isn't deactivated.
To deactivate or delete a login user's account, do the following:
-
Open the Organization Settings page as a user with an Administrator role.
-
Select the Login Users tab. A list of all of the current organization's login users appears.
-
Locate the user that you want to deactivate or delete. Then, on the right of that user's row, select the hamburger menu icon.
-
To deactivate the user's account, choose Disable User.
-or-
To delete the user's account, choose Delete User.
-
A warning message appears that asks you to confirm the action. To confirm the action, choose OK.
IMPORTANTKeep in mind the following when deleting user accounts:
- If you delete a user's account, you can't reactivate it. Instead, you must create a new user account for the user to reactivate them.
- User account data and audit trails are preserved after account deletion for compliance purposes.
Activate a Deactivated User Account
To activate a deactivated login user's account, do the following:
- Open the Organization Settings page as a user with an Administrator role.
- Select the Login Users tab. A list of all of the current organization's login users appears.
- Locate the user that you want to reactivate. Then, on the right of that user's row, select the hamburger menu icon. A menu appears.
- Select Enable User.
Reset User Account Passwords
To request that a login user resets their account password, do the following:
- Open the Organization Settings page as a user with an Administrator role.
- Select the Login Users tab. A list of all of the current organization's login users appears.
- Locate the user whose password you want to reset. Then, on the right of that user's row, select the hamburger menu icon. A menu appears.
- Choose Reset password. A warning message appears that asks you to confirm that you want to send the user an email to reset their TDP password.
- Choose OK.
Log Out an Active User
To force an active user to log out, do the following:
- Open the Organization Settings page as a user with an Administrator role.
- Select the Login Users tab. A list of all of the current organization's login users appears.
- Locate the user that you want to force to log out. Then, on the right of that user's row, select the hamburger menu icon. A menu appears.
- Choose Log Out User. A dialog appears asking you to confirm that you want to force the selected login user to log out.
- Choose OK.
Manage SQL Access for Login Users
To view and manage SQL credentials for login users, do the following:
- Open the Organization Settings page as a user with an Administrator role.
- Select the Login Users tab. A list of all of the current organization's login users appears.
- To view the current status of each login user's SQL credentials, review the SQL CREDENTIALS column. Yes indicates that the user has valid SQL credentials. No indicates that the user doesn't have SQL credentials.
- To remove a login user's SQL credentials, do the following:
- Select the hamburger menu icon in the far right of the user's row. A menu appears.
- Select Revoke SQL Access Creds.
IMPORTANTIf you're using third-party tools to connect to Athena SQL tables, make sure that you configure your driver's
WorkGroupconnection parameter as your organization's slug (the same as your<orgSlug>value). SQL queries fail if theWorkGroupconnection parameter isn't configured as a validorgSlugvalue, even though it's listed as an optional parameter in the AWS documentation.
Manage Service Users
Organization administrators can manage Service User accounts (service accounts for applications or Tetra Agents integrated with the TDP) through the following actions on the Organization Settings page:
- Add a service user
- Edit a service user role
- Deactivate or delete a service user
- Activate a service user
- Generate a JWT for a service user
- Manage service user SQL access
NOTEIf you make any updates to a Tetra Agent's TDP service user, you must restart the Agent for the changes to take effect. Agent Group Users (Windows service user accounts) are managed through the host machine and also require an Agent restart for changes to take effect.
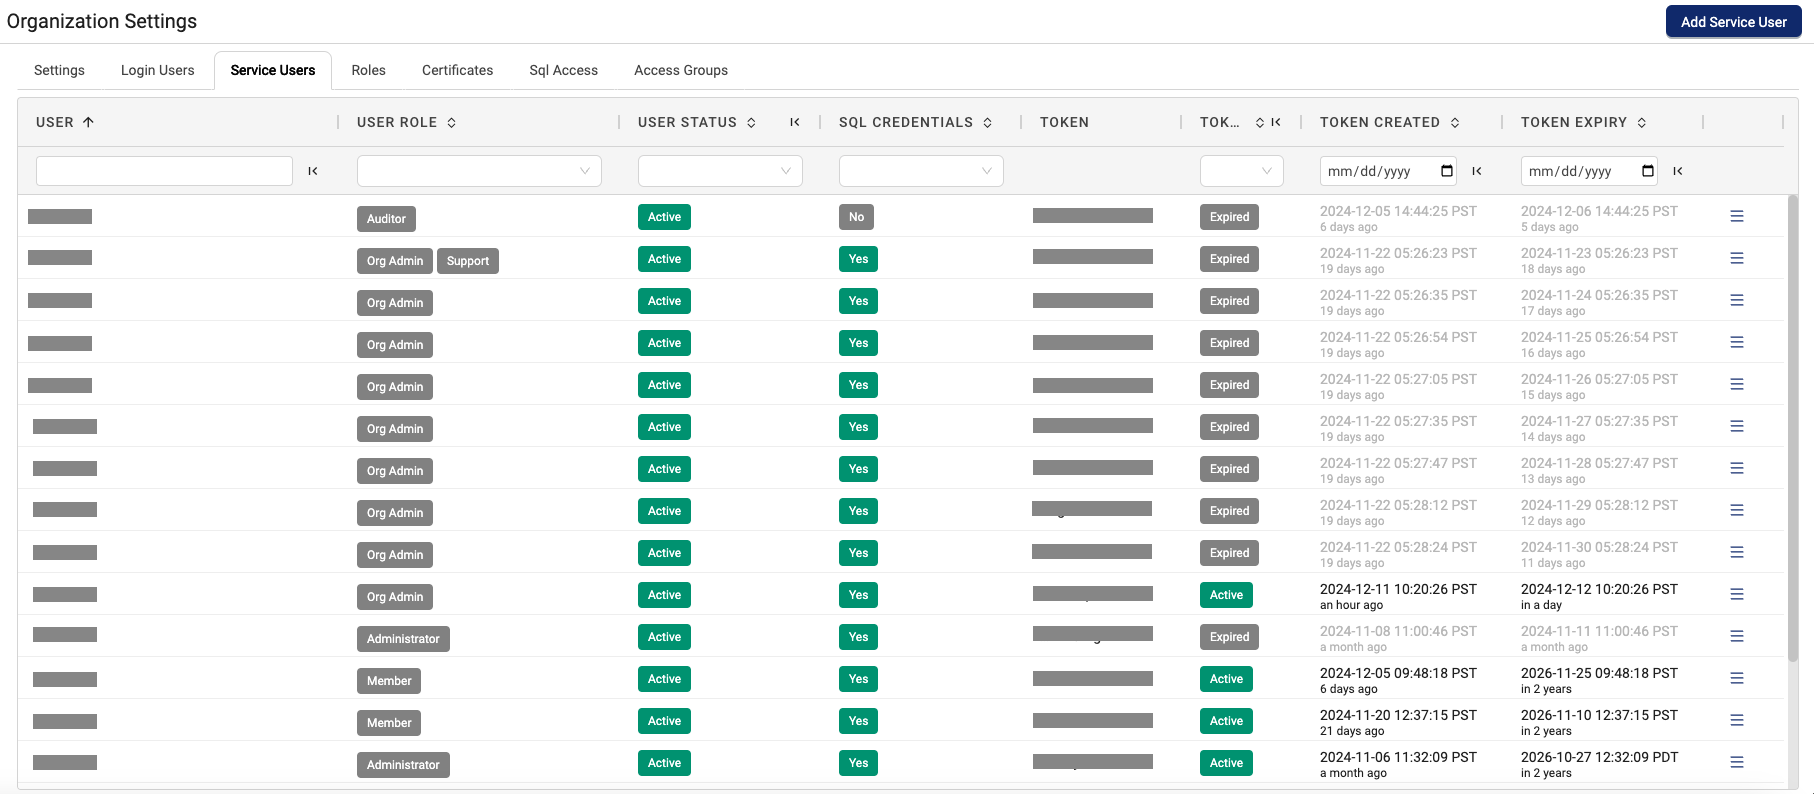
Service Users Tab Fields
The following table describes the fields in the Service Users tab.
| Field | Description |
|---|---|
| Add Service User | Create a service user |
| Hamburger menu | Edit User, Disable user, Rotate SQL Access Creds, Revoke SQL Access Creds, Generate Token, Delete User |
| USER | Lists the user name (includes a search field) |
| USER ROLE | Filters the list of users to display on the page: Administrator, Member, or Read Only. \n \nNote: Select All (default) to show all user accounts |
| USER STATUS | Filters the list of users to display on the page: Active or Disabled. Select All (default) to show all user accounts. |
| SQL CREDENTIALS | Shows if the user has valid SQL credentials (Yes) or not (No). |
| TOKEN | Displays the token generated for the service user (you can copy the token to your clipboard) |
| TOKEN STATUS | Filters the list of users to display on the page: Active, Disabled, Expired or No Token user accounts \n \nNote: Select All (default) to show all user accounts |
| TOKEN CREATED | Shows when the token was created |
| TOKEN EXPIRY | Shows the expiration date for the token, if there is one (has a date filter) |
Add a Service User
To add a new service user, do the following:
- Open the Organization Settings page as a user with an Administrator role.
- Select the Service Users tab. A list of all of the current organization's service users appears.
- Choose Add Service User. The Add Service User dialog appears.
- For NAME, enter a name for the service user.
- For TOKEN EXPIRES, enter the amount of time in days that the service user's access token automatically expires. You can choose any expiration period between
1and720days. An expiration date is required for all access tokens. - For ORGANIZATIONAL ROLE, choose a role for the service user.
- For DESCRIPTION, enter a description for the service user.
- For EMAIL CONTACTS TOKEN EXPIRY (OPTIONAL), enter one or more email addresses that you want to receive automated JWT expiry notifications for. Enter multiple addresses as a comma-separated list. Emails are sent 30 days, 20 days, 10 days, 5 days, and 1 day before the token expires.
- Choose Add.
Edit a Service User
To edit an existing service user's name, role, description, or JWT expiry email notifications, do the following:
- Open the Organization Settings page as a user with an Administrator role.
- Select the Service Users tab. A list of all of the current organization's service users appears.
- Locate the service user that you want to edit. Then, on the right of that service user's row, select the hamburger menu icon. A menu appears.
- Choose Edit User. The Edit Service User dialog appears.
- Edit the service user's NAME, ORGANIZATION ROLE, DESCRIPTION, and/or EMAIL CONTACTS TOKEN EXPIRY (OPTIONAL) fields.
- Choose Save.
For more information about each editable field, see Add a Service User.
NOTEIf you make any updates to a Tetra Agent TDP service user, you must restart the Agent for the changes to take effect.
Deactivate or Delete a Service User
To deactivate or delete a service user account, do the following:
-
Open the Organization Settings page as a user with an Administrator role.
-
Select the Service Users tab. A list of all of the current organization's service users appears.
-
Locate the service user that you want to deactivate or delete. Then, on the right of that user's row, select the hamburger menu icon. A menu appears.
-
To deactivate the server user's account, choose Disable User.
-or-
To delete the service user's account, choose Delete User.
Activate a Service User
To activate a service user account, do the following:
- Open the Organization Settings page as a user with an Administrator role.
- Select the Service Users tab. A list of all of the current organization's service users appears.
- Locate the service user that you want to activate. Then, on the right of that service user's row, select the hamburger menu icon. A menu appears.
- Select Enable User.
Generate a JWT for a Service User
NOTEIf you make any updates to a Tetra Agent Group User (service user account), you must restart the Agent for the changes to take effect.
To generate a JSON Web Token (JWT) for a service user account, do the following:
- Open the Organization Settings page as a user with an Administrator role.
- Select the Service Users tab. A list of all of the current organization's service users appears.
- Locate the service user that you want to generate a JWT for. Then, on the right of that service user's row, select the hamburger menu icon. A menu appears.
- Choose Generate Token. The Generate New Token dialog appears.
- In the TOKEN EXPIRES field, enter the number of days that you want the token to be valid for (
1to720days). - ChooseGenerate token.
- Choose Copy Token to copy the token to your clipboard.
- Choose OK.
NOTETo create automated email notifications that inform specific users when the service user's JWT is about to expire, see Edit a Service User.
Manage Service User SQL Access
To manage a service user's SQL credentials, do the following:
- Open the Organization Settings page as a user with an Administrator role.
- Select the Service Users tab. A list of all of the current organization's service users appears.
- Locate the service user that you want to manage SQL access for. Then, on the right of that service user's row, select the hamburger menu icon. A menu appears.
- Do one of the following:
- To create SQL credentials for a login user that doesn't have existing SQL credentials, select Generate SQL Access Creds.
- To rotate a user's SQL credentials, select Rotate SQL Access Creds.
- To remove a user's SQL credentials, select Revoke SQL Access Creds.
IMPORTANTKeep in mind the following:
- For security reasons, the OAuth 2.0 authentication method introduced in TDP v4.0.0 doesn’t allow the following:
- Non-expiring Service User tokens are no longer allowed. All access tokens must have an expiration date.
- Users can no longer copy access tokens from the TDP user interface after a token is generated. Users can now copy access tokens when they’re first generated only.
- If you're using third-party tools to connect to Athena SQL tables, make sure that you configure your driver's
WorkGroupconnection parameter as your organization's slug (the same as your<orgSlug>value). SQL queries fail if theWorkGroupconnection parameter isn't configured as a validorgSlugvalue, even though it's listed as an optional parameter in the AWS documentation.
Create Organization-Level Announcements
NOTEIf you create an ANNOUNCEMENT at the organization level, the message is cascaded to all users across that organization. Announcements are shown one time for each user login.
To create an announcement for all users in your tenant, across all of your organizations, see Create Tenant-Level Announcements.
To create an announcement to display to all users in an organization when they log in, do the following:
- Open the Organization Settings page.
- In the ANNOUNCEMENT tile, choose Edit. An Edit Announcement dialog appears.
- In the Markdown section, enter your message using standard Markdown syntax. A preview of the display message appears in the Preview section.
- Choose Save.
Turn Off Organization-Level Announcements
To turn off an organization-level announcement after it's created, do the following:
- Open the Organization Settings page.
- In the ANNOUNCEMENT tile, choose Edit. An Edit Announcement dialog appears.
- In the Markdown section, delete the existing message.
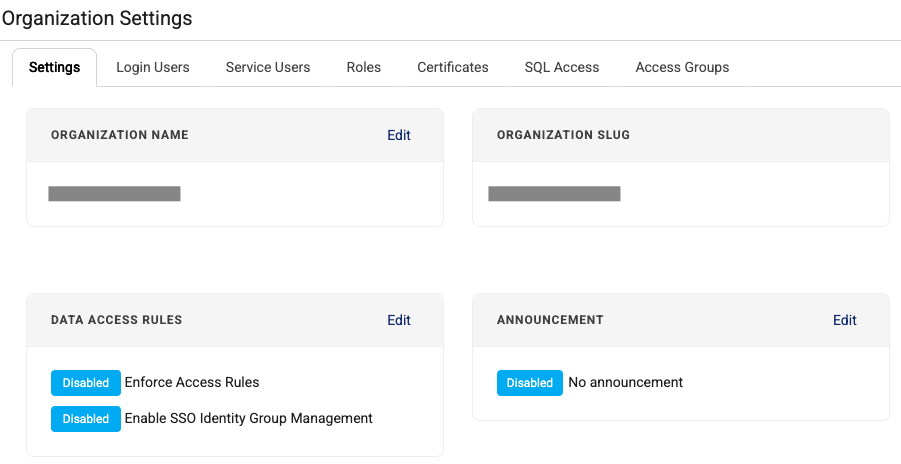
- Choose Save. The Announcement tile on the Organization Settings page displays a Disabled button and says No announcement.
Documentation Feedback
Do you have questions about our documentation or suggestions for how we can improve it? Start a discussion in TetraConnect Hub. For access, see Access the TetraConnect Hub.
NOTEFeedback isn't part of the official TetraScience product documentation. TetraScience doesn't warrant or make any guarantees about the feedback provided, including its accuracy, relevance, or reliability. All feedback is subject to the terms set forth in the TetraConnect Hub Community Guidelines.
Updated 2 months ago