Search and Discovery
To search for data in the Tetra OS, you can use any of the following methods:
- The Search page
- The Search (Classic) page
- SQL and Amazon Athena Queries
- TetraScience API
- Query domain-specific language (DSL) queries
You can also use the Tetra Data & AI Workspace to access and use scientific data with analysis applications and correlate analysis results through Tetra Data Apps. For more information and best practices, see Data Access in the TetraConnect Hub. To request access, see Access the TetraConnect Hub.
NOTEThe Search (Classic) page is designed for data engineering use cases, with default filter options for File Category, Source Type, and Pipeline.
File Types
There are three file types available through search: RAW, IDS, and PROCESSED.
RAW Files
RAW files are unprocessed files, such as the ones generated by instruments.
You can search for RAW files by filename, file metadata (such as creation time) and attributes.
IDS Files
IDS files are schemas that are applied to raw instrument data or report files. These schemas are used to map vendor-specific information (like the name of a field) to vendor-agnostic information. To learn more, see Intermediate Data Schemas.
To search for an IDS and view its visualization and associated artifacts, see View Artifact Information.
You can also list or find schemas by using the List schemas API endpoint, which returns the following information for each IDS:
- The associated JSON schema
- The associated OpenSearch mapping and also fields that are not indexed in OpenSearch
PROCESSED Files
PROCESSED files are derived from a RAW file and generated from a Tetra Data Pipeline. For example, a processed file could be a .zip file that was unzipped into many smaller files, or image thumbnails from a large microscopy image.
Access the Search Page
The Search page is designed for scientific users to be able to do the following more efficiently:
- Find data in the TDP by scientifically relevant criteria, including the following:
- Text searches
- File upload date and file category
- Any recommended labels where data exists
- Saved searches (also referred to as Collections)
- Share and bookmark search results
- Create, update, and manage saved searches
- Download or add labels to multiple files
You can also use the Projects feature to quickly organize and access data that’s associated with specific labs, experiments, instruments, or any other type of project through the Search page.
To view the Search page, do the following:
- Sign in to the TDP.
- In the left navigation menu, choose Search. A menu appears.
- From the menu, choose Search. The Search page appears.
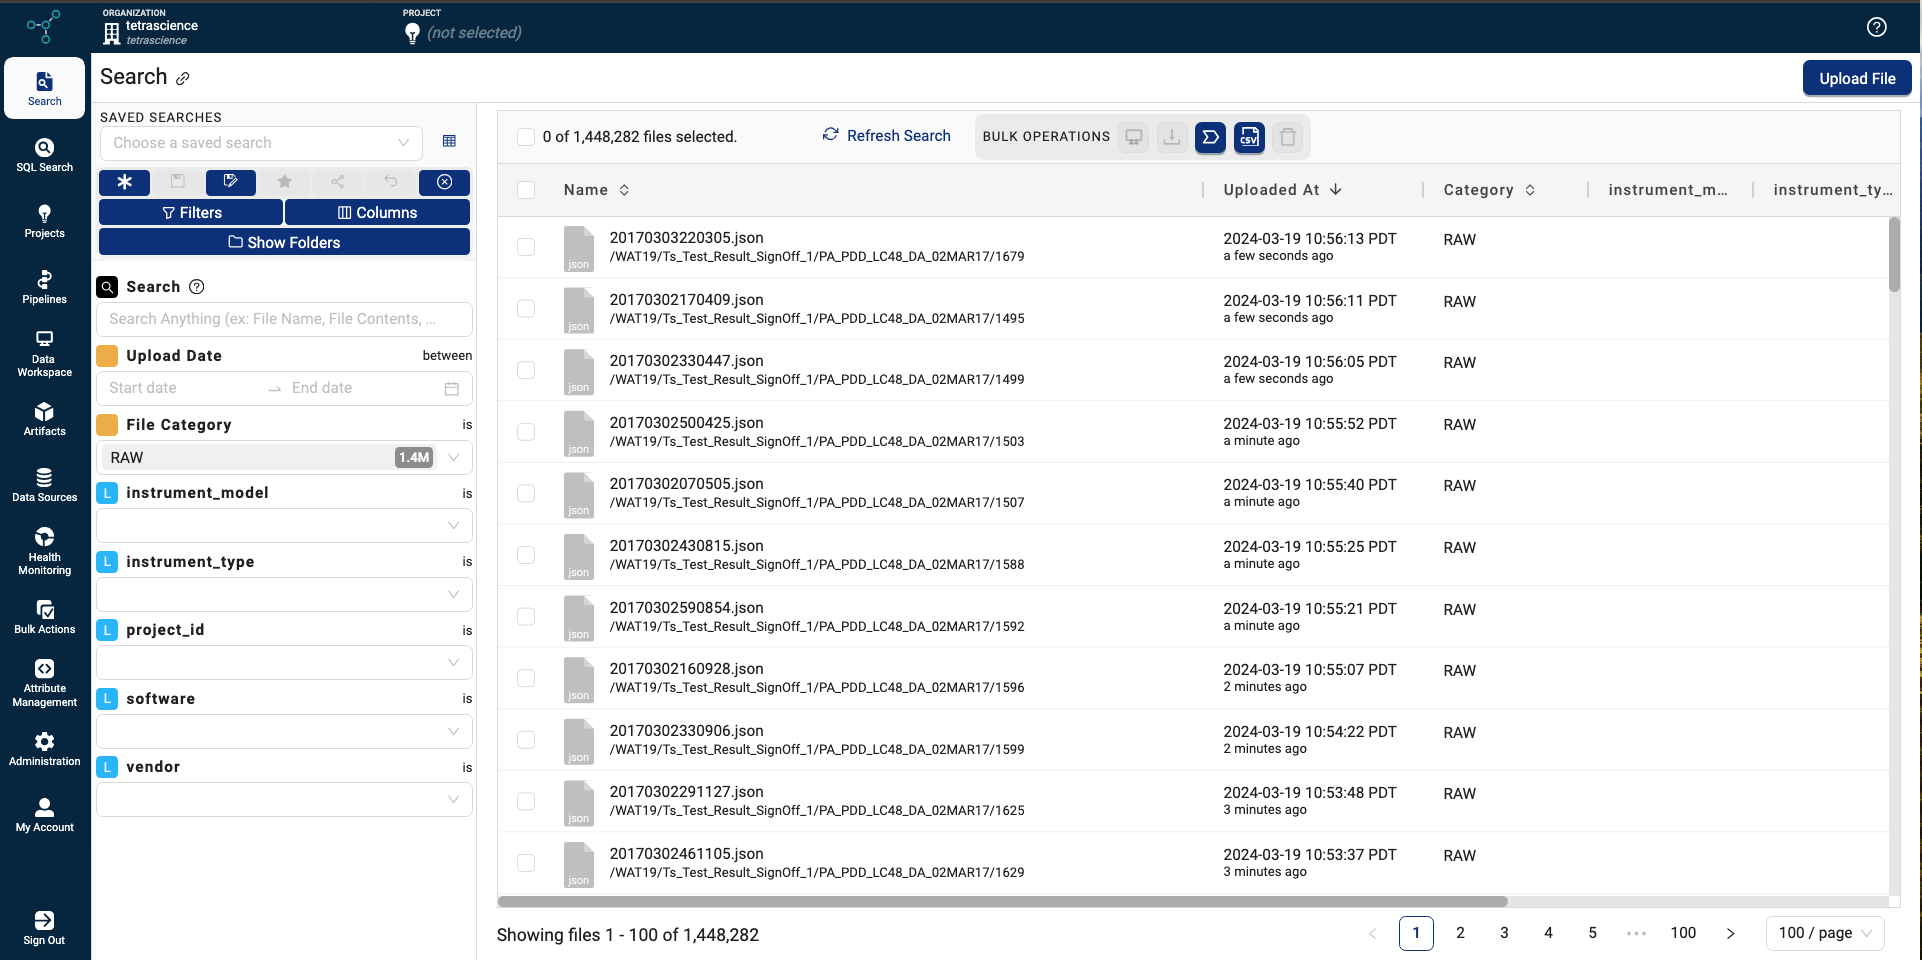
Run a Search by Using the Search Bar
IMPORTANTSearch behavior differs between the Search bar and the search Filters. Namely, the Improved Search Bar Functionality for TDP v3.6.0 and Higher applies to the Search bar only.
The following section describes the Search bar's behavior. For more information about using search Filters, see Filter Options for Search.
To run a search by using the Search bar, enter terms and fields that you want to search for in the upper left Search bar. Files that match the search criteria you enter display as results in the file list. By default, results are sorted by relevance instead of by upload date. However, you can organize the result set chronologically by selecting the Uploaded At column heading.
You can also share and bookmark search results by using a search URL link. For example, /search?category=RAW&label.organism=mouse opens the Search page with the referenced filters applied.
For example searches, see Search Query Examples and Results.
When running a search in the Search bar, keep in mind the following:
- The Search feature filters and searches on terms similar to a common website search. You can enter both full-text queries (search indexed text associated with a file) and filtered queries.
- Filters are case-insensitive and
ANDis the default Boolean operator. - To search and match for an exact phrase, enclose the text with "double quotes" (for example
"lab123 experiment5"). - Exact-match text searches and exact-match (is) filters return only exact matches to those search terms and filters.
- Results from searches that don't require an exact match also include Intermediate Data Schema (IDS) output files that return the associated RAW input files. Any additional filters that you apply further filter these search results based on the selected filter criteria.
- Make sure that you don’t use wildcard searches.
Fuzzy SearchA fuzzy search is done by means of a fuzzy matching program, which returns a list of results based on likely relevance even though search argument words and spellings may not exactly match. By adding a tilde (
~) at the end of a search term, you can make a typo (maximum of two characters), and still return relevant results. However, make sure that you don't add a tilde (~) to the end of a keyword/value of a filter, or if the keyword it contains includes any of the following wildcard characters (*, ?, or !). If you do, the query fails.IMPORTANT: Fuzzy searches don’t always return all possible related files. Incomplete results are sometimes returned when there is a high number of files indexed that have similar field values.
Improved Search Bar Functionality for TDP v3.6.0 and Higher
IMPORTANTThe following Search bar feature improvements are available for data that’s processed after the TDP v3.6.0 upgrade only. To apply these enhancements to historical data, customers must reindex the data by reconciling it, or contact their customer account leader for support. For more information, see Reprocess Files. These enhancements do not apply to search Filters.
Improved Context Search Feature
An improved Context Search feature now displays results returned by the TDP’s Search bar for search terms and filters that don't require an exact match based on content in the primary (RAW) and schematized (IDS) versions of files. This new functionality allows for more powerful contextual search without metadata, tags, or labels. Now, when customers search for content found in an IDS file through the Search bar, the results show information from that IDS file and its related, source RAW file as well as any related IDS files.
Improved Broad Search Feature
An improved Broad Search feature provides customers the ability to enter a portion of a file path into either the TDP Search bar feature or TetraScience /searchEql endpoint search in the query_string to return results, rather than the entire file path. For example, if you were to search for part of a filename, such as lab123 experiment5, then a file with the following path would now also be returned in the search results: /lab123/instrumentB/user1_experiment5_20231212.dat.
Show Folders
To view search results by folder, rather than list view, choose the upper left Show Folders button. A FOLDERS panel appears that displays a folder view of your search results.
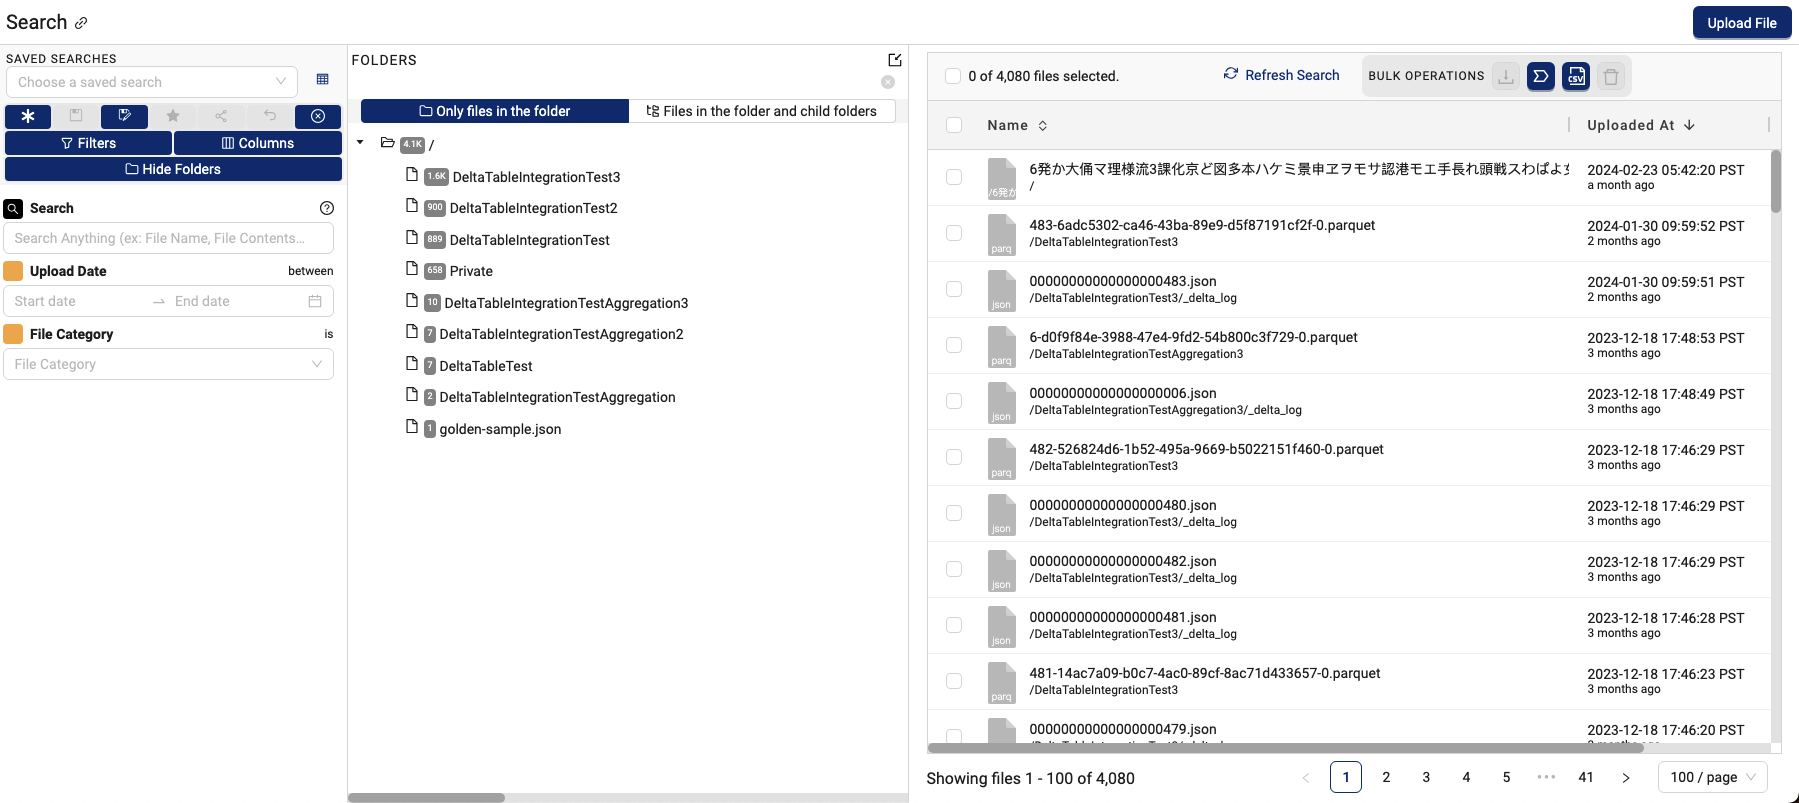
To show all of the search results in the folder view, select Files in the folder and child folders.
- or -
To show the current folder's files only, select Only files in the folder.
NOTEWhen you alter your search criteria, the folder view updates to display the most current search results automatically.
Filter Options for Search
The left filter pane on the Search page includes the following filter options.
Default Filter Options
The following filter options appear by default on every search on the Search page.
| Filter | Description |
|---|---|
Search |
Standard search bar, which allows you to search for any keywords (for example, by file name or file contents) |
Upload Date |
Searches by a date range, based on when files were last uploaded or modified in the TDP |
File Category |
Searches by the type of file: RAW, PROCESSED, or IDS (default option is RAW) |
Labels* |
Searches by any populated Recommended Labels that are in your TDP environment, if there are any *If you don't have labels in your TDP environment, no label search filters appear. Tool tips are available from the Description value in Attribute Management |
More Filter Options
To add more filter options outside of the default filter options on the Search page, do the following:
- In the left filter pane, choose the Filters button. The Filters dialog appears.
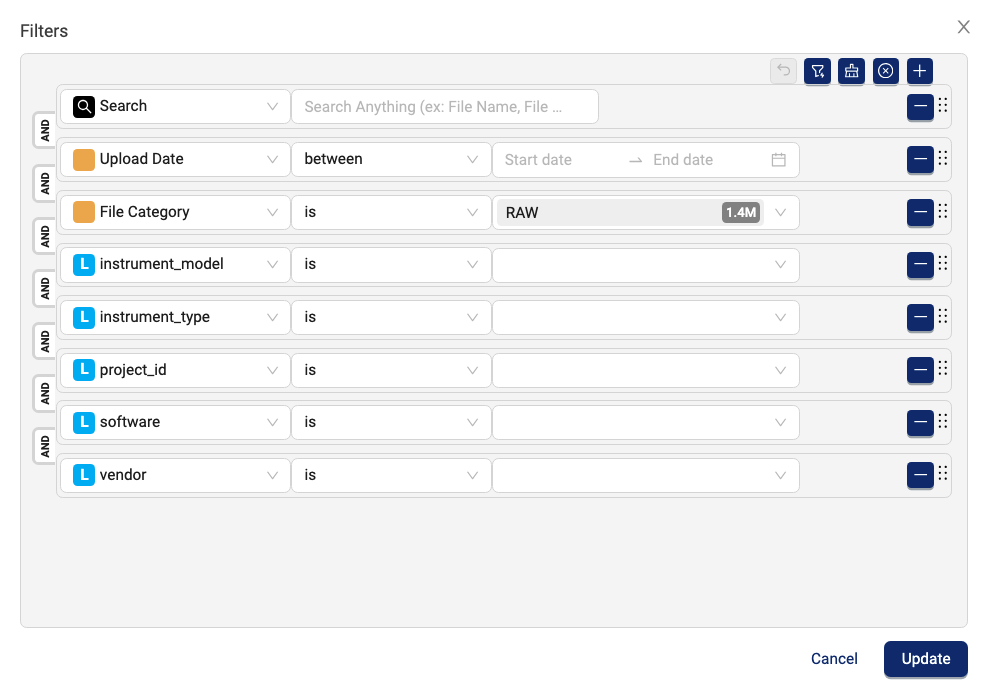
- To add a new filter type, select the upper right plus sign (
+) button. A new row with a Select a filter type field appears. Then, select a filter type from the drop-down list in the new row and choose Update.
-or-
To remove a filter, choose the minus sign (-) button next to the filter that you want to remove from your search.
NOTEAdding a high number of filters can increase the Search page's loading time.
Optional Filter Types
The following are optional filter types that you can add to any search on the Search page.
| Filter | Description |
|---|---|
File Path |
Searches by the name of the file, and includes the ability to use Note: The |
Metadata, Tags, and Labels |
Searches by specific metadata, tags, and labels as well as their corresponding values |
Other Options |
Searches by Pipeline, Source Name, and/or Source Type, and includes the ability to do complex filters by using Boolean operators ( |
Default Searches
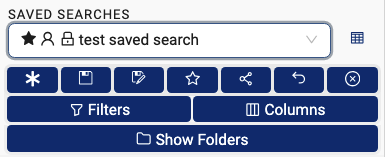
You can return to a default search, or access and manage saved searches from the Search page by using the actions at the top of the left filters pane.
Update Default Search Settings
To configure your personal default search filters and columns that appear when you use the Search page, see Update Your Default Search Filters.
To configure default Search settings for your organization as a user with an Administrator role, see Configure Default Search Settings for an Organization.
Start a New Search
To start a new search from the default search filters, select the Start a new search button (shown as an asterisk (*) icon).
Saved Searches
To access your personal, or your organization's saved searches from the Search page, select the Choose a saved search drop-down field from the top of the left filters pane.
To manage your personal, or your organization's saved searches, select the Manage Saved Searches icon to the right of the Choose a saved search drop-down.
You can also share and bookmark search results by using a search URL link.
Update an Existing Saved Search
To update the saved search that you're using, select the Update this saved search button (shown as a save icon). Then, choose one or both of the following options:
- Add to Personal Favorites adds the updated search criteria as a saved search to your personal list of saved searches.
- Share With the Entire Organization adds the updated search criteria as a saved search for every user in your organization.
To save the settings, choose OK.
Create a New Saved Search
To create a new saved search based on the filters that you've chosen, select the Create a new saved search icon (shown as a save icon that includes a pen).
NOTEThe following characters aren't supported in Saved Search names: double consecutive spaces and periods,
<,>,:,",/,\,|,?, and*.
Share a Saved Search with Your Organization
To share one of your personal saved searches with your organization, select the Share this saved search with your organization button (shown by a link icon).
Revert Filters to an Original Saved Search
To revert your search filters to the original saved search that you were using, select the Revert filters to the saved search button (shown as a curved-arrow icon).
Clear All Filters
To clear all filters from your search and revert to the default search filter options, select the Clear all filters button (shown as an X icon).
Refresh Search Results
To refresh your search results, choose the upper right Refresh Search option that's above your search results.
Edit Column Order and Width
To edit the order and width of the columns that display on the Search page based on the filters you choose, you can do any of the following:
- To move a column, select the column's name. Then, drag and drop it where you want.
- To change a column's width, hover over the bar that divides the column names. An expansion arrow appears. Then, select the expansion arrow and move your curser to adjust the column's width.
Edit Column Names and Create Custom Columns
To edit column names, or to create your own custom columns, do the following:
NOTEWhen you use recommended columns, the system will automatically generate columns based on the filters you are using. New columns will be automatically added or removed when the filters are changed. You can adjust the order and width of the columns, but you can't add or remove columns. When you use custom columns, you must manually add or remove columns. Columns will remain unchanged when filters are changed. You can specify the text of the column heading in addition to the order and width.
- Near the top of the SAVED SEARCHES pane, choose the Columns button. The Edit Columns dialog appears.
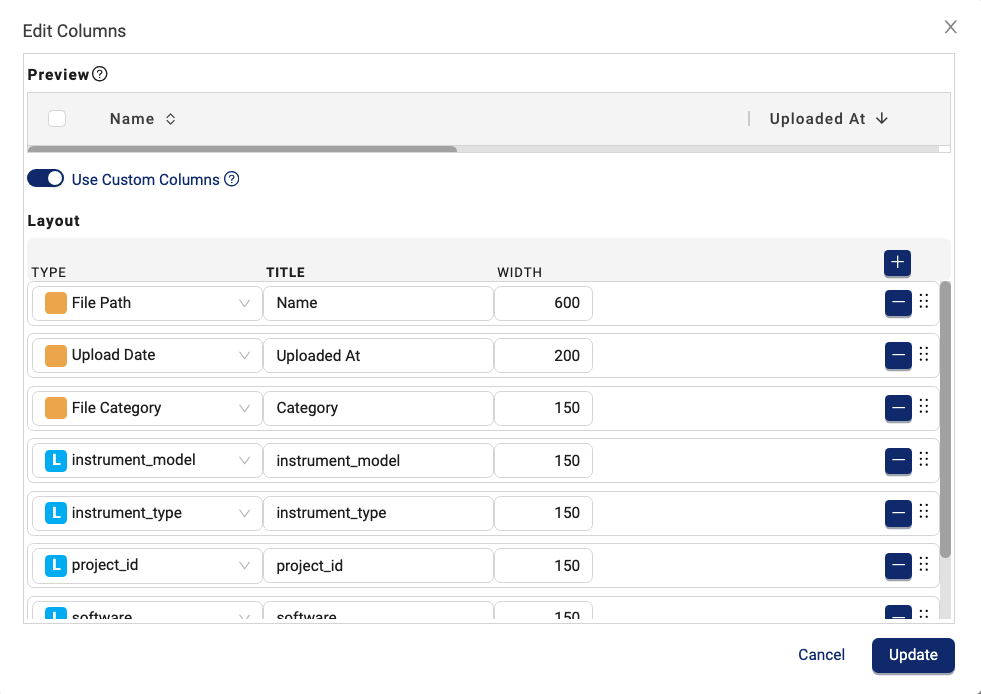
- (Optional) To create your own custom columns, move the Use Custom Columns toggle to the right.
- For each filter in the search, you can edit any of the following fields:
- For TITLE, enter the name that you want the filter's column to display.
- for WIDTH, enter how wide you want the column to be in pixels
- (Optional) To keep an applied filter's column from displaying in search results, select the minus (-) sign on the right of that column's row.
- Choose Update.
NOTETo change the order of the columns, select the far right three-dot icon in each column's row. Then, drag and drop it to the position where you want it.
Search Indexing
All of the data in Intermediate Data Schema (IDS) files is indexed and available through search.
Depending on your deployment's search indexing configuration, the first 1 MB of the following RAW, unprocessed file types can also be indexed for search:
| Media (MIME) Type | Possible File Extensions |
|---|---|
text/plain | ["txt","text","conf","def","list","log","in","ini"] |
application/json | ["json","map"] |
text/csv | ["csv"] |
application/xml | ["xml","xsl","xsd","rng"] |
NOTEYou can also search for RAW, unprocessed files by filename, file metadata (such as creation time), and attributes. RAW file content indexing is controlled by deployment configuration and might not be enabled for all TDP environments. The default 1 MB RAW file content indexing limit and the file categories that are indexed can be adjusted on request.
View File Information
To view a specific file's information on the Search page, select a file from the list of files that are returned by your search. A pane appears on the right that lists optional file actions along with the following default file information:
- FILE NAME—shows the file's name
- UPLOAD DATE—indicates the date and time when the file was last modified
- SIZE—shows the compressed file size. The actual file size is larger when you download it.
- CATEGORY—indicates the type of file (RAW, PROCESSED, or IDS)
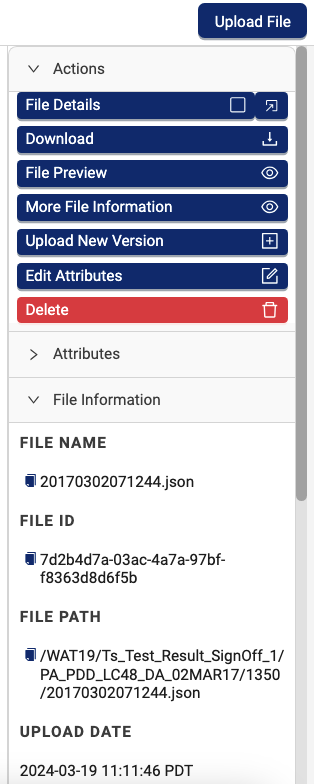
Available Actions For Files
After you select a file on the Search page, you can run any of the following actions from the file's right Actions pane. The available actions are based on the logged-in user’s role.
NOTEActions marked with an asterisk (*) are available for users with Administrator roles only.
| Action | Description |
|---|---|
File Details |
Opens the File Details page for the file |
Download |
Downloads the file to your computer |
File Preview |
Opens a preview of the file |
More File Information* |
Shows JSON details |
Upload New Version* |
Opens a dialog that allows you to upload a new version of the file |
Edit Attributes* |
Opens a dialog that allows you to edit the file's attributes. For more information, see Apply Attributes to Specific Files. |
Delete* |
Soft deletes the file version in the TDP and makes it unavailable through search or SQL queries. \n \nNote: The Delete action makes deleted file versions unavailable through search or SQL queries. It is a soft delete within the system, which means that the deleted file versions remain in the Data Lake, still display with a UUID on the File Details page, and remain available through the TetraScience API. However, restoring deleted files to an active state requires manual steps that must be done in conjunction with TetraScience, and should be done only in business critical situations. Please contact your customer account leader if you need to restore deleted files. |
🚧 IMPORTANTThe Delete action makes deleted file versions unavailable through search or SQL queries. It is a soft delete within the system, which means that the deleted file versions remain in the Data Lake, still display with a UUID on the File Details page, and remain available through the TetraScience API. However, restoring deleted files to an active state requires manual steps that must be completed in conjunction with TetraScience, and should be done only in business critical situations.
View the File Details Page
To view additional file details, choose File Details in the right pane that appears for the selected file.
The File Details page appears and displays three tabs:
- File info:shows additional file details
- File Journey: shows the event history for a file after it's been uploaded to the Tetra Data Lake, including pipeline processing events
- File Attribute History: shows label history for any files uploaded to the TDP after customers upgrade to TDP v4.2.0
NOTEThe File Journey tab displays Tetra File-Log Agent file events only. Incorporating events from other integration types is planned for a future TDP release. To view file events generated by the Tetra File-Log Agent outside of the TDP, see Monitor Events.
Link to a File in the TDP
To link to a specific file in the TDP outside of the platform, you can do any of the folloing:
- Copy the File Details page's URL for the file. Then, use that URL to create a hyperlink.
- Generate a download link that you can programatically send to you LIMS or ELN system. For instructions, see Add TDP Download Links to ELNs and LIMS in the TetraConnect Hub. For access, see Access the TetraConnect Hub.
- Share and bookmark search results by using a search URL link. For example,
/search?category=RAW&label.organism=mouseopens the Search page with the referenced filters applied.
NOTETo access a file in the TDP through an external link, users must still have the permissions required to access the file.
File Info
The following information is provided on the File info tab on the File Details page for each file in the Tetra Data Lake.
| Section | Description |
|---|---|
FILE VERSIONS |
Lists the total number of file versions in chronological order with the most recent file displayed at the top of the list.
|
FILE ACTIONS |
You can:
|
File Info |
Displays the following file details:
|
Attributes |
Displays any associated file attributes such as: metadata, tags, and labels. |
INPUT FILE |
Shows files from which the current file was derived. For example, for an IDS file, the RAW file would be the input file. |
OUTPUT FILES |
Shows files that the current file produced. For example, the IDS file typically produces a JSON file. This also indicates the pipeline that processed the file, the file name, the date and time that the file was created, the IDS file name, and the TMP file. |
View all Files and Workflows |
Shows files and workflows that are related to the current file. |
File Journey
NOTEThe File Journey tab displays Tetra File-Log Agent file events only. Incorporating events from other integration types is planned for a future TDP release.
The File Journey tab on the File Details page shows the event history for a file after it's been uploaded to either the Tetra Data Lake or Data Lakehouse, including pipeline processing events.
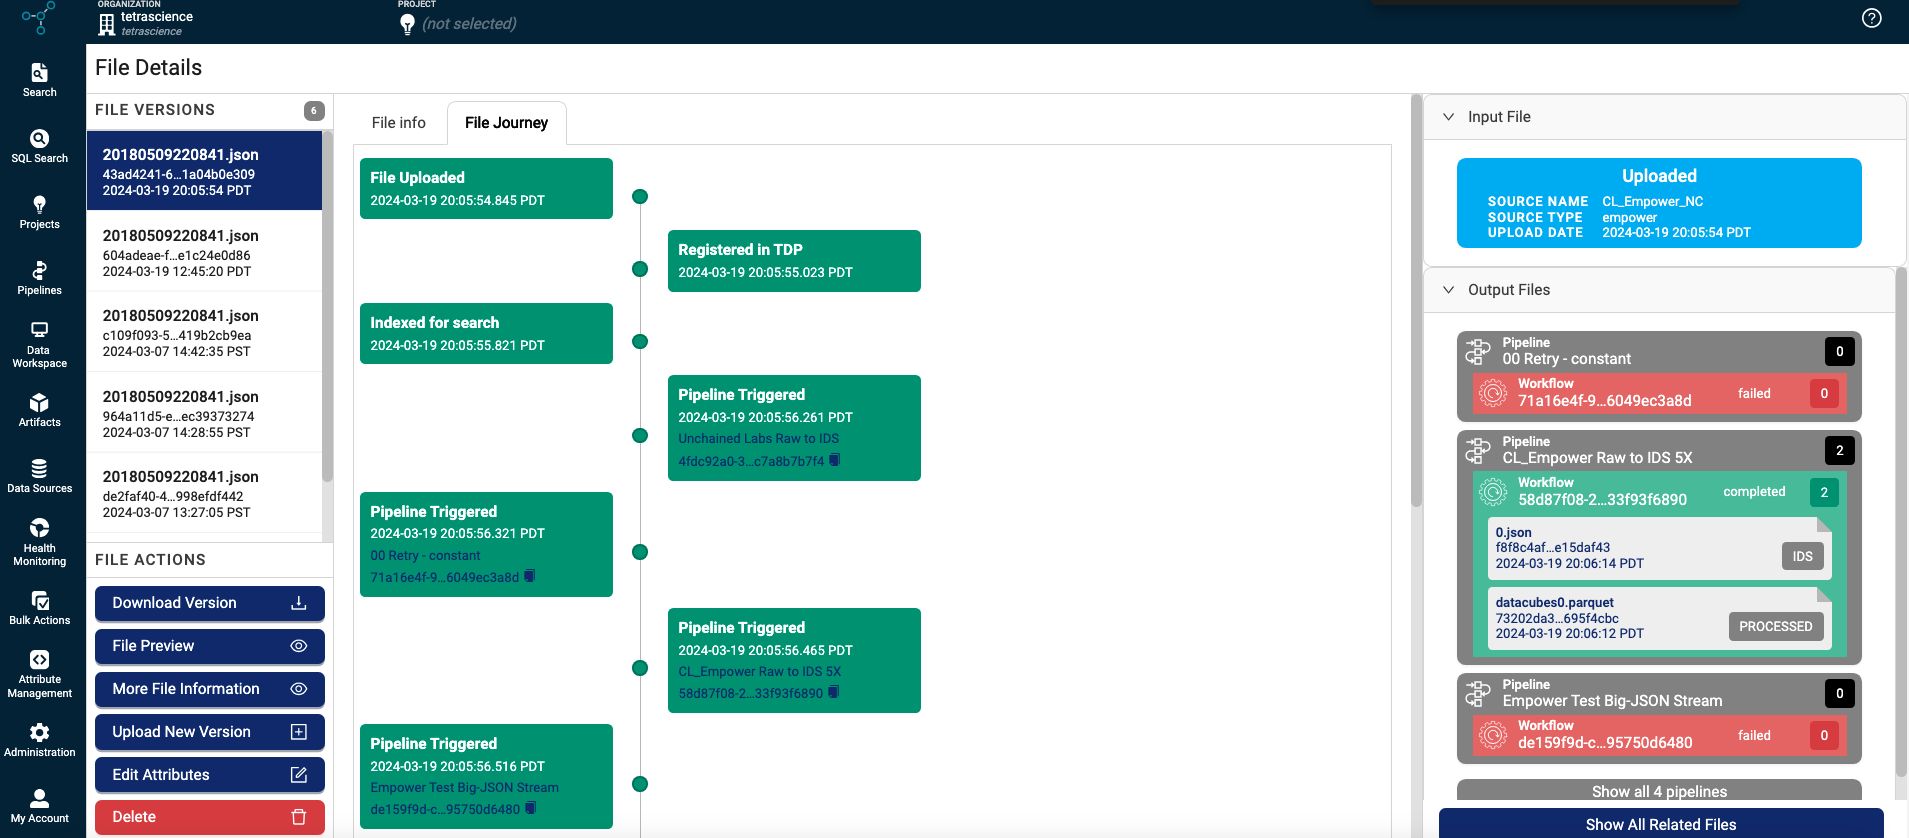
File Journey Event Types
The File Journey tab on the File Details page reports the following event types.
| Event Type | Description |
|---|---|
| Connector Event | |
| Connector file detected | Shows when the system has detected a file for upload through a configured connector |
| Connector file processing | Shows when a file uploaded through a configured connector is processing |
| Connector file success | Shows when a file is uploaded to the TDP through a configured connector successfully |
| Data Lake Events | |
| File Uploaded | Shows when a file is uploaded to the Data Lake |
| Registered in TDP | Shows when a file is registered in the TDP |
| Indexed for search | Shows when a file is indexed in OpenSearch |
| Indexed for SQL | Shows when a file is indexed in Amazon Athena |
| Data Lakehouse Events | |
| Indexed for Lakehouse (IDS) | Shows when an IDS file is available for querying in the Data Lakehouse |
| Indexed for Lakehouse (File Info) | Shows when file attributes are available for querying in the Data Lakehouse |
| Pipeline Events | |
| Pipeline Triggered | Shows when a pipeline is triggered |
| Workflow Failed | Shows when an executed workflow that was triggered failed |
| Workflow Completed | Shows when a workflow that was triggered completed |
| Workflow Canceled | Shows when a workflow was canceled |
File Attribute History
The File Attribute tab on the File Details page shows the label history for any files uploaded to the TDP after customers upgrade to TDP v4.2.0. It captures every change made to a file’s labels, including when a label was modified and the user or action that updated it.
IMPORTANTKeep in mind the following:
- It can take up to 30 minutes for a label change to take effect and appear on the File Attribute History tab.
- The File Attribute History tab shows the current state of a file's metadata and tags only if you select the Advanced Fields option. However, it doesn't show the history of that file's metadata and tags, which are on a deprecation track.
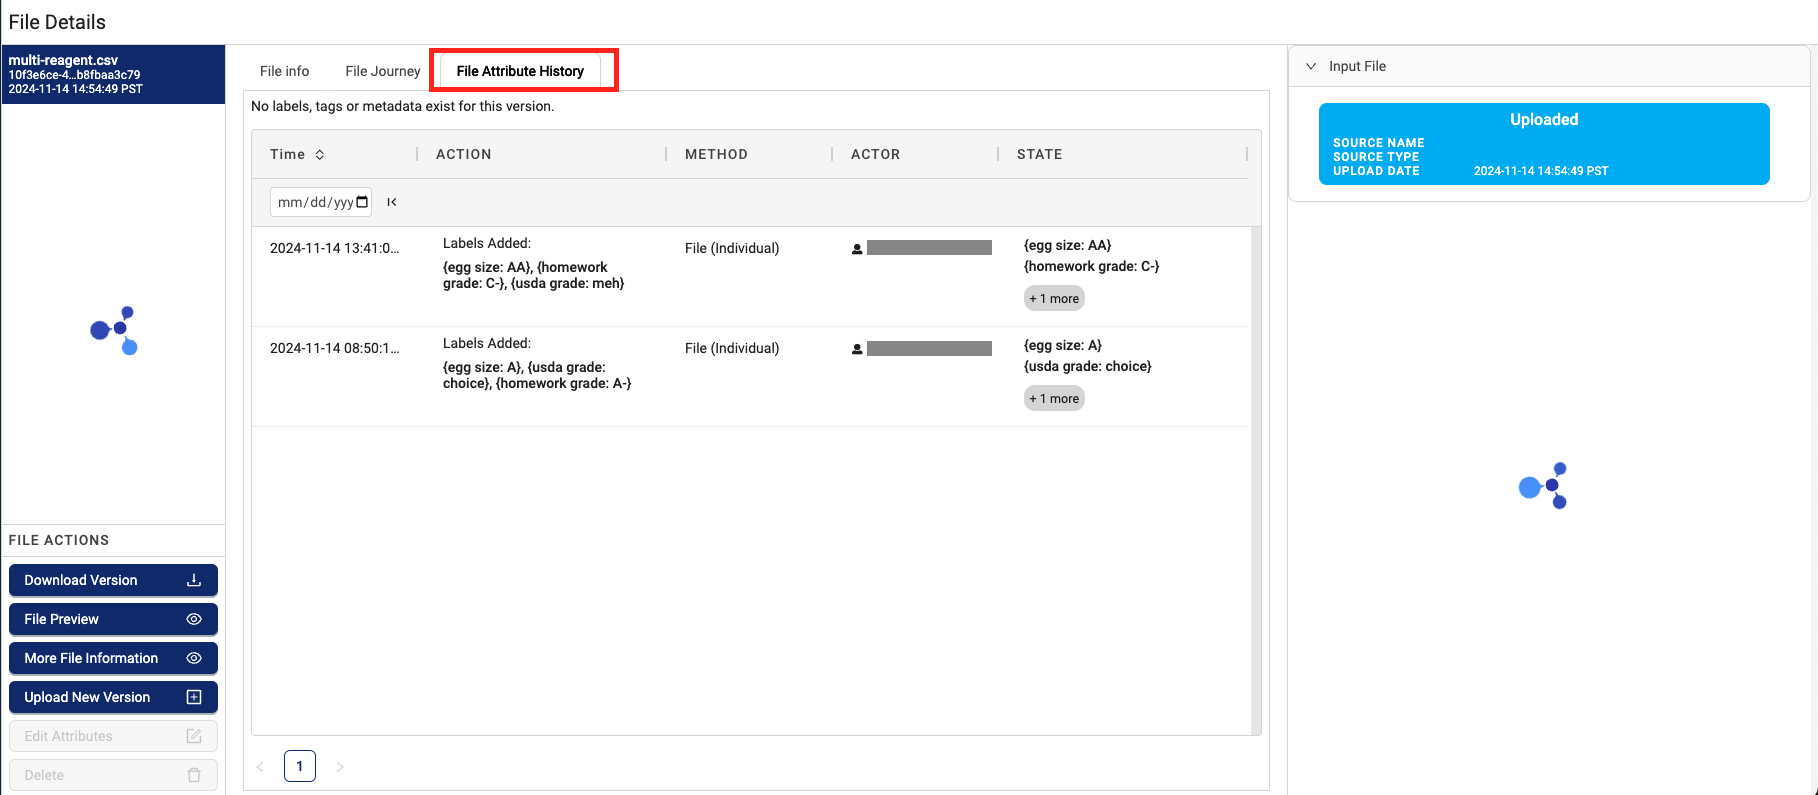
Label Change Operations**
The File Attribute History tab on the File Details page reports the following label change operations and details.
Label Change Operation Types
- Label Added
- Label Removed
NOTEUpdates to existing labels generate two label change operations: both a Label Added and a Label Removed operation.
Label Change Operation Details
| Operation Detail | Description |
|---|---|
| TIME | Shows when the label change operation happened |
| ACTION | Shows if a label was added or removed |
| METHOD | Shows the data source or what entity caused the change |
| ACTOR | Shows the details for the data source or entity that caused the change |
| CURRENT STATE | Shows the full state of labels on a file after the specific change in the ACTION column occurred |
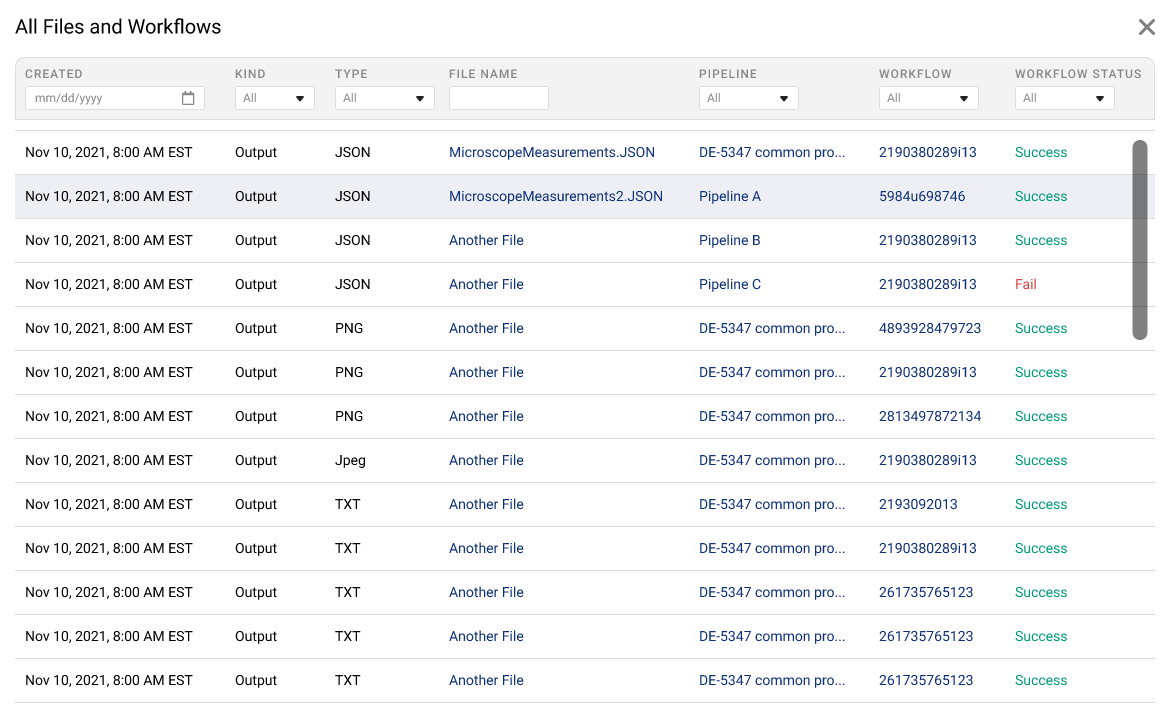
View All Files and Workflows
On the File Details page, select the View All Files and Workflows button to display all of the current file's related files and workflows. The following All Files and Workflows page appears.
All Files and Workflows Page Section Overview
| Section | Description |
|---|---|
| CREATED | Shows the date the file was created |
| KIND | Indicates if a file is an input or output file |
| TYPE | Shows the file type |
| FILE NAME | Shows the file's name |
| PIPELINE | Shows the pipeline that contains the workflow that produced the file |
| WORKFLOW | Shows the workflow ID of the workflow that produced the file |
| WORKFLOW STATUS | Indicates if the workflow that created the file was successful or not |
Download, Edit, or Delete Multiple Files
The BULK OPERATIONS options at the top right of the Search page allow you to select multiple files, and then either download, edit, or delete those files all at once.
NOTEYou can also open a batch of selected files in a Data & AI Workspace by selecting the Data & AI Workspace icon next to BULK OPERATIONS.
Select Multiple Files
To select the files that you want to include in your bulk action, you can do any of the following:
- Choose multiple, individual files by selecting the left check box in each file's row
-or- - Choose all of the files returned by your search by selecting the top left check box in your search results (next to the NAME column)
Download Search Results as a CSV File
To download search results as a CSV file, do the following:
- Next to BULK OPERATIONS, select the Download search results as a CSV file option (shown as a CSV icon). A Download CSV File dialog appears.
- (Optional) To include all platform metadata of the file as a JSON column in the results download, move the Include Full File Information (this will increase the size of the CSV file) toggle to the right. This option can be helpful for troubleshooting purposes.
- Choose Next. The CSV file builds.
- Choose Download.
Download Selected Files
IMPORTANTIn TDP v4.4.3 and earlier, the Download selected files action replaces the following characters with an underscore (
_) if they appear before the file extension in file names:/[/\\:*?<>|.]+/gu;. As a workaround, you can compare the names of downloaded files against the source file names in the TDP and then rename them if required. A fix for this issue is in development and testing and is scheduled for TDP v4.4.4.
To download all of your selected files to your computer, do the following:
- On your local computer, create a new empty folder. This is the folder where your selected files are downloaded to.
- Sign in to the TDP through Google Chrome. Other web browsers don't support downloading multiple files from the TDP.
- On the TDP Search page, next to BULK OPERATIONS, select the Download selected files option (shown as an arrow pointing into a bin icon). A Bulk Download dialog appears.
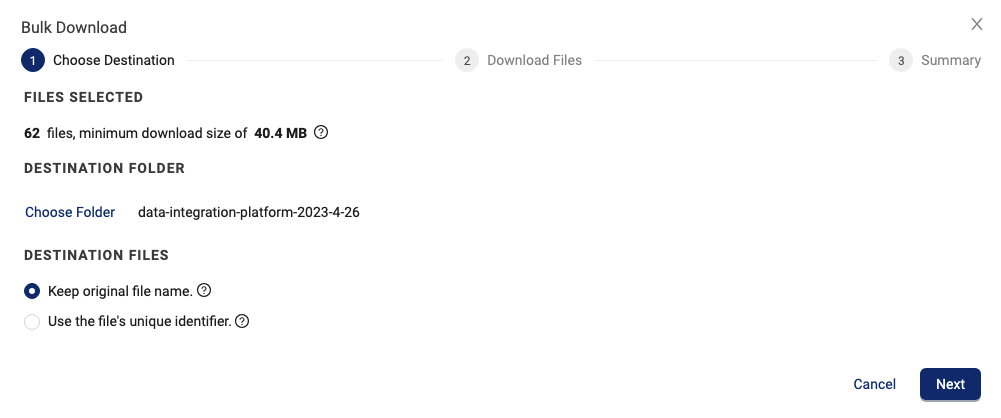
- Under DESTINATION FOLDER, select Choose Folder. Then, select the local, empty folder you created earlier.
- Choose Next. The dialog shows the bulk download job status as it's running, and then confirms when it's successful.
Bulk Edit Labels
To edit the labels of all of your selected files, do the following:
- Next to BULK OPERATIONS, select the Create a Bulk Label Change Job option (shown as a chevron icon). A Create Bulk Label Change Job dialog appears.
- Follow the instructions in Edit Labels in Bulk.
NOTETo monitor a Bulk Label Edit job's status, see Monitor a Bulk Label Edit Job's Status.
Bulk Delete
🚧 IMPORTANTThe Bulk Delete action makes deleted file versions unavailable through search or SQL queries. It is a soft delete within the system, which means that the deleted file versions remain in the Data Lake, still display with a UUID on the File Details page, and remain available through the TetraScience API. However, restoring deleted files to an active state requires manual steps that must be done in conjunction with TetraScience, and should be done only in business critical situations. Please contact your customer account leader if you need to restore deleted files.
To delete your selected files from the TDP and make them unavailable through search or SQL queries, do the following:
- Next to BULK OPERATIONS, select the Delete Selected Files option. A Delete Files dialog appears.
- To delete the selected files, choose Delete Files. To cancel the operation, choose Cancel.
Upload a New File
NOTEWhen a new file version is uploaded, the TDP copies all file metadata from the previous file version, including workflow data. The system then uses this information to relate the new file version to the workflow that created the previous file version. This process results in the new file version being displayed on the File Details page and showing that the new, uploaded file version was produced by a workflow.
To upload a new file through the Search page, do the following:
- Select the upper right Upload File button. An Upload File dialog appears.
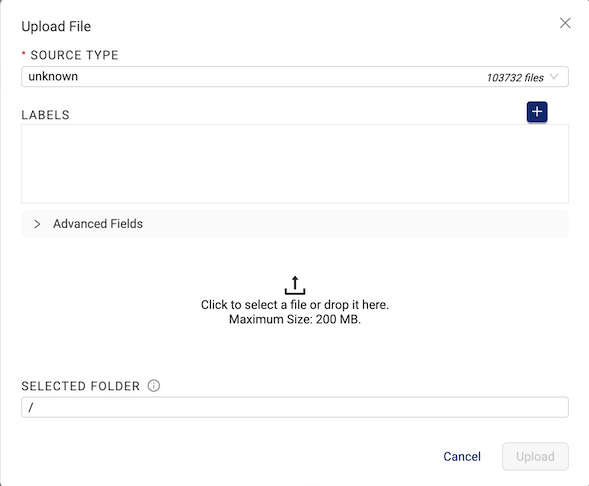
- For SOURCE TYPE, enter a source type for the uploaded file. Each newly uploaded file needs to be attributed to a source type.
- (Optional) For LABELS, select the labels that you want to add to the file.
- Select the file upload box to select a file to upload, or drag and drop a file into the box.
- (Optional) To upload the file to the same destination as a specific integration's upload path, or any other folder besides the default root folder, enter the target folder in the SELECTED FOLDER field.
- Choose Upload.
NOTEThe maximum file size you can upload through the TDP user interface is 200 MB. To upload larger files, use the TetraScience API or a Tetra Agent or Connector.
Documentation Feedback
Do you have questions about our documentation or suggestions for how we can improve it? Start a discussion in TetraConnect Hub. For access, see Access the TetraConnect Hub.
NOTEFeedback isn't part of the official TetraScience product documentation. TetraScience doesn't warrant or make any guarantees about the feedback provided, including its accuracy, relevance, or reliability. All feedback is subject to the terms set forth in the TetraConnect Hub Community Guidelines.
Updated about 1 month ago