Upgrade an Agent
The procedures on this page show how to do the following:
Configuration NotesKeep in mind the following:
You can deactivate an Agent if you notice incorrect behavior. When you deactivate an Agent, it can't communicate with the TDP until you reactivate it.
If you configure an Agent for S3 Direct Upload, then the temporary AWS credentials are valid and used until the expiration time (set to less than an hour) is reached. After the Agent reaches the expiration time, the Agent can't retrieve new temporary AWS credentials.
Upgrade an Agent's Software
Review the Release Notes
Review the release notes for the latest Agent version. To view Agent release notes, see Tetra Agent Release Notes.
Prepare the Agent for Upgrade
To prepare an existing Agent for upgrade, do the following:
- Open the Agent's Management Console by doing the following:
- On the Agent's host server, open Windows Programs.
- In the Windows Programs menu, choose TetraScience Agent[name]. The Agent Management Console appears.
- Review the console's Summary tab and verify that the Agent isn't processing data.
- Verify that the Management Console for the Tetra Agent isn't running for any user who's logged in.
- Stop the Agent by pressing the Stop button in the Agent Status section of the Management Console.

- Save the configuration settings locally. You'll use this information to verify the upgrade.
- Close the Agent's Management Console.
- Copy the SQLite Database's
applicationdb.sqlitefile and store the file in a safe place. The file location differs by Agent:- Tetra Chromeleon Agent:
<Directory where you installed the agent>\Bin\Database - Tetra Empower Agent:
<Directory where you installed the agent>\db - Tetra File-Log Agent:
<Directory where you installed the agent>\Bin\Database - Tetra LabX Agent:
<Directory where you installed the agent>\Bin\Database - Tetra UNICORN Agent:
<Directory where you installed the agent>\Bin\Database
- Tetra Chromeleon Agent:
Local SQLite DatabaseAdditional runtime states (for example, files pending upload) are stored in a local SQLite database. These files store internal details for the Agent. Don't manually change these files.
Note about Chromeleon UpgradesFor Tetra Chromeleon Agent v2.0.0 and earlier, before you stop the Agent for an upgrade, make sure that you check that the process
TetraScience.Agent.Chromeleon.Runnerisn't running. To check the process status, open Windows Task Manager. If the process is running, select the process and choose End Task. Then, complete the upgrade.
Install the Latest Agent Version
After you've prepared the existing Agent for upgrade, upgrade the Agent's software by downloading the latest installation package for that Agent from the Tetra Agent & Connector Installers page in the TetraConnect Hub. For access, see Access the TetraConnect Hub.
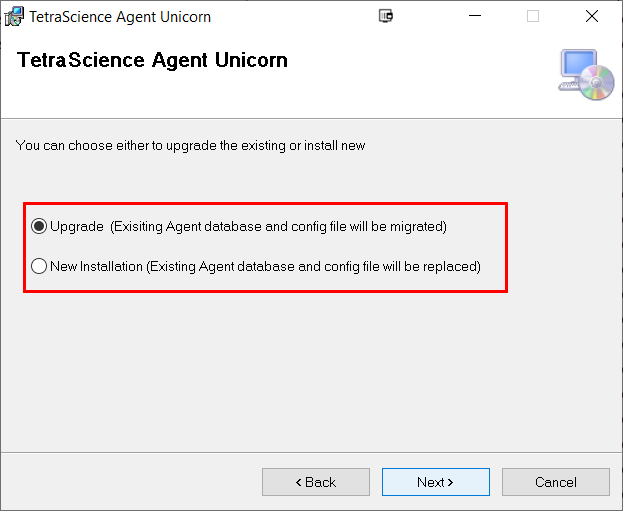
When running the installation package, make sure that you select the Upgrade option. Don't select the Install option, which is for new Agent installations only.
IMPORTANTThe Upgrade option upgrades the Tetra Agent that's in-place, rather than replacing it. Upgrading an Agent retains its existing configuration settings and state, but deletes the local copies of the log files.
Log File BackupsLog files are backed up in Amazon CloudWatch.
Agent Documentation
For more information about how to install and configure a specific Agent, see the documentation of the Agent you're upgrading.
- Tetra Chromeleon Agent Documentation
- Tetra Empower Agent Documentation
- Tetra File-Log Agent Documentation
- Tetra IoT Agent
- Tetra LabX Agent Documentation
- Tetra UNICORN Agent Documentation
- Tetra HTTP Relay Agent
- Tetra OpenLab Agent
Verify the Upgrade
After installing the latest Agent version, verify the upgrade by doing the following:
- Open the Agent Management Console and confirm that the new version displays in the console's title bar.

- Verify that the Agent's Configuration settings are the same as they were before the upgrade.
Upgrade an Agent's Host Machine
To upgrade an existing Agent's host machine, do the following:
- Carefully review the prerequisites and installation instructions for the Agent that you're using. Make sure that the new hardware meets that Agent's hardware requirements.
- Follow the instructions in Prepare the Agent for Upgrade. Make sure that you Stop the existing Agent and copy and save the SQLite Database's
applicationdb.sqlitefile. - Install the latest Agent version on the new hardware instance by following the Agent's installation instructions.
- Replace the SQLite database on the new hardware with the SQLite database that was on the previous hardware.
- Follow the instructions in Verify the Upgrade.
Restrict Access to the Agent Management Console
To restrict access to the local Agent Management Console, you can edit the Agent’s installation folder’s permissions to grant least privilege access. For more information, see Access Control Overview - Windows Security in the Microsoft Documentation.
IMPORTANTAdministrator and service user permissions are required for each Agent’s installation folder. You can grant other users access as needed.
Agent User Types
There are three types of Agent users:
- Administrators: To register the Agent as a Windows Service, Agents must be installed and initially configured by a user with local administrator privileges.
- Service users: A user role created specifically for running the Agent as a Windows Service. This role should have limited access to the necessary resources (for example, file paths) and access to the Agent’s installation folder.
- System users: Individuals who use the system locally. These users might not be aware of the Agent, because it’s running as a service in the background.
Documentation Feedback
Do you have questions about our documentation or suggestions for how we can improve it? Start a discussion in TetraConnect Hub. For access, see Access the TetraConnect Hub.
NOTEFeedback isn't part of the official TetraScience product documentation. TetraScience doesn't warrant or make any guarantees about the feedback provided, including its accuracy, relevance, or reliability. All feedback is subject to the terms set forth in the TetraConnect Hub Community Guidelines.
Updated 2 months ago