Tetra Chromeleon Agent Installation and Configuration (Version 1.1.0)
This guide describes how an IT Administrator can install and configure the Tetra Chromeleon Agent (version 1.1.0). It describes how to:
- Select and set up a data connection
- Install the Tetra Chromeleon Agent
- Configure the Tetra Chromeleon Agent
- Select the Data Vault
- Monitor Tetra Chromeleon Agent progress and server system metrics
Agent RequirementsBefore you begin, ensure that your environment meets the prerequisites listed here.
Select and Set Up Data Connection
The Tetra Chromeleon Agent generates RAW files which are uploaded to the Tetra Data Platform (TDP) through a Data Connector.
To enable secure file transfers, TetraScience provides two available data connectors:
- eneric Data Connector (GDC)] ((https://developers.tetrascience.com/docs/agent-common-behavior#generic-data-connector-aka-gdc)
- loud Data Connector (CDC)] ((https://developers.tetrascience.com/docs/agent-common-behavior#user-defined-integration-aka-udi) (Note that the UDI was renamed the Cloud Data Connector (CDC) in version 3.1 of the TDP software.)
Before you install the Tetra Chromeleon Agent, you must set up one of these data connectors. To determine which data connector to select, click this [link] (https://developers.tetrascience.com/docs/agent-common-behavior#agent-tetrascience-platform-integration-summary) for details.
Install the Tetra Chromeleon Agent
TetraScience provides a Microsoft Installation Package (.msi) file to install the Chromeleon Agent in the host server. To access the server and run the installation package, you must log in as an Administrator.
- To obtain the link to the .msi installation package, please contact your TetraScience Customer Success Manager (CSM).
- Once you have the link, download the Tetra Chromeleon Agent to a machine
that runs a supported version of Thermo Fisher Chromeleon. - Double-click the Tetra Agent installation file to start the installation wizard. The installation wizard guides you through the prompts. The default Tetra Chromeleon Agent installation path is:
C:\Tetrascience\Tetrascience.Agent.Chromeleon.v1.0.0. - After the Tetra Chromeleon Agent is successfully installed on the server, you can access its Windows-based Management Console under the TetraScience folder from the Windows Programs. Select TetraScience Agent Chromeleon from the Windows Programs list to open the Agent.
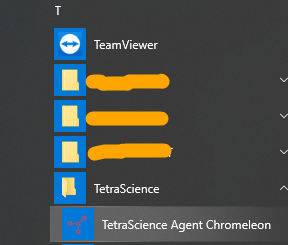
Tetra Chromeleon Agent path
Configure the Tetra Chromeleon Agent
After you have successfully installed the Tetra Chromeleon Agent, use the Windows-based Management Console to continue the Agent configuration.
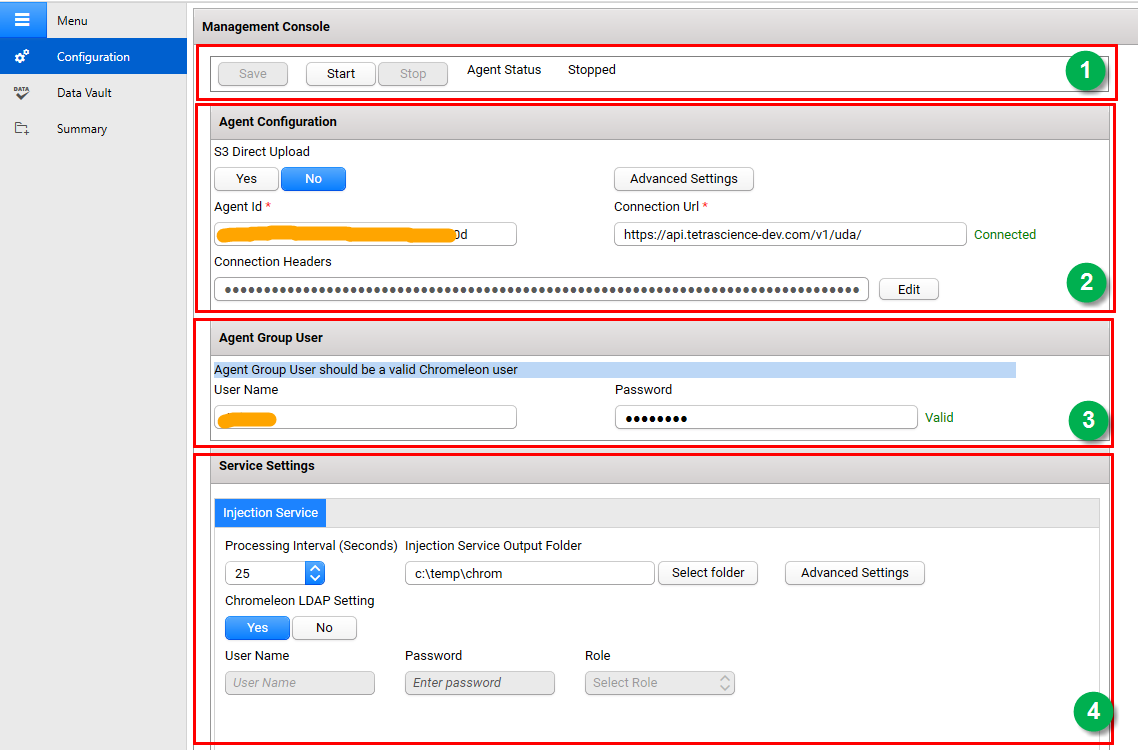
Management Console
Click Configuration from the menu on the left. The Management Console is divided into four sections:
- Agent Status
- Agent Configuration
- Agent Group User
- Service Settings
Section 1: Agent Status
This section indicates the current state of the Agent's processing status:
- Agent Service Not Installed
- Stopped
- Running

Agent Stopped Status
- To save the Chromeleon Agent configuration, click Save.
- To start the Chromeleon Agent with the new configuration settings, click Start. When the Chromeleon Agent starts, the status indicator shows Running for an Agent that is successfully up and running.

Agent Running Status
- When the Chromeleon Agent starts, the Stop button is enabled. To stop the Chromeleon Agent, click Stop.
Section 2: Agent Configuration
Use this section to configure the Agent connection the Tetra Data Platform. TetraScience provides several options to connect the Tetra Data Platform. Click this link to select the best option for your company's needs.
S3 Direct Upload
To have the Tetra Chromeleon Agent directly upload files to the AWS S3 bucket bypassing GDC or CDC, set the S3 Direct Upload option to Yes. When you set this option to Yes, you can upload a maximum file size of one TB. No is the default setting.
- If you use the S3 Direct Upload option with GDC, you must add an L7 Proxy Data Connector in the same Data Hub where you set up the GDC. Additionally, the port of the L7 Proxy Data Connector is open. To learn more about GDC, see this link.
- To learn more about CDC, see this link.
SQLite Database File BackupsTo enable the Tetra Chromeleon Agent to automatically perform regular backups of the SQLite database file, set the S3 Direct Upload option to Yes. When you enable this option, the SQLite database file (which stores agent configuration data) is uploaded to the backup bucket in the Data Lake. If a Tetra Chromeleon Agent failure occurs, you can restore the database file from the backup bucket and continue processing.
If you do not use not use the S3 Direct Upload option, then we recommend that you create periodic backups of the Tetra Agent database, which is typically stored in the installation folder under C:\TetraScience<agent>\Bin\Database. In the event of a failure (for example, if the host server drive is lost), this would enable the data extraction to continue from where it left off without having to re-upload all of the data.
Agent ID and Connection URL
Before you set up a Tetra Chromeleon Agent from GDC or CDC, you must enter:
- (Required) An Agent ID. The Agent ID (a UUID) is used to connect the Tetra Data Platform. You can retrieve Agent ID from the Tetra Data Platform when you set set up GDC or CDC.
- A full connection URL from GDC or CDC (as shown in these URL examples):
- GDC URL is
http://10.100.1.1:8888/generic-connector/v1/agent - CDC URL is
https://api.tetrascience-dev.com/v1/uda/
- GDC URL is
Verify the Agent ID and Connection URL
- Agent ID is required. The Connection URL is required if you are uploading RAW files to the Tetra Data Platform; optional, if you are not.
- Before you use the Agent ID and URL with the Tetra Data Platform, we strongly suggest that you verify both with your TetraScience Customer Success Team.
If you use the CDC Connector, then you must attach the API Key or JWT token to the header.
- Click Edit next to the Connection Headers field.
- The Connection Headers Editors dialog displays three predefined header keys:
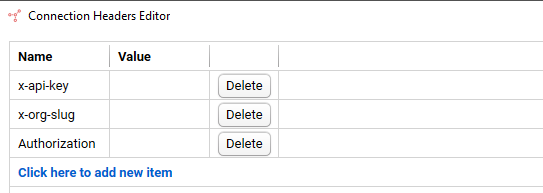
Connection Headers Editor
- If you use an API Key, then enter the its value in the Value column next to the x-api-key.

Enter API Key value
- If you use the JWT token, then enter values for both the x-org-slug and Authorization fields, respectively. To learn how to get the JWT token, see CDC.

Enter x-org-slug and Authorization values
Note
Authorization,Beareris optional. If you do not provide it, then the Tetra Chromeleon Agent adds it automatically.
- Click Save to close the dialog and save the header information. The Agent validates the connection immediately and displays the updated connection status next to the Connection URL field.

Connection validation
Section 3: Agent Group User
The Agent Group User is the service account that runs the Tetra Chromeleon Agent.
- If Chromeleon enables LDAP, then this User Name and Password must be a valid Chromeleon user account.
- If Chromeleon does not enable LDAP, then this User Name and Password can be any valid Windows account.
Group user tipIf you are having trouble signing in with your Chromeleon user account, try adding
.\at the front of your user name. For example, if you user name is "Tetra", try using ".\Tetra"
When the you enter the Chromeleon Group User Name and Password, the Agent validates the account immediately. If the user name and password are correct, then the Tetra Chromeleon Agent displays a Valid status next to the field.
Section 4: Service Settings
Use this section to configure the Tetra Chromeleon Agent's settings at run time.
- Set the Processing Interval (Seconds) field to indicate how often the Tetra Chromeleon Agent runs the Injection extract task in the specified time interval. The extract task includes scanning Chromeleon to detect new or modified injections, and the generation of the RAW injection file.
- Select the Injection Service Output Folder to where you want to temporarily store the generated RAW file. After the files have been uploaded to the Tetra Data Platform successfully, the RAW file is deleted from the temporary folder to save disk space.
- Set the Chromeleon LDAP Setting to match the LDAP setting in Chromeleon. If Chromeleon enables LDAP, select Yes; otherwise, select No.
- If LDAP is not enabled (Chromeleon LDAP Setting = No), then you must enter information in the User Name, Password, and Role fields so that the Tetra Agent can access Chromeleon based on that specific user account.
- Click Advanced Settings to specify the batch size to scan and generate the injection. Click OK.
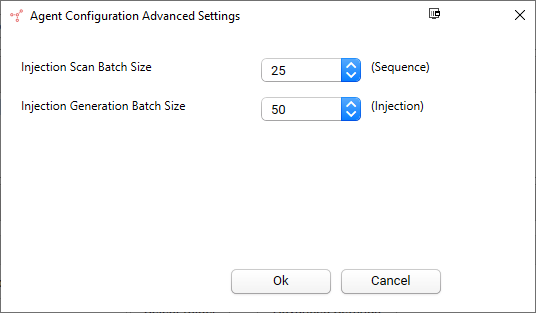
Tetra Agent Advanced Settings
Daily Agent Run ScheduleAfter you complete the initial installation and configuration, you can use a Windows Task script to re-start the Tetra Chromeleon Agent (for example, you can set it to run at 1:00 AM) and ensure that it runs constantly. For details, see [link] (https://developers.tetrascience.com/docs/using-windows-schedule-task-to-schedule-agent-services).
Set the Data Vault
The Tetra Chromeleon Agent can access all of the Data Vaults that the user has permission to access. Instead of generating the injections from all of the Data Vaults, you can select individual ones from the Data Vault list.
To select individual Data Vaults:
- From the Management Console, verify that the Tetra Chromeleon Agent has been started and has a status of Running.
- Select Data Vault from the left of the Management Console to open the Data Vault dialog. The Data Vault list takes a minute or two to populate.
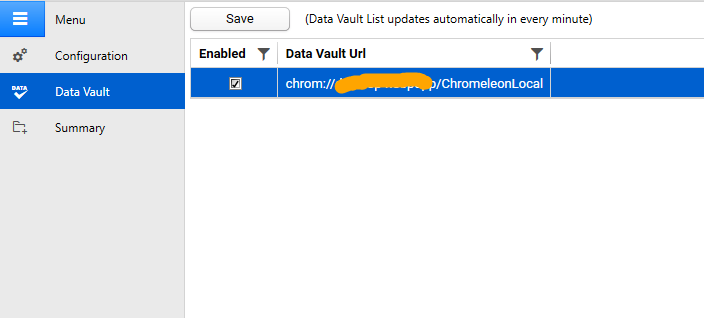
Data Vault
- Select the Data Vaults from which you want the Tetra Chromeleon Agent to extract injections.
Processing Summary
To review the Tetra Chromeleon Agent's run time progress and host server's system metrics:
- Select Summary from the left of the Management Console to open the Summary dashboard:
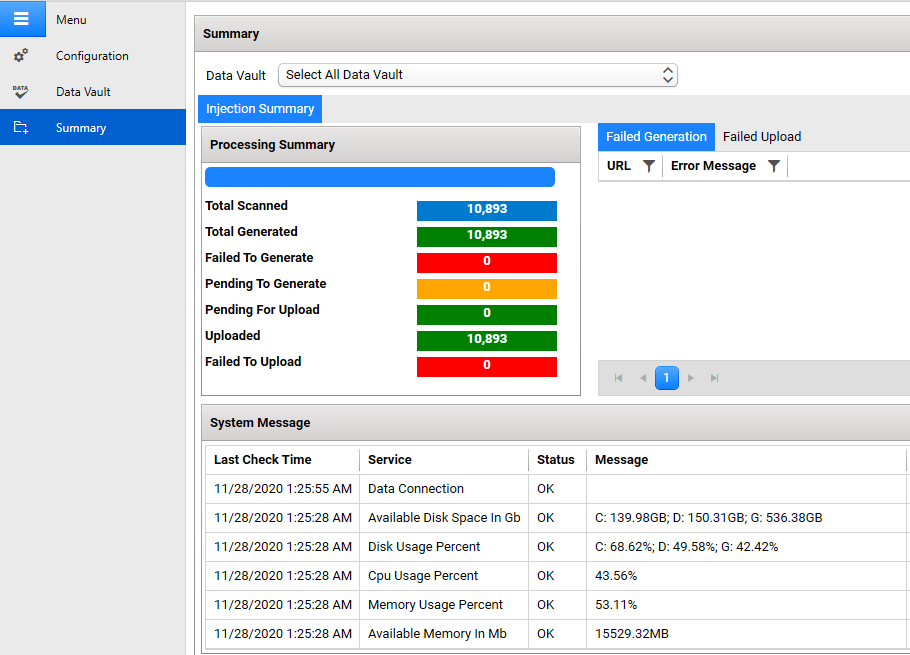
Summary Dashboard
From the summary page, you can review see how many total injections have been scanned in a given Data Vault, and how many injections have been generated and uploaded. If any failure occurs, the numbers display here. If there are any errors, the error message, and related injection URL displays on the right.
In addition to the Injection processing summary, the Agent includes system metrics on the host server as well. That information is uploaded to the Tetra Data Platform.
The Processing Summary dashboard displays this information:
- Total Scanned - Number of files scanned by the agent
- Total Generated - Number of files generated
- Failed to Generate - Number of files that failed to generate
- Pending To Generate - A pending state. When the Tetra Chromeleon Agent stops, the Pending To Generate state is reset to zero. Any file that was not completely generated is removed from the Tetra Chromeleon Agent's database and resets the counter. When the Tetra Chromeleon Agent restarts, it calculates how may files it needs to generate and starts from the beginning instead of resuming from where the file generation left off.
- Pending For Upload - A pending state. When the Tetra Chromeleon Agent stops, the Pending For Upload state is reset to zero. Any file that was not completely uploaded is removed from the Tetra Chromeleon Agent's database and resets the counter. When the Tetra Chromeleon Agent restarts, it calculates how may files it needs to upload and starts from the beginning instead of resuming from where the file upload left off.
- Uploaded - Number of files that have been uploaded to the agent successfully
- Failed To Upload - Number of files that failed to upload to the agent
Error Messages
This section displays any detailed error messages.
System Messages
This section displays the host server system metrics and messages every minute and provides these metrics:
- Data Connection (connection status between the Agent and the Tetra Data Platform)
- Available Disk Space (in GB)
- Disk Usage (as a % of the total)
- CPU Usage (as a % of the total)
- Memory Usage (in MB)
- Available Memory (in MB)
Updated 26 days ago
