Embedded Data Apps
Embedded Tetra Data Apps run in the cloud and are configured for software as a service (SaaS) application streaming back to the Tetra Data Platform (TDP). TetraScience provides many pre-built Embedded Data Apps. You can also create your own custom self-service Data Apps.
Users can access Embedded Data Apps and their documentation through the Tetra Data & AI Workspace.
For a list of available Embedded Data Apps, see Supported Data Apps.
Activate an Embedded Data App
NOTEOnly users with the following policy permissions can activate, edit, or deactivate an Embedded Data App:
To activate an Embedded Data App, do the following:
- Open the Data & AI Workspace page.
- Select the Gallery tab. The App Gallery page appears.
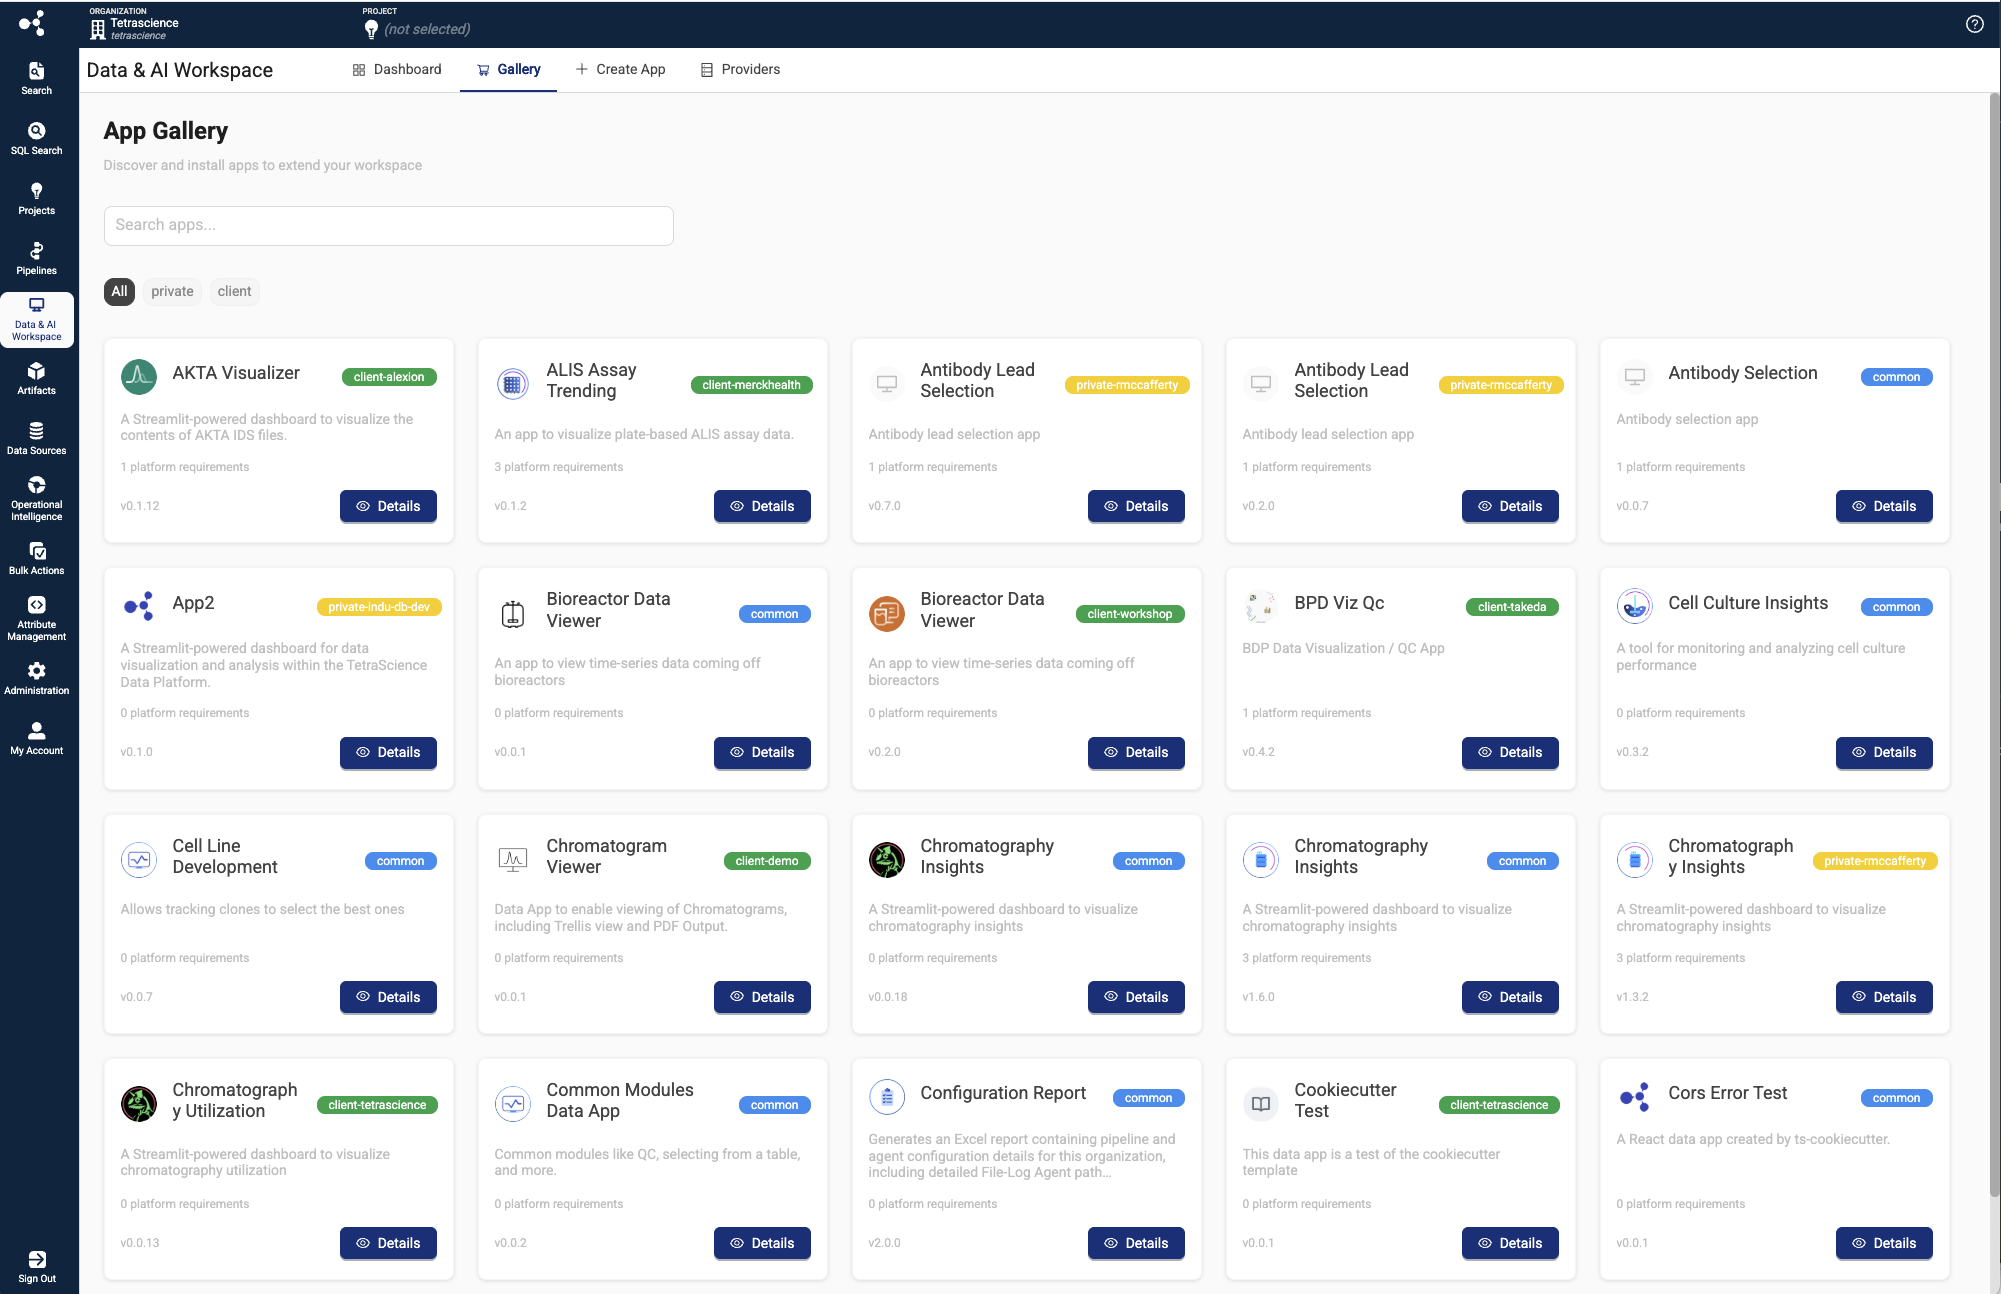
- Browse available apps. You can search for specific apps by using the search bar, or by using one of the namespace filters (All, common, private, client).
- Select the Details button on the app that you want to activate. A dialog with the app's details appears.

- Review the Platform Requirements listed, and make sure that the prerequisites are met before activating the app.
- Select which app version you want to use in the dropdown next to the app's namespace.
- (Optional) For Add New Provider, select an external system, such as Databricks or Snowflake, to connect the app to. You must first create a new Data App Provider on the Providers tab, before adding it to the app.
- (Optional) For Attribute Management, assign labels to the app for organization and access control.
- Choose Install. A new data app tile appears under the Embedded Data Apps section on your Data & AI Workspace Dashboard tab. Depending on the selected application, the app may take up to 5 minutes to activate. After activation completes, the Embedded Data App is accessible to all members of your organization.
View a Data App in Fullscreen Mode
When a Data App is displayed, you can toggle fullscreen mode to hide the left navigation panel and the top toolbar so that you can focus entirely on the app experience.
To view a Data App in fullscreen mode, do the following:
- Open the Data App that you want to view.
- Select the fullscreen toggle button. The left navigation panel and the top toolbar are hidden from view, and the app fills the available screen space.
- To exit fullscreen mode, select the fullscreen toggle button again. The left navigation panel and the top toolbar are restored to their original state.
NOTEFullscreen mode is available in both the Build and Manage (IT Mode) view and the Sci UX view. Toggling fullscreen mode doesn't affect the Data App's core functionality or layout.
Create a Self-Service Data App
The self-service Data App framework provides a secure, scalable way to create custom data visualization and analysis tools for your organization.
To create a self-service Data App, do the following:
- Open the Data & AI Workspace page.
- Select the + Create App tab. The Create Your Own App page appears.
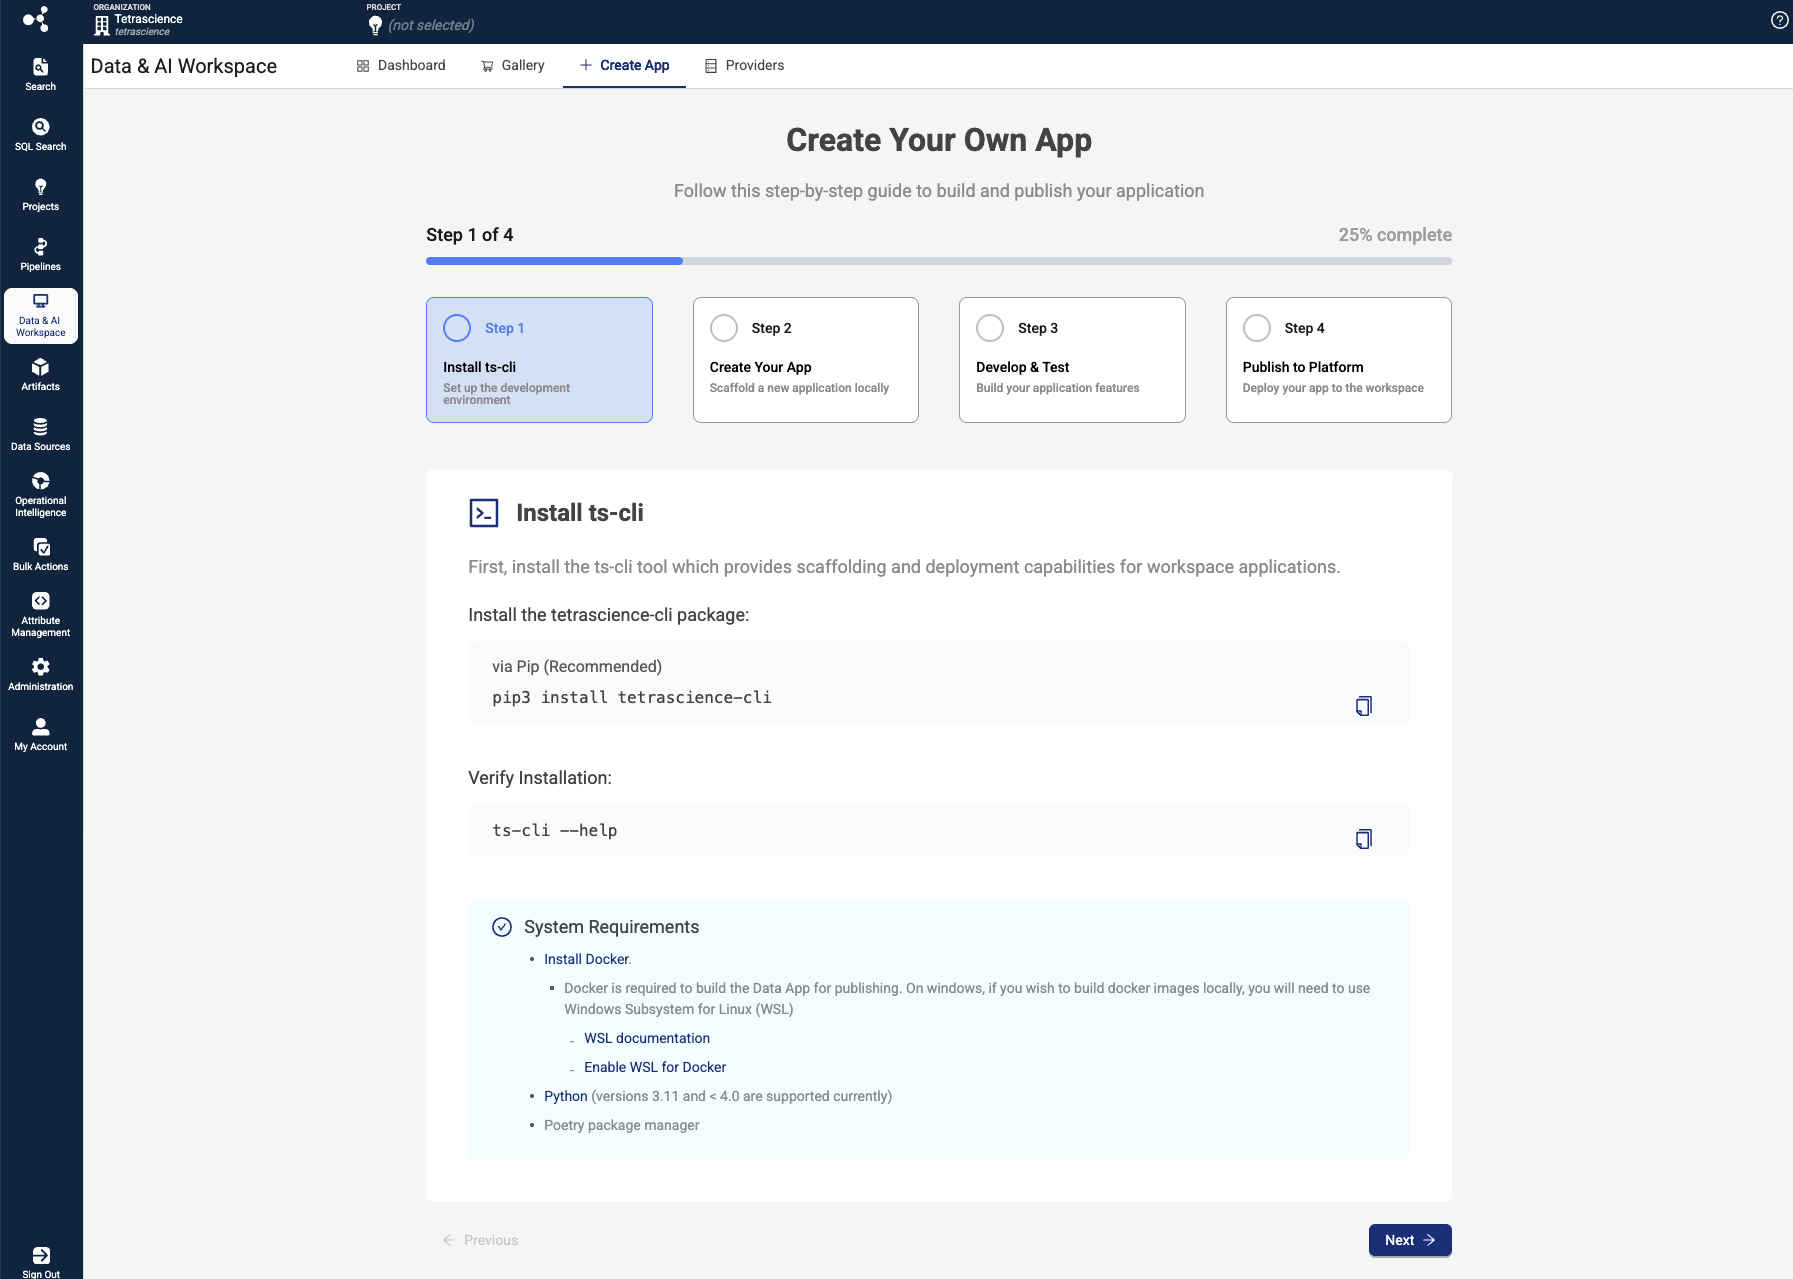
- Follow the steps provided in the software wizard to create your app locally, build your application features, and then deploy your app to the Tetra Data & AI Workspace.
For more information and to get started building your own Data Apps, see the Self-Service Data Apps FAQ and Self-Service Data Apps in the TetraConnect Hub. For access, see Access the TetraConnect Hub.
NOTEIf your Self-Service Data App doesn't load in the Tetra Data & AI Workspace, see A Self-Service Data App Won't Load in the Troubleshooting section.
Self-Service Data App Example Use Cases
You can use self-service Data Apps in many ways. Here are a few common example use cases:
-
Create interactive dashboards for data visualization and analysis.
-
Build custom data exploration tools for specific scientific workflows.
-
Develop specialized reporting applications for laboratory data.
-
Create data quality monitoring and validation interfaces.
-
Build custom data export and transformation tools.
-
Integrate with external systems and APIs for enhanced functionality.
For more information about example self-service Data App use cases, see Example Use Cases for Self-Service Data Apps in the TetraConnect Hub. For access, see Access the TetraConnect Hub.
Connect External Systems to an Embedded Data App
To connect an Embedded Data App to an external system, such as Databricks or Snowflake, first create a new Data App Provider on the Providers tab. Then, add the provider to the Data App in the Tetra Data & AI Workspace.
NOTEOnly users with the following policy permissions can create, update, or delete a Data App provider:
Create a New Data App Provider
To create a new Data App Provider, do the following:
- Open the Data & AI Workspace page.
- Select the Providers tab. The Data App Providers page appears.

- Choose Create new Provider. The Create Data App Provider dialog appears.
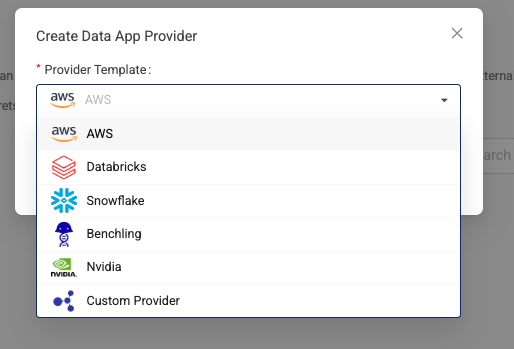
- In the Provider Template field, either select one of the preconfigured provider templates (for example, Databricks, Snowflake, Benchling, or Nvidia) or select Custom Provider to configure another provider. Then, fill in all of the required secrets fields, which vary between each external system.
- Choose Save. Then, add the provider to an app.
NOTEData App providers may exhibit the following issues when shared secrets are configured using the Custom provider option:
- Existing secrets linked to a provider can appear blank or fail to resolve correctly.
- New secrets created through the Custom provider option on the Providers page can appear as duplicate entries on the Shared Settings page. Do not delete these entries.
- Upgrading a data app after deleting a provider can return a
503error. As a workaround, do a hard refresh in your browser and retry the upgrade.To avoid these issues when using the Custom provider option, create shared secrets on the Shared Settings page using all-lowercase names, and reference them as existing secrets in the provider rather than creating new secrets directly from the Providers page. Do a hard refresh in your browser after any provider changes, especially deletion. If you encounter duplicate secret entries or secrets that fail to resolve, contact your customer account leader for assistance. A fix for these issues is in development and testing and is scheduled for a future release.
Add a Provider to an Embedded Data App
To add a provider that you've already configured to an Embedded Data App, do the following:
- Open the Data & AI Workspace page.
- Select the Dashboard tab.
- In the tile for the app that you want to add a provider to, select the three-dot menu icon. Then, choose Details. The app's details page appears.
- Select Providers.
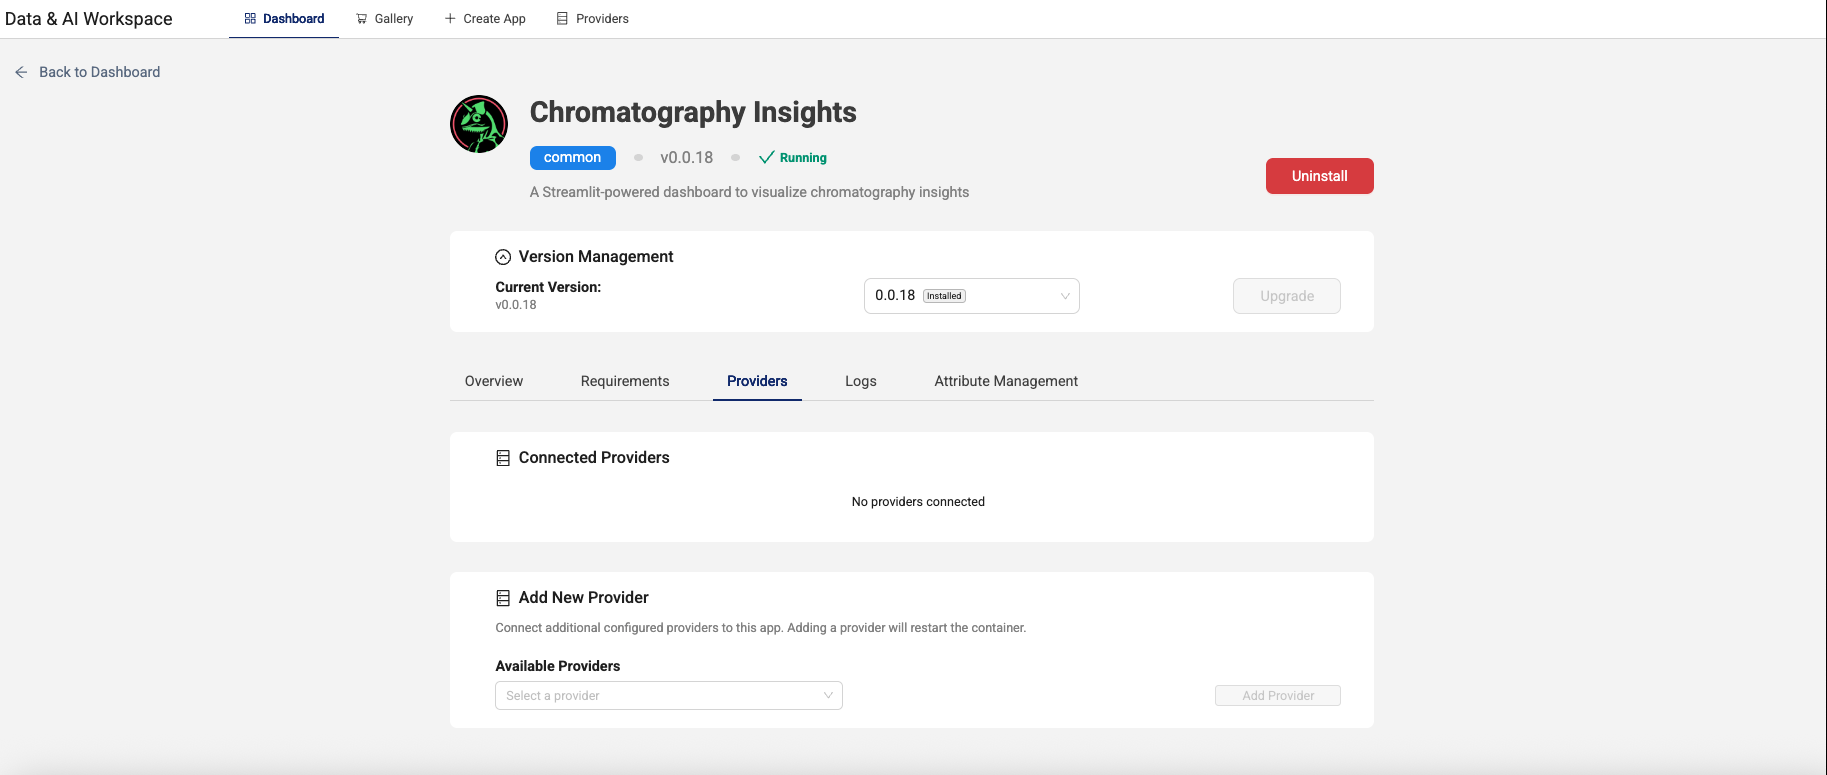
- For Add New Provider, select a provider that's already configured in your organization. If no providers are configured, choose Add Provider and then fill in the required fields to create a new provider.
Access Provider Secrets
After you add a provider to an Embedded Data App, the provider's secrets are automatically made available to your application as environment variables. This setup allows your Data App code to securely access external system credentials and configuration values.
Environment Variable Names
Environment Variable Name Format: {PROVIDER_NAME}_{FIELD_NAME}
Provider field names are converted to environment variable names using the following transformation rules:
- Provider name and field name values are converted to uppercase
- Dots (
.), spaces, and hyphens (-) are replaced with underscores (\_) - Characters that aren't letters, numbers, or underscores are removed
Determining Environment Variable Names
To determine the exact environment variable names for your specific provider configuration, do the following:
- Take note of your provider's name as it appears in the TDP user interface.
- Identify the field names you configured when creating the provider.
- Apply the naming convention transformation rules described in Environment Variable Names
- Use the resulting environment variable names in your application code.
Environment Variable Naming Examples
OpenAI Provider
- Provider name:
"OpenAI" - Field name:
"api_key" - Environment variable:
OPENAI_API_KEY
Databricks Provider
- Provider name:
"My Databricks" - Field name:
"server-hostname" - Environment variable:
MY_DATABRICKS_SERVER_HOSTNAME
Custom Provider
- Provider name:
"Lab.System-1" - Field name:
"access.token" - Environment variable:
LAB_SYSTEM_1_ACCESS_TOKEN
NOTEEnvironment variables are only available when the provider is successfully attached to your Embedded Data App. If you don't see expected values, verify that the provider has been properly added to your data app through the Manage Data Apps dialog.
Accessing Environment Variables in Your Code
Python
import os

# Access the OpenAI API key
api_key = os.environ.get("OPENAI_API_KEY")

# Access Databricks hostname
databricks_host = os.environ.get("MY_DATABRICKS_SERVER_HOSTNAME")
JavaScript/Node.js
// Access the OpenAI API key
const apiKey = process.env.OPENAI_API_KEY;

// Access Databricks hostname
const databricksHost = process.env.MY_DATABRICKS_SERVER_HOSTNAME;
Uninstall an Embedded Data App
To uninstall an Embedded Data App for your organization, do the following:
- Open the Data & AI Workspace page with an Org Admin role.
- Select the Dashboard tab.
- In the tile for the app that you want to remove, select the three-dot menu icon. Then, choose Uninstall. A dialog appears that asks you to confirm that you want to uninstall the app.
- Choose Uninstall to confirm. The Data App tile is removed from the EMBEDDED DATA APPS section of your Data & AI Workspace Dashboard and is no longer accessible to organization members.
Troubleshooting
A Self-Service Data App Won't Load
If a Self-Service Data App fails to load and is stuck in Updating status, it's likely because of one of the following potential issues:
| Potential Issue | Resolution |
|---|---|
The app has no heartbeat script (heartbeat.py) | Check your app's files to make sure that it includes the default heartbeat.py file. If the app doesn't include a heartbeat.py file, remove the deployed app from the Tetra Data & AI Workspace following the instructions in Remove a Self-Service Data App in the TetraConnect Hub. Then, add a heartbeat.py file to your app and redeploy it to the TDP. For more information, see Self-Service Data Apps and Self-Service Data App Files in the TetraConnect Hub. For access, see Access the TetraConnect Hub. |
| The app fails to import dependencies | Check your app's Logs on the app's Details page in the Tetra Data & AI Workspace and look for error messages indicating which dependencies failed to import. Then, update your Self-Service Data App Files so that the dependencies import correctly. Make sure that you check your Dockerfile import paths specifically. For apps based on Streamlit, also make sure that your poetry.lock dependency file is being regenerated after adding any other new dependencies. For more information, see Self-Service Data App Files in the TetraConnect Hub. For access, see Access the TetraConnect Hub. |
An Embedded Data App Opens in One TDP Environment and Not Another
If an Embedded Data App opens in one of your TDP environments, but not another, and it returns a 400 error code, it's likely because of a cookie caching issue.
To resolve the issue, clear the cookies in your web browser for all TDP related domains (domains ending in <*>.tetrascience.com).
Documentation Feedback
Do you have questions about our documentation or suggestions for how we can improve it? Start a discussion in TetraConnect Hub. For access, see Access the TetraConnect Hub.
NOTEFeedback isn't part of the official TetraScience product documentation. TetraScience doesn't warrant or make any guarantees about the feedback provided, including its accuracy, relevance, or reliability. All feedback is subject to the terms set forth in the TetraConnect Hub Community Guidelines.
Updated about 1 month ago