Tetra Chromeleon Agent User Manual (v2.2.x)
This guide shows how to configure and use Tetra Chromeleon Agent versions 2.2.x after an Agent is installed by using the local Agent Management Console.
To install the Agent, see the Tetra Chromeleon Agent Installation Guide (v2.2.x).
Agent Management Console Configuration
You can use the Agent Management Console to do any of the following:
- Configure Tetra Chromeleon Agent settings
- Configure Chromeleon Data Vaults for data acquisition
- Activate the Injection Service
- Activate the Report Generation Service
- Review injection and report generation Summary to troubleshoot issues
- Run commands
To get started, do the following.
Open the Agent Management Console
To open the Agent Management Console on the host server, do the following:
- On the Agent's host server, open Windows Programs.
- In the Windows Programs menu, choose TetraScience Chromeleon Agent. The Agent Management Console appears.
Configure the Agent
To configure the Tetra Chromeleon Agent after it's installed, do the following:
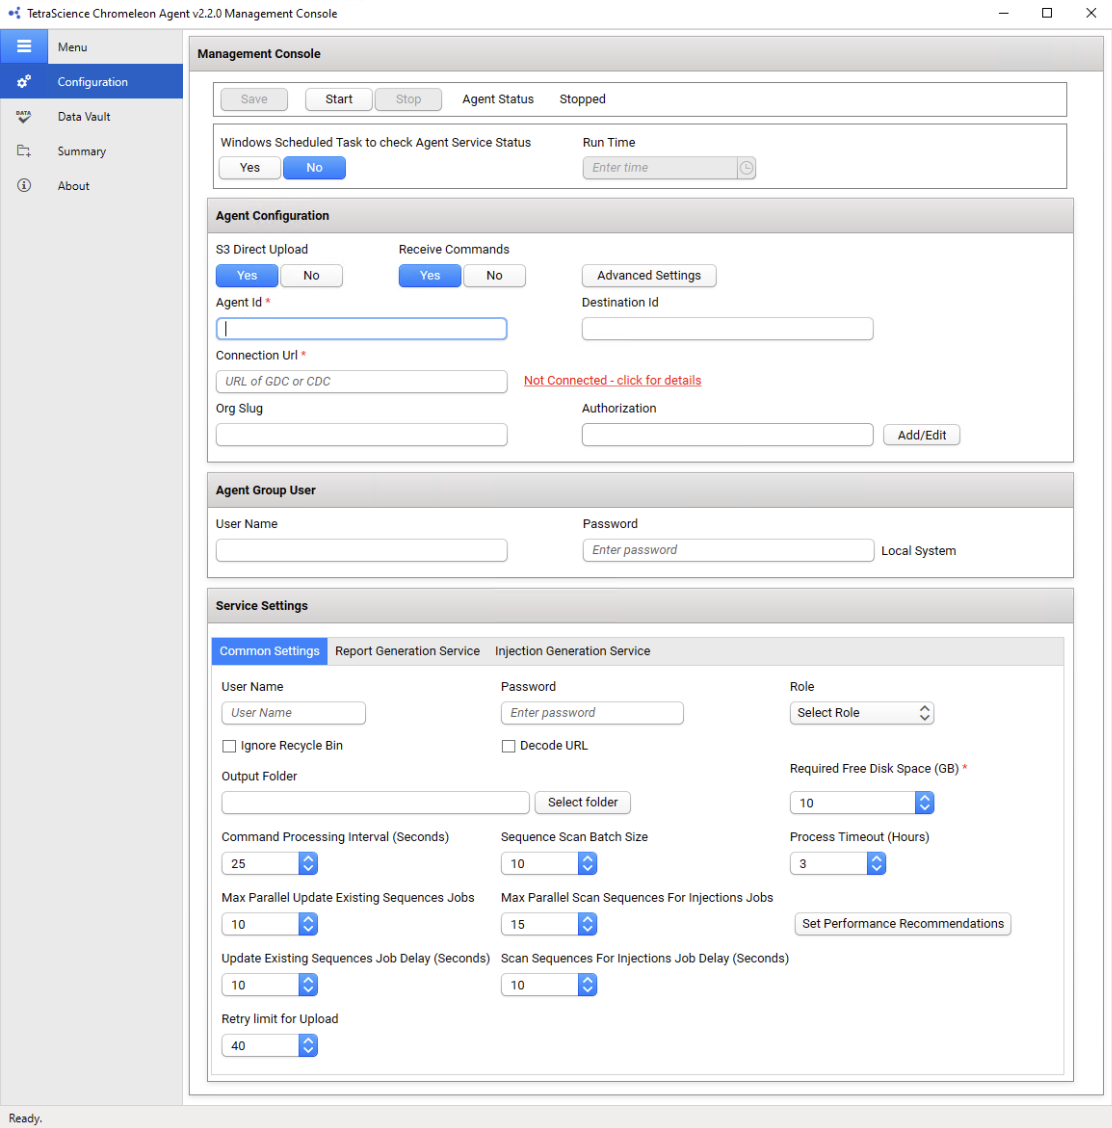
- In the Agent Management Console, select the menu icon in the left navigation menu. Then, choose Configuration. The Agent configuration page appears.
-
Configure the Agent by filling out the fields in the following sections on the Agent Configuration page:
- Agent Status
- Windows Task Scheduler
- Agent Configuration
- Agent Group User
- Service Settings
NOTEChromeleon stores the time stamps as Coordinated Universal Time (UTC). However, the date notation is displayed according to regional settings made in the operating system. The regional time is dependent on the time settings of the computer the time was acquired on.
Chromeleon generally displays time in the regional time plus the offset to the UTC. The UTC is a common time standard used across the world and is independent of location and daylight saving time.
For example, India Standard Time (IST) is UTC+5:30, which means the offset to the universal coordinated time is +5:30 hours. For 17:00:00 IST, Chromeleon would then display 17:00:00 +5:30.
Configure the Agent Status
The Agent Status section indicates the current state of the Agent's processing status, which can be either of the following:
- Agent Not Started
- Running
To save, start, or stop the Agent, do the following:
- To save the Agent configuration, choose Save.
- To start the Agent after configuring new settings, choose Start. When the Agent starts, the status indicator shows Running.
- To stop a running Agent, choose Stop. The Stop button can be selected only if the Agent is running.

Automate Status Checks by Using Windows Task Scheduler
To avoid needing to check the Agent’s service status manually, it’s recommended that you create a Windows task to perform daily status checks.
To create a Windows task, do the following:
- Under Windows Scheduled Task to check Agent Service Status, choose Yes.
- For Run Time, enter the time that you want the status check to run each day. If the Agent is stopped, then the scheduled Windows task restarts the Agent service automatically. If the Agent is running, it continues to run, and the Windows task will run at the time you selected.

NOTEIf you manually stop the Agent, the task is removed from Windows Task Scheduler. When you run the Agent without specifying an Agent Group User account, the task runs under the LocalSystem account.
Edit Agent Configuration Settings
The Agent Configuration section on the Configuration tab provides settings to do any of the following:
- Set the S3 Direct Upload option (activated by default).
- Set the Recieve Commands option to allow the Agent to receive commands from the TDP (activated by default).
- Configure Proxy Settings.
- Establish a data connection between the Agent and the TDP.
- Specify the Destination Id so that files from multiple Agents can be uploaded to the same Amazon S3 bucket. (Usually, it helps to split the load into multiple Agents for scaling horizontally.)
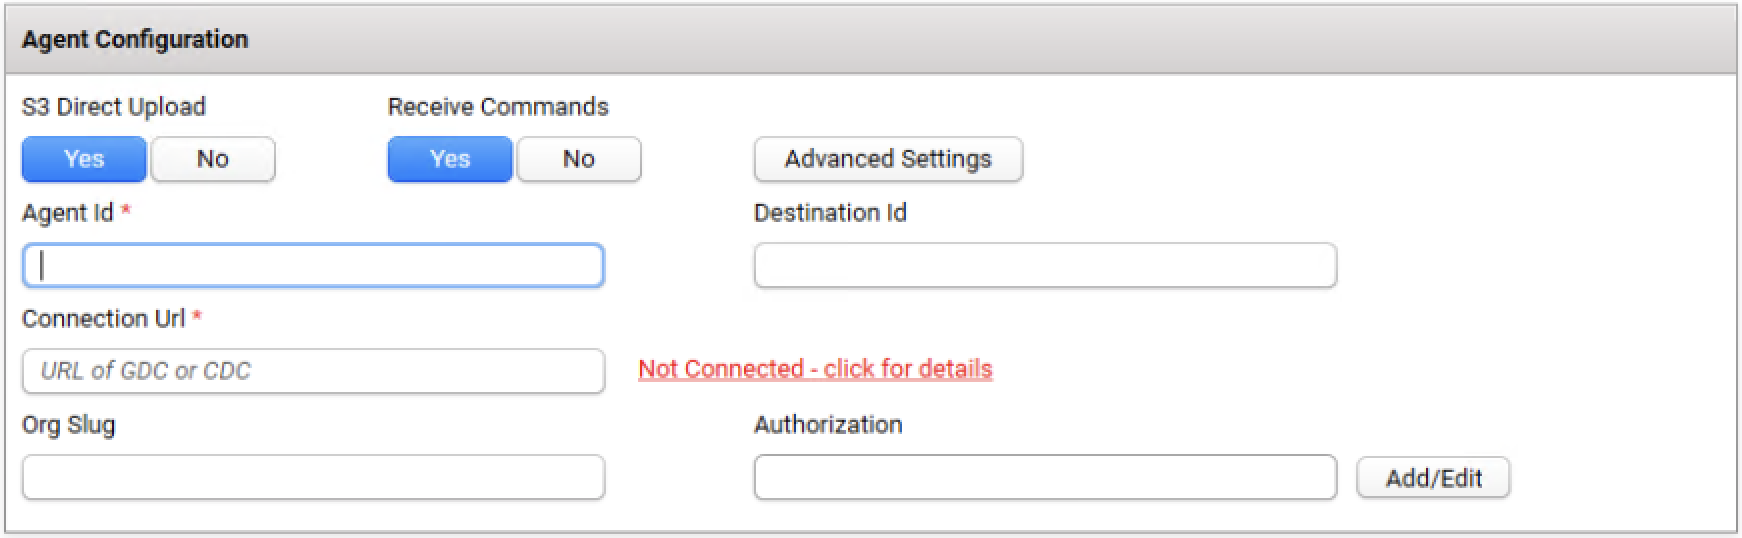
Set the S3 Direct Upload Option
To have the Agent upload files directly to your Amazon Simple Storage Service (Amazon S3) bucket, set the S3 Direct Upload option to Yes. For new installs, Yes is the default setting. When upgrading the Agent, the S3 Direct Upload setting from the previous version of the Agent is retained.
For more information, see S3 Direct Upload.
If you choose this option, keep in mind the following:
- If you use the S3 Direct Upload option with a Tetra Data Hub that uses a Generic Data Connector (GDC), you must add an L7 Proxy Connector in the same Hub where you set up the GDC. The port of the L7 Proxy Connector must also be open. For more information, see GDC Connections.
SQLite Database File BackupsTo have the Agent automatically perform regular backups of the SQLite database file, set the S3 Direct Upload option to Yes. When you enable this option, the SQLite database file (which stores agent configuration data) is uploaded to the backup bucket in the Tetra Data Lake. If an Agent failure occurs, you can restore the database file from the backup bucket and continue processing.
If you don't use the S3 Direct Upload option, it's recommended that you create periodic backups of the Agent database, which is typically stored in the installation folder under
C:\\TetraScience\<agent>\\db. In the event of a failure (for example, if the host server drive is lost), this would enable the data extraction to continue from where it left off, without having to re-upload all of the data.
Allow the Agent to Receive Commands from the TDP
To allow the Agent to securely receive and run commands from the TDP, do the following:
- From the Tetra Chromeleon Agent Management Console, in the left navigation menu, under Menu, choose Configuration.
- Verify that the Receive Commands toggle is set to Yes (the default value).
For more information, see Enter TDP Connection Settings in the Tetra Chromeleon Agent Installation Guide. For a list of supported commands, see Run Commands.
Establish a Data Connection Between the Agent and the TDP
To set up a data connection between the Agent and the TDP, enter the following information in the Agent Configuration section on the Configuration tab:
IMPORTANTWhen establishing a connection between the Agent and the TDP, keep in mind the following:
- Agent ID is required.
- The connection URL is required only if you're uploading RAW files to the TDP.
- Before you use your Agent ID and connection URL, it’s strongly recommended that you verify both with your TetraScience Customer Success Team.
- For Agent Id, enter the Agent’s ID. The Agent ID is a Universal Unique Identifier (UUID) value that’s used to connect the Agent to the TDP. To find your Agent ID, do the following:
- Sign in to the TDP.
- In the left navigation menu, choose Data Sources. Then, choose Agents. The Agents page opens.
- In the AGENT column, find the name of the Agent that you’re configuring. The Agent ID is listed below the Agent name.
- For Connection Url, enter the complete connection URL of the Connector or integration type that you’re using:
- TDP (No Connector) URL:
<https://api.tetrascience-dev.com/v1/data-acquisition/agent/> - Hub:
http://10.100.1.2:8443/generic-connector/v1/agent - Generic Data Connector (GDC) URL:
<http://10.100.1.1:8888/generic-connector/v1/agent>
- (For “TDP (No Connector)” setups only) If you’re using an Agent without a Connector, make sure that you do the following:
- For Org Slug, enter your organizational slug. To get your organizational slug, see Viewing Organization Details. The organizational slug is required when using a JSON Web Token (JWT). Adding the slug to this field attaches it to the Agent’s API request headers.
- For Authorization, select Add/Edit. Then, enter your JWT in the dialog that appears. To get a JWT, see Generate a JWT for a Service User. Then, choose Save to encrypt and save the JWT. The Agent validates the connection immediately and displays the updated connection status next to the Connection Url field.
- (Optional) To specify the Destination Id for allowing the files to be uploaded to the same S3 location from multiple agents. Destination Id is a UUID. This feature helps to split the load into multiple agents for scaling horizontally.
Configure Advanced Settings
You can configure the following options by selecting Advanced Settings on the Configuration page:
- Data Connection status check every: Indicates how often the software checks the status of the connection (heartbeat) between the TDP and the Agent. If the TDP doesn't receive a heartbeat message for more than five minutes, the platform assumes that the Agent is offline. The default value is
30seconds. - Agent log files upload every: Indicates how often the Agent uploads log files to the Data Lake. The default value is
300seconds. - Proxy Settings: Indicates what type of proxy the Agent is using (System or Custom), or if it's not using a proxy (None).
- System (default setting): Uses the system proxy specified in Windows for the service user. If basic authentication is required, you can specify a username and password for the proxy.
- Custom: Makes all of the Agent's proxy options configurable, regardless of any other settings. This proxy takes precedence over any existing system proxy or L7 proxy.
- None: Explicitly configures the Agent service to not use any proxies for web requests.
NOTEIf a system proxy requires credentials, make sure that you enter them in the Proxy Username and Proxy Password fields.
To keep the recommended settings, or to save the new values you entered, choose OK. Only consider changing these values if connection checks (heartbeat) frequency needs to be changed, or if logs files are needed to be uploaded to the TDP at a different frequency.
Configure the Agent Group User
The Agent Group User is the Windows service account that runs the Tetra Chromeleon Agent.
To configure the Agent Group User, do the following:
- In the Agent Group User section, for User Name, enter the user name.
- For Password, enter the password.
The Agent then validates the account. If the user name and password are correct, the Agent displays a Valid status in the console.

NOTEIf you're using a Windows local account, add .\ at the front of the user name. For example, if the user name is Tetra, enter .\Tetra.
Configure Agent Common Service Settings
To configure the Agent's service settings, enter the following information in the Common Settings of the Service Settings section on the Configuration tab:
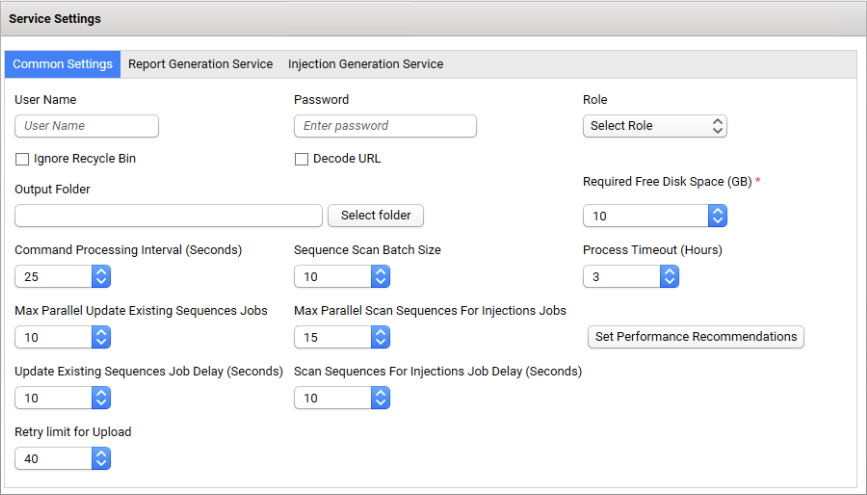
- (When Chromeleon User Mode is activated only) For User Name, Password, and Role, specify the credentials of a Chromeleon local user or a Lightweight Directory Access Protocol (LDAP) authenticated user. This configuration allows the Agent to access Chromeleon through a specific user account. The credentials you enter must be for a valid Chromeleon user account. A busy indicator appears while the user account is being verified. The Agent cannot be started until the Chromeleon user account is verified.
- For Ignore Recycle Bin, option to check the box to skip the generation of any deleted sequences and injections in data vaults.
- For Decode Injection URL, option to check the box to escape URL encoding in the injections and/ or report generation path created in Amazon S3.
IMPORTANTIf you're upgrading from a previous version of the Tetra Chromeleon Agent, selecting the Decode Injection URL option can result in new RAW JSON files for changed injections or reports in the new Amazon S3 path. For more information, see What is the impact of changing the Decode Injection URL setting in Agent UI?
- For Output Folder, enter the directory where you want ther Agent to temporarily output RAW files. When the files are uploaded to TDP, the RAW files are deleted from this output folder.
- For Required Free Disk Space (GB), enter the minimum required free disk space required for the Agent to process an injection. The default setting is 10 GB.
NOTEThe free disk space refers to the output disk. When the Agent processes an injection or report, it first checks if the machine meets or exceeds the minimum required free disk space value. If the machine meets the required free disk space, then it processes the injection or report. If it does not, then the machine writes a log message while the Agent pauses and waits for other injections or reports in progress to finish processing. The Agent then waits for files to finish uploading to the TDP before it attempts to process new injections or reports again.
RAW Files May Use a Large Amount of Disk SpaceIf you decide to retain the RAW files, be aware that RAW files may use most of the disk space. If the available disk space is less than what you've indicated in the Required Free Disk Space setting, then the Agent will pause the Injection or Report generation. Use the Summary page to check the available disk space.
- Command Processing Interval (seconds): Provides the frequency for processing commands from TDP if Receive Commands is enabled. The default setting is 25 seconds.
- Sequence Scan Batch Size: Provides the setting for the size of the batch for detecting new sequences or changes to sequences. The batch sizes that you choose need to balance the application’s footprint and overall throughput. The number can be adjusted based on the data type. Injections with 3D data fields will generate large RAW JSON files. The default setting is 10.
- Process Timeout (Hours): This setting is to prevent the scan process to hang due to unhandled exceptions or unknown errors. The default is 3 Hours.
- Max Parallel Update Existing Sequences Jobs: Provides the setting for maximum parallel processes to scan and update changes to sequences previously detected and uploaded by the Agent. The default is 10.
- Max Parallel Scan Sequences for Injections Jobs: Provides the setting for maximum parallel process to scan for new sequences generated in the Data Vault using the Chromeleon SDK. The default is 15.
- Update Existing Sequences Job Delay (Seconds): This setting allows you to specify a waiting period between scans for changes in the existing sequences. If you do not suspect to have many changes or updates to already ingested Sequences, this delay can be set longer such that the scan happens less frequently. The default is 10 seconds.
- Scan Sequences For Injections Job Delay (Seconds): This setting allows you to specify a waiting period between scans for new sequences in the Data Vault. If you want the Agent to scan less frequently, you can increase the delay. The default is 10 seconds.
- Retry limit for Upload: This setting is to prevent the upload process from retrying indefinitely when the RAW file fails to upload to TDP. The default is 40.
- Set Performance Recommendations: This setting can recommend defaults to override existing defaults based on your compute resources. To further optimize performance, it is recommended for you to fine tune these settings as needed.
Configure Report Generation Service Settings
To configure the Agent's Report Generation Service settings, enter the following information in the Report Generation Service portion of the Service Settings section on the Configuration tab:
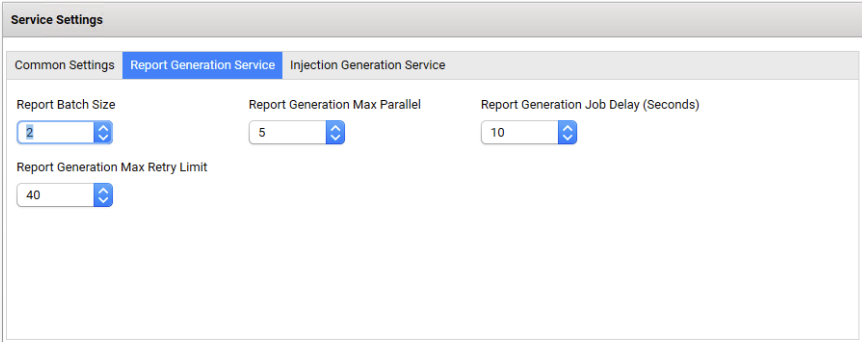
- Report Batch Size: Provides the setting for size of the batch for Report Generation. The batch sizes that you choose need to balance the application’s footprint and overall throughput. The default setting is 2.
- Report Generation Max Parallel: Provides the setting for maximum parallel processes to Generate Reports. The default is 5.
- Report Generation Job Delay (Seconds): This setting allows you to specify the waiting period between when reports are generated. The default is 10 seconds.
- Report Generation Max Retry Limit: This setting is to prevent the reports from attempting to generate indefinitely and hang due to unhandled exceptions. The default is 40.
Configure Injection Generation Service Settings
To configure the Agent's Injection Generation Service settings, enter the following information in the Injection Generation Service portion of the Service Settings section on the Configuration tab:
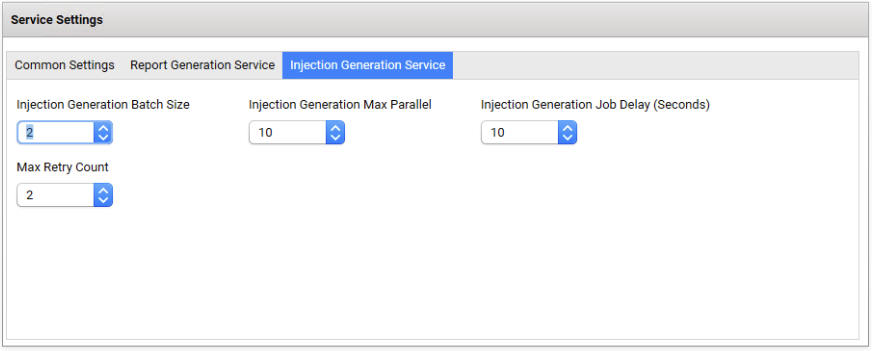
- Injection Generation Batch Size: Provides the setting for size of the batch for Injection Generation. The batch sizes that you choose need to balance the application’s footprint and overall throughput. The default setting is 2.
- Injection Generation Max Parallel: Provides the setting for maximum parallel processes to Generate Injections. The default is 10.
- Injection Generation Job Delay (Seconds): This setting allows you to specify the waiting period between when injections are generated. The default is 10 seconds.
- Max Retry Count: This setting is to prevent the injections from generating indefinitely and hang due to unhandled exceptions. The default is 2.
Configure Data Vaults
The Data Vault tab provides settings to do any of the following:
- Configure Chromeleon Servers and Data Vaults for the Tetra Chromeleon Agent to monitor.
- Activate Injection and Report Generation Services to acquire RAW data.
- Configure Report Generation Settings to acquire the Sequence Electronic Report for analysis.
To configure the Data Vaults for the Tetra Chromeleon Agent to monitor and acquire RAW Data, do the following:
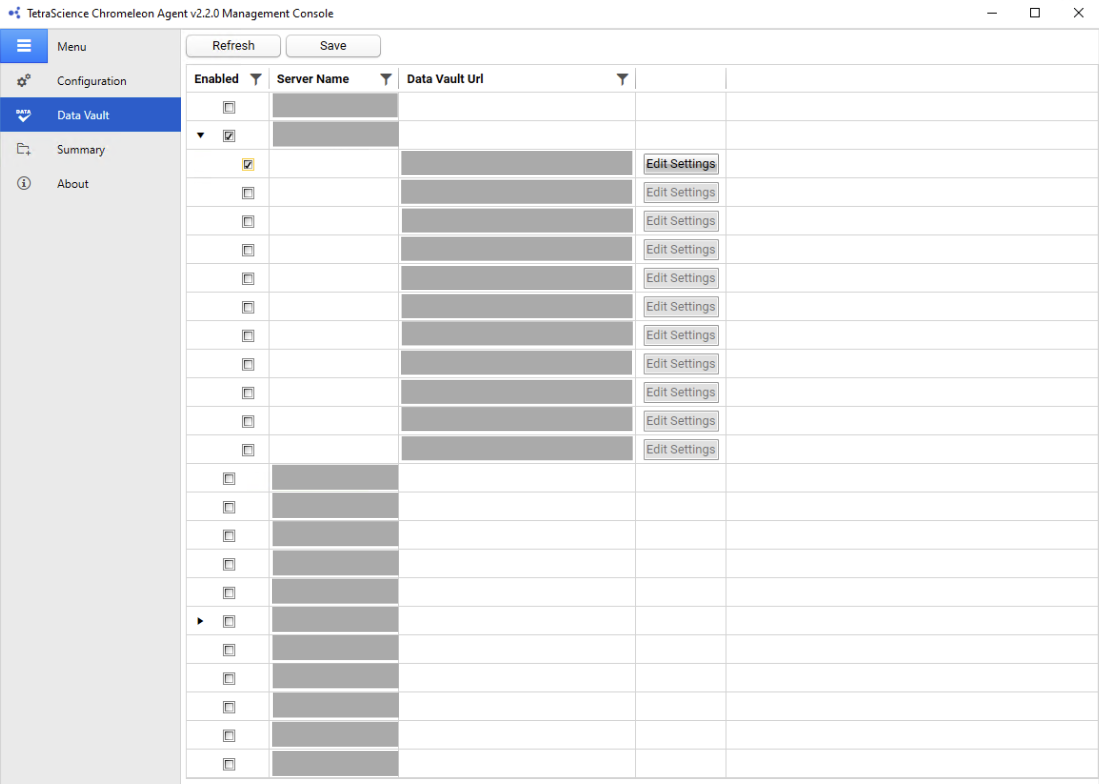
In the Agent Management Console, select the menu icon in the left navigation menu. Then, choose Data Vault. Select Refresh and the list of available Servers, Data Vaults accessible by the User Name, Password, and Role specified in Configuration will populate.
- Enable or disable the Chromeleon Servers and Data Vaults
- You can select Data Vaults only when their associated Data Server is activated.
- If a Data Server or a Data Vault is unchecked when the Agent is running, the Agent will postpone the pending injection generations that belong to those Data Vaults.
Data Vault Settings
To configure specific Data Vault settings, select Edit Settings to modify the following:
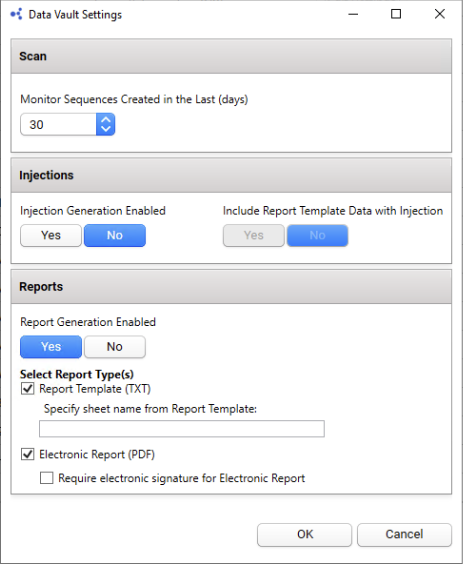
Data Vault Scan Settings
- Monitor Sequences Created in the Last (days): This setting is used to limit the number of sequences scanned in the Data Vault for detecting changes to optimize Agent performance. Specify the last number of days that the Agent continues to monitor for sequences created within this range. This range will be a rolling window from the current day. The default is 30 Days.
Data Vault Injections Settings
- Injection Generation Enabled: The setting to enable or disable acquiring injection RAW data. Yes to enable Injection Generation. No to disable Injection Generation. The default is No. On Upgrade, the Injection Generation Enabled setting will persist.
- Include Report Template Data with Injection: The setting to enable or disable the inclusion of Report Template Data in the Injection RAW data. YES to include Report Template Data in Injection RAW data. No to not include Report Template Data in Injection RAW data. The default is NO. On Upgrade, the Include Report Template Data with Injection setting will persist.
Data Vault Reports Settings
- Report Generation Enabled: The setting to enable or disable the generation of Sequence Reports from Chromeleon. Yes to enable Report Generation. No to disable Report Generation. The default is NO. On Upgrade, the Report Generation Enabled setting will persist.
When Report Generation Enabled is Yes, you can generate Sequence Reports from Chromeleon in the following file formats:
- Report Template (TXT): Checking this setting will generate a TXT file from the sheet name as defined in Specify sheet name from Report Template in the default Report Template defined in your Chromeleon Sequence
- Specify sheet name from Report Template: The name of one sheet, case and spacing sensitive, from the default Report Template for the Data Vault. The Agent currently only supports generating a single sheet from a Report Template. When Report Generation is enabled and Report Template (TXT) is checked, the sheet name for Report Generation will apply to all Sequences in the Data Vault.
- Electronic Report (PDF): Checking this setting will generate an Electronic Report as a PDF when the Electronic Report for a Sequence is updated in Chromeleon. With this setting, electronic signatures are not required to generate the Electronic Report.
- Require electronic signature for Electronic Report: This setting is used to only generate Electronic Reports that are electronically signed.
Review Injection and Report Generation Summaries
The Summary tab provides settings to do the following:
- Configure Summary Views per Data Vault
- View Injection Processing Summary
- View Report Template Processing Summary
- View Electronic Report Processing Summary
View Injection Summary
The Tetra Chromeleon Agent generates summaries for the injection data acquisition processes to inform progress and any errors that may occur.
Injection Processing Summary
The Injection Processing Summary shows the scan, generation and upload status of injections for a selected Data Vault (or all Data Vaults).
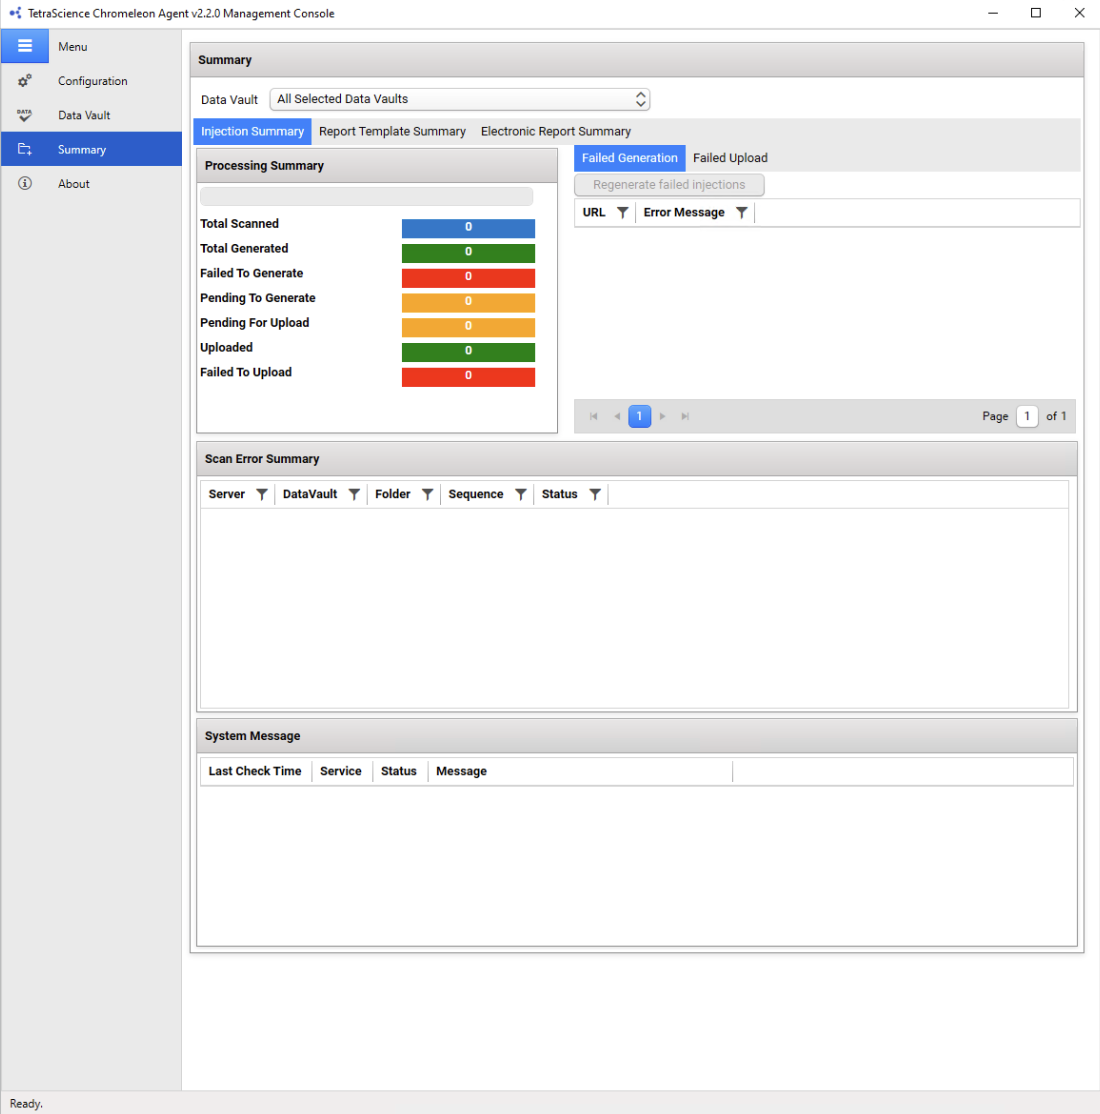
The Processing Summary displays the following information:
- Total Scanned: Number of Injections scanned by the Agent for the Data Vaults enabled. If the path of a Sequence is changed, the Injections in the Sequence are counted twice.
- Total Generated: Number of Injections the Agent successfully generated in the selected Data Vault. If a Sequence is modified, the Injections are removed from this count. If an individual Injection is modified, the Injection is counted again.
- Failed to Generate: Number of Injections that the Agent has failed to generate for the Data Vault(s) enabled.
- Pending to Generate: Number of Injections awaiting generation for the Data Vault(s) enabled.
- Pending for Upload: Number of successfully generated Injections awaiting upload for the Data Vault(s) enabled.
- Uploaded: Number of Injections that the Agent successfully uploaded for the Data Vault(s) enabled.
- Failed to Upload: Shows the total number of Injections that the Agent has failed to upload for the Data Vault(s) enabled.
Review Injection Generation Error and Injection Upload Errors
To review injections that were scanned but couldn't be generated because of an error, look at the Failed Generation tab.

To review injections that were generated, but couldn't be uploaded to the TDP because of an error, look at the Failed Upload tab.

To regenerate and re-upload the failed injections manually, select a row in the grid and click Regenerate failed injections or Reupload failed injections in the appropriate grid.
Review Scan Error Summary
To review sequences that could not be scanned, look at the Review Scan Error Summary tab. These issues can result from network connection or access permissions issues and can happen to the Data Server, Data Vault, Folder, or Sequence. If the issue is resolved, the error is removed from the list.
Review System Messages
The Tetra Chromeleon Agent generates host server system metrics every minute and provides the following metrics:
- Data Connection (connection status between the Agent and the Tetra Data Platform)
- Available Disk Space (in GB)
- Disk Usage (as a percent of the total)
- CPU Usage (as a percent of the total)
- Memory Usage (in MB)
- Available Memory (in MB)
View Report Template Summary
The Tetra Chromeleon Agent generates summaries for the Report Template data acquisition processes to inform progress and any errors that may occur.
Report Template Processing Summary
The Report Template Processing Summary shows the scan, generation and upload status of injections for a selected Data Vault (or all Data Vaults).
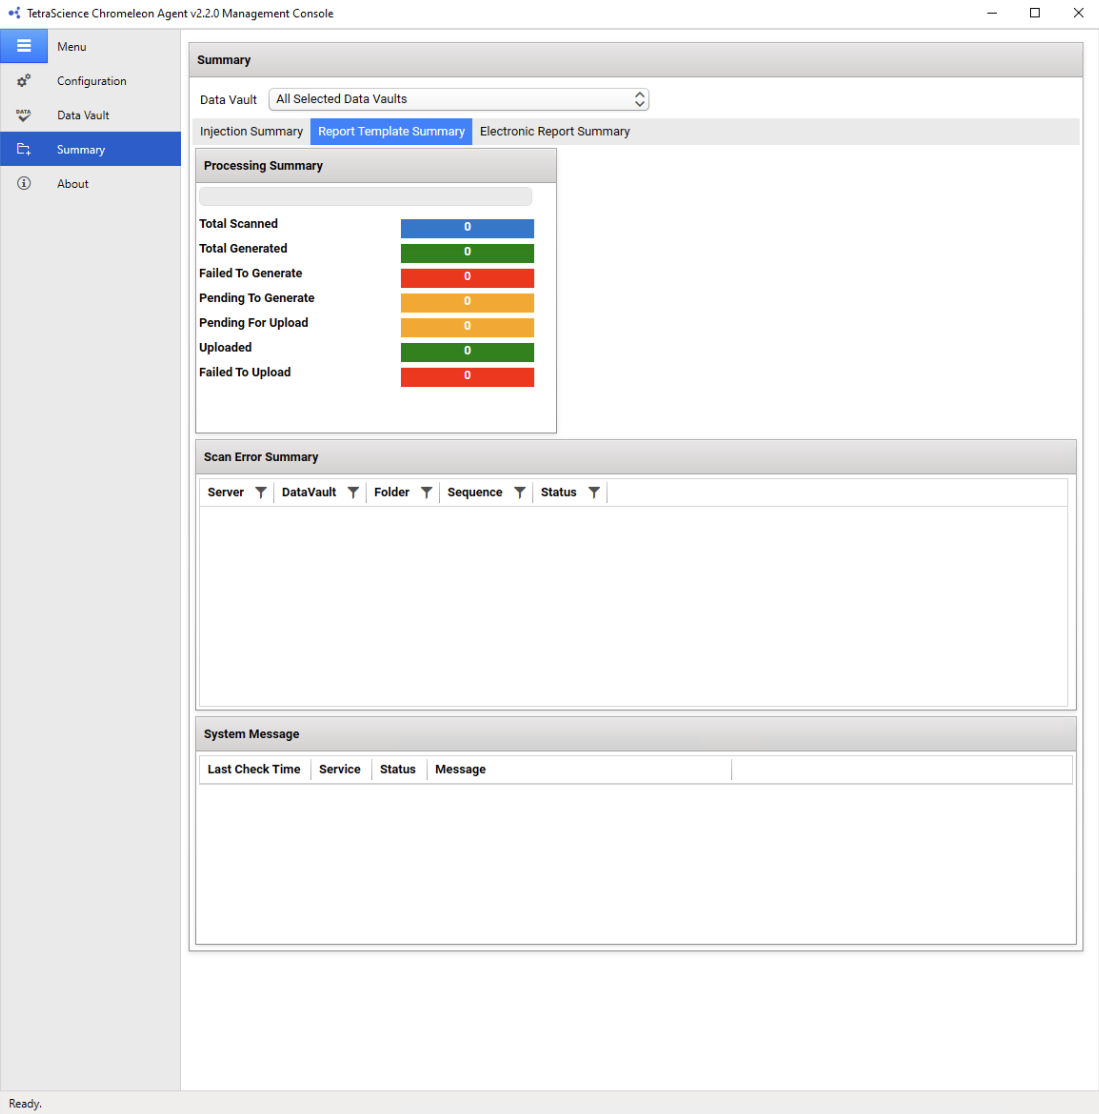
The Report Template Processing Summary displays the following information:
- Total Scanned: Number of submitted sequences with new reports scanned by the Agent for the Data Vault(s) enabled.
- Total Generated: Number of reports the Agent successfully generated utilizing the defined sheet in the Report Template for the Data Vault(s) enabled.
- Failed to Generate: Number of reports generated from the sheet specified in the Report Template that the Agent has failed to generate for the Data Vault(s) enabled.
- Pending to Generate: Number of reports generated from the sheet specified in the Report Template awaiting generation for the Data Vault(s) enabled.
- Pending for Upload: Number of successfully generated reports from the sheet specified in the Report Template awaiting upload for the Data Vault(s) enabled.
- Uploaded: Number of reports generated from the sheet specified in the Report Template that the Agent successfully uploaded for the Data Vault(s) enabled.
- Failed to Upload: Shows the total number of reports generated from the sheet specified in the Report Template that the Agent has failed to upload for the Data Vault(s) enabled.
View Electronic Report Summary
The Tetra Chromeleon Agent generates summaries for the Electronic Report data acquisition processes to inform progress and any errors that may occur.
Electronic Report Processing Summary
The Electronic Report Processing Summary shows the scan, generation and upload status of injections for a selected Data Vault (or all Data Vaults).
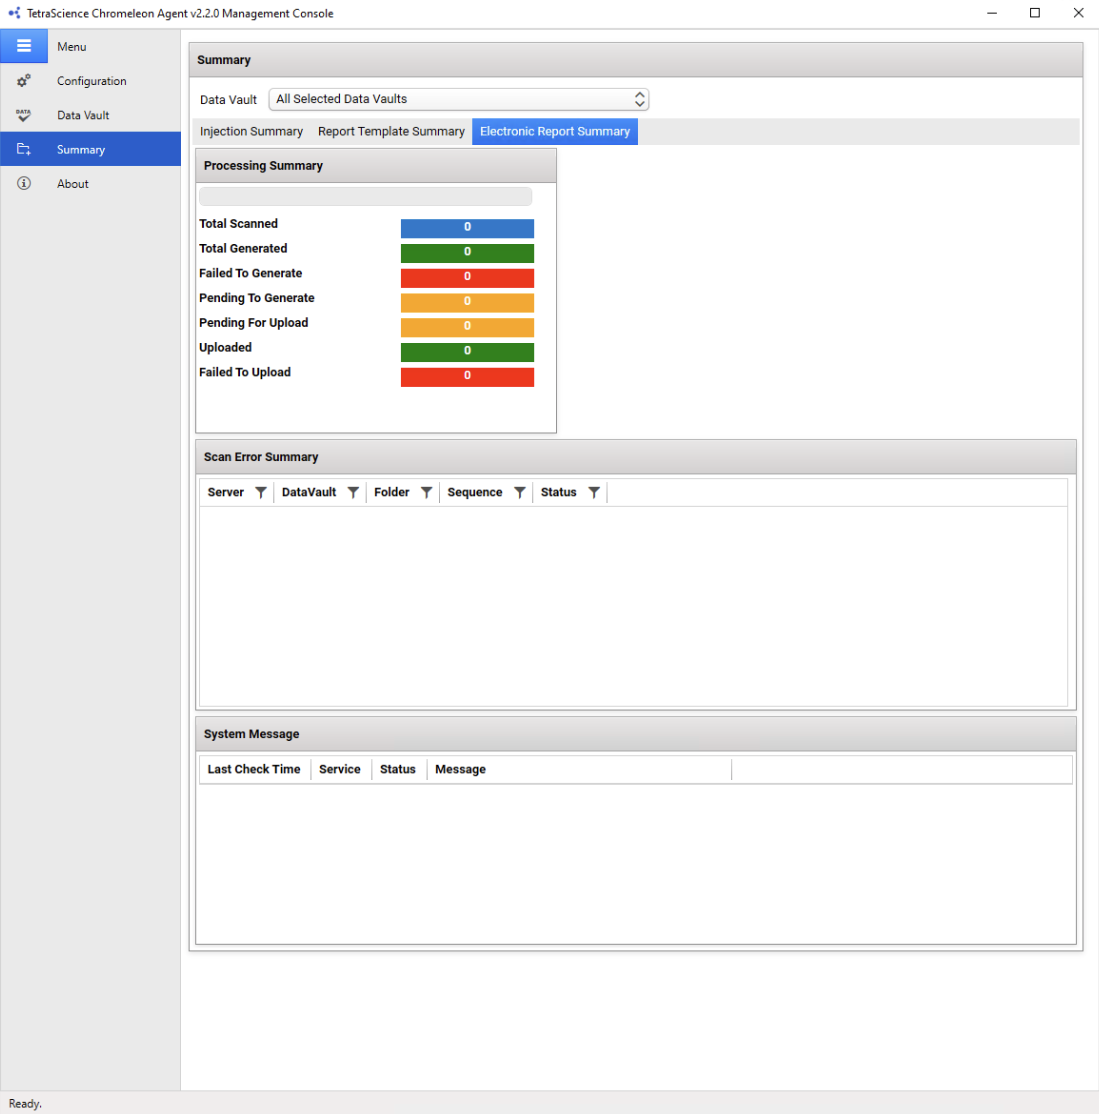
The Electronic Report Processing Summary displays the following information:
- Total Scanned: Number of sequences with Electronic Reports scanned by the Agent for the Data Vault(s) enabled.
- Total Generated: Number of Electronic Reports the Agent successfully generated for the Data Vault(s) enabled.
- Failed to Generate: Number of Electronic Reports that the Agent has failed to generate for the Data Vault(s) enabled.
- Pending to Generate: Number of Electronic Reports awaiting generation for the Data Vault(s) enabled.
- Pending for Upload: Number of successfully generated Electronic Reports awaiting upload for the Data Vault(s) enabled.
- Uploaded: Number of Electronic Reports that the Agent successfully uploaded for the Data Vault(s) enabled.
- Failed to Upload: Shows the total number of Electronic Reports where the Agent has failed to upload for the Data Vault(s) enabled.
View Chromeleon Cultural Settings
To see Chromeleon cultural settings that are set on the host server, such as decimal or dot symbols, date formatting, and negative number formatting, do the following:
- Open the RAW JSON file for the injection in the TDP.
- Find the
"AgentContext"and"AgentHostServer"sections. The Chromeleon Cultural settings are listed here.
Example Chromeleon Cultural Settings as They Appear in a RAW JSON File
{
"RawJsonSchemaVersion": "v2",
    "AgentVersion":"v2.0.0",
    "AgentContext": {
        "AgentHostServer": {
            "CultureInfo": "en-US",
            "ShortDate": "M/d/yyyy",
            "LongDate": "dddd, MMMM d, yyyy",
            "ShortTime": "h:mm tt",
            "LongTime": "h:mm:ss tt",
            "DecimalSymbol": ".",
            "DigitGroupingSymbol": ",",
            "NegativeSignSymbol": "-",
            "NegativeNumberFormat": "LeadingNegativeWithNoSpace"
            }
      }
    ...
  }
"NegativeNumberFormat" Patterns
| RAW JSON Name | Associated Pattern |
|---|---|
| 0 - Parenthesis | “(n)” |
| 1 - LeadingNegativeWithNoSpace | “-n” |
| 2 - LeadingNegativeWithSpace | “- n” |
| 3 - TrailingNegativeWithNoSpace | “n-” |
| 4 - TrailingNegativeWithSpace | “n -” |
Generate Chromeleon Sequence Reports
The Tetra Chromeleon Agent v2.2.0 supports automatically generating reports as a TXT file from one sheet within the default Report Template in a Sequence and/or generating the Electronic Report as a PDF that is associated with the Sequence.
Generate Text-based Report from the Report Template
The Tetra Chromeleon Agent can generate a text-based report for a Sequence using the default Report Template. This text-based report can contain result tables, formulas, injection summary tables and is in a format that can be parsed and processed in a LIMS or ELN.
Prerequisites
- Chromeleon Sequence must be Submitted and electronically signed
- Default Report Template must be defined for the Sequence
- Default Channel must be defined for the Sequence
Configure the Agent and Chromeleon to Get Reports
- Make sure the Data Vault is configured in the Agent to acquire Report Templates (
TXT), see Data Vault Reports Settings. - Setup a Chromeleon Sequence using Create Sequence Command, eWorkflow Creation Command or setup a new Sequence using Chromeleon. Refer to the Thermo Fisher Chromeleon 7.x.x Quick Start Guide on how to set this up in the Chromeleon Console.
IMPORTANT
- Make sure that your Sequence is configured to Submit sequences for electronic signature. Approve and Review are optional for Report Generation. If enabled, subsequent versions of the Report will be generated on changes with the electronic signature.
- Default Report Template must also be specified with the Sequence, otherwise the electronic report will not generate.
- Start and run your Sequence in Chromeleon. Now, Chromeleon Sequence state is Run Finished.
- Submit the Sequence. An Electronic Report is generated in Chromeleon. Then, electronically sign the Sequence.
- The Agent detects that the Sequence is submitted and generates the text-based report from the Sheet specified in the Data Vault Reports Settings within the Report Template. After the Report is generated, it's uploaded to the TDP.
NOTEIt's recommended that you create a new sheet in your Report Template, TetraScience Sheet Template for Report Generation. This template follows a structure that is compatible with the Tetra Data Schema Slug:
thermofisher-chromeleon-reportsto be used for processing in ELN or LIMS. If you use one of your existing sheets in the Report Template and want to consume the report data for processing, a custom pipeline may be required.
- The sheet name is specified.
Generate New Versions of the Text-Based Report
The first version of the text-based report is generated when the Chromeleon Sequence is Submitted, Signed, and an Electronic Report is associated with the Sequence in Chromeleon.
Generate Additional Versions of the Report
- If the Sequence in Chromeleon requires Approval with Electronic Signature and the Sequence is Approved, another version of the text-based report is generated.
- If the Sequence in Chromeleon requires a Reviewer with Electronic Signature and the Sequence is Reviewed, another version of the text-based report is generated.
- If the Sequence needs to be modified, you can change the submit status to Remove Submit in Chromeleon. After changes are made to the Sequence and the Sequence is Submitted again, the Agent detects a change to the Sequence and generates another version of the text-based report.
Generate Electronic Reports
The Tetra Chromeleon Agent can generate the Electronic Report as a PDF-format that is associated with the Sequence in Chromeleon. The Electronic Report for a Sequence can contain the following:
- Sequence Summary which includes the list of injections, instrument methods, processing methods, and additional details about the Sequence
- Reports as defined in the Report Template such as Calibration and System Suitability Testing
- Chromatograms and Results such as Peak Data per injection: Retention Time, Area, Height, Width, and more
Prerequisites
- An Electronic Report must be associated with the Sequence(s) in Chromeleon.
Configure the Agent and Chromeleon to Acquire an Electronic Report for a Sequence Into the TDP
- Make sure the Data Vault is configured in the Agent to acquire Electronic Report (
PDF). For more information, see Data Vault Reports Settings. - Set up a Chromeleon Sequence by using the Create Sequence Command or setup a new Sequence using Chromeleon. Refer to the Thermo Fisher Chromeleon 7.x.x Quick Start Guide on how to set this up in the Chromeleon Console.
- Start and run your Sequence in Chromeleon. Now, Chromeleon Sequence state is "Run Finished"
- Autoreport will generate an electronic automatically, otherwise generate an Electronic Report using the Chromeleon Chromatography Studio in Chromeleon and associate it with the Sequence
- The Agent will detect that the Electronic Report is generated as a part of the Sequence. When the Electronic Report is generated, it will be uploaded to TDP.
Generate New versions of the Electronic Report
If only Electronic Report is enabled, the first version of the Electronic Report is generated when an Electronic Report Object is associated with the Sequence in Chromeleon.
If Require electronic signature for Electronic Report is enabled, the first version of the Electronic Report is generated after the sequence is submitted and electronically signed.
Generate Additional Versions of the Report
If only Electronic Report is enabled, when the Electronic Report is modified or updated, it generates a new version of the Electronic Report and uploads it to the TDP.
If Require electronic signature for Electronic Report is enabled, the following occurs:
- A new version of the Electronic Report is generated after the Sequence is reviewed and approved.
- If the Sequence needs to be modified, you can change the submit status to Remove Submit in Chromeleon. After changes are made to the Sequence and the Sequence is Submitted again, the Agent detects a change to the Sequence and generates additional versions of the Electronic Report.
Run Commands
You can use the Tetra Chromeleon Agent and TDP Command Service to programmatically do any of the following:
- Create a Sequence from the TDP to Chromeleon by using Worklist
- Create or append to a Sequence from the TDP to Chromeleon by using an eWorkflow
- Notify the Tetra Chromeleon Agent from the TDP that updates have occured to sequences in Chromeleon
- Get user and role information from Chromeleon and upload it to the TDP
Documentation Feedback
Do you have questions about our documentation or suggestions for how we can improve it? Start a discussion in TetraConnect Hub. For access, see Access the TetraConnect Hub.
NOTEFeedback isn't part of the official TetraScience product documentation. TetraScience doesn't warrant or make any guarantees about the feedback provided, including its accuracy, relevance, or reliability. All feedback is subject to the terms set forth in the TetraConnect Hub Community Guidelines.