Workflow Creation Assistant User Guide (v1.0.x)
This guide shows how you can set up and use the Workflow Creation Assistant to quickly build and deploy your own custom lab data automation workflows, without needing to write any code or rely on internal IT teams to build custom data integrations.
Prerequisites
Workflow Creation Assistant v1.0.x requires the following.
TDP Requirements
All Workflow Creation Assistant setups must meet the following minimum Tetra Data Platform (TDP) requirements:
- v4.2.0 or higher (v4.3.1 or higher is recommended for full functionality).
- Customers must contact their customer account leader to activate the app in their TDP environment.
- App users must have either Developer or Administrator TDP permissions.
- A Tetra Data Pipeline deployed in the same TDP org as the Workflow Creation Assistant that uses one of the following protocols:
- For Revvity Signals integrations: Use the
python-exec-signals:v1.0.0protocol or higher. The pipeline should be configured with access credentials to Revvity Signals, and pipeline triggers to process IDS files that become available in the TDP - For Benchling integrations: Use the
python-exec-benchling:v1.0.0protocol or higher. The pipeline should be configured with access credentials to Benchling, and pipeline triggers to process IDS files that become available in the TDP.
- For Revvity Signals integrations: Use the
NOTEThe Workflow Creation Assistant will configure the pipeline that you create with code to transform and push data to your selected ELN. Workflow Creation Assistant will not modify other pipeline configurations, which must be updated through the TDP user interface. For more information, see Set Up and Edit Pipelines.
Revvity Signals Requirements
To build Revvity Signals integrations, app users must have access to the following information about their organization's Signals account:
- Signals Base URL
- Signals API key
These settings may be saved as Tetra Shared Settings and Secrets or entered directly in the app. In addition, the Admin Defined Tables used for integration must already be defined, and a Signals Experiment must already exist for integration testing between TDP and Signals.
Benchling Requirements
To build Benchling integrations, app users must have access to the following information about their organization's Benchling account, which must have access to Output File Processors, Assay Runs, and Assay Results:
- Benchling Base URL
- Benchling Project ID
- Benchling App credentials with access to all schemas and Benchling Projects within the integration's scope, including the following:
- A Client ID
- A Client Secret
- Benchling Assay Run and Result schema definitions (IDs) defined and accessible in Feature Settings
The Benchling Base URL, Project ID, Client ID, and Client secret may all be saved as Tetra Shared Settings and Secrets or entered directly in the app.
Set Up the Workflow Creation Assistant
To set up the Workflow Creation Assistant, do the following.
Step 1: Connect Your LIMS or ELN System to the TDP
If your organization hasn't already, make sure that the laboratory information management system (LIMS) or electronic lab notebook (ELN) that you're using can communicate with the TDP by setting up the required Tetra Integration for that system.
Step 2: Activate the Workflow Creation Assistant
To activate the Workflow Creation Assistant, first contact your customer account leader to activate the app in your TDP environment. Then, follow the instructions in Activate an Embedded Data App. Make sure that you select the Workflow Creation Assistant.
IMPORTANTThe Workflow Creation Assistant uses caching to improve application performance, and content in the app may not respond to changes in the source system. Leaving the Workflow Creation Assistant and re-entering the Data App refreshes the app's cache.
Step 3 (Optional): Configure Providers for Shared Settings and Secrets
The Workflow Creation Assistant allows users to optionally access TDP Shared Settings and Secrets in the app using Tetra Data App Providers. Configuring one or more providers for the Workflow Creation Assistant allows the user to streamline their experience by pre-populating the data app with settings saved in their TDP organization.
If providers are not created and configured for the Workflow Creation Assistant, the user can manually enter their credentials on-screen.
Create a Scientific Data Workflow
Access the Workflow Creation Assistant
To access the Workflow Creation Assistant in the Tetra Data Platform (TDP) after it is activated and initially configured by your customer account leader, do the following:
- Sign in to the TDP.
- In the left navigation menu, choose Data & AI Workspace. The Data & AI Workspace page appears.
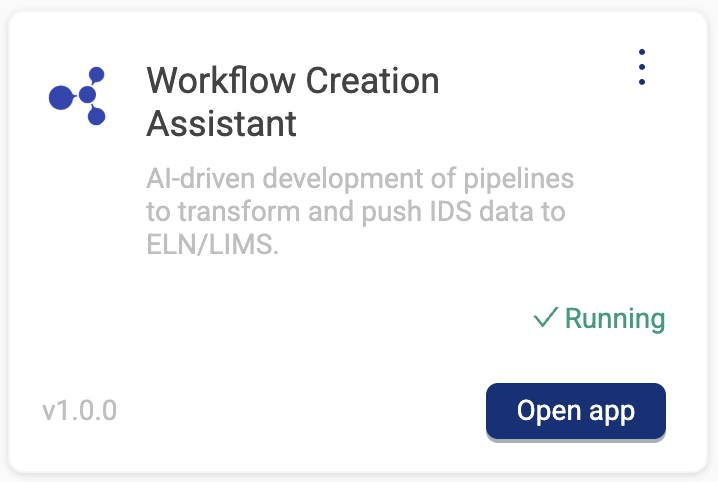
- In the EMBEDDED DATA APPS section, select the Workflow Creation Assistant tile.
For TDP v4.4.0 and Higher
Your customer account leader and TDP admin can also optionally enable a feature flag that makes the Workflow Creation Assistant directly accessible from the Pipelines menu.
- Sign in to the TDP.
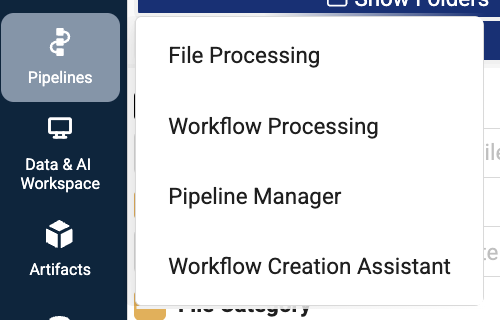
- In the left navigation menu, choose Pipelines. Then, select Workflow Creation Assistant.
Build a Data Workflow
The Workflow Creation Assistant offers distinct development workflows for Benchling and Revvity Signals integration development.
Step 1: Select an IDS
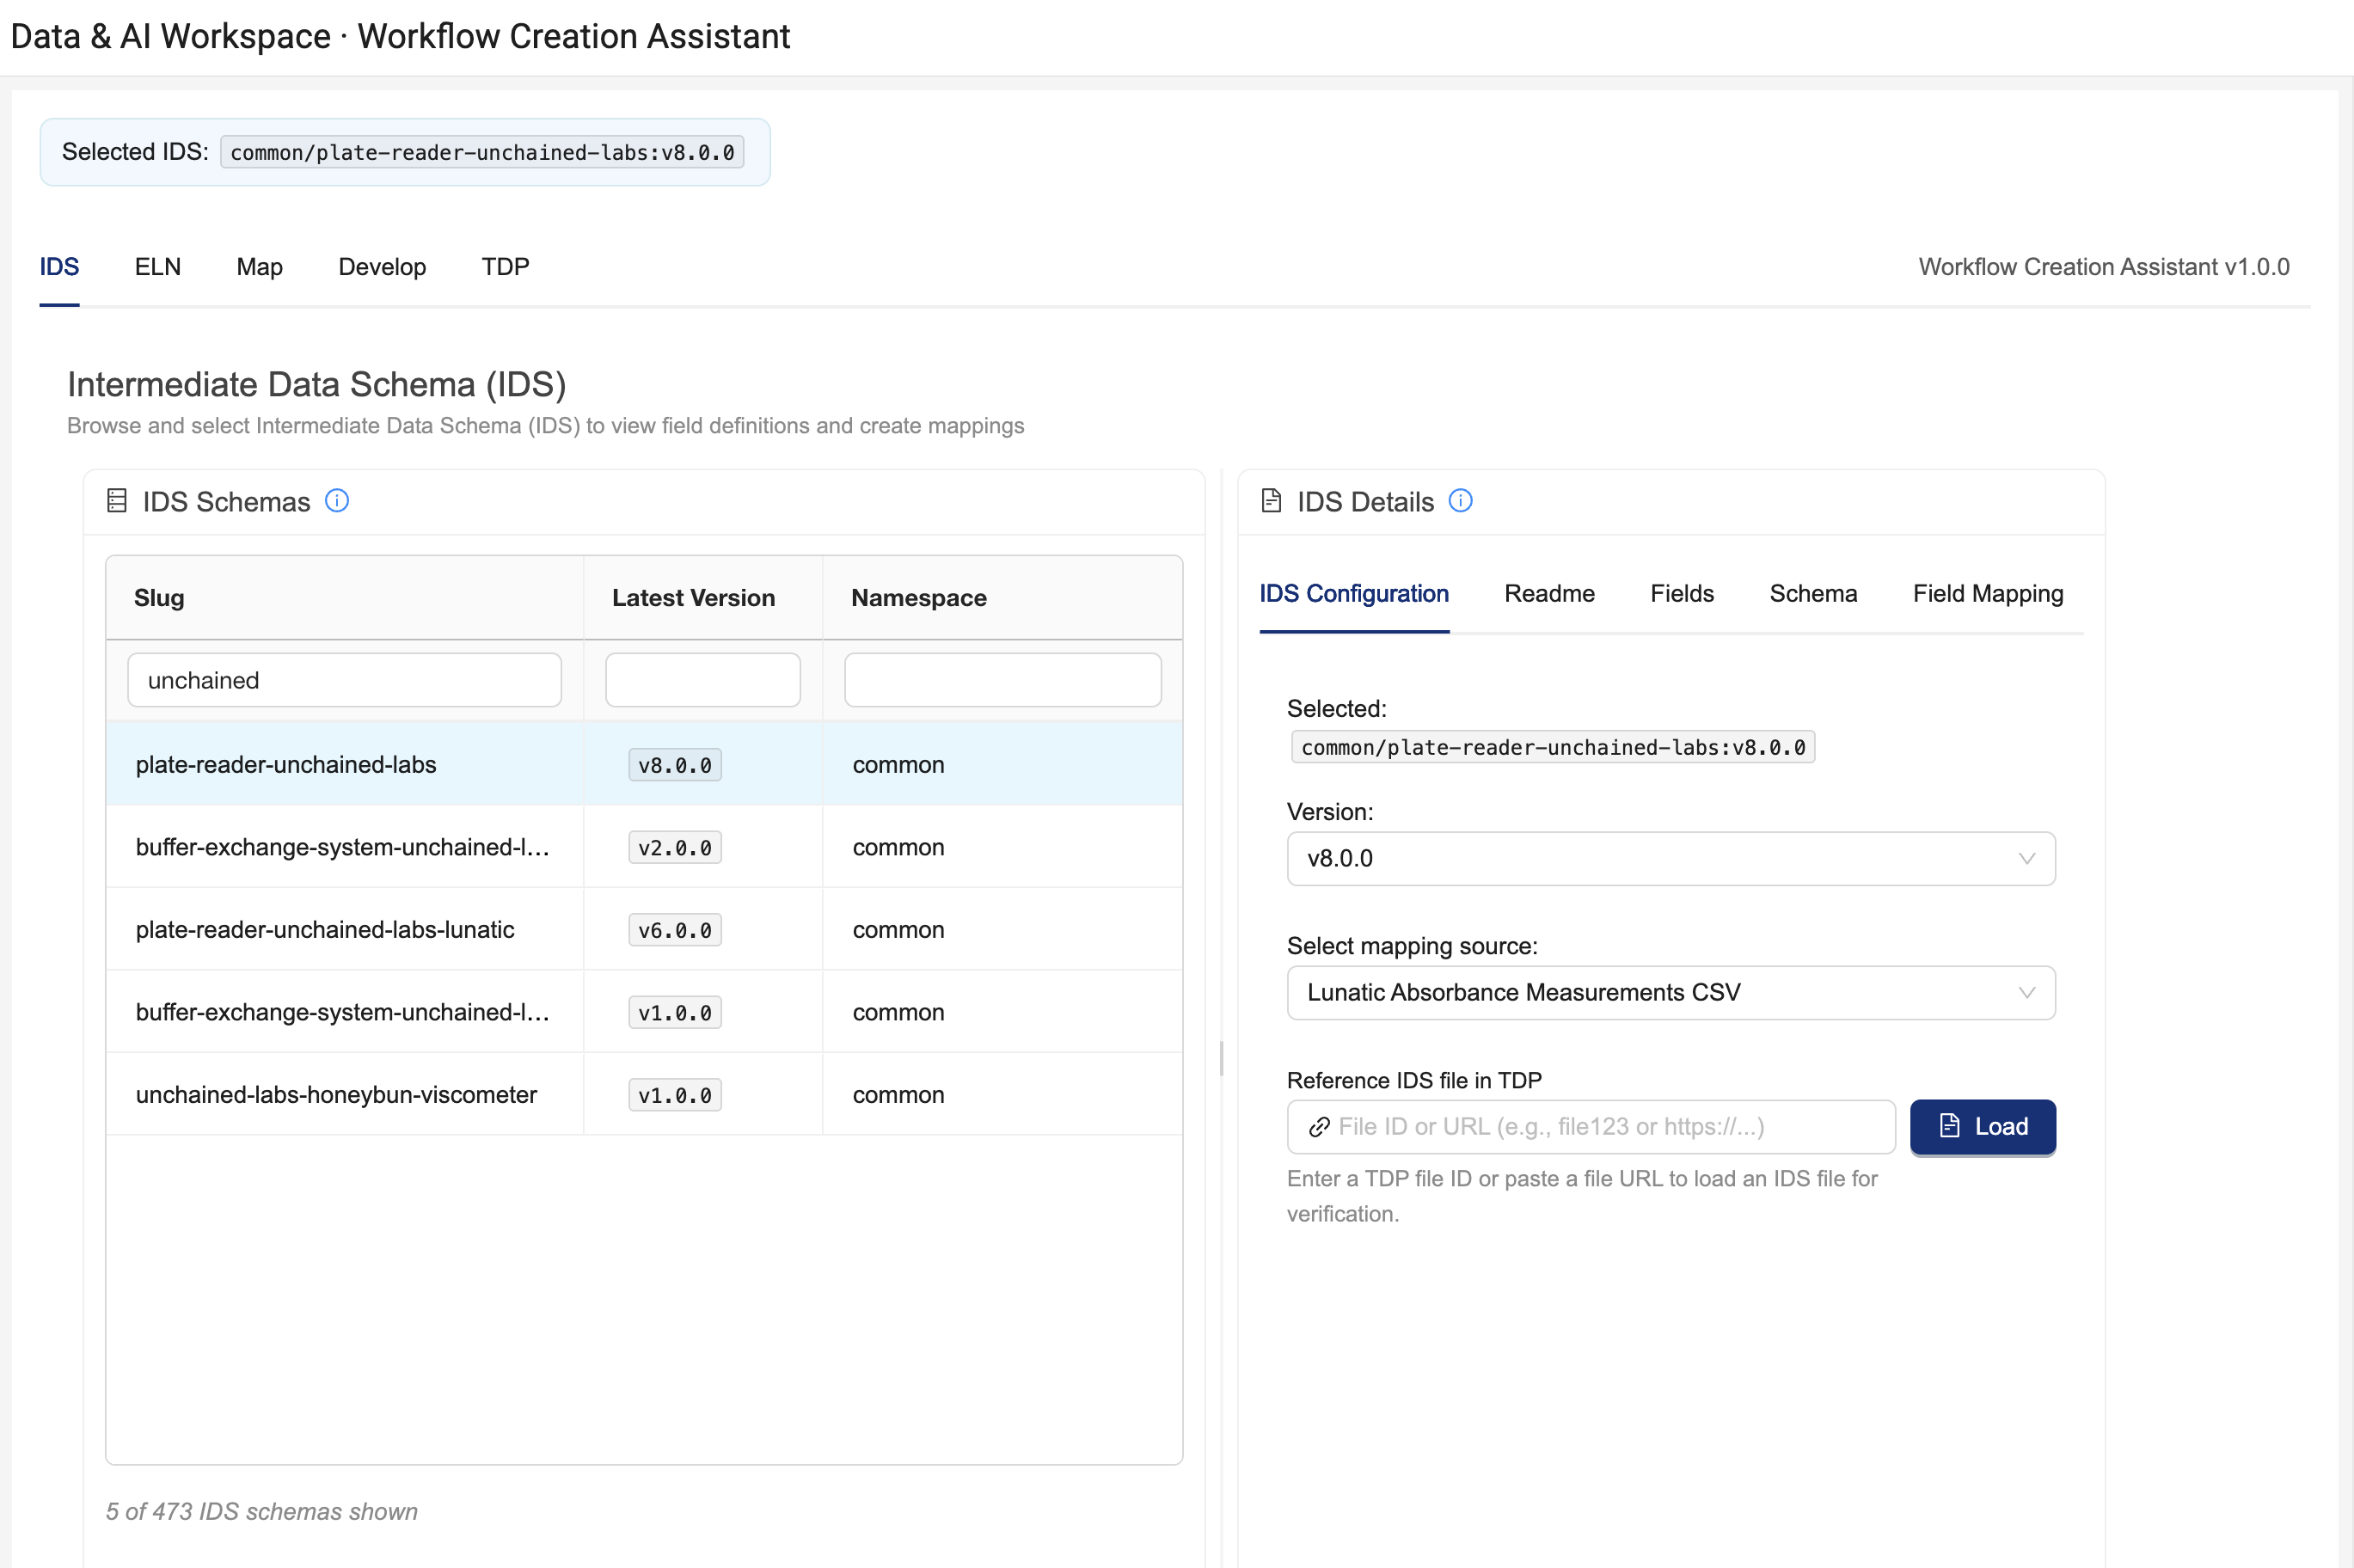
The IDS tab provides the option to explore the Intermediate Data Schemas (IDSs) accessible in your TDP organization and select a target IDS to send to the destination system.
Clicking on an IDS in the IDS Schemas table results in the Workflow Creation Assistant using the latest version of that IDS for integration. You can optionally adjust the configuration of the Workflow Creation Assistant by interacting with the IDS Configuration Details on the right:
- Version dropdown: Allows you to change from current version to other versions available in your org
- Mapping source dropdown: Optionally see the raw file locations from which IDS fields are derived. This dropdown is only populated for IDS artifact versions that contain a mapping table, and the drop down is not populated in TDP versions below v4.3.1.
- Reference IDS File: Enter an IDS File ID for a reference IDS file in TDP to use its content for reference during field mapping and for testing. Warning: Large reference IDS files (e.g. > 80 Mb) may be blocked by your browser or cause app instability. As a workaround for some IDSs, customers can remove
datacubesfields from an IDS file and re-upload it for testing.
Due to the importance of live data for design and testing, users are strongly recommended to configure a reference IDS. Without the reference IDS, the Workflow Creation Assistant is unable to perform integration and end-to-end tests directly with the TDP.
Proceed to the ELN tab to continue.
Step 2: Choose a Target ELN
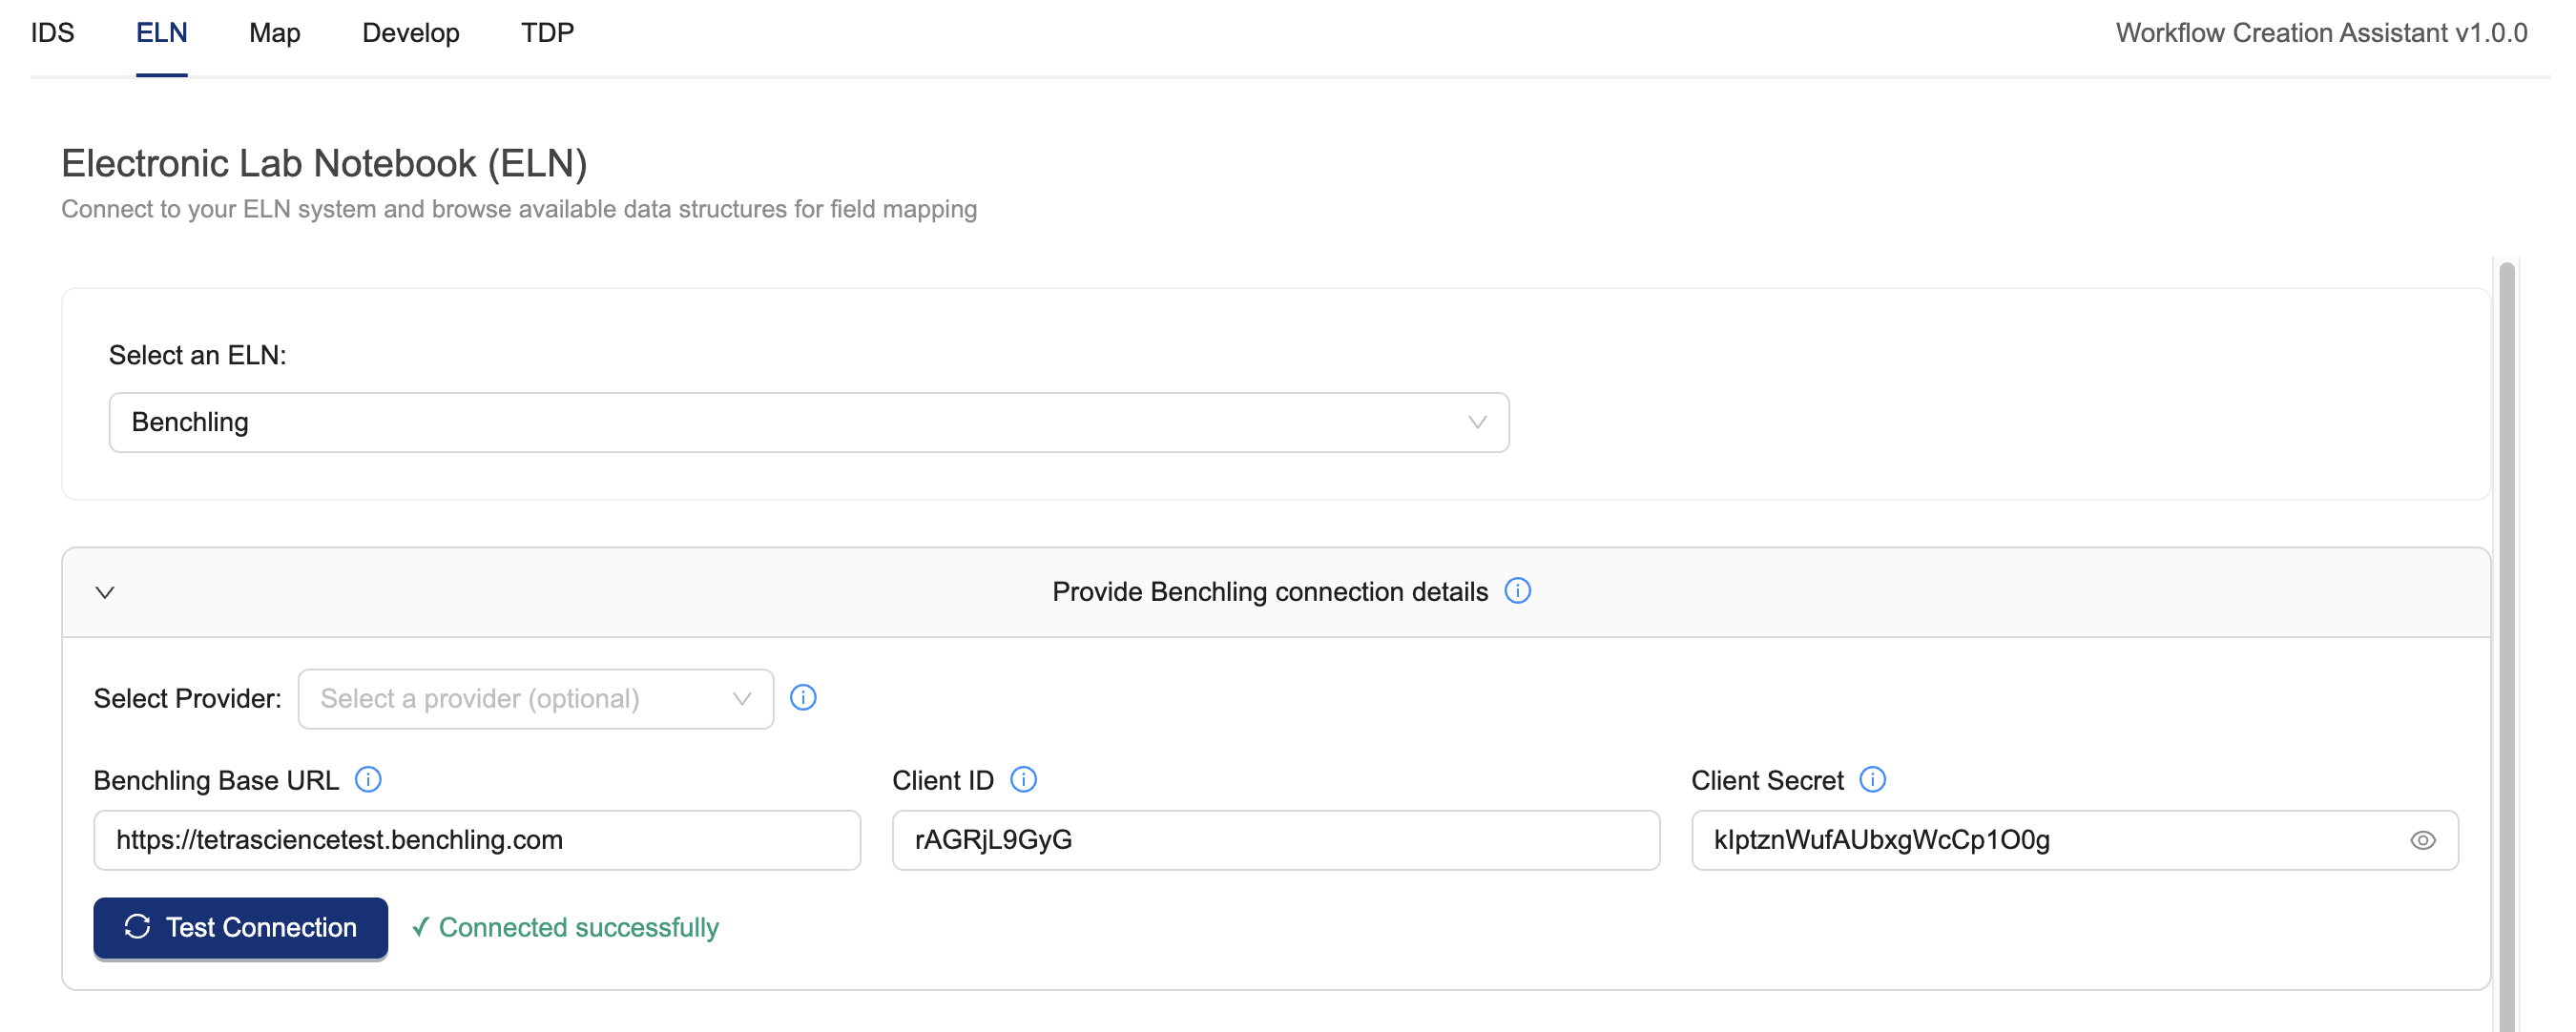
The ELN tab provides the option to choose a target electronic lab notebook (ELN) system and table for data mapping. Two ELNs are currently supported (Benchling and Revvity Signals). Each has their own configuration requirements.
Benchling Lab Data Automation Configuration
NOTEBefore configuring a Benchling integration in the Workflow Creation Assistant, you must first create and install a Benchling App with permissions to your target projects and schemas. You will need the client id and client secret for your TDP Pipeline configuration and for the following Workflow Creation Assistant workflow.
-
From the Select an ELN dropdown, select Benchling.
-
The following Benchling Connection details are needed for the Workflow Creation Assistant to fetch data for this workflow. Optionally load a pre-configured Benchling provider using the provider dropdown, otherwise enter:
- Benchling Base URL: the base URL to your Benchling tenant, which is used to make API calls. For example:
https://tetrascience-documentation.benchling.com - Client ID: the Benchling App's Client ID. You can access the Benchling App's Client ID in Benchling Settings > Developer Console > Apps > [select your Benchling app] > Credentials.
- Client Secret: the secret your Benchling App uses for authentication.
- Benchling Base URL: the base URL to your Benchling tenant, which is used to make API calls. For example:
-
Provide Assay Run Project ID by doing the following:
- Fetch the Benchling Project ID from Benchling following any of the examples known to you or shown in this guide. Benchling project IDs resemble strings like
src_ABc123de.
- Fetch the Benchling Project ID from Benchling following any of the examples known to you or shown in this guide. Benchling project IDs resemble strings like
-
Provide the Benchling Assay Run, Result, and Output File Processor info.
- press the [ + Import run schema ] button. A modal dialog box appears.
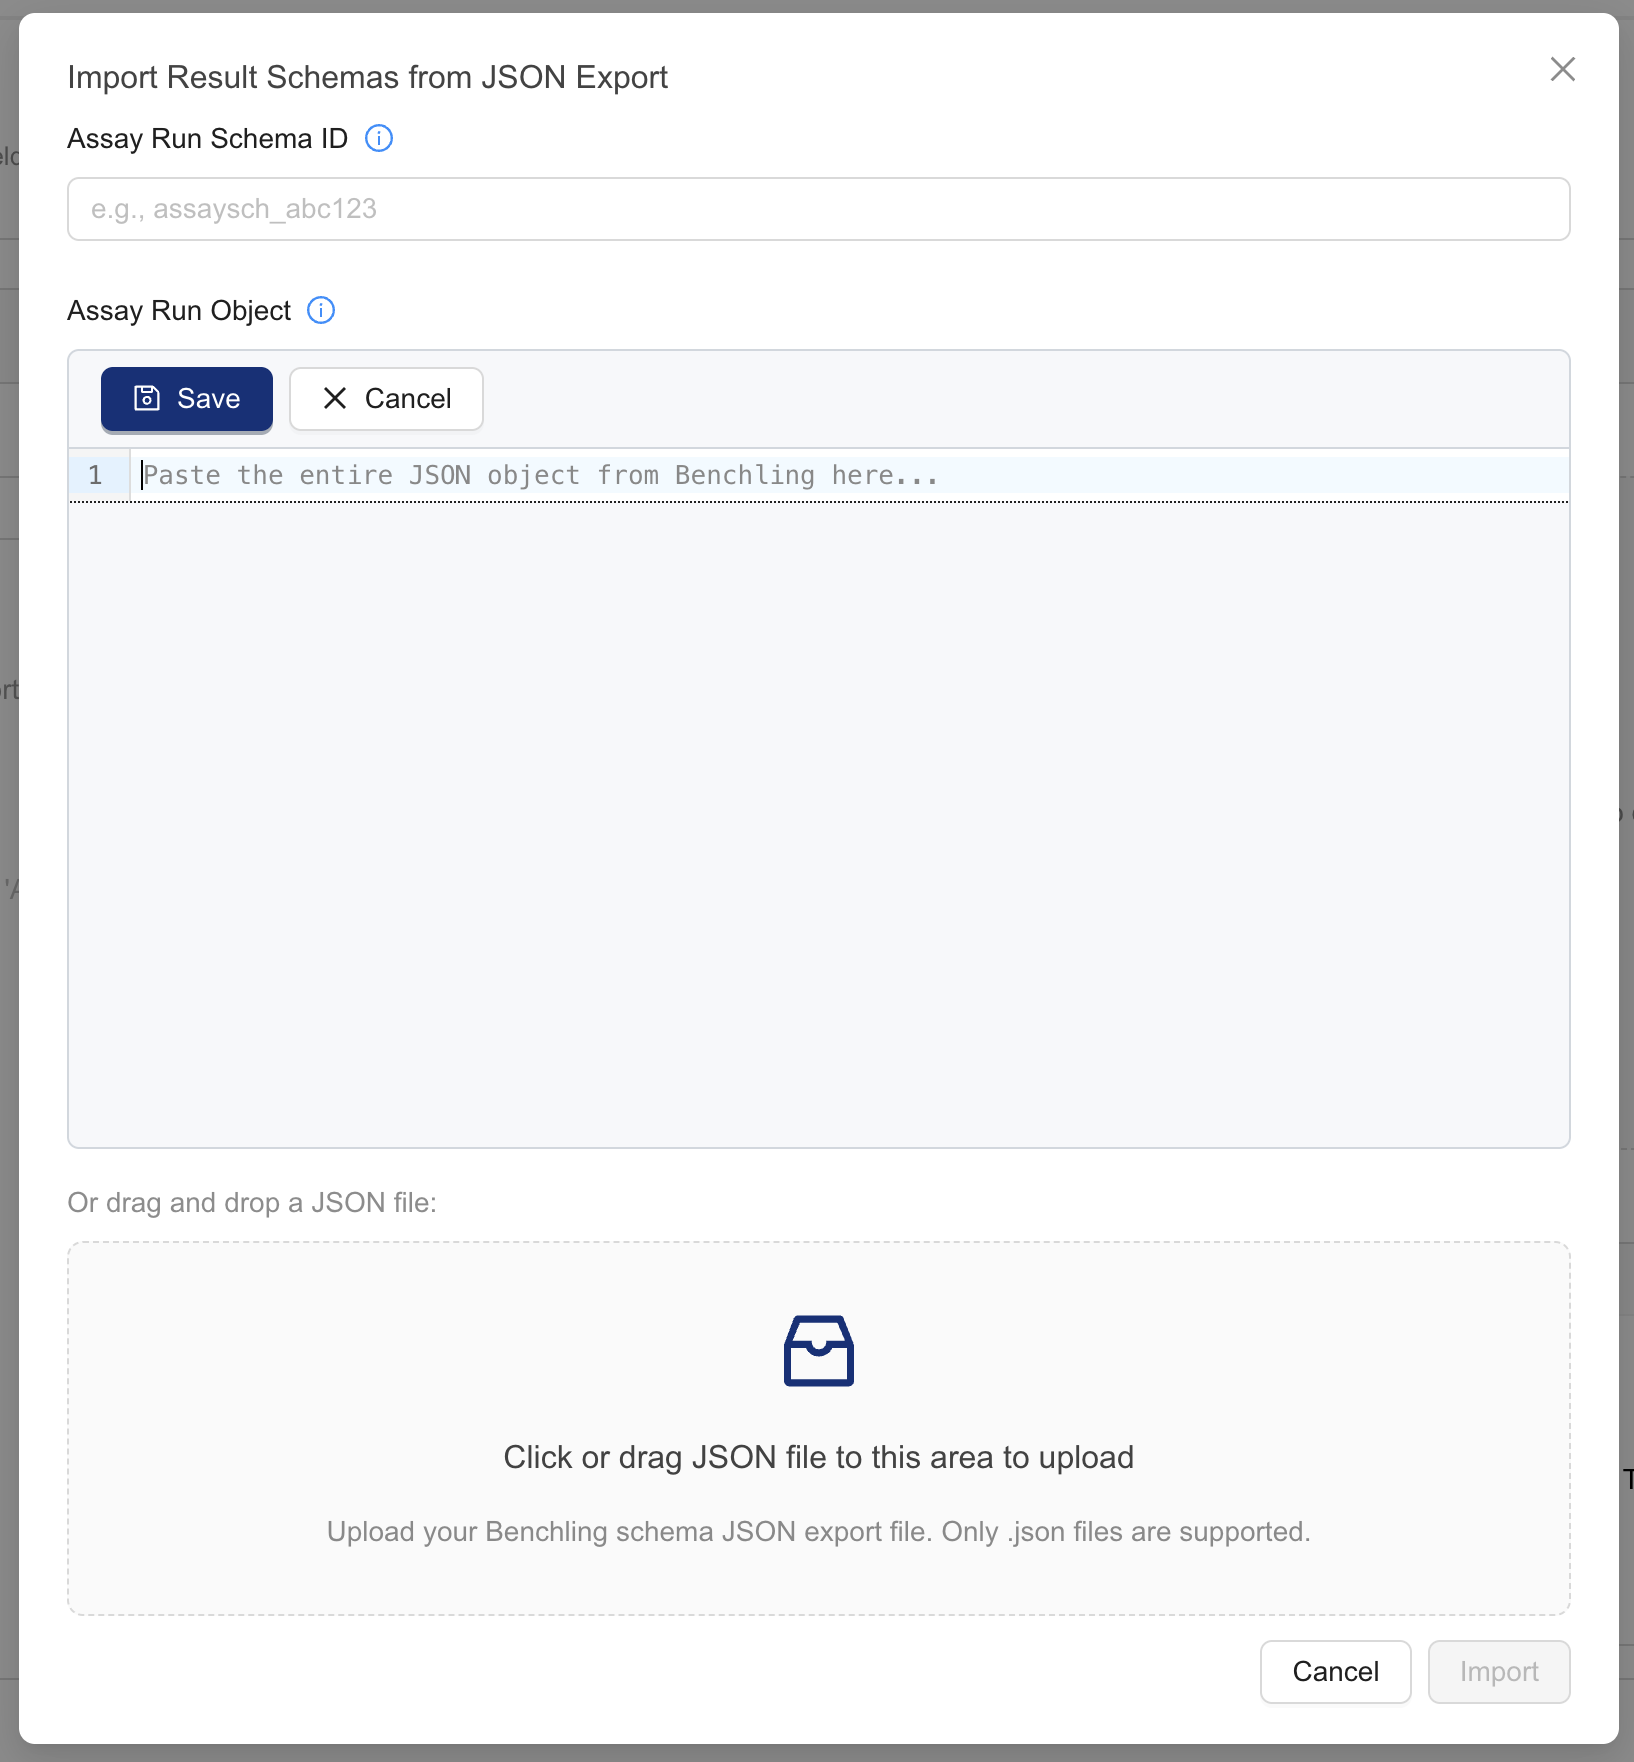
- For the AssayRun Schema ID, Benchling Settings > AUTOMATION SCHEMAS > Run schemas > [Copy API ID button on your AssayRun tile]. Alternatively, copy the assay run schema ID from its AssayRun schema page URL.
- For AssayRun object, enter your AssayRun object JSON code. You can copy this code from the Assay Run details page in Benchling Settings > AUTOMATION SCHEMAS > Run schemas > [select your AssayRun] > scroll to the bottom of the page and press the Edit as JSON button. Make sure that you copy the entire JSON object from Benchling to clipboard or as a file onto your computer. The file may be copied and saved in the web editor or uploaded as a file from your computer.
- Then, press the Import button. This initiates a series of API calls to Benchling to enhance the Assay Run Edit JSON object with additional metadata. A detailed view appears.
-
Review your assay run's detailed view. The Workflow Creation Assistant enhances the provided schema with additional metadata from Benchling. Review your Assay Run and Automation Output File Configurations carefully to understand their semantics. Note the assay run output file configuration details. Be aware that fields in the
outputFileProcessorconfiguration may berequiredeven if the corresponding AssaryRun fields from Benchling
Revvity Signals Lab Data Automation Configuration
NOTEBefore configuring a Revvity Signals integration in the Workflow Creation Assistant, you must first generate a Signals API Key.
-
From the Select an ELN dropdown, select Revvity Signals.
-
Under Provide Connection Details, provide your connection details
- If a Revvity Signals provider was configured for the data app, select a provider's credentials to use. Otherwise, continue:
- For Signals URL, enter the base URL for sending API requests. For example:
https://tetrascience-documentation.signalsresearch.revvitycloud.com - For API Key, enter your Signals API key.
-
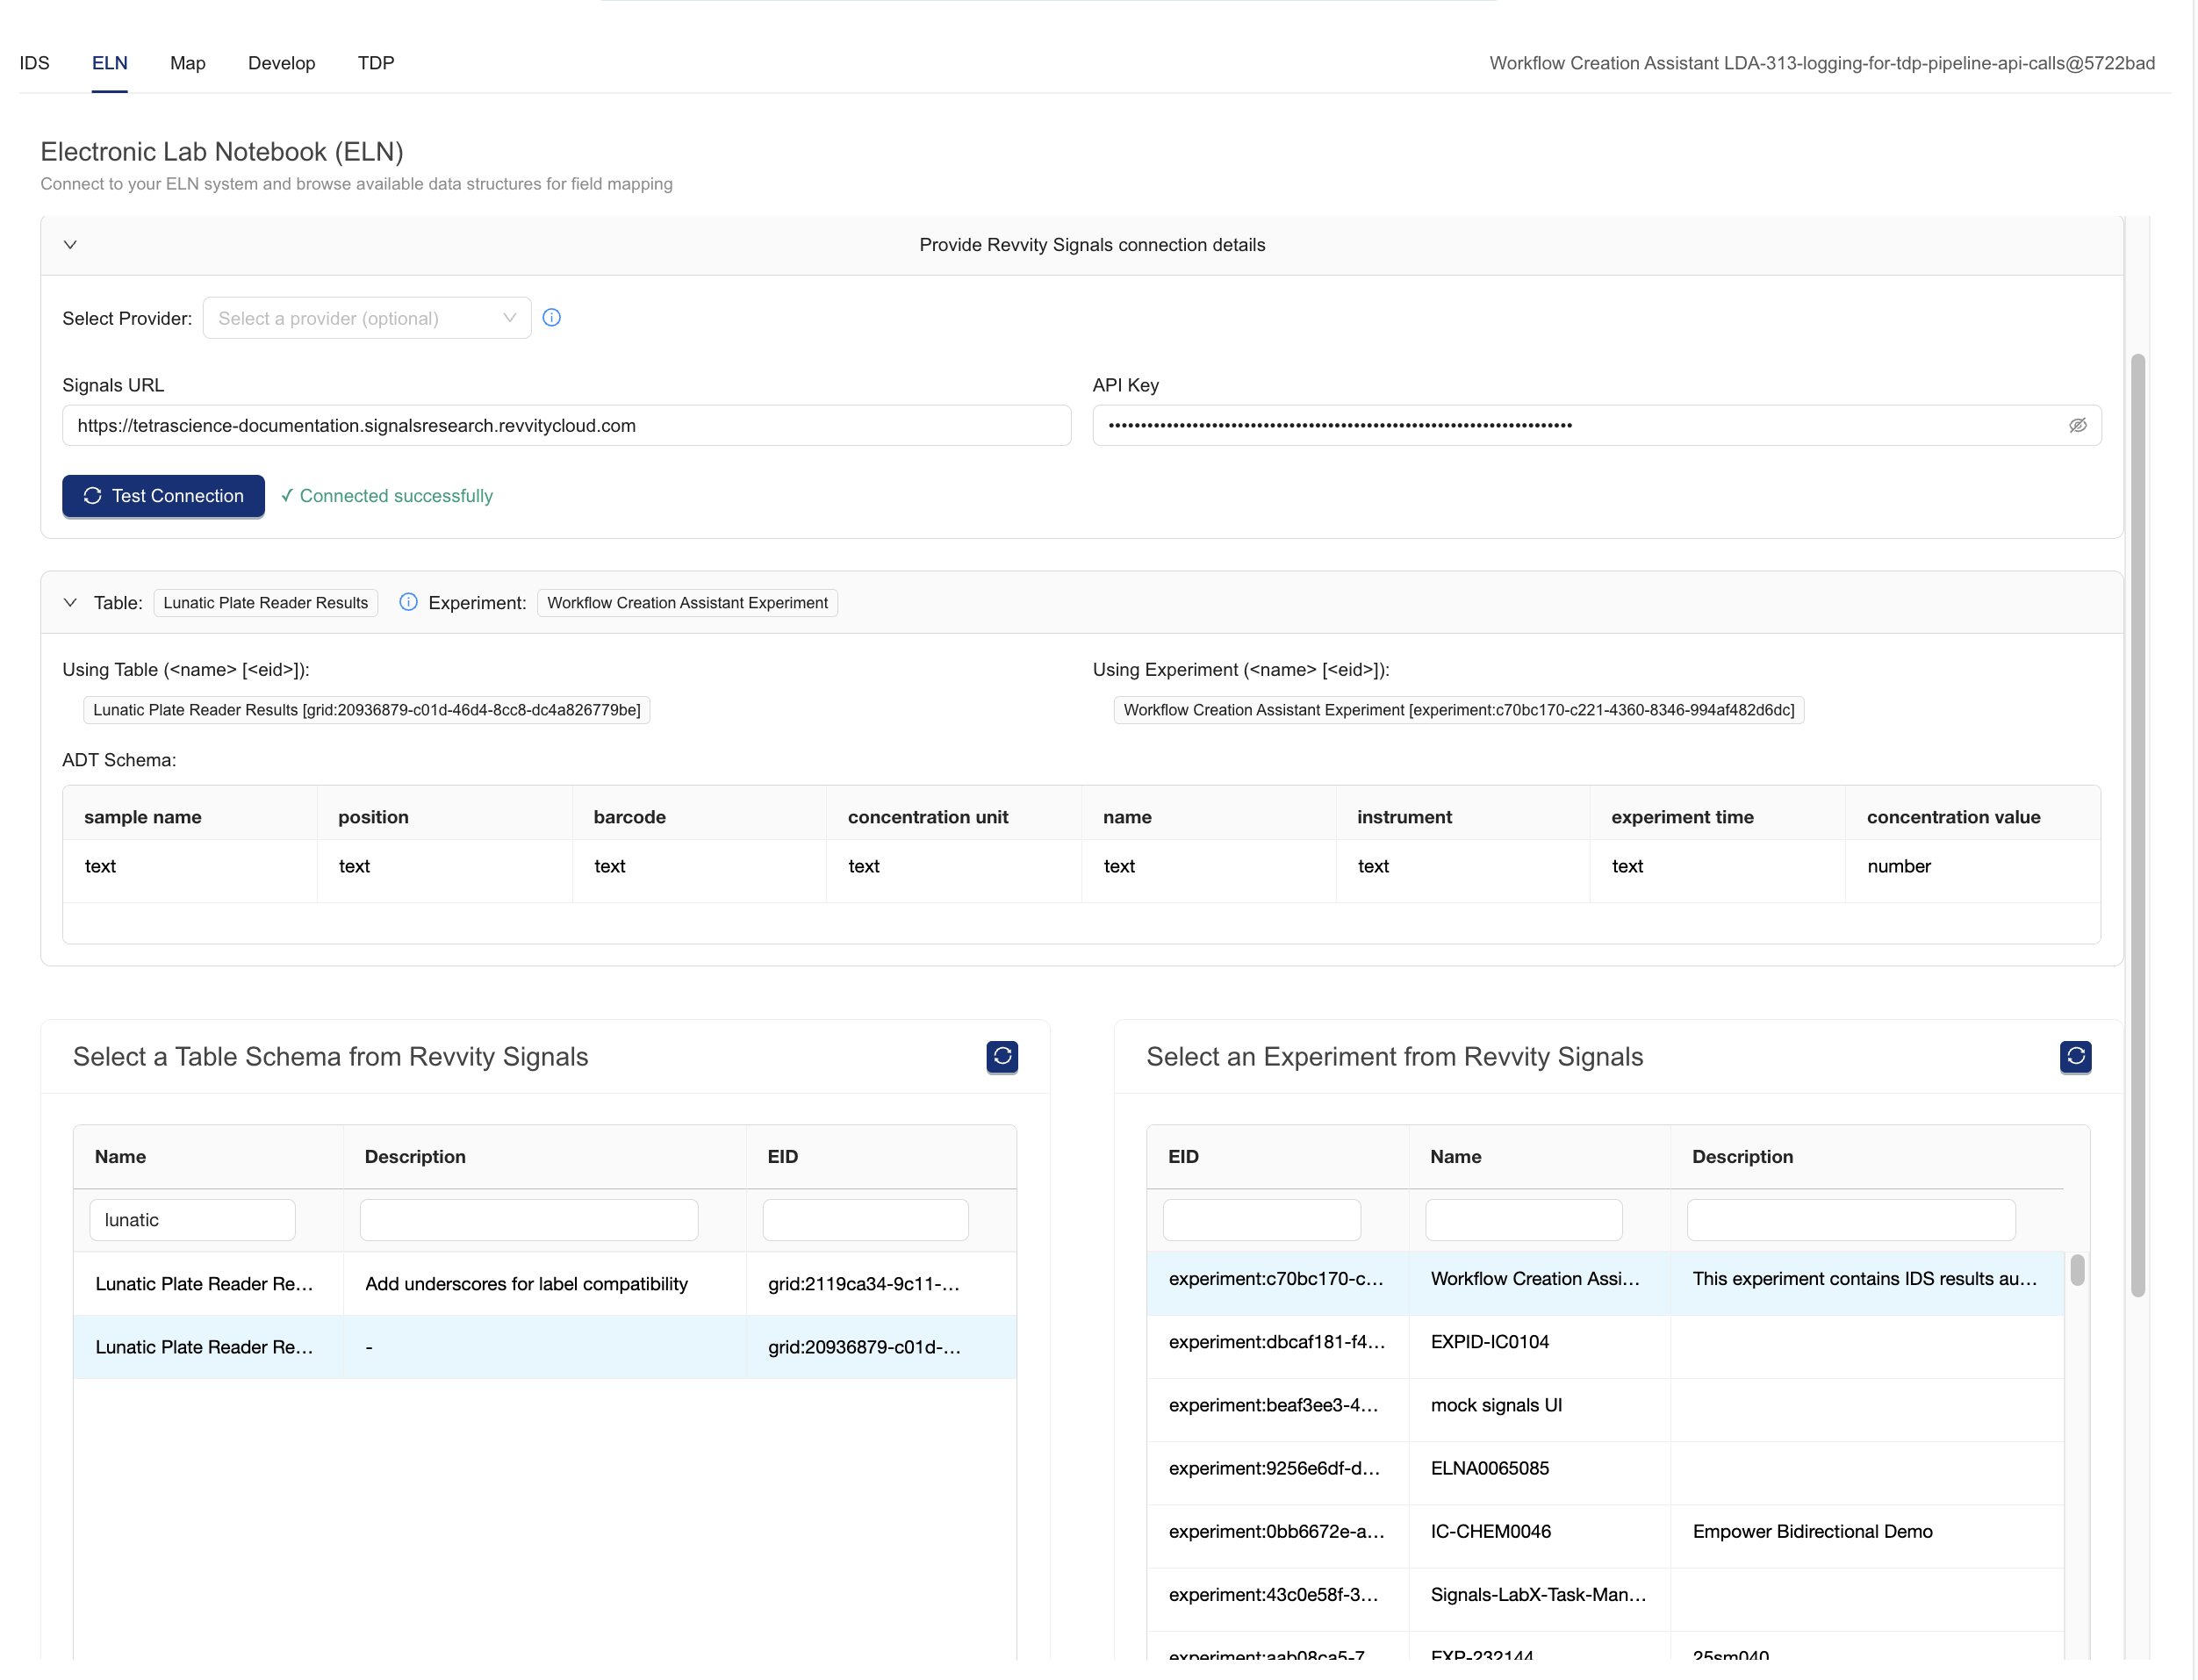
Press the Test Connection button. This will fetch content from Signals and populate the tables and experiments selectors at the bottom of the page.
-
Select a Table Schema from Revvity Signals: Filter and scroll to find the Admin Defined Table (ADT) schema definition that will be used for integration. THe Workflow Creation Assistant will display the table schema on the page
-
Select an Experiment from Revvity Signals: Filter and scroll to find the experiment that will be used for testing. Data will be sent to this experiment when the WCA performs an end-to-end test.
Review the Revvity Signals selections on screen before proceeding to the Map tab to continue. Here is an example page.
Step 3: Map Fields
The Map tab provides the ability to map fields between the selected IDS and ELN table and specify what data from the IDS is pushed to the ELN. The Workflow Creation Assistant uses a mapping wizard to guide the user through the process of associating ELN/LIMS fields with IDS content
To map fields, either use the [import] button to upload a CSV of previous mappings or do the following for each mapping:
IMPORTANTPlease upload a reference IDS file in the IDS tab > IDS Configuration Details . Your scientific data may be generated or exported in a particular way that merits careful attention. Although TetraScience offers an
expected.jsonsample file with each IDS artifact, this file is synthetic and may not be representative of your data.
- Press [+ Add new mapping]. THis will open the mapping wizard.
- Select one of the ELN fields from the table. The table is pre-populated with fields that were configured in the ELN tab. Press Next to continue.
- Select one of the IDS fields from the table. The table is pre-populated with fields that are from the IDS version selected in the IDS tab. If a reference IDS file or the mapping source is configured from the IDS Tab > IDS Configuration details, then columns for these will be visible on the mapping table. Press next to continue.
- Review the mappings and press the [Map these fields] button to continue.
NOTEThe Field Mapping Configuration table has an [Export CSV] button that allows you to download the mappings configuration for future reference. Downloaded field mappings can be re-uploaded later by using the optional [IMport CSV] button.
Mappings can be removed with the [Remove selected mapping] and [Remove all] buttons
Mapping Limitations
The Field Mappings are used by the Workflow Creation Assistant to reshape IDS data into a format suitable for the target ELN. The Workflow Creation Assistant assumes a 1:1 mapping association from IDS contents to ELN field contents. More complex mappings require additional tuning after the Workflow Creation Assistant drafts the code.
Non 1:1 Field Mapping Examples:
- 1:M or M:1 mappings: ELN display_value ← Results[].value + " " Results[].units.upper()
- Transformations: ELN acquired_date ← datetime.strftime(Methods[*][0], "%Y-%m-%d")
- Calculations: ELN count_of_successes ← sum([result.value for value in result[*].value])
- Conditional logic: ELN result_pass_qc ← True if result.value > 5 else False
- File metadata: ELN link_to_file_in_tdp ← f"http://tdp.tetrascience.com/file-details/{file_id}"
- Constant Values: ELN sample_type ← "Control"
To add more complex logic, manually edit the prototype code that the Workflow Creation Assistant produces.
Proceed to the Develop tab to continue.
Step 4: Develop Data Transformation Code
The Develop tab provides the ability to request, review, and verify AI-generated Python data transformation code that's based on the selected field mappings. The Workflow Creation Assistant will write a function, def transform_ids(ids), custom designed to extract your IDS contents.
Verify the Configuration Details
-
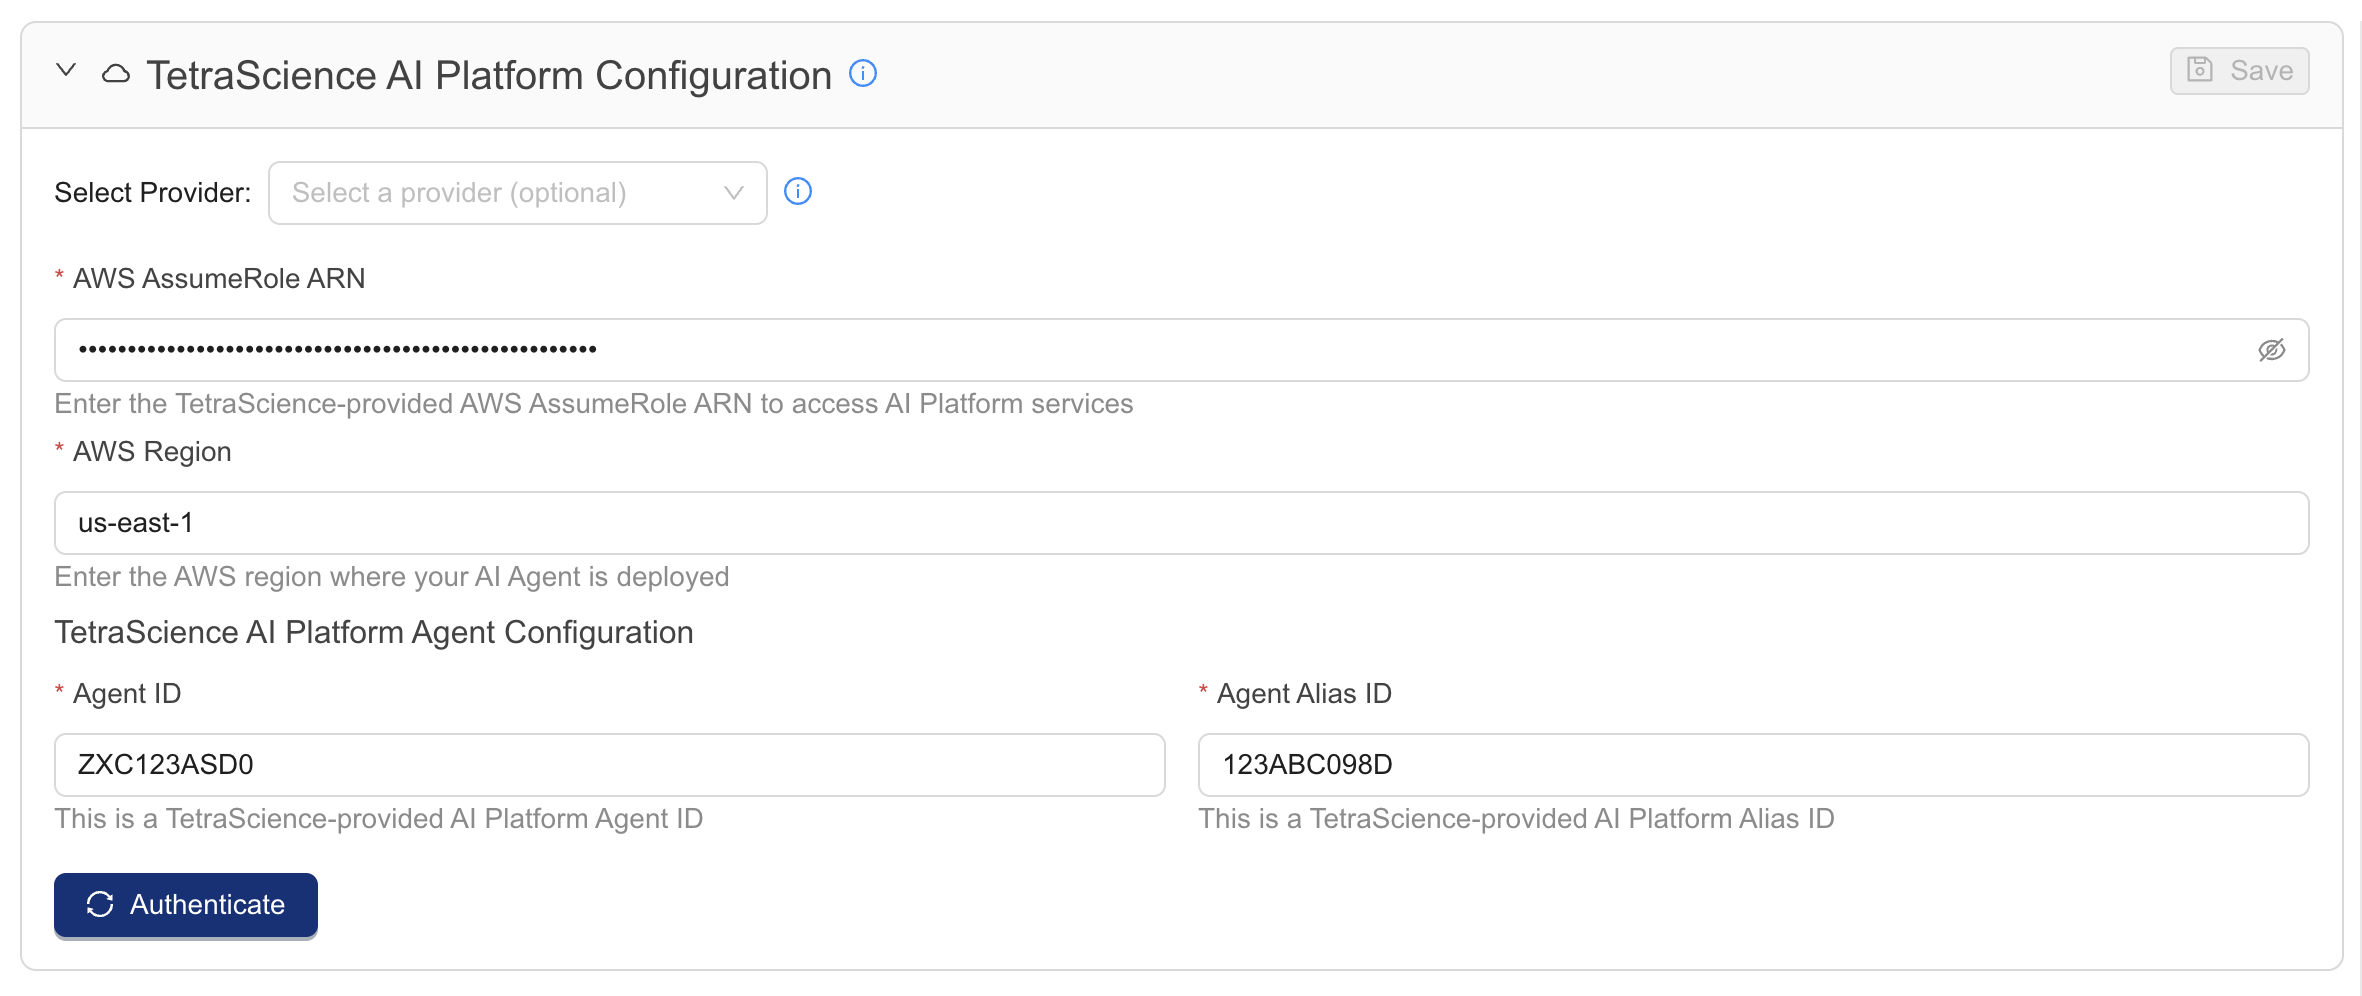
In the TetraScience AI Platform Configuration section, verify the following AWS configuration details (request AWS credentials from your customer account leader if they are not already configured):
- Select a provider if credentials are saved as Shared Settings and Secrets and accessible as a provider.
- For AWS AssumeRole ARN, enter your AWS Identity and Access Management (IAM) Role Amazon Resource Name (ARN).
- In the Advanced AWS Settings expander, enter the AWS Region, Agent ID, and Agent Alias ID.
-
Press the [Authenticate] button to attempt communication with the Workflow Creation Assistant AI resources. A response message appears below the button.
-
Press the [Save] button to save changes to these settings for future Workflow Creation Assistant sessions. This button is disabled until the credentials are confirmed with the [Authenticate] button.
Generate and Review Prototype Code
-
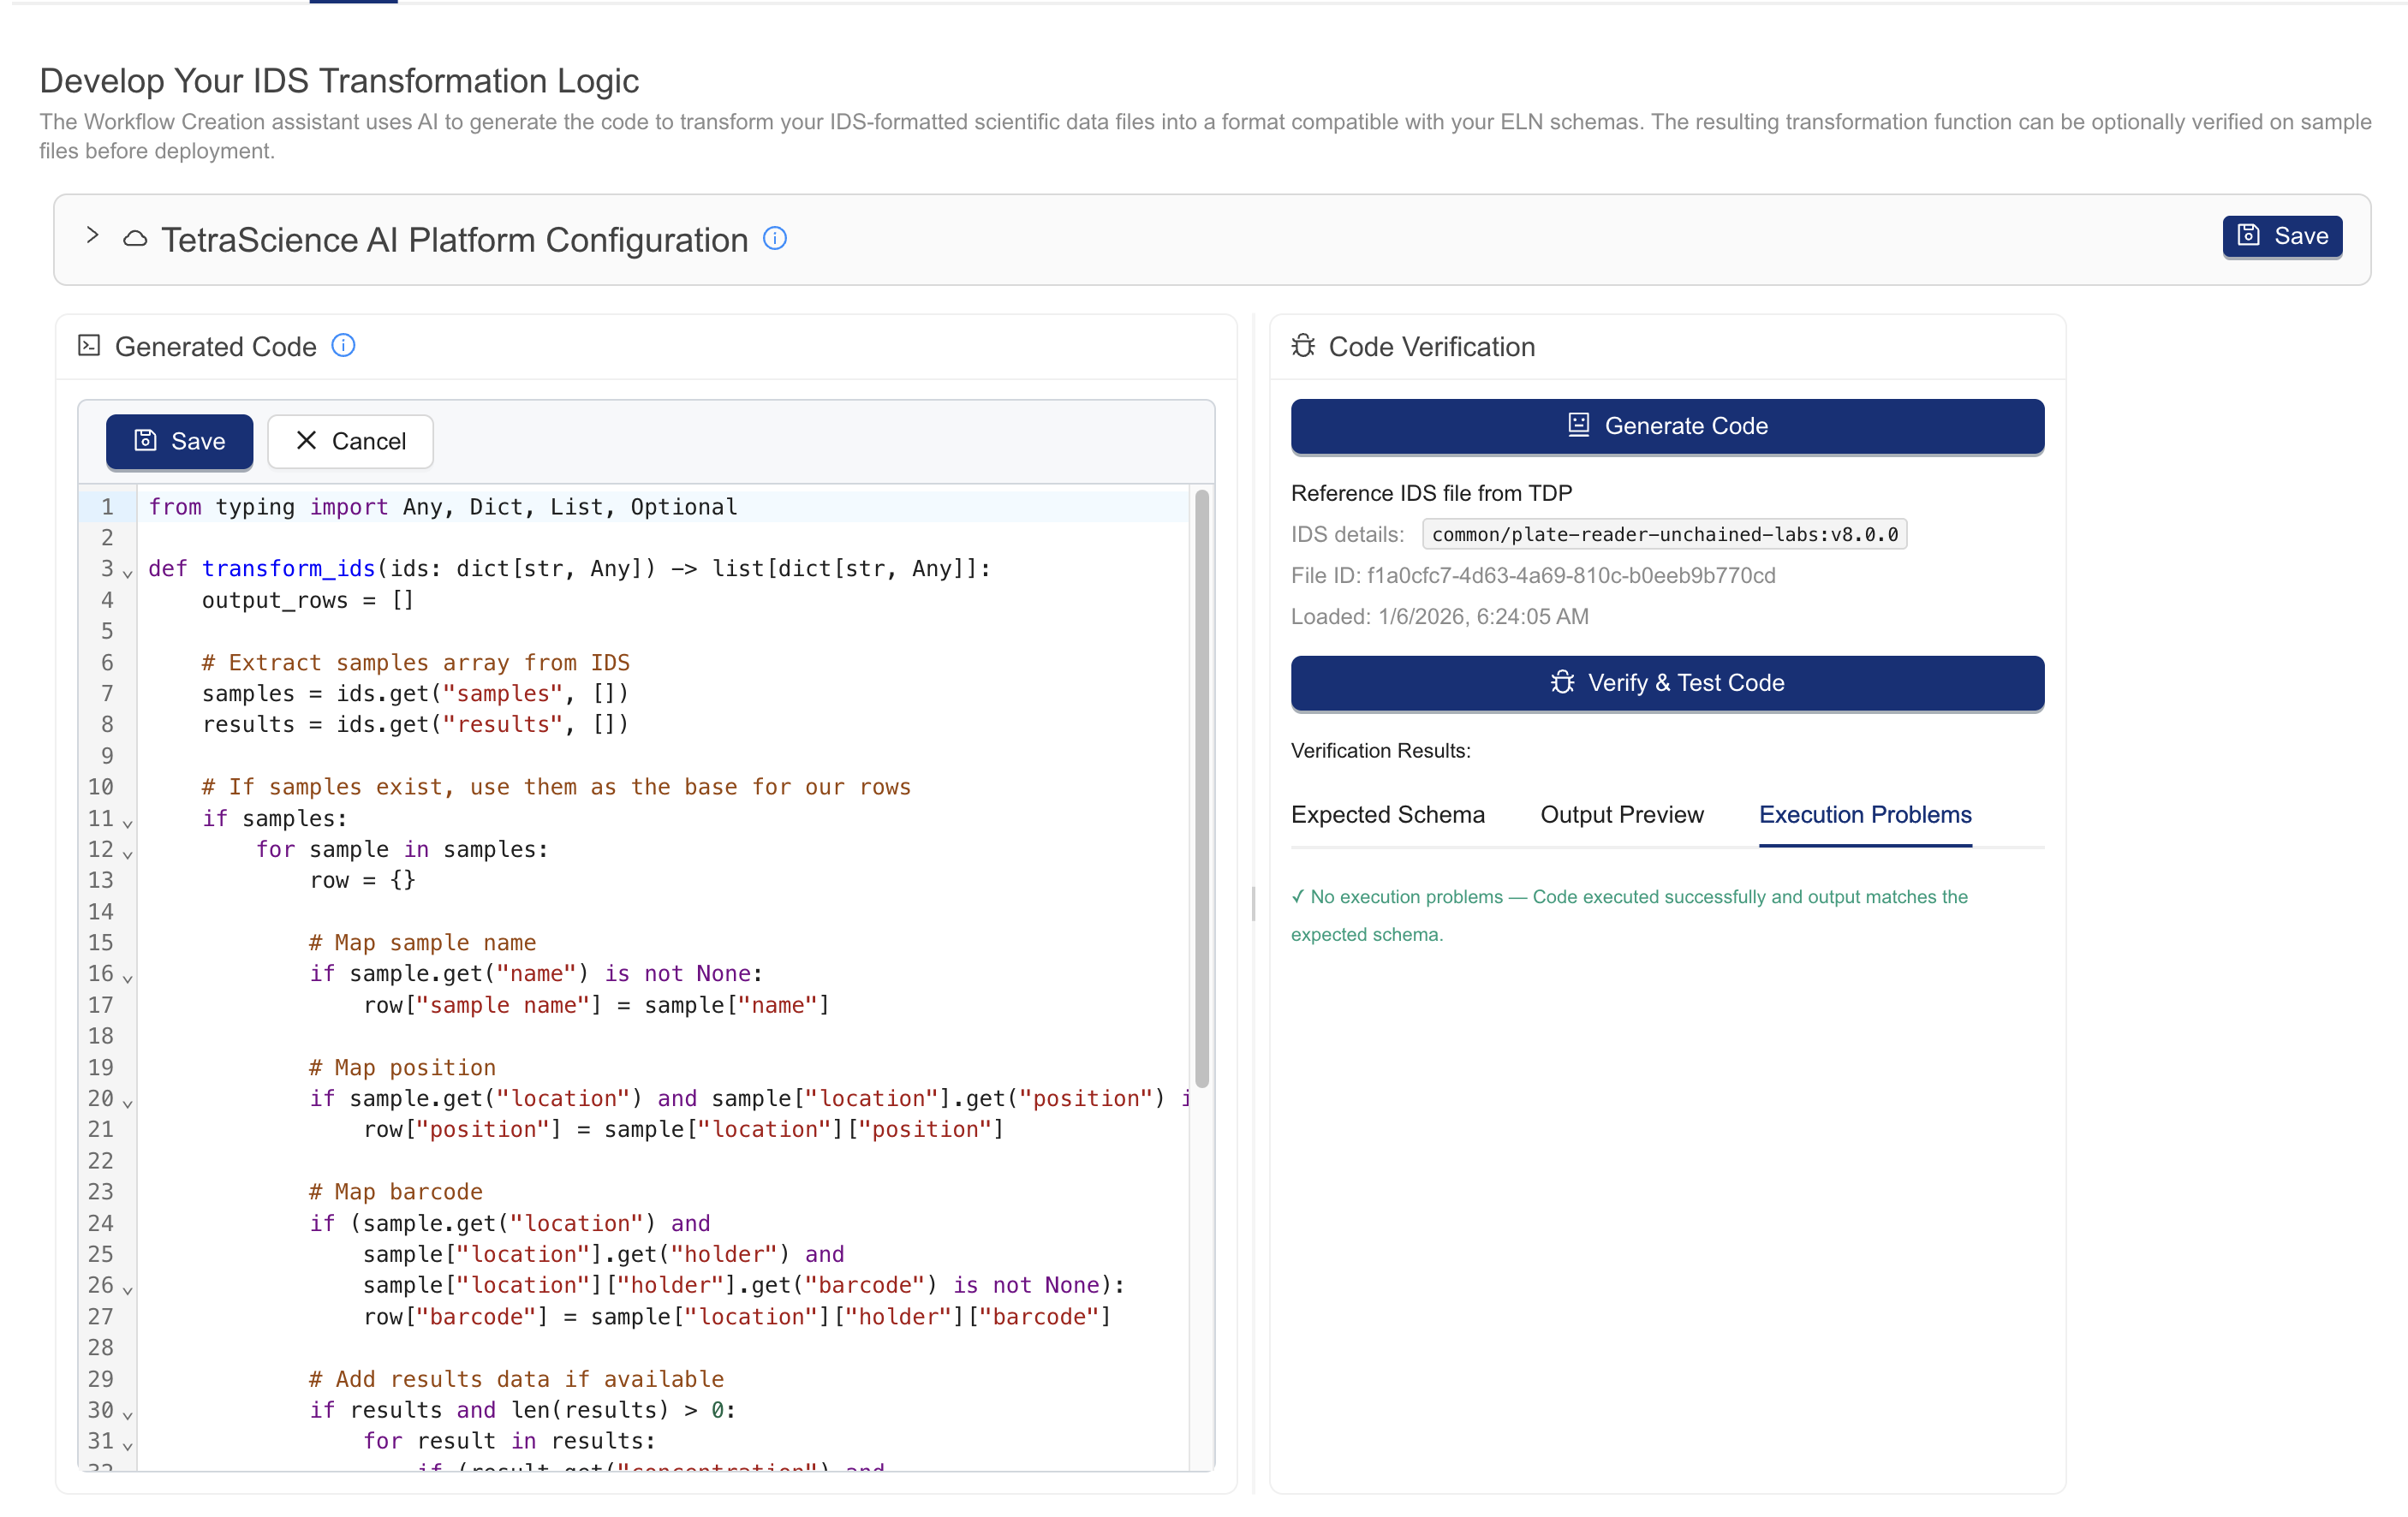
Press the Generate Code button. After about a minute, a code editor is populated with prototype data transformation code.
-
Review and edit the code. The browser-based code editor allows you to edit the prototype code and use the [Download] and [Save] buttons in the toolbar. You must save changes for Workflow Creation Assistant to use them.
-
Test the code. Press the [Verify and test code] button to execute series of standardized verification tests to accelerate the development process, which attempt to answer the following questions:
- Syntax check: Is the Python syntax valid?
- Execution: Does the function execute without error on the user's uploaded IDS, if provided?
- Output: Does the function output on the user's uploaded IDS meet the ELN format specification?
Proceed to the TDP tab to continue.
NOTEIt can be more practical to regenerate the transform code by pressing the Generate Transform Code button instead of committing significant time to debugging.
🚧 IMPORTANTRepeated errors with code validation may indicate that the reference IDS used is incomplete or otherwise not suitable for the designed use case. Examine your sample data carefully. Verify that it's complete and that it includes all of the required fields.
Some repeated errors in output/schema verification may be expected or acceptable for your use case. Consider: If the reference file data contains integers in some fields, and the schema specification is for floats, will a schema mismatch be a concern for reporting?
Step 5: Integrate the Code Into Your Pipeline
The TDP tab provides the ability to build and review the AI-generated Tetra Data Pipeline code for the data integration. While the Develop tab code extracts and transforms the IDS content into a suitable format for the target ELN, the TDP tab code loads the IDS from the Data Lake, transforms it, and pushes the data to the selected ELN.
IMPORTANTThe code generated in the TDP tab is deployed to your pipeline in the TDP.
Running the End-to-End test requires configuring a reference IDS file in the IDS Tab > IDS Configuration
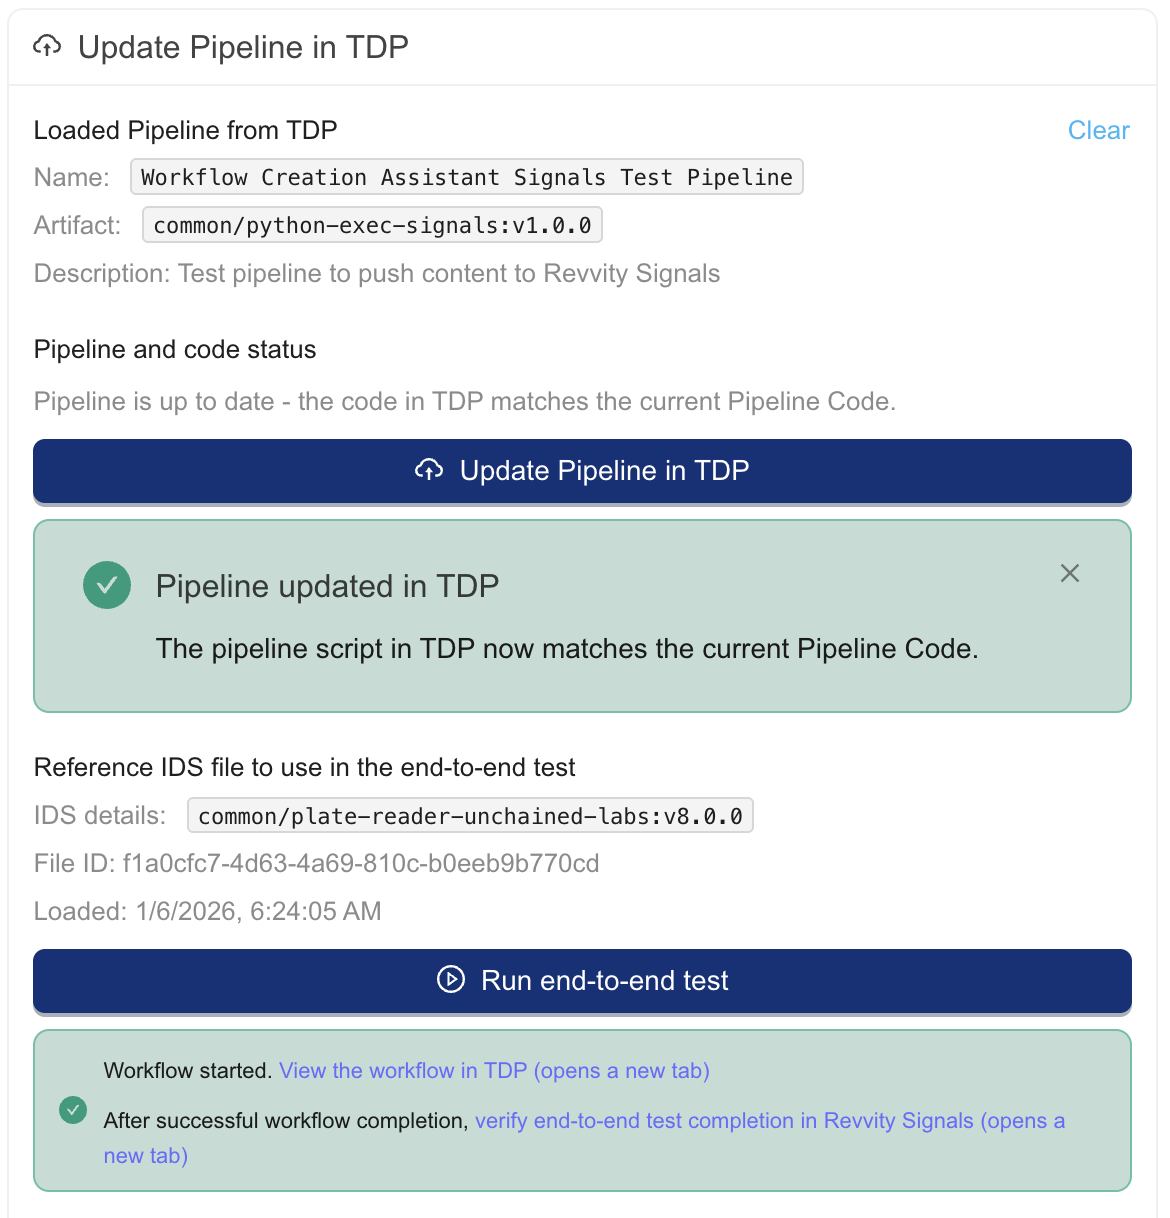
- Review the pipeline code in the TDP Tab code editor carefully. The pipeline code is designed to load required modules, transform IDS contents into the ELN-suitable format, and send the data to the ELN. This results in test data landing in the target system.
- Load a pipeline from your TDP ORG. Enter a Pipeline ID or URL next to the [Load Pipeline] button. Press the [Load Pipeline] button to fetch the pipeline details for the Workflow Creation Assistant
- Update the pipeline. Press the [Update Pipeline in TDP] button to push the code in the pipeline code editor to this pipeline
- Test the pipeline on the reference IDS. Press the [Run end-to-end test] button to process the reference IDS with the pipeline. This initiates the workflow. A message will appear with convenience links to verify test completion.
The completion of these should resemble the following in the Workflow Creation Assistant.
NOTEThe Workflow Creation Assistant is tested on the latest version of the
python-execfamily of protocols. For Benchling, that iscommon/python-exec-benchling:v1.0.0or higher. For Signals that iscommon/python-exec-signals:v1.0.0or higher.
📘 NOTETo monitor your workflow, see Monitor Pipeline File Processing.
Development and Troubleshooting Tips
-
It is a best practice to save your data mappings from the map tab for reuse and documentation purposes.
-
If the pipeline code fails, it is sometimes more practical to have Workflow Creation Assistant draft the entire pipeline code from scratch than to manually edit the existing code. Review the Mapping Limitations to see how well your use case matches Workflow Creation Assistant development automation.
-
Customers with TDP 4.3.0 and higher may have access to instant start pipelines, which can greatly improve the testing cycle speed by eliminating the cold start time of TDP pipelines. This can be configured for some task scripts by going to the Pipeline Manager, editing the pipeline, and in the memory setting of the task script, selecting an instant start memory setting.
-
Test your pipeline on a variety of files to ensure that operationally normal edge cases are covered.
-
If the Python code length exceeds the character limit in the TDP Pipeline Manager, then you can copy the pipeline code from TDP back into the Integrate tab editor and make edits there. Update the pipeline in the TDP with the interface in the TDP tab.
-
If the workflow fails with authentication-related errors, there may be issues with the pipeline configuration. Review the pipeline configuration carefully.
-
It is common practice to send data to the destination system folder/project/experiment defined in an IDS file label. This allows the Tetra Data Pipeline to dynamically route data in complex deployments.
For Benchling Integrations Only
-
If the workflow in the TDP completed successfully, but the results are not visible in the target ELN, verify that the project ID is assigned correctly in the TDP-deployed Python snippet.
-
Before rolling out the pipeline for general use, consider updating the project ID assignment to use the correct project IDs. This commonly involves extracting a project ID from file labels.
-
If your assay run is not visible in the Benchling Inbox, verify that the project ID used in the python snippet matches your Benchling Project ID.
-
Permissions-related errors associated with uploading runs, results, and entities to Benchling may be due to insufficient permissions assigned to the Benchling App used by the pipeline.
For Signals Integrations Only
-
Be aware that the Workflow Creation Assistant-developed code pushes content to a test experiment. Before rolling out the pipeline for general use, consider updating the experiment ID to use the correct experiment ID. This commonly involves extracting the experiment ID from file labels.
-
Be aware that Signals treats all field entries as optional. Accordingly, experiment updates with incomplete results, transforms with incomplete outputs, and missing defaults in the pipeline logic will be accepted by Signals.
If you have questions, please reach out to your customer account leader.
Documentation Feedback
Do you have questions about our documentation or suggestions for how we can improve it? Start a discussion in TetraConnect Hub. For access, see Access the TetraConnect Hub.
NOTEFeedback isn't part of the official TetraScience product documentation. TetraScience doesn't warrant or make any guarantees about the feedback provided, including its accuracy, relevance, or reliability. All feedback is subject to the terms set forth in the TetraConnect Hub Community Guidelines.