Data Capture App User Guide (Beta Release)
This guide shows how to use the beta release versions of the Data Capture App. The app provides scientists the ability to capture readings from simple instruments, such as balances and pH meters. It then automatically uploads the measurements to the Tetra OS, where they can be accessed, processed and passed to downstream systems such as ELNs and LIMS.
NOTEThe Data Capture App is available in beta release currently and is activated for customers through coordination with TetraScience. For more information, or to activate the app in your environment, contact your customer success manager (CSM).
Set Up the Data Capture App
See how to set up the app
To set up the Data Capture App, do the following.
Step 1: Connect Your LIMS or ELN System to the TDP
If your organization has not already, make sure that the LIMS or ELN system that you are using can communicate with the TDP by setting up the required Tetra Integration for that system.
Step 2: Get the Data Capture App installer
Contact your customer account leader to get the Data Capture App installer. Then, install the app on our device by running the installer.
Step 3: Connect the App to the TDP
To connect the app to the Tetra Data Platform (TDP) after it's installed, do the following:
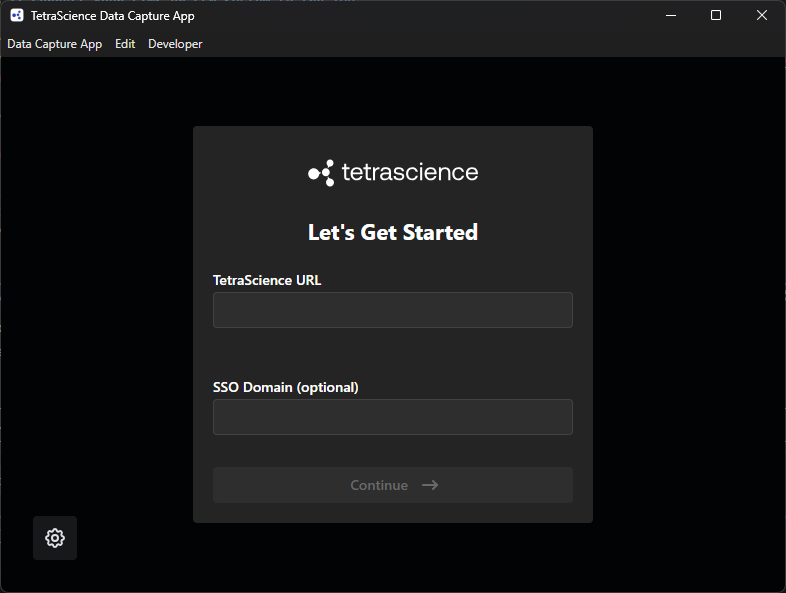
- Look for the Data Capture App icon on your device and open the app. The Let's Get Started screen appears.
-
For Tetrascience URL, enter your TDP server URL (for example, https://tetrascience-uat.com).
-
(Optional) If you are in a multi-tenant environment, enter your subdomain for SSO Domain.
-
Choose Continue. The sign-in screen appears.
Step 4. Configure the App
To configure the app after it's installed, do the following:
-
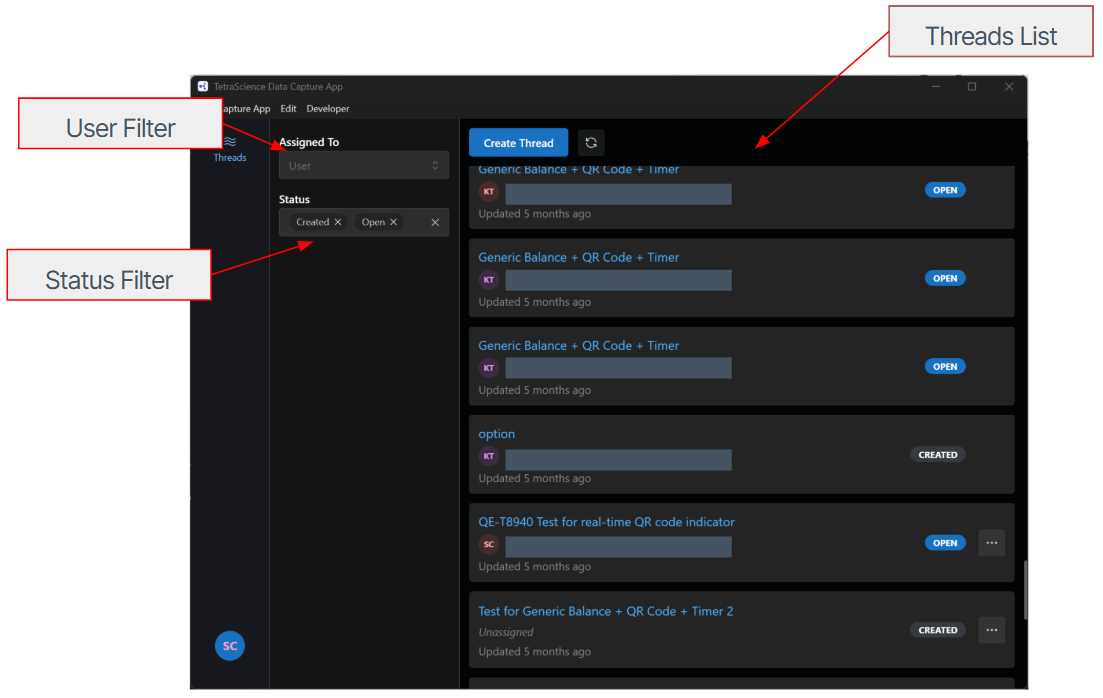
Enter your TDP credentials (email and password). Then, choose Login. The Threads list view appears.
-
To change the organization you are logged in to, select the user icon in the lower left corner. Then, select gear icon to open Settings. Select Organization you want to join from the dropdown list.
NOTETo reset your password, see Reset a Forgotten Password.
Get Started
You can use the Data Capture App to do the following:
Capture Readings
To capture readings through the Data Capture App, do the following:
- Sign in to the Data Capture App. Your task list(s) appear as threads.
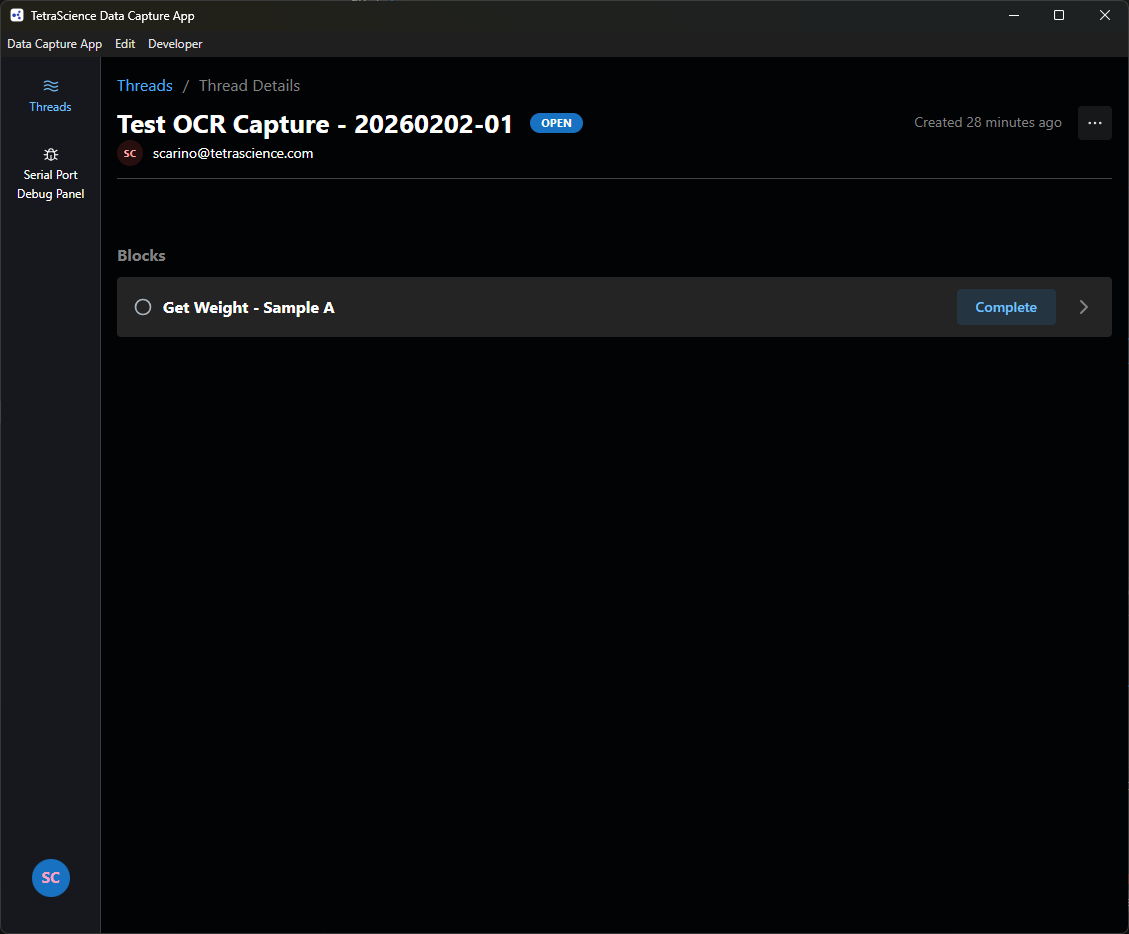
- Select the thread that you want to capture readings for. Details of the thread appear, including description of the task, its current status, who it's assigned to, and the list of blocks appears.
NOTEThe app only allows users assigned to the thread to capture readings.
- Select the block title (for example, Get Weight —[X]) for the block (task) that you want to capture. The block details will appear
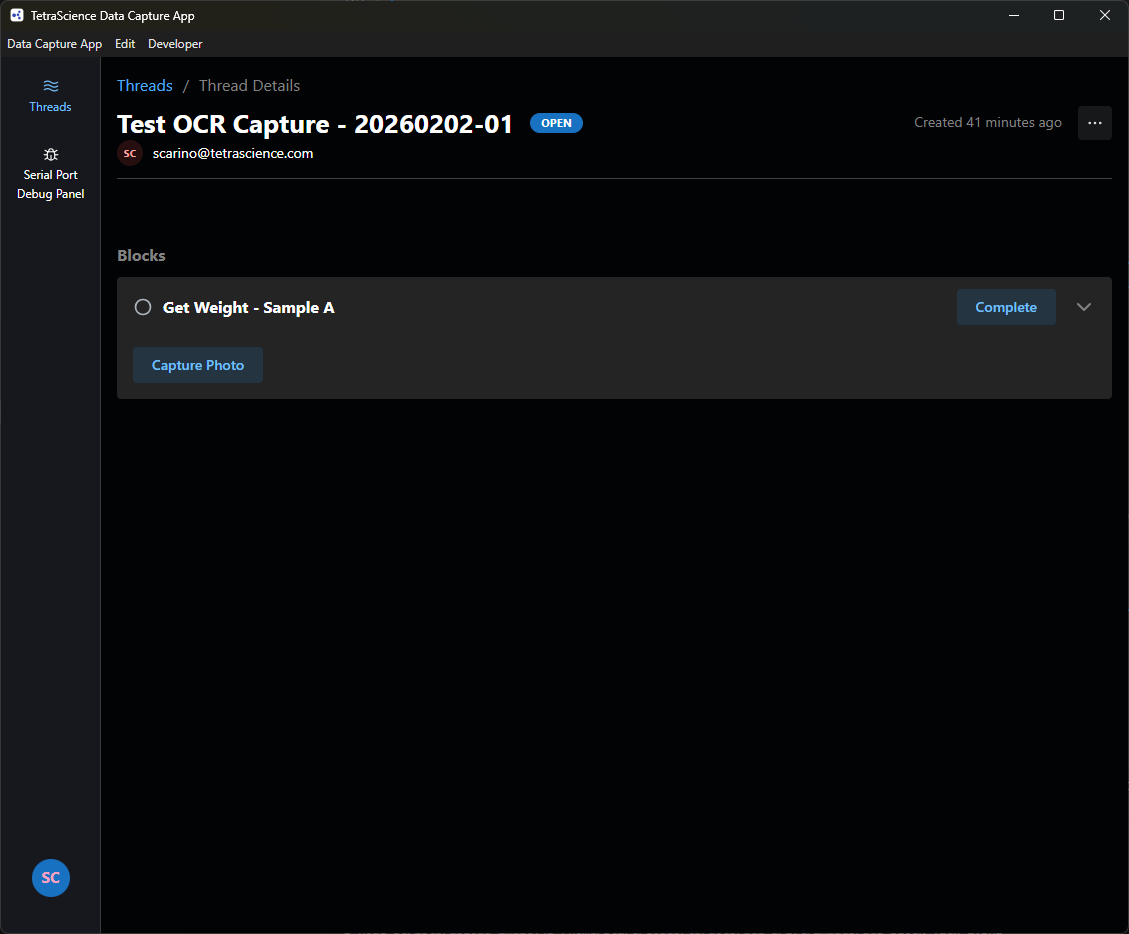
- Choose Capture Photo. The image capture screen appears.
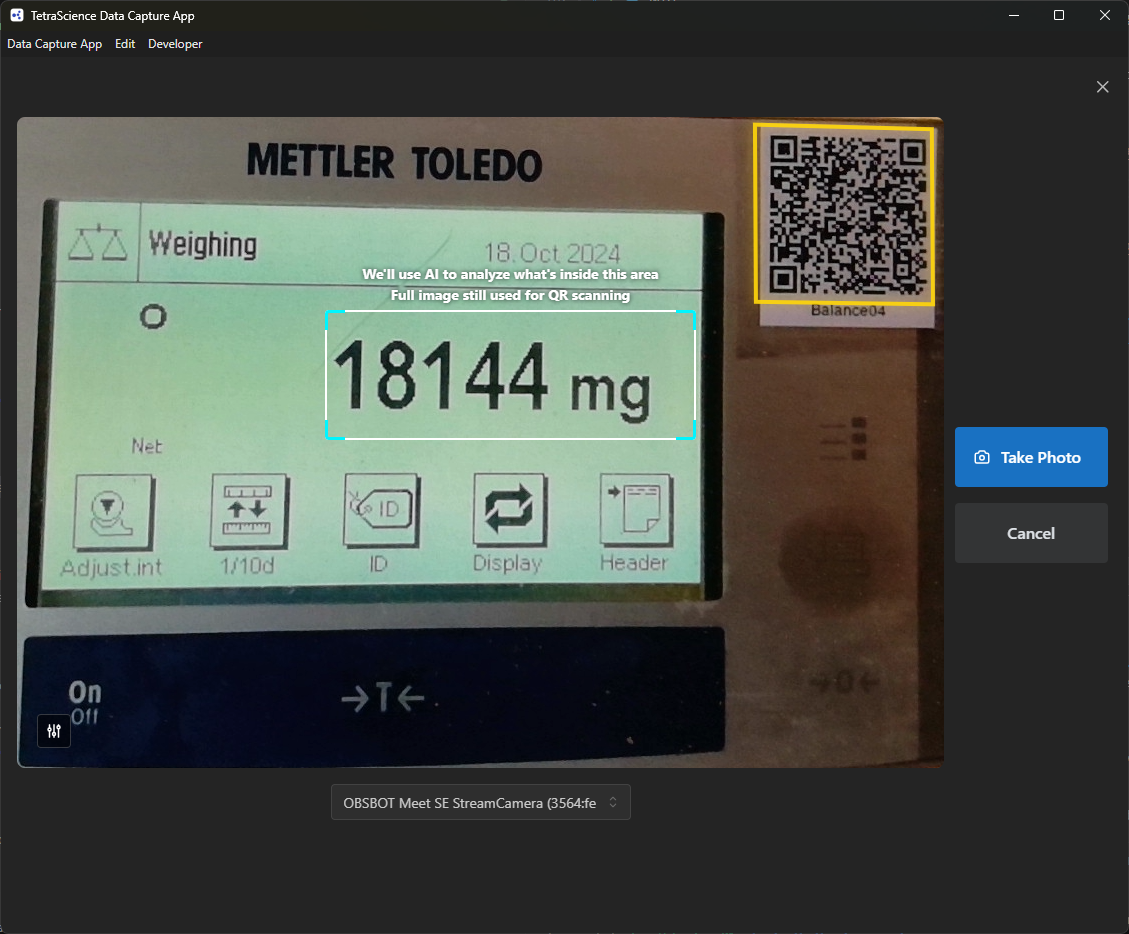
- Position the device so that both of the following are visible in the camera frame:
- Device QR code
- Instrument reading (make sure the reading is visible within the onscreen rectangle)
NOTETo adjust the size and placement of the onscreen rectangle, choose the adjustment icon
.
on the lower left corner of the image frame. Click the arrows to move the rectangle or click "+" or "-" to resize the rectangle.
- Select the camera to use such that the rectangle is over the desired reading and the QR code is visible in the frame. Yellow borders around the QR code indicate that it has been detected.
- Choose Take Photo.
- The task's reading appears, including an image of the reading and the details of the sample.
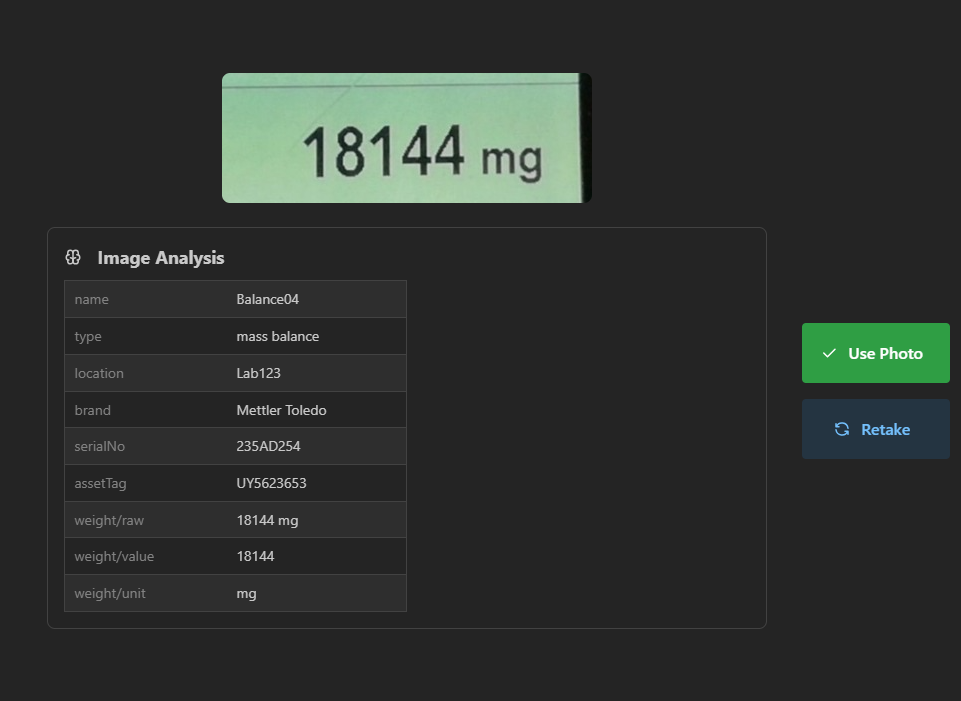
- (Optional) To recapture the reading, choose Retake.
- Choose Use Photo.
- Choose Complete to complete the current block. Each completed block is marked with a green checkmark.
- Proceed to the blocks as needed.
- After all blocks in the thread are complete, choose Close. The thread is marked as complete and the readings are sent to the TDP and any preconfigured LIMS or ELN systems.
View Completed Readings
To view completed readings (threads) in the app, do the following:
- Sign in to the Data Capture App.
- In the upper right filter dropdown on the Threads screen (default All), select Completed. Then, select the completed thread that you want to review.
Enabling Feature Flags
Some features in the Data Capture App are controlled by feature flags and are disabled by default. This section explains how to enable these features.
Enabling Serial Port Capturing
Serial port capturing allows you to collect data from instruments connected via serial port. This feature is disabled by default and must be enabled through the Advanced Settings.
Step 1: Enable Advanced Settings
Advanced Settings are hidden by default. To access them:
- Open the Data Capture App.
- Click on the Developer menu in the application menu bar.
- Click Enable Advanced Settings.
- The application will automatically restart to apply the change.
NOTEOn macOS, the Developer menu is located in the menu bar at the top of the screen. On Windows, the menu bar is located at the top of the application window.
Step 2: Enable Serial Port Capturing
After the application restarts with Advanced Settings enabled:
- Click the Settings icon (gear) to open the Settings screen.
- Scroll down to the Advanced Settings section.
- Toggle the Enable Serial Port Capturing switch to On.
- The setting is saved automatically.
Once enabled, you will see the Capture Serial Port button on Serial Port blocks in your threads.
Optional: Enable Serial Port Debug Mode
For troubleshooting serial port connections, you can enable debug mode:
- Ensure Enable Serial Port Capturing is already enabled.
- In the Advanced Settings section, toggle Enable Serial Port Debug Mode to On.
- This mode provides additional logging and debugging information for serial port connections.
Disabling Advanced Settings
To hide the Advanced Settings section:
- Click on the Developer menu.
- Click Disable Advanced Settings.
- The application will restart. The Advanced Settings section will no longer be visible, but your enabled features remain active.
Troubleshooting
Common Issues and Solutions
Image Capture Isn't Working
- Verify that AI Services are activated in your TDP environment.
- Go to the Threads app and ensure that the relevant block has a valid AI model and properly configured.
- Ensure the block has valid instructions and output specifications.
- Verify camera permissions are granted to the application.
QR Code Isn't Being Detected
- Ensure adequate lighting for the camera.
- Position the QR code closer to the camera.
- Make sure the QR code is not damaged or distorted.
- Verify the QR code was generated with proper error correction.
Can't Assign a Thread to a User
- Verify the user exists in your organization.
- Check that the user has the appropriate role to be assigned threads.
- Refresh the user list by reloading the page.
Get More Help
If you continue to experience issues after following the troubleshooting steps, do the following:
-
Check the application logs: The Data Capture App logs errors that can help diagnose issues. To access the logs, click Developer > Open Logs in the menu bar.
-
Verify prerequisites: Ensure your environment meets all prerequisites.
-
Contact your administrator: For permission-related issues or TDP configuration problems.
-
Contact TetraScience support: For persistent technical issues, contact your customer success manager (CSM).
Documentation Feedback
Do you have questions about our documentation or suggestions for how we can improve it? Start a discussion in TetraConnect Hub. For access, see Access the TetraConnect Hub.
NOTEFeedback isn't part of the official TetraScience product documentation. TetraScience doesn't warrant or make any guarantees about the feedback provided, including its accuracy, relevance, or reliability. All feedback is subject to the terms set forth in the TetraConnect Hub Community Guidelines.
Updated 2 months ago