Build a Data App: Hello, Science
Build a scientific QC review app on Tetra OS with your AI assistant — from a mock plate map to reading and writing real data.
Build a working scientific data app on Tetra OS the way scientists actually work: describe what you want in plain language, let your AI assistant assemble it from the TetraScience toolkit, and refine as you review. You'll go from a mock plate map to an app that reads and writes real data — checking the code only at the moments that matter.
Overview
What You'll Learn
- Scaffold a starter Tetra data app with
ts-cli. - Build a one-screen QC review UI on the React Component Library (PlateMap, StatCard, DataAppShell).
- Read a real Tecan plate (IDS) from Tetra OS through your app's server.
- Persist QC exclusions as a versioned results file, then read them back on load.
- Publish the app to Tetra OS as an installable app tile.
Time to Complete
45–60 minutes.
Prerequisites
Before you begin, ensure you have:
- Node 20. The
ts-cliReact template pinsenginesto>=20.0.0 <21.0.0, so Node 18 and Node 22 both fail. Check withnode --version. - Corepack enabled. The template uses Yarn 4.x via
packageManager. Runcorepack enableonce before your first install. ts-cli— you install it in Step 1.- An AI coding assistant with access to your project workspace.
- Access to a Tetra OS organization, with permission to upload files to the data lake.
- For Step 10 only: a service user, which requires Organization Admin rights to create. If you don't have them, ask an org admin to create one and send you its
auth.json.
NOTENode 20 and Corepack are the two things that most often stall Step 1. Settling them before you start saves a debugging detour.
Part 1: Build the App
What You're Working With
On Tetra OS your data lands clean and standardized, queryable through the Scientific Data Foundry. To build an app on it your assistant leans on three things:
ts-cli— scaffolds a complete starter app in one command, so you begin from a working project, not a blank page.@tetrascience-npm/tetrascience-react-ui— the React Component Library, ships ready-made scientific components including a PlateMap built for exactly this view.- Your data — mock for now, real in Part 2.
Step 1: Scaffold the starter app
Two commands you run yourself — the first installs ts-cli, the second creates the project:
pip install tetrascience-cli
ts-cli init data-app ts-hello-science --template react
That gives you a ts-hello-science folder with a complete, working app inside: a React front end, a small backend, and the TetraScience toolkit installed. From here, hand the driving to your assistant — open the folder in its workspace and ask it to get the app running:
Prompt — paste to your assistant:
I just scaffolded a Tetra app with ts-cli. Upgrade @tetrascience-npm/tetrascience-react-ui to 0.6.0 or later in both the client and server workspaces, then install dependencies and start the dev server. I'm on Node 20 with Corepack enabled, which is what this template requires. If the toolchain still complains, sort out whatever's genuinely needed to get the dev server running clean, but don't rewrite config that's already working. Tell me when it's up and mention anything you had to change.You just confirm the dev server comes up. You'll have a live app open in your browser — empty, but running.
NOTEThis tutorial was authored against
@tetrascience-npm/tetrascience-react-ui0.6.0. Later versions are fine — component APIs are stable across the versions used here — which is why the prompt says "or later" rather than pinning an exact version.
Step 2: Describe the app
This is the heart of it. Use plain language to describe your app — paste this in as-is:
Prompt — paste to your assistant:
Build a single-page QC review screen for a 96-well UV plate reader, as a TetraScience data app using @tetrascience-npm/tetrascience-react-ui v0.6.0 or later. Read the installed package's type definitions and use the real component APIs — don't guess props.

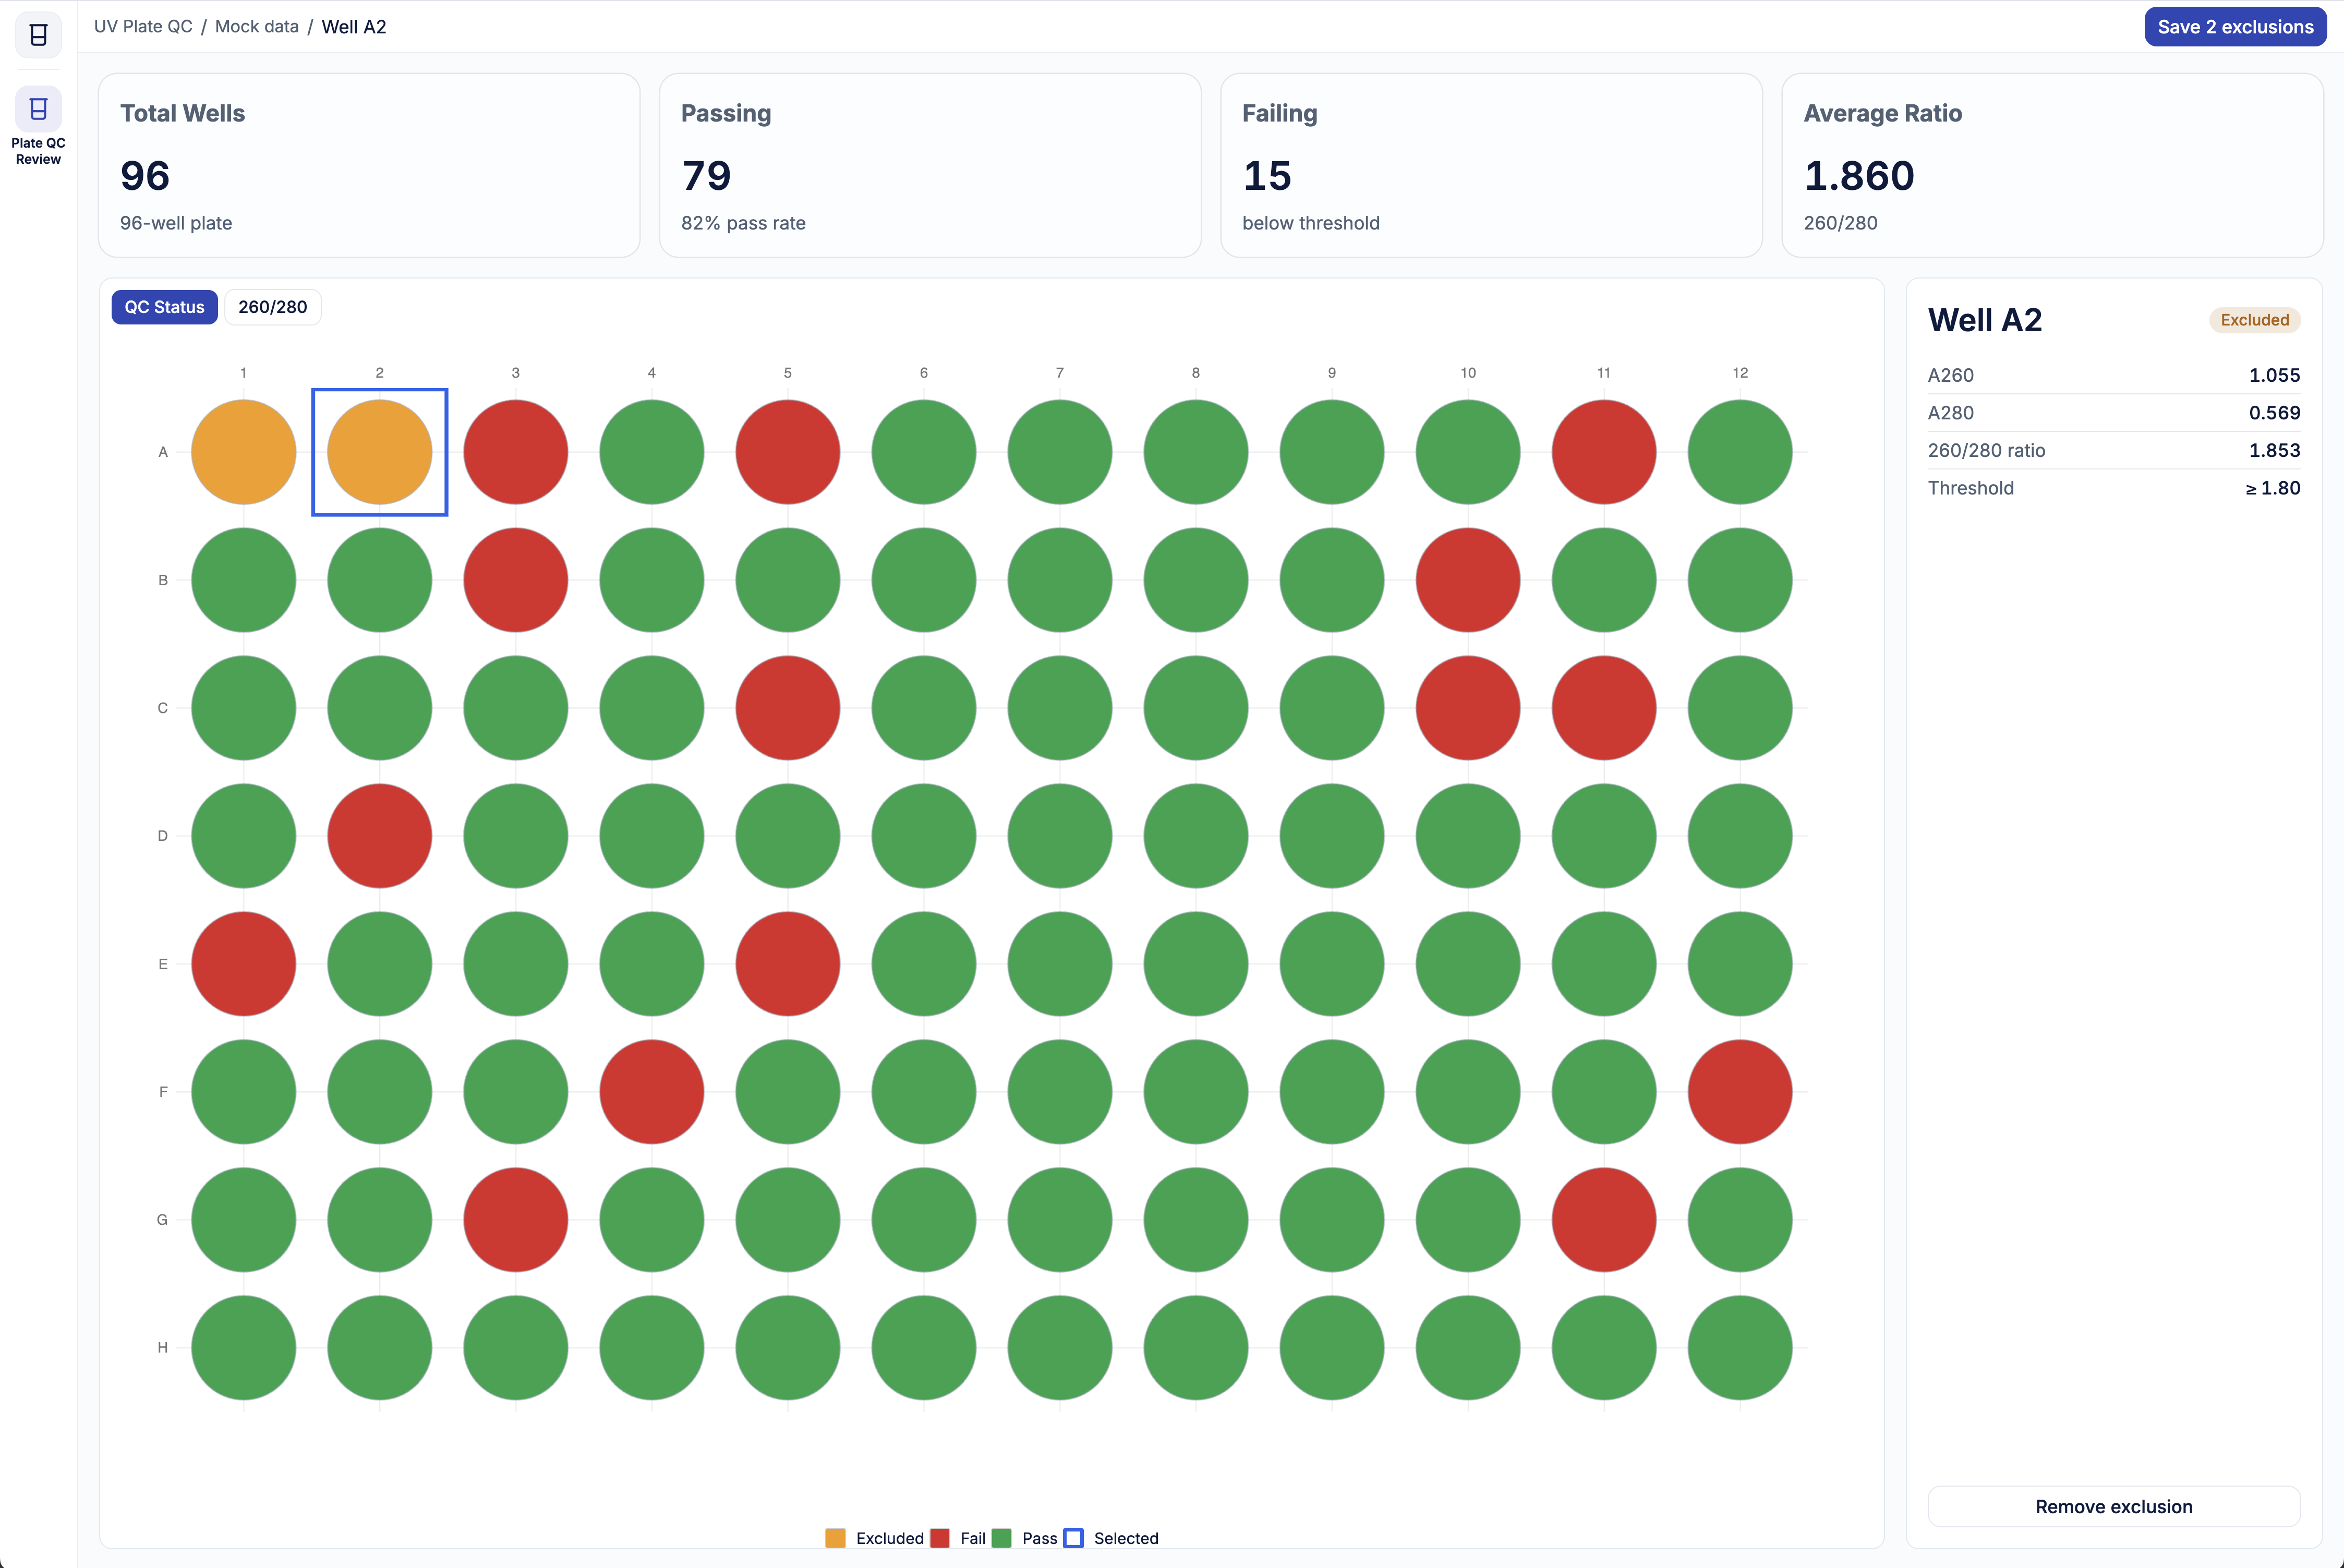
Data: deterministic mock for all 96 wells, each with A260, A280, and their 260/280 ratio. Ratios in the ~1.8–2.0 nucleic-acid purity range, threshold 1.80, ~15 seeded below so the plate is colorful. A well passes if ratio ≥ threshold, fails if below, amber if I've excluded it.

Layout must fit one screen with no scrolling, at any width. Wrap everything in the toolkit's DataAppShell. Header: title left, a "Save N exclusions" button right, selected well in the breadcrumb. Then four StatCard components forced onto one row — use grid-cols-4 with no responsive breakpoints (the shell sidebar narrows the content and would collapse them): Total Wells, Passing (+ % pass rate), Failing (+ "below threshold"), Average Ratio. Below that, a two-column row that fills the remaining height: PlateMap on the left, a persistent inline detail panel on the right (w-80, not a drawer).

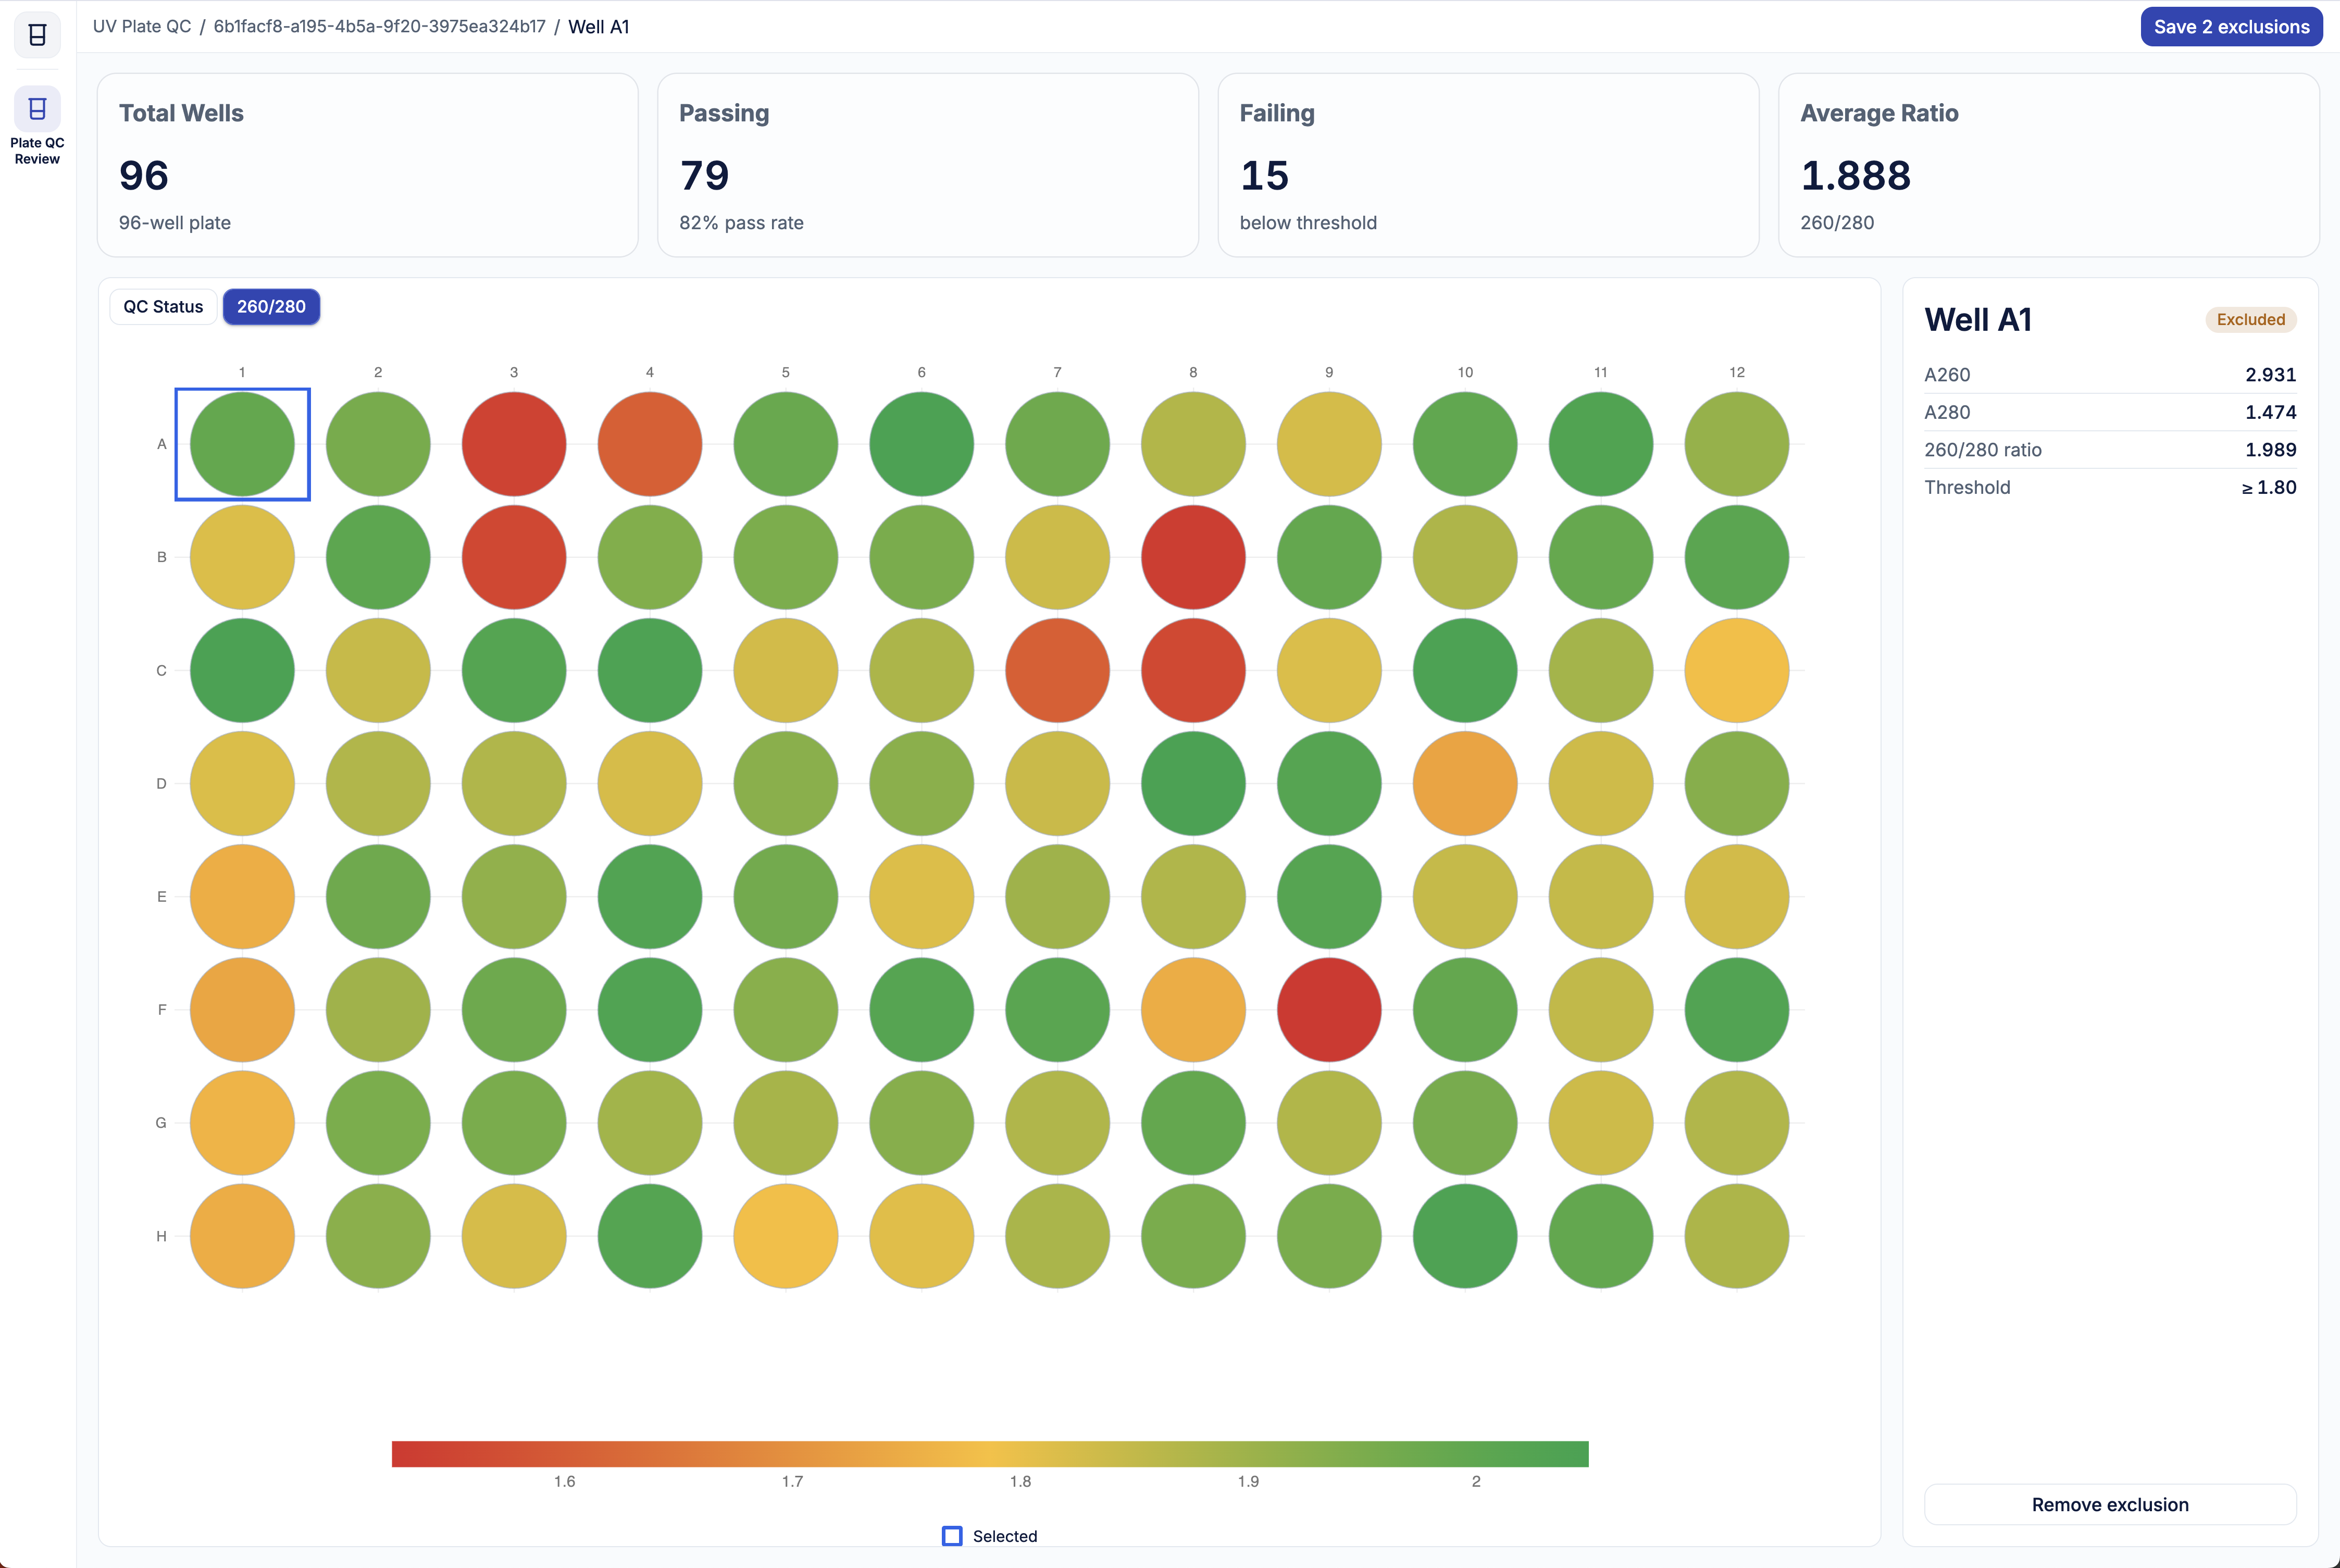
PlateMap: use its built-in layer toggle with two layers — a categorical "QC Status" (green pass / red fail / amber excluded) and a "260/280" heatmap. Put the legend at the bottom so it doesn't overlap the panel. Clicking a well selects and highlights it.

Detail panel: A260, A280, ratio, a status badge, the threshold, and a mark-excluded / remove-exclusion button; show an empty state when nothing's selected. For the save toast use the toolkit's Sonner pattern — mount <Toaster richColors /> once and add sonner as a dependency.

Verify: type-check, build, run the dev server clean, and screenshot at desktop width to confirm it fits one view.
That description is enough for a capable assistant to build the whole screen. When it's done, refresh your browser.
Step 3: Look at it, then refine by asking
Now the part scientists are best at: judge the result. Open the app, click around, notice what's off, and say so. Refinement is the same loop as the build — describe the change, let the assistant make it, look again.
Prompt — paste to your assistant:
On the summary cards, show the passing count as a percentage too.Prompt — paste to your assistant:
When a well is below threshold, add a clear 'below threshold' note in the detail panel.You're reviewing a draft and asking for revisions. Each pass gets you closer to the screen you actually want.
Step 4: Check your assistant's work
Assistants are fast and mostly right, but "mostly" is why you look. Before moving on, have it run the project's own quality checks:
Prompt — paste to your assistant:
Run the build, the linter, and the tests, and fix anything that fails. Don't suppress errors with ignore comments; fix the underlying issue.A clean build, clean lint, and passing tests is the finish line for Part 1. You now have a working Hello, Science app — plate map, summary cards, detail panel, exclude toggle — running entirely on mock data. The only thing that isn't real yet is the data itself. That's next.
Part 2: Go Live — Connect, Edit, Write Back
Same loop: you describe, the assistant builds, you check. The difference is the data is real now, so a few steps carry real weight. You don't have to write any of what follows, but the concepts are the difference between an app that looks like it saved your data and one that actually did.
The One Concept to Hand Your Assistant
Your app's calls to Tetra OS go through the small server the scaffold ships — never straight from the browser, which can't safely hold a token. You don't set this up; the scaffold already works this way.
Prompt — paste to your assistant:
From here we're connecting this app to real Tetra OS data. Important: the React front end must never call the Tetra OS API directly or hold any token; browsers can't keep secrets. Add endpoints to the project's server instead, and have the server make the authenticated Tetra OS calls.

For the credentials, use the request's auth context that this scaffold's JWT Token Manager already populates — req.tdpAuth.token and req.tdpAuth.orgSlug — not process.env.TS_AUTH_TOKEN. That middleware resolves the logged-in user's own token from cookies when the app runs on Tetra OS, and only falls back to the TS_AUTH_TOKEN environment variable in local development. Reading the env var directly would make every user share one static identity in production. See the template's docs/tdp-api-integration.md. Keep the React side as ordinary fetches to our own server.
Attribution depends on this
req.tdpAuthis what makes an action traceable to the person who took it. If the server readsprocess.env.TS_AUTH_TOKENinstead, the published app runs as a single static identity for everyone — no per-user attribution, no RBAC, no audit trail.TS_AUTH_TOKENis a local-development credential only.
Step 5: Read real data
First, set your local credentials. .env.server isn't in the scaffold yet — create it from the example, then fill in all three values and restart the dev server (they're read once, at startup):
cp .env.example .env.serverTDP_ENDPOINT=https://api.tetrascience.com
ORG_SLUG=<your org slug>
TS_AUTH_TOKEN=<your local-dev token>
Leave the /v1 off TDP_ENDPOINTSet
TDP_ENDPOINTto the API host only — for examplehttps://api.tetrascience.com. The template's own.env.examplewarns: do NOT include the/v1suffix. The endpoint paths already carry it, so adding it here produces/v1/v1/...and 404s. This is the single most common first-timer error in this step.
For TS_AUTH_TOKEN, either your own login token or a service-user token works, with a tradeoff — see For local development, should you use a login token or a service user token? in the Self-Service Data Apps FAQ. In short: a login token exercises your real permissions, so it's the better match for this app; a service-user token is simpler but won't reflect production permission boundaries.
NOTE
TS_AUTH_TOKENis a local-development credential only, and it's a different thing from theauth.jsonyou'll need in Step 10.auth.jsonis a service-user credential thatts-cliuses to publish, and creating a service user takes Organization Admin rights. Once the app is deployed, the server gets its token fromreq.tdpAuth— the logged-in user's — andTS_AUTH_TOKENis not used at all.
Next, get a plate into Tetra OS. This tutorial ships a sample: a synthetic plate-reader-tecan-magellan IDS covering all 96 wells, published in the public TetraScience API examples repository.
- Download hello-science-sample-plate.json.
- In Tetra OS open Upload File (from Search). For the required Source Type, pick
unknown— since the sample is already a processed IDS, this keeps any instrument pipeline from re-parsing it. - Open the uploaded file's File Details → File Info tab and copy its File ID (a UUID). That's the
fileIdyou'll hand the app.
NOTEIn a real deployment you wouldn't hardcode an ID: the platform hands your app the
fileIdwhen it's launched from a file, or you'd search the data lake for plate-reader IDS files. Hardcoding the sample's ID is just the simplest way to follow along.
The conversion from IDS to flat well-records is the one genuinely new piece of logic. The run is stored as a standardized IDS that keeps samples (one per well, with plate position) separate from measurements (UV260, UV280). Your server reads it with Retrieve a File. Describe that shape so the assistant gets the pairing right:
Prompt — paste to your assistant:
Add a GET /api/plate/:fileId endpoint. Fetch that file from the Tetra OS data lake retrieve endpoint, authenticating with the request's auth context that the scaffold's JWT Token Manager provides: send Authorization: Bearer <req.tdpAuth.token> and x-org-slug: <req.tdpAuth.orgSlug>. Do not read the token from process.env — that would break per-user attribution once this is deployed. The file comes back as a standardized IDS, not a flat list: there's a samples array (one per well, each with a plate position at location.position like A1 and a primary key pk) and a datacubes array (two measurements per well, each linked to its well by fk_sample, one whose measure is named UV260 and one UV280, each carrying one absorbance value at measures[0].value[0][0]). Convert that into the same flat well-record array the page already uses, pairing each well's two measurements, computing the ratio, and setting pass/fail against the QC rule, then return that. Don't send the raw IDS to the browser; keep the front end on the exact shape it used for the mock data so it renders unchanged. Also in the breadcrumb, show the data source: "Mock data" when the app is on the mock fallback, and the live file's ID once the real plate fetch succeeds.Then point the app at the plate you uploaded:
Prompt — paste to your assistant:
Load the plate with file ID <paste your uploaded file's ID here> by default, fetching it through the GET /api/plate/:fileId endpoint on mount, and fall back to the mock plate if the fetch fails.Because the server does the conversion, the React side stays an ordinary fetch and the UI renders identically. Confirm in the browser: same screen, your real numbers.
Set the threshold to your assayThe sample plate's ratios run ~1.52–2.05, so the textbook
1.80nucleic-acid purity cutoff fails 15 of the 96 wells — the same split the mock data had, which is why the screen looks familiar on real numbers.Your own plates won't be so tidy. A260/A280 only means "purity" when you know what's in the well, so check your plate's actual range before trusting the default, and if you have a real spec threshold for your assay, use that number instead.
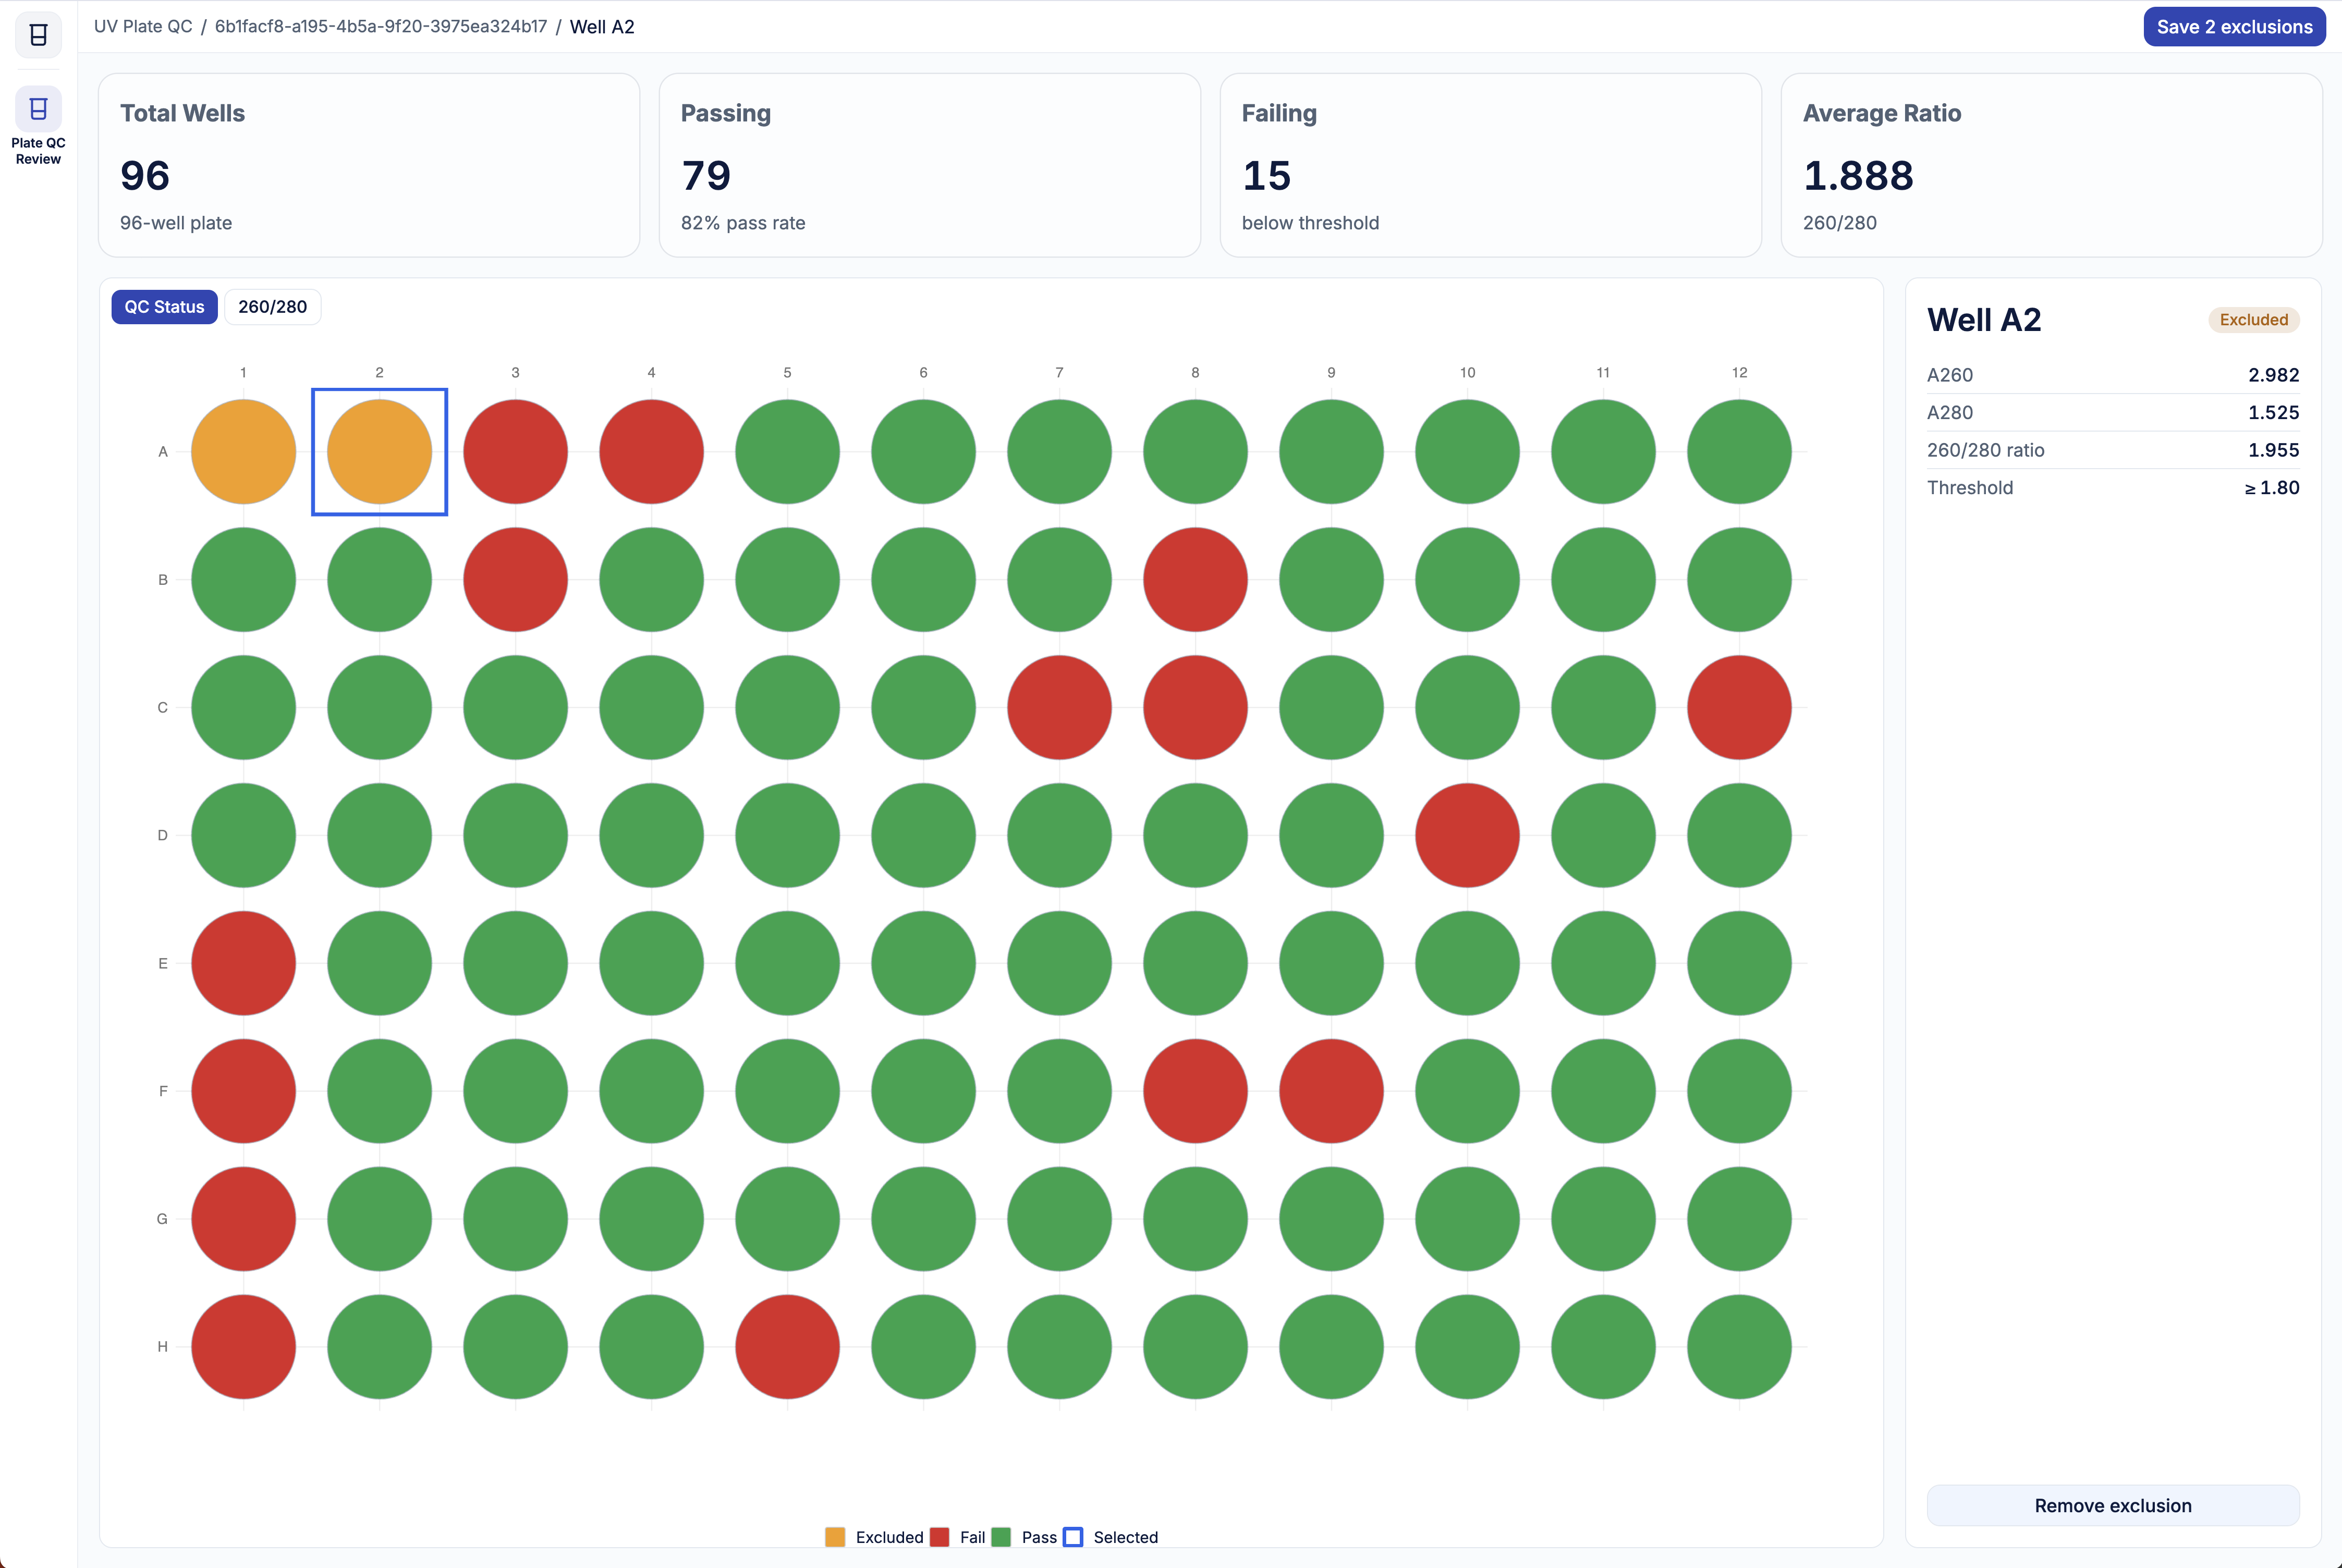
Toggle the PlateMap to the 260/280 layer to see the same plate as a ratio heatmap instead of pass/fail:
Step 6: Make the edit
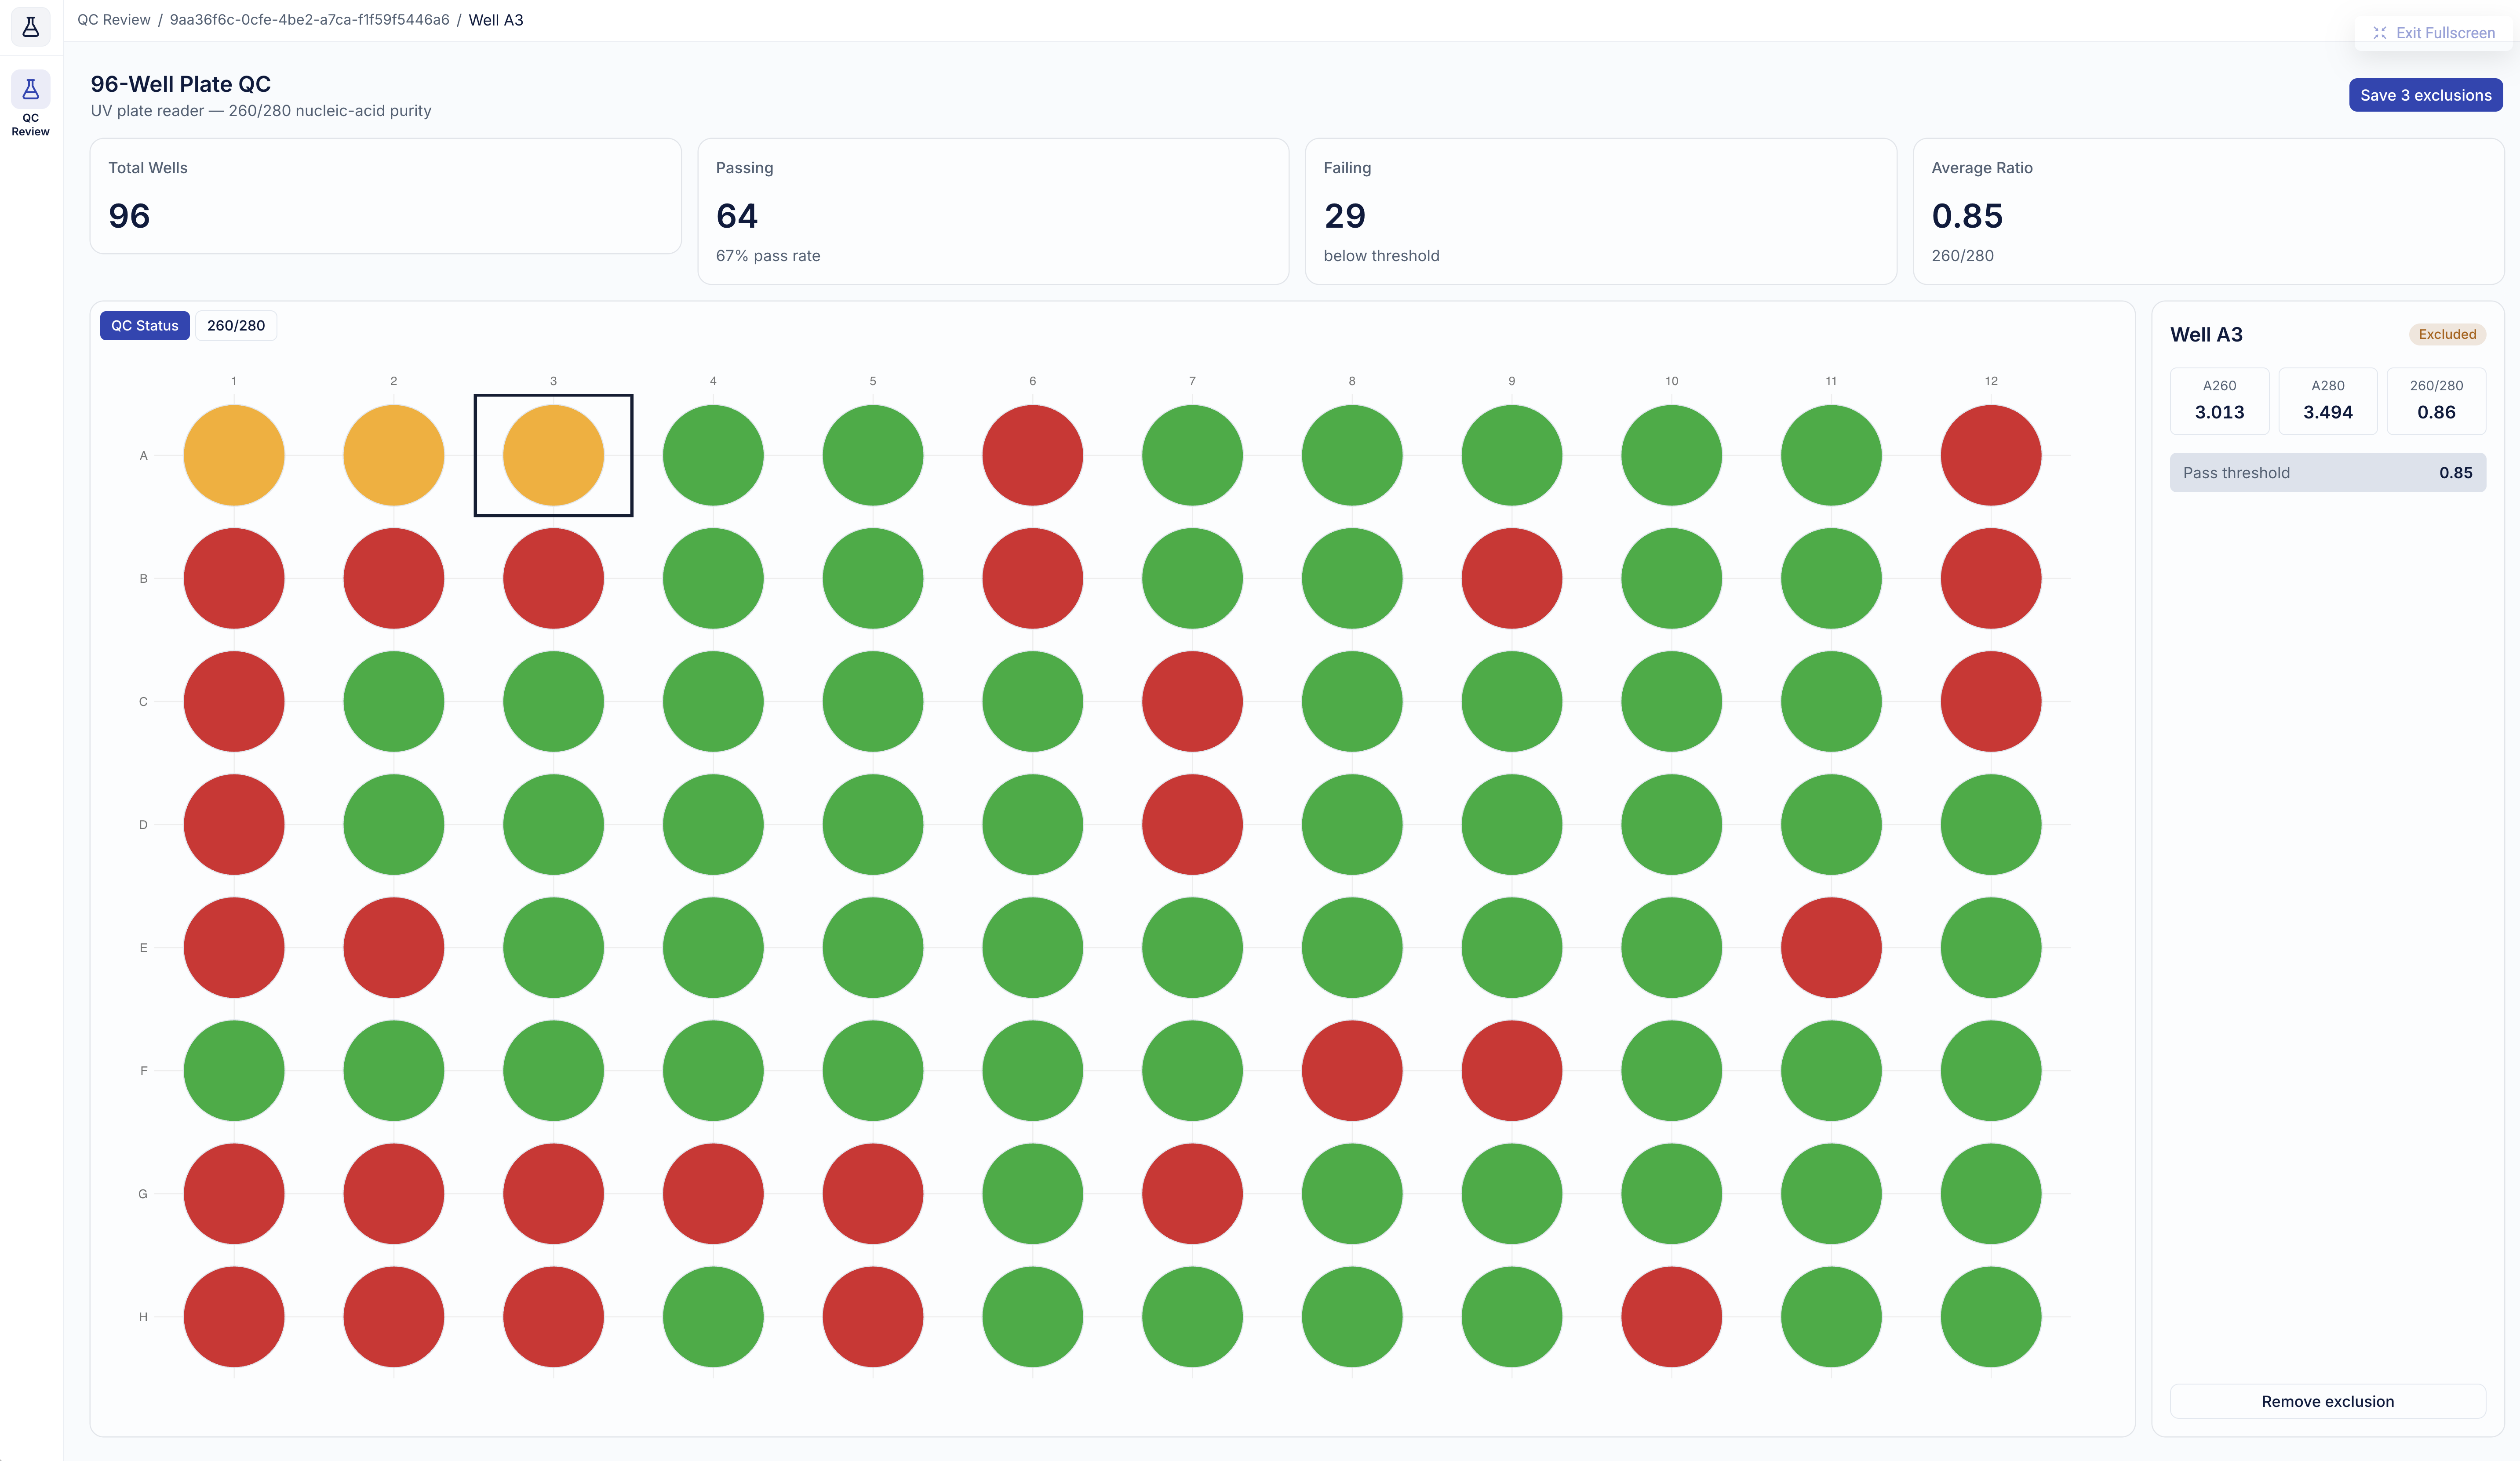
The exclusion flow is deliberately two-phase: review first, then commit. Marking a well excluded only changes what's on screen (the well turns amber); saving is a separate, explicit action.
Prompt — paste to your assistant:
Add a save action to the QC review page. Marking a well excluded should only update on-screen state; don't save anything yet. Once there's at least one excluded well, show a 'Save N exclusions' button in the header. Clicking it POSTs the excluded well IDs to a new endpoint, /api/plate/:fileId/annotations.

Two things to do carefully, because skipping either gives a save that looks like it worked when it didn't. First, disable the button and show a spinner while the request is in flight; the first save can be slow, and I don't want a double-submit.

Second, only show the success message if the server actually confirms the write: check that the response is OK and reflects what the platform accepted. A failed fetch won't throw on its own for a server error, so an unchecked failure would otherwise slide right into a success message. Success toast on confirmed save, error toast on failure.
NOTE"Only celebrate a confirmed write" is the single easiest place in the whole app to fool yourself. For the toasts to appear, the toolkit's
Toastermust be mounted once at the app root — ask your assistant to add it if it isn't.
A confirmed save shows a success toast — this appears only after the platform acknowledges the write:
Step 7: Write the change back
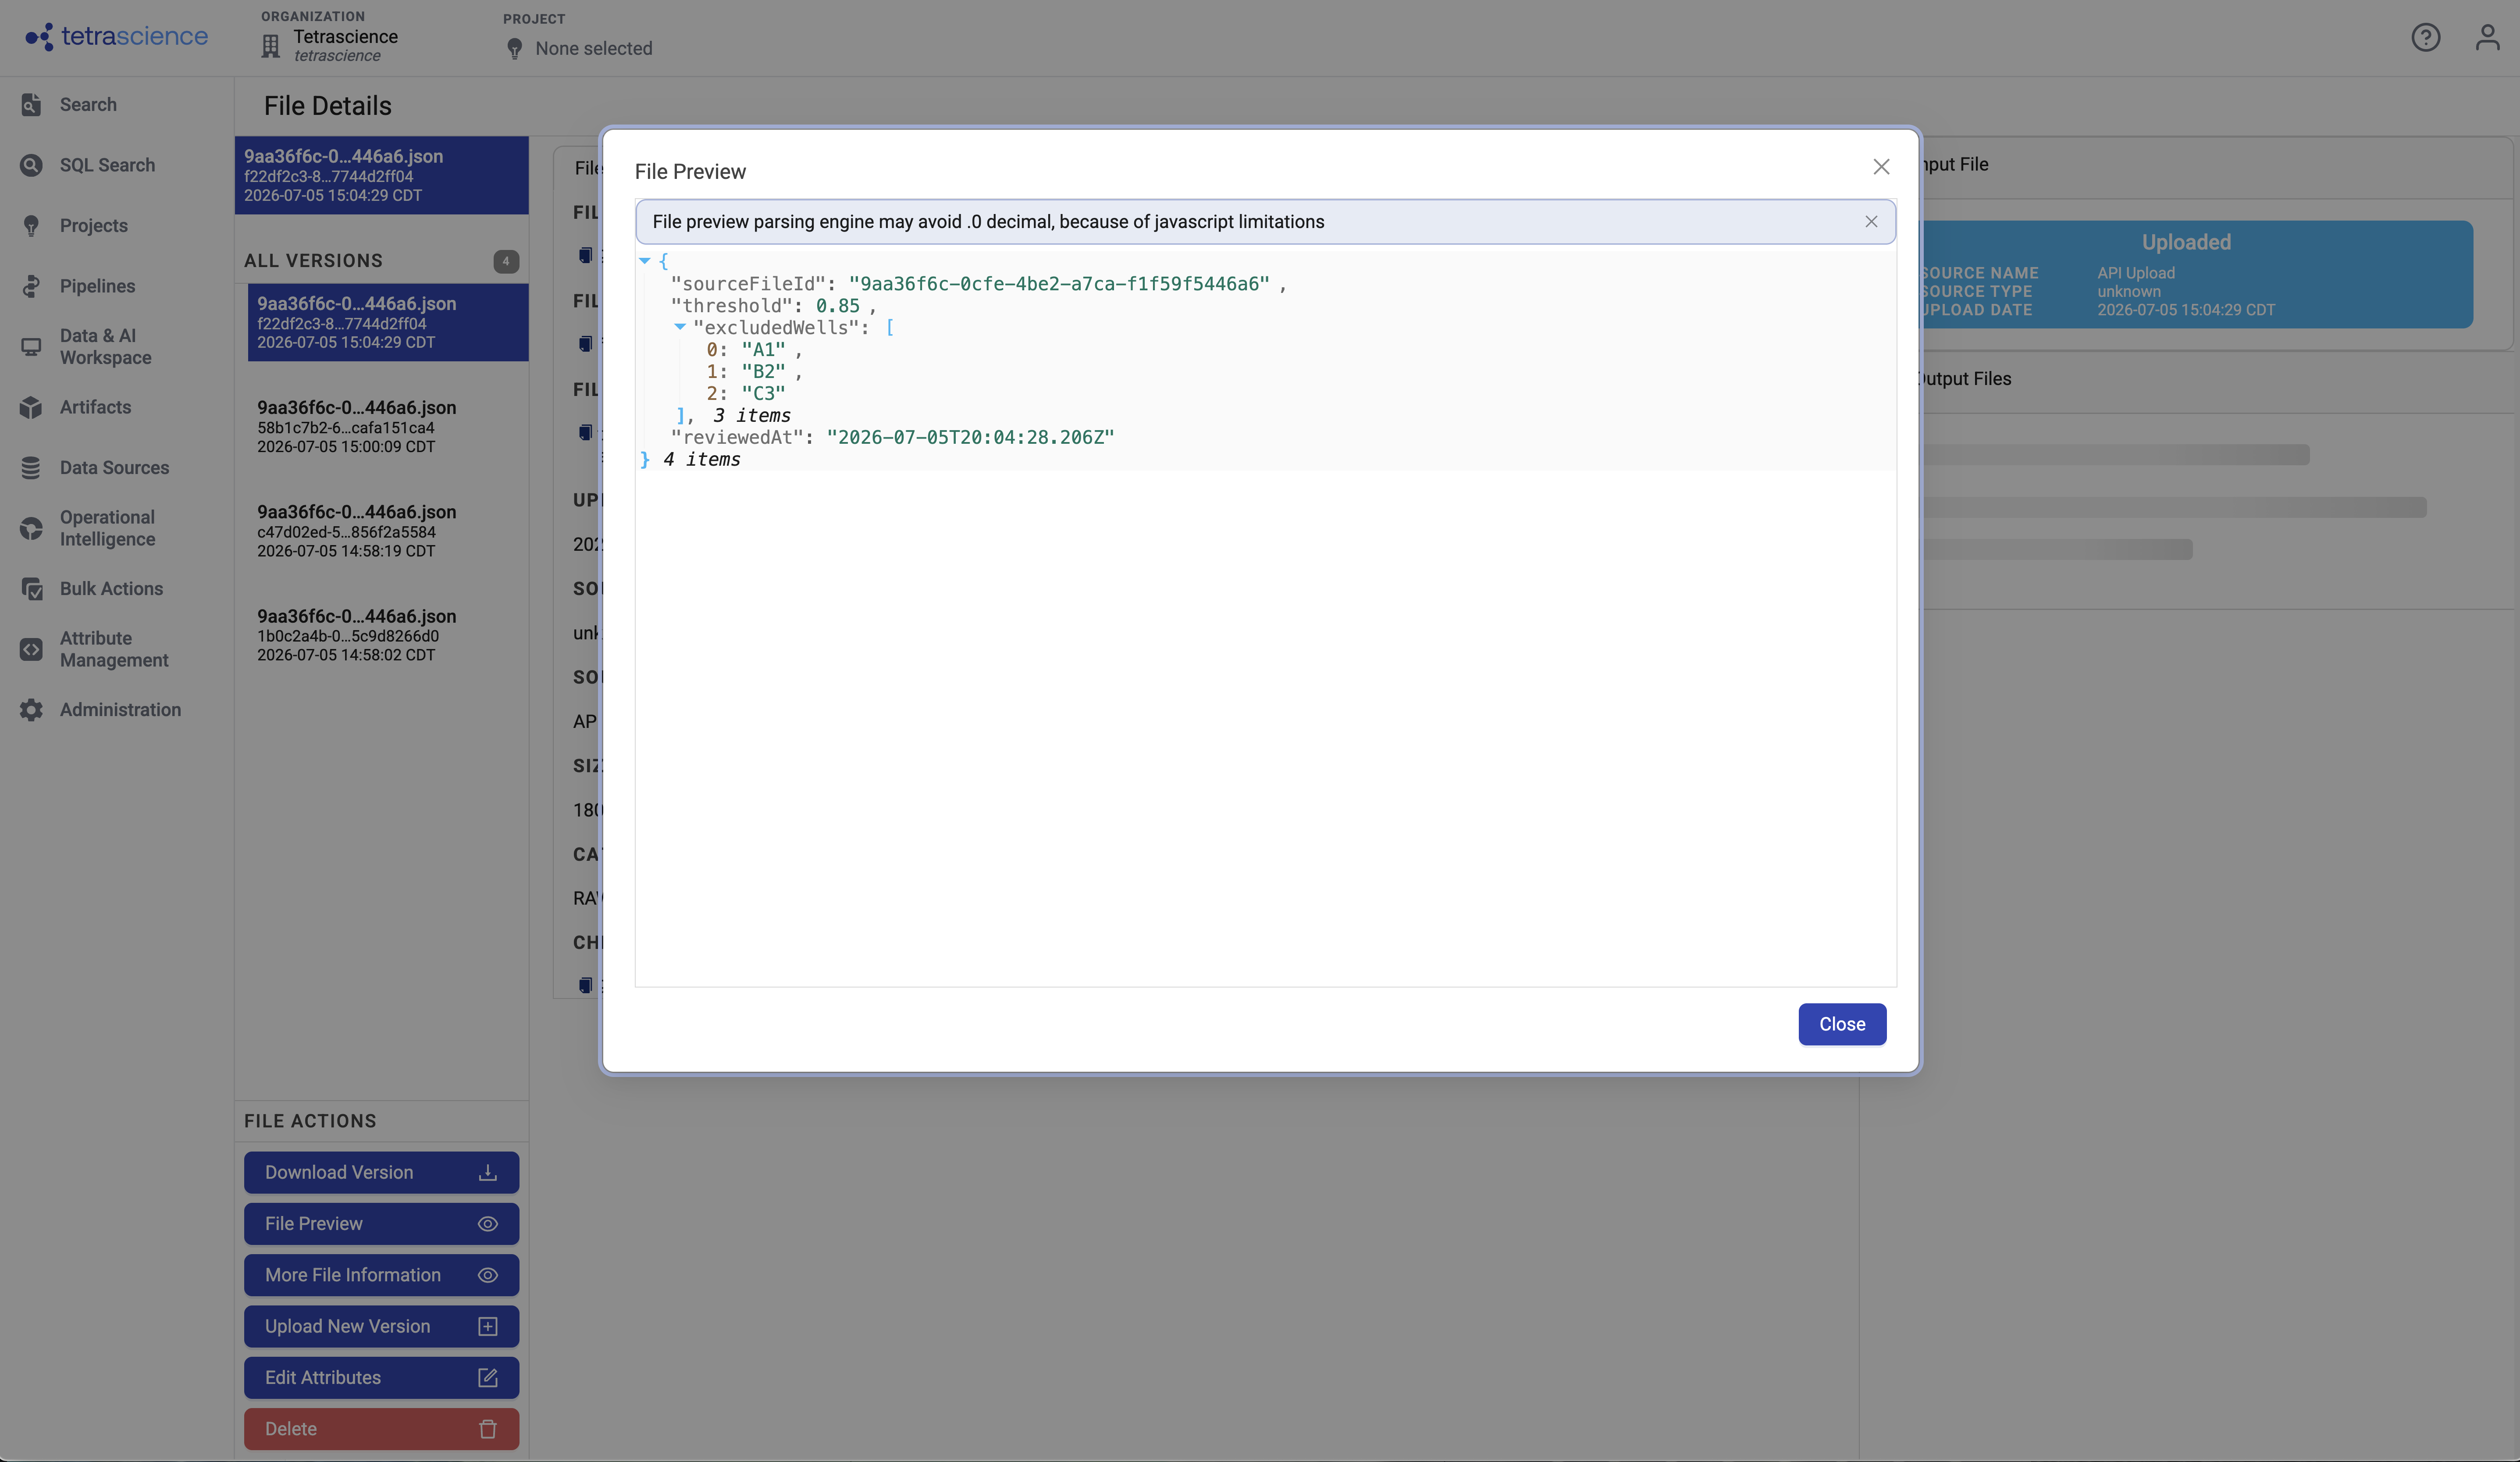
The browser posts the edit to your server; the server writes it to Tetra OS with the token from req.tdpAuth — the logged-in user's own — so the change is attributed to the person who made it. You persist the QC decision as a small JSON results file in the data lake via Upload a File — a separate artifact that leaves the source plate untouched.
Versioning is by pathThe data lake versions files by path. Upload to a new path each time and every save spawns a brand-new file; upload to the same stable path and each save becomes a new version. So derive a deterministic location — directory
/hello-science/exclusionsplus filename<plateId>.json, giving the file path/hello-science/exclusions/<plateId>.json.Watch the split: the upload endpoint's
pathfield takes the directory only and appendsfilenamefor you. Handing it the full file path is the most common way to end up with a doubly-nested stray file.
Prompt — paste to your assistant:
Implement the POST /api/plate/:fileId/annotations endpoint. Build a small JSON results object { sourceFileId, threshold, excludedWells: [...], reviewedAt } and upload it to the Tetra OS data lake via the Upload a File endpoint (POST /v1/datalake/upload) as multipart form data with fields file (the JSON blob), filename, path, and sourceType. Authenticate the same way as the read endpoint: Authorization: Bearer <req.tdpAuth.token> and x-org-slug: <req.tdpAuth.orgSlug>, so the write is attributed to the logged-in user. Use sourceType unknown (so no parsing pipeline touches it). Important: path is the data-lake *directory*, not the full file path — the platform appends the filename itself. So send path as /hello-science/exclusions and filename as <sourceFileId>.json. Passing the full path in path double-nests it and writes a stray file at /hello-science/exclusions/<sourceFileId>.json/<sourceFileId>.json. Keeping the directory and filename stable means re-saving the same plate creates a new version of the same file rather than a new file. After the upload, check the response is OK and that it returns a new fileId; only report success once the platform confirms it, and return the fileId (and versionId). On failure, stop and return the platform's status and detail.Step 8: Confirm the round trip
The green toast closes the loop — but a toast is a claim, and the file is the proof. Confirm the artifact independently, once: in the data lake, find your results file at /hello-science/exclusions/<plateId>.json (search by name or the returned fileId) and open File Details to check your exclusions are in it.
Step 9: Read your writes back on load
Right now the app writes your exclusions but never reads them back — reload the plate and your amber wells are gone. Close that gap so re-opening a plate shows your last review.
Prompt — paste to your assistant:
Add a GET /api/plate/:fileId/exclusions endpoint that finds the latest saved results file for this plate and returns its excludedWells. To locate it, POST to /v1/datalake/searchEql with { query: { term: { filePath } }, sort: [{ createdAt: "desc" }], size: 1 }, where filePath is the exact path you wrote in the previous step. Two things to get right: match on filePath, not filePath.keyword, and rely on the default collapse — it returns one hit per path at its newest version, so you get the current version rather than the original. Then retrieve that fileId and read its excludedWells. On load, after fetching the plate, call it and seed the excluded set so previously-excluded wells come back amber. Keep it best-effort: if nothing is found or the call fails, just don't restore anything, and never block the plate from loading.That's the loop closed: exclude, save, reload — and your review comes back where you left it.
Step 10: Ship it to Tetra OS
The last step publishes the app to Tetra OS so it shows up as a real app tile your team can open — ts-cli does the heavy lifting and your assistant can drive it.
Publishing needs an auth.json: a service-user credential, and a different thing from the local-dev token you put in .env.server back in Step 5. If you don't have one yet:
- In Tetra OS, go to Administration → Org Settings → Service Users and add a new Service User. This takes Organization Admin rights — if you don't have them, ask an org admin to create it and send you the file.
- Download the
.json, rename it toauth.json, and save it in your project root.
Next, set the app's identity. The app needs a small manifest.json telling Tetra OS its name, version, and which org it belongs to. You should already have this file — ask your assistant to make sure it's valid:
Prompt — paste to your assistant:
Verify I have a valid manifest.json for this data app so I can publish with ts-cli. Name it ts-hello-science, version v0.1.0, in my org's private namespace. Null out the platformRequirements, given it's a demo app. Use a minimal, valid manifest with only the fields ts-cli actually requires.Then build and publish into your private namespace first, so only your org can see it while you iterate:
Prompt — paste to your assistant:
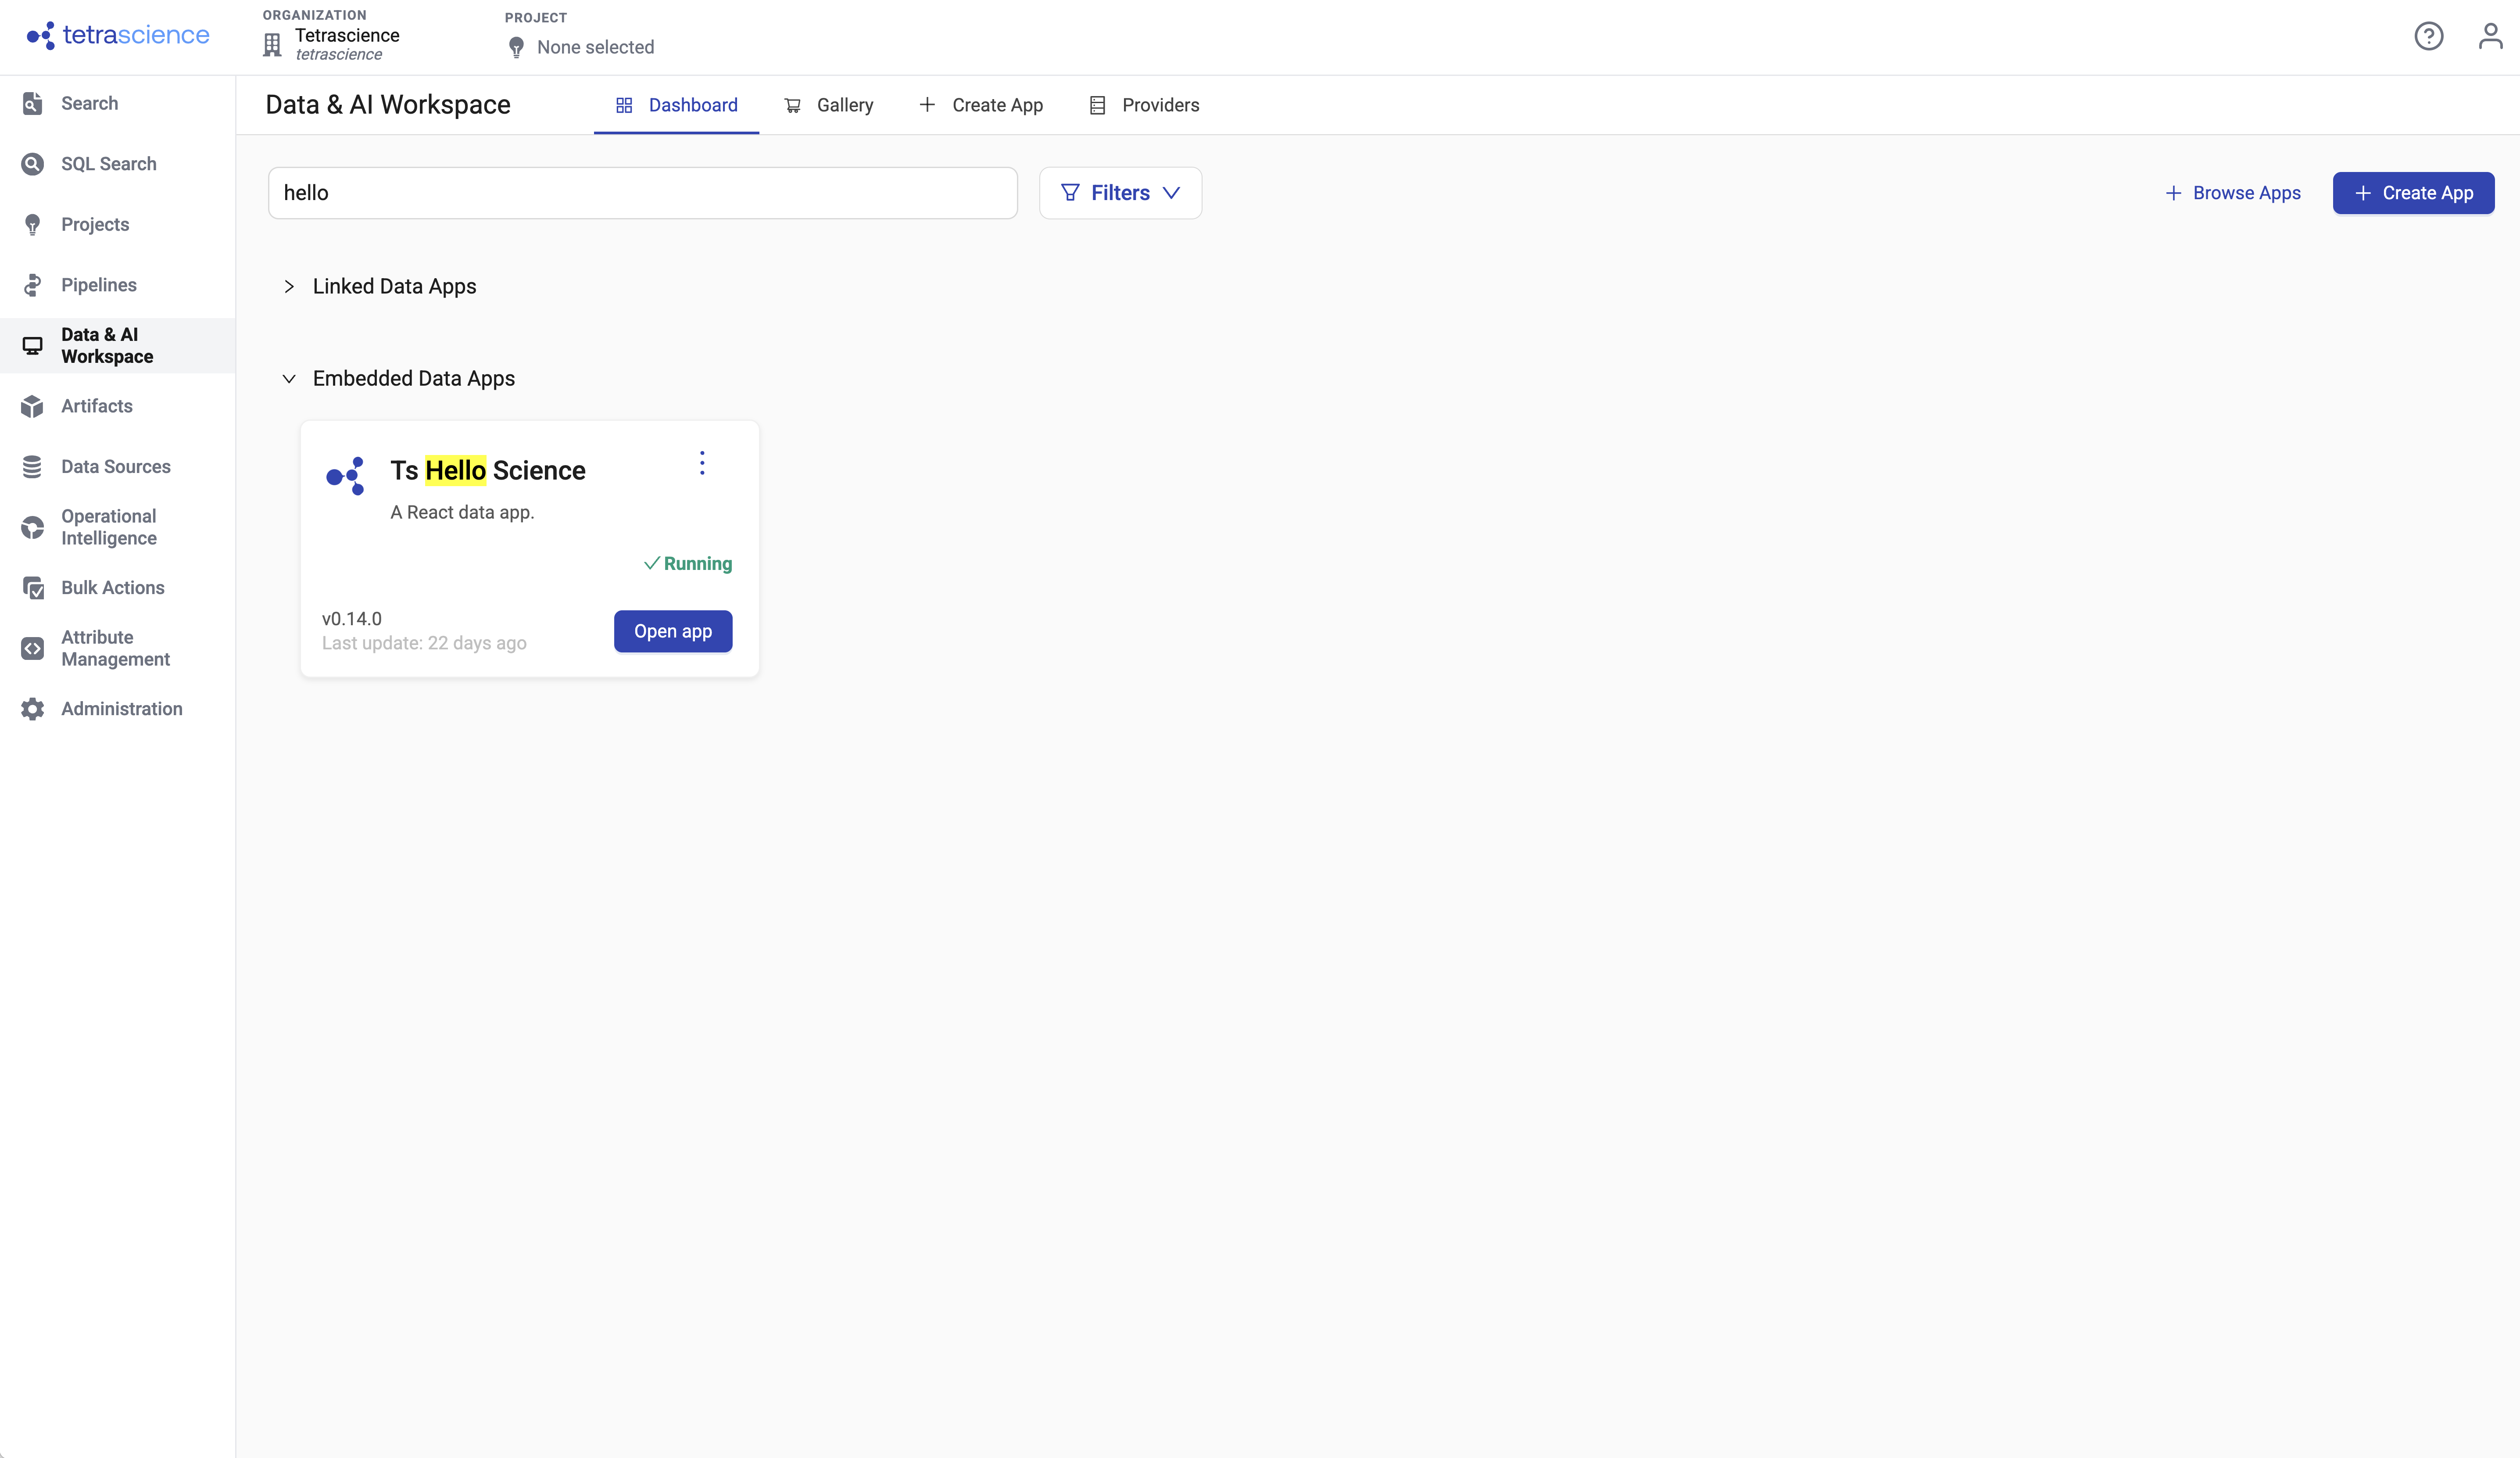
Build the publishable container and publish this app to my private namespace with ts-cli. Check ts-cli publish --help first to confirm the exact flags for the installed version, then run it for me.Once it publishes, finish in the browser: open Tetra OS → Tetra Data & AI Workspace, find the app in the gallery, click Details, then Install. Your app is now live — reading and writing real scientific data.
What You Built
The full round trip: read your data, edit it, write it back, and see it again next time. You did it by describing what you wanted, letting your assistant assemble it from the TetraScience toolkit, and refining as you reviewed — checking the code at the moments that mattered. The science is yours; the typing is the assistant's.
| Capability | What you built |
|---|---|
| Scientific UI | A one-screen QC review built on the React Component Library's PlateMap, StatCard, and DataAppShell. |
| Live Data | Read a real Tecan IDS plate as the logged-in user, via the scaffold's req.tdpAuth context — the server converts IDS to flat well-records. |
| Write Back | Persist exclusions as a versioned JSON results file at a stable data-lake path, then read them back on load. |
| Confirmed Writes | Never celebrate an unconfirmed save — success only after the platform acknowledges the write. |
Next Steps
Now that you've completed this tutorial, you can:
- Swap the hardcoded
fileIdfor a real launch context or a data lake search, so the app opens whichever plate the user selected — see Embedded Tetra Data Apps. - Read the Self-Service Data Apps FAQ for
manifest.jsonrules, Providers and secrets, and theTDP_ENDPOINTvsTDP_INTERNAL_ENDPOINTdistinction. - Add your own metric or plate layout — the same describe-review-refine loop applies to any assay, not just UV.
- Publish to a shared namespace once you're happy with it, so the whole org sees the tile.
Troubleshooting
yarn install fails on the Node version
yarn install fails on the Node versionProblem: The install aborts with an engines or unsupported-version error.
Solution: The template pins Node to >=20.0.0 <21.0.0. Node 18 and Node 22 both fail. Run node --version and switch to Node 20.
yarn isn't found, or resolves to the wrong version
yarn isn't found, or resolves to the wrong versionProblem: The template declares Yarn 4.x through packageManager, which needs Corepack.
Solution: Run corepack enable once, then re-run the install.
Every Tetra OS call returns 404
Problem: TDP_ENDPOINT includes a /v1 suffix, so requests resolve to /v1/v1/....
Solution: Set TDP_ENDPOINT to the host only — https://api.tetrascience.com. The endpoint paths supply /v1 themselves.
Tetra OS calls return 401 locally
Problem: No TS_AUTH_TOKEN in .env.server, an expired token, or the dev server wasn't restarted.
Solution: Confirm .env.server exists (cp .env.example .env.server) and all three values are set, then restart the dev server — they're read once at startup. Locally there are no Tetra OS cookies, so req.tdpAuth falls back to TS_AUTH_TOKEN; if it's missing or stale, every call is unauthenticated.
Every well fails, or every well passes
Problem: The threshold doesn't match the plate's actual ratio range. You'll hit this the moment you point the app at your own data instead of the sample.
Solution: Check the plate's real min and max, then set a threshold that meaningfully splits it — or use your assay's spec value. See Set the threshold to your assay in Step 5.
The save shows success but no file appears
Problem: The success toast fires without checking the platform's response.
Solution: A failed fetch doesn't throw on an HTTP error status. Confirm the response is OK and returns a new fileId before showing the success toast, as described in Step 6.
Related Resources
- ts-cli — PyPI: tetrascience-cli
- React UI toolkit — npm: @tetrascience-npm/tetrascience-react-ui
- Retrieve a File and Upload a File API reference
- Tetra Data Apps
- Self-Service Data Apps FAQ
Documentation Feedback
Do you have questions about our documentation or suggestions for how we can improve it? Start a discussion in TetraConnect Hub. For access, see Access the TetraConnect Hub.
NOTEFeedback isn't part of the official TetraScience product documentation. TetraScience doesn't warrant or make any guarantees about the feedback provided, including its accuracy, relevance, or reliability. All feedback is subject to the terms set forth in the TetraConnect Hub Community Guidelines.
Updated 2 months ago