

TetraScience AI Services User Guide (v1.2.x)
This guide shows how to use TetraScience AI Services versions 1.2.x.
Prerequisites
TetraScience AI Services requires the following:
- Tetra Data Platform (TDP) v4.4.1 or higher
- A TDP role that includes at least one of the following policy permissions :
Access AI Services
To access TetraScience AI Services, do the following:
- Sign in to the Tetra Data Platform (TDP) as a user with one of the required policy permissions .
- In the left navigation menu, choose Artifacts.
- Select AI Services. The Scientific AI Workflows page appears.
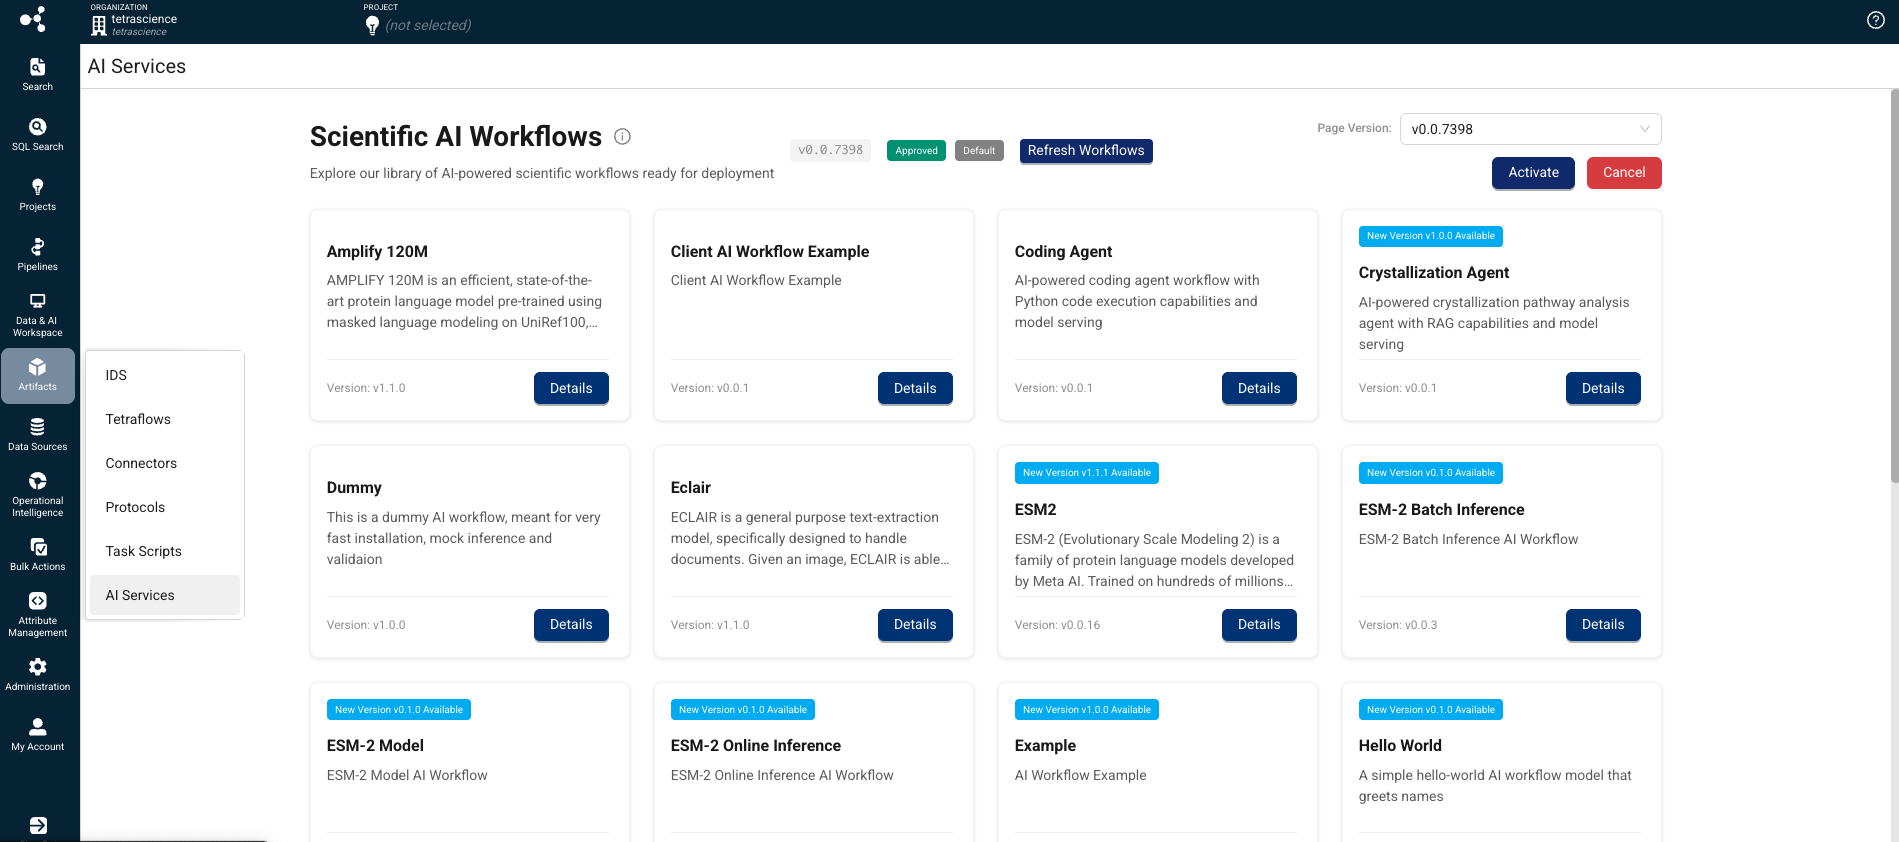
On the Scientific AI Workflows page, you can do any of the following:
- Find a Scientific AI Workflow for your use case: Browse and review workflow versions with associated metadata.
- Activate a Scientific AI Workflow: Admins can activate a specific workflow version to make it available for authorized users.
- Install a Scientific AI Workflow: Provision the required compute resources on-demand, resulting in an inference endpoint you can call programmatically .
- Uninstall a Scientific AI Workflow: Remove the compute resources for a workflow without deleting its artifacts or versions.
- Create and deploy a custom AI Workflow (BYOM): Use the TetraScience CLI (
ts-cli) to scaffold, configure, and publish your own "Bring Your Own Model" AI workflow. - Update the AI Services user interface version: Update the AI Services UI to the latest version.
You can also monitor Scientific AI Workflow jobs through the TDP Health Monitoring Dashboard and System Log.
To run an inference using an installed Scientific AI Workflow, see Run an Inference (AI Services v1.1.x).
Find a Scientific AI Workflow for Your Use Case
To browse Scientific AI Workflows by version and metadata, do the following:
- Open the AI Services page as a user with one of the following policy permissions :
- Tenant Admin
- Organization Admin
- Developer
- Machine Learning Engineer The Scientific AI Workflows page appears and displays the AI Workflows available to your organization.
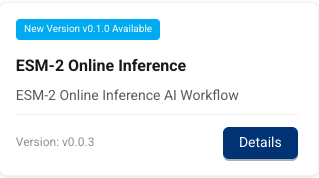
- Find the workflow for your use case. Each workflow's tile displays its name, description, and current version number. Workflows that have new versions available are marked with a New Version vx.x.x Available banner. To get more information about a specific workflow, or to install it, select the workflow's Details button.
NOTEIf you don't see a Scientific AI Workflow for your use case, you can create and deploy a custom "Bring Your Own Model" (BYOM) AI Workflow using the TetraScience CLI (
ts-cli). For additional assistance, contact your customer account leader.
Activate a Scientific AI Workflow
To activate a specific AI workflow version and make it available to authorized users in your organization, do the following:
- Open the AI Services page as a user with one of the following policy permissions :
- Find the workflow that you want to activate.
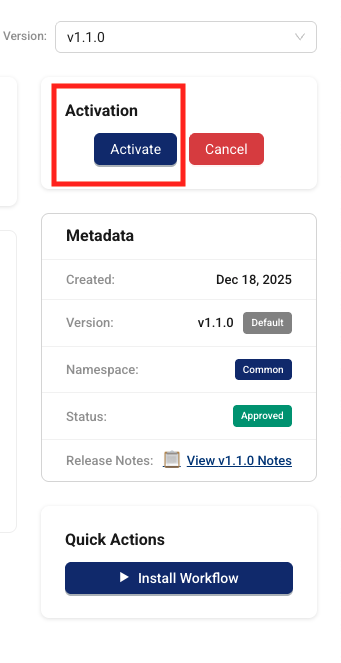
- Choose the workflow tile's Details button. The AI Workflow's page appears.
- In the Validation tile, choose Activate. The AI workflow is now activated and is available to authorized users in your organization through the AI Services page.
Install a Scientific AI Workflow
To activate compute resources for specific Scientific AI Workflows on-demand and get an inference URL that you can call to run an inference, do the following:
- Open the AI Services page as a user with one of the following policy permissions :
- Find the workflow that you want to install and receive a new inference URL for.
- Choose the workflow tile's Details button. The AI Workflow's page appears.
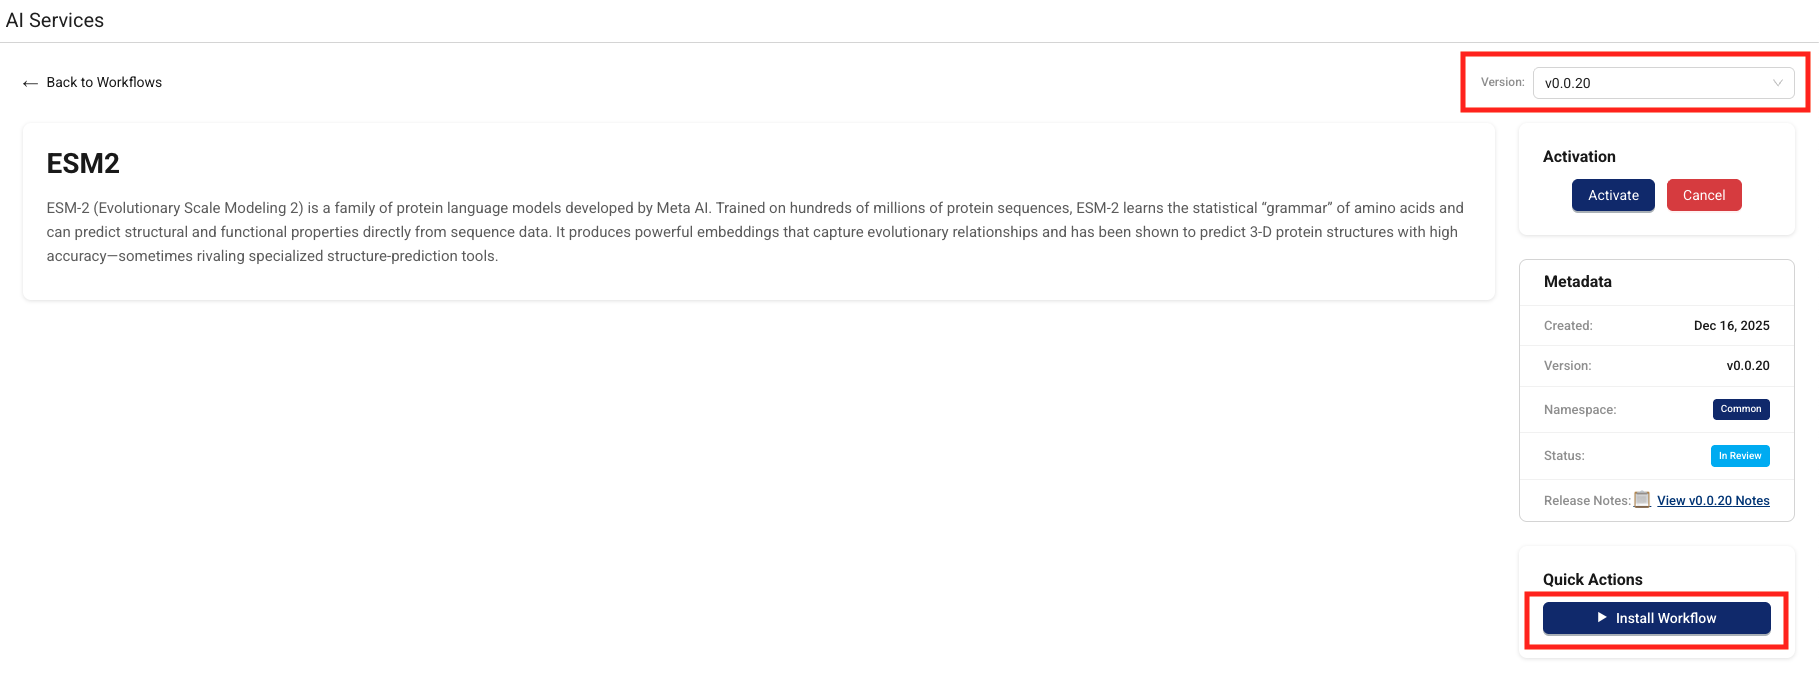
- In the Version dropdown, select the workflow version that you want to install.
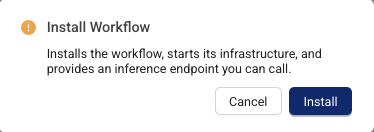
- Choose Install Workflow. The Install Workflow dialog appears and prompts you to confirm that you want to install the workflow. Choose Install.
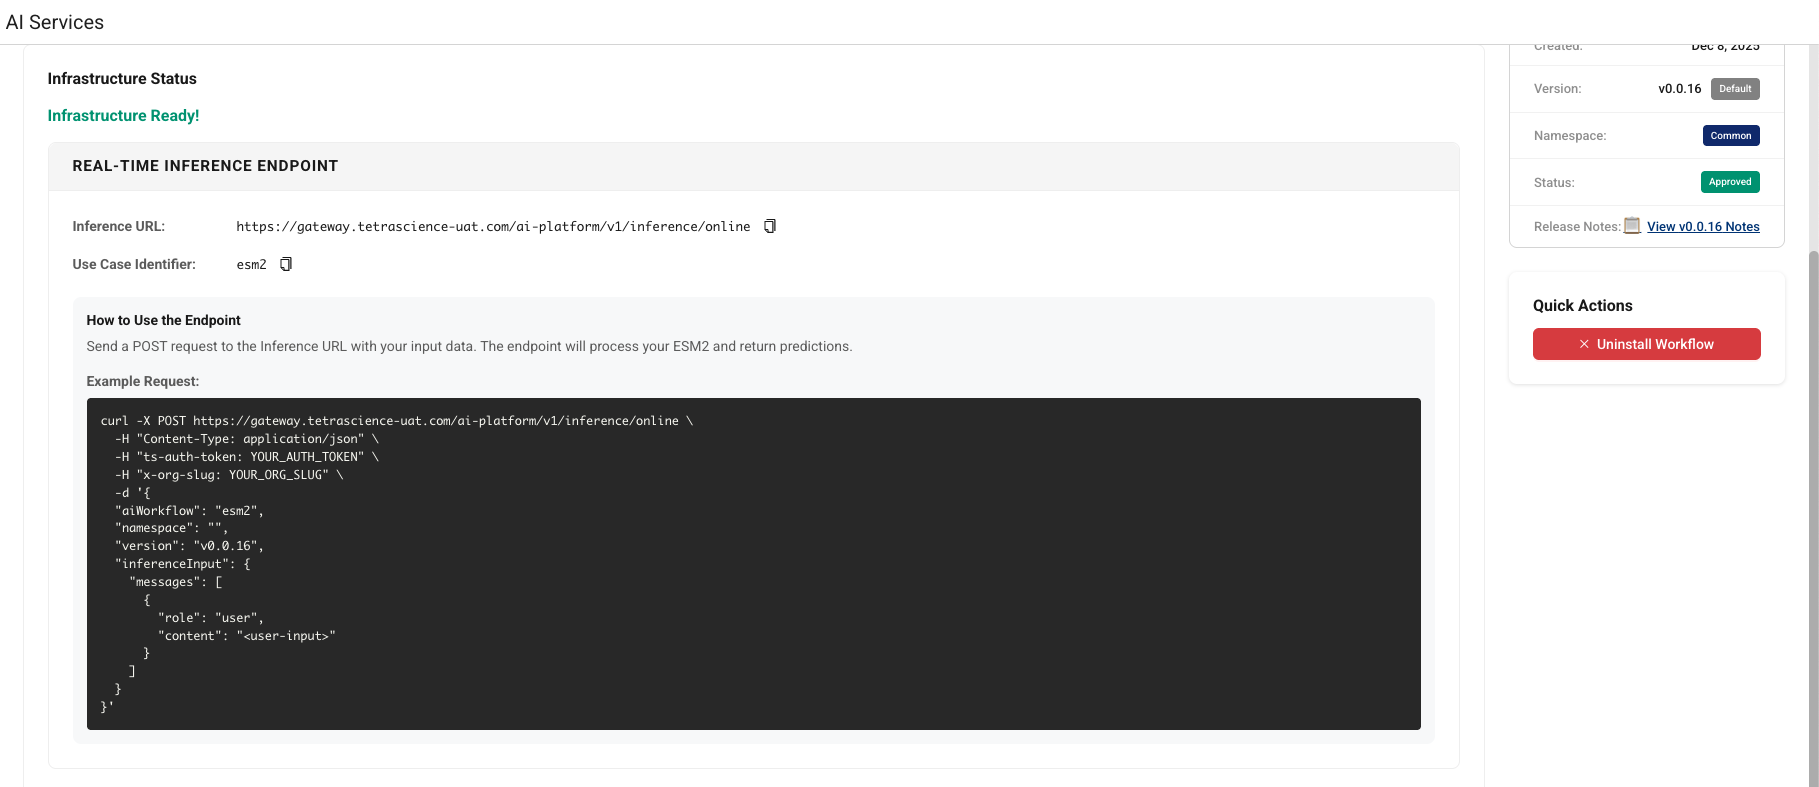
The infrastructure status appears. Setting up your inference environment may take several minutes.

- Copy either the BATCH ENDPOINT or the REAL-TIME ENDPOINT, based on the type of inference you want to run. You can then send a
POSTrequest to the inference URL with your input data, and the endpoint will process it and return a response. For more information about how to run an inference using your installed AI workflow, see Run an Inference.
Run a Scientific AI Workflow Inference
TetraScience AI Services provides the following API endpoints that you can call using your installed AI workflow:
- Submit a real-time (synchronous) inference request(
/inference/online): Invokes the appropriate LLM, AI agent, or custom model to return real-time predictions from text-based inputs. - Submit a batch (asynchronous) inference request(
/inference): Provides inputs through JSON files or specify datasets for batch predictions and asynchronous processing. - Invoke a custom notebook (
/inference/invoke/*): Invokes any notebook in the AI Workflow, including training notebooks, with arbitrary JSON payloads and S3 input files.
For more information, see Run an Inference (AI Services v1.2.x) .
Uninstall a Scientific AI Workflow
To remove the compute resources for an AI workflow without deleting its artifacts or versions, do the following:
- Open the AI Services page as a user with one of the following policy permissions :
- Find the workflow that you want to uninstall.
- Choose the workflow tile's Details button. The AI Workflow's page appears.
- Choose Uninstall Workflow.
The Uninstall Workflow dialog appears and prompts you to confirm that you want to uninstall the workflow. Choose Uninstall.
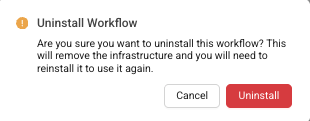
The Scientific AI Workflow infrastructure is removed without deleting its artifacts or versions. To use the AI workflow again, you must reinstall it.
Monitor Scientific AI Workflow Jobs
To see a complete list off all Scientific AI Workflow installation and uninstallation requests, along with inference requests, see the TDP System Log.
You can also track failed inference jobs through the TDP Health Monitoring Dashboard, by doing the following:
- Sign in to the TDP as a user with one of the required policy permissions .
- In the left navigation menu, choose Health Monitoring. The Health Monitoring page appears with the Dashboard tab selected by default, which displays an end-to-end snapshot of your components' health for your entire TDP ecosystem.
- Select the Jobs tab. Then, for Artifact Type, select AI Workflow. A list of your TDP organization's Scientific AI Workflow job failures appears, including details about each failed job.
Update the AI Services UI Version
To update the AI Services user interface version in your TDP organization, do the following:
-
Open the AI Services page as a user with one of the following policy permissions :
-
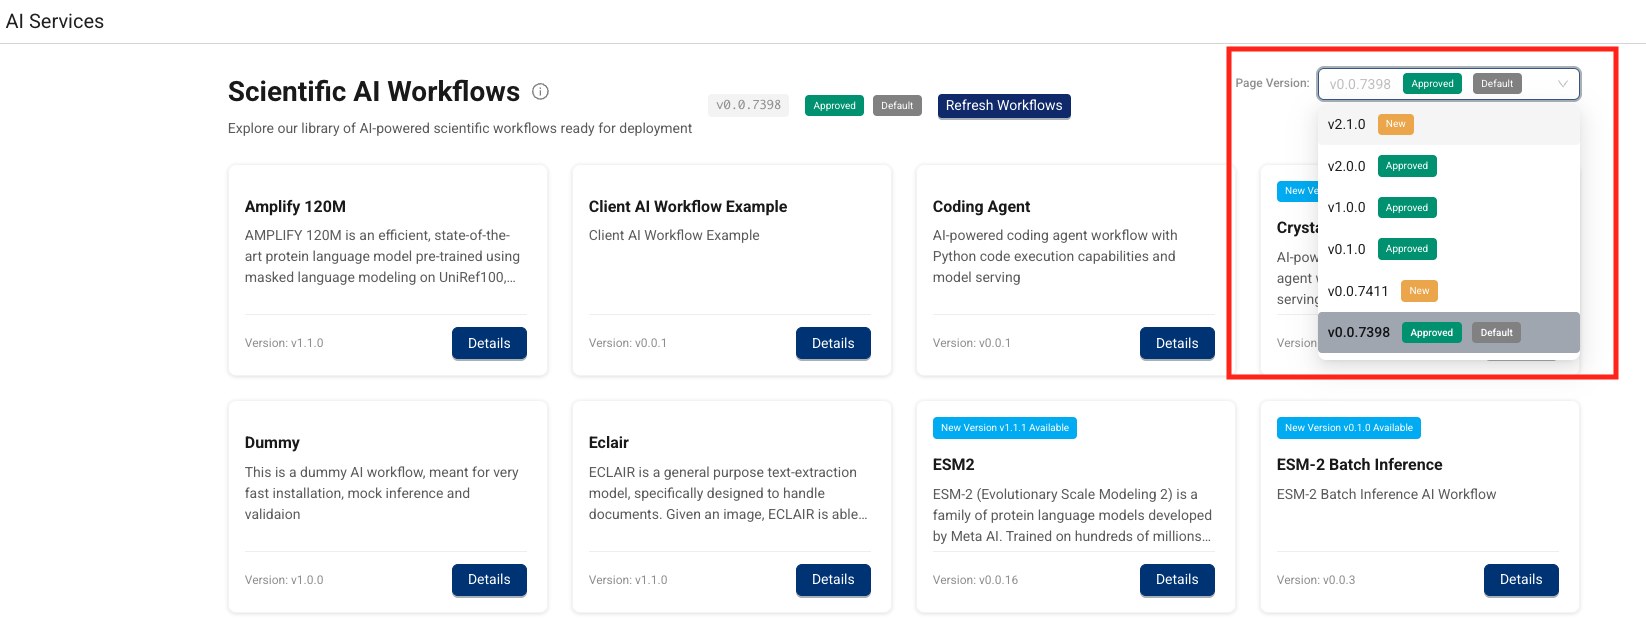
In the Page Version dropdown, select the latest AI Services UI page version. A dialog appears that asks you to confirm that you want to update the AI Services UI to the latest version.
-
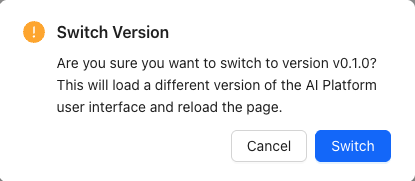
Choose Switch. The latest AI Services UI appears and becomes the default page version for your organization.
-
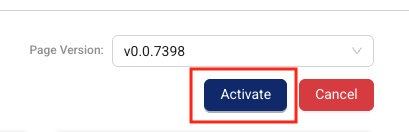
To activate the selected AI Services UI version for all users in the TDP organization, select Activate. A dialog appears prompting you to confirm by selecting Activate again.
Create and Deploy a Custom AI Workflow (BYOM)
You can create and deploy a custom "Bring Your Own Model" (BYOM) AI workflow to TetraScience AI Services by using the TetraScience CLI (ts-cli). This enables you to bring your own models into the platform and use the same activate → install → inference lifecycle as TetraScience-provided workflows.
Prerequisites
To create and deploy a custom AI workflow, you need the following:
- Tetra Data Platform (TDP) v4.5.3 or later
- TetraScience CLI (
ts-cli) v2.1.0 or later - TetraScience AI Services v1.2.0 or later
- Access to a Databricks workspace for model registration and serving
- A TDP role that includes one of the following policy permissions:
- Python 3.8 or later (for
ts-cliinstallation)
Step 1: Install or Update ts-cli
Install the latest version of ts-cli from PyPI:
pip install --upgrade tetrascience-cliVerify the installation:
ts-cli --versionThe command prints the version number. Ensure the version is 2.1.0 or later.
Step 2: Configure ts-cli Authentication
Before you can publish artifacts, configure ts-cli with your TDP credentials. Create a local configuration file (for example, dev-cfg.json) with the following format:
{
    "api-url": "<TDP API endpoint base URL>",
    "auth-token": "<service token you generated>",
    "org": "<your organization slug name>",
    "ignore-ssl": false
}
Then save the configuration to a named profile:
ts-cli config save dev-cfg.json --profile <profile-name>You can also save the configuration globally (applies to all projects):
ts-cli config save dev-cfg.json --globalDownload the configuration file from the TDP UI under Settings > API Tokens, or obtain it from your TDP administrator. For more information about authentication setup, see Configure TDP Dependencies and Authentication.
Step 3: Scaffold a BYOM AI Workflow
Use ts-cli init to scaffold a new BYOM AI workflow in the current directory:
ts-cli init ai-workflow "<Name of the workflow>"Replace <Name of the workflow> with the name of your AI workflow.
This generates a Databricks Asset Bundle project with the following files and directories:
| File / Directory | Description |
|---|---|
manifest.json | Artifact metadata including namespace, slug, version, and workflow type |
databricks.yml | Databricks Asset Bundle configuration |
README.md | Documentation template for the workflow |
resources/minimal_ai_workflow_job.yml | Databricks job definition for the AI workflow |
notebooks/entrypoint.py | Main notebook entrypoint for the workflow |
notebooks/register_model.py | Notebook for model registration |
notebooks/register_endpoint.py | Notebook for serving endpoint configuration |
.gitignore | Git ignore rules for the project |
Step 4: Configure the Workflow
Edit the generated files to configure your BYOM workflow. The key files to update are manifest.json (artifact metadata), databricks.yml (Databricks Asset Bundle configuration), the job definition in resources/, and the notebooks in notebooks/.
Configure manifest.json
manifest.jsonThe manifest.json file contains artifact metadata that tells the TDP how to discover, deploy, and display your AI workflow. When present, ts-cli publish reads configuration from this file automatically — you don't need to specify these fields as command-line arguments.
Minimum manifest.json Example
The following example includes only the required fields:
{
  "type": "ai-workflow",
  "namespace": "private-my-org",
  "slug": "my-byom-workflow",
  "version": "v1.0.0"
}
Recommended manifest.json Example
Include additional metadata for better documentation, discoverability, and proper job invocation:
{
  "type": "ai-workflow",
  "namespace": "private-tetrascience",
  "slug": "customer-ml-model",
  "version": "v0.1.3",
  "name": "Customer ML Model",
  "description": "Customer ML Model - model registration and serving endpoint (Databricks asset bundle).",
  "invoke": [
    {
      "key": "resources.jobs.model_registration",
      "name": "Customer ML Model Model Registration",
      "type": "installation",
      "description": "Registers model and configures serving endpoint."
    }
  ],
  "include": [
    "databricks.yml",
    "manifest.json",
    "README.md",
    "resources/*.yml",
    "notebooks/*.py"
  ]
}
manifest.json Required Fields
| Field | Type | Description |
|---|---|---|
type | string | Must be ai-workflow |
namespace | string | The artifact namespace (for example, private-my-org). See Namespaces. |
slug | string | A unique identifier for the AI workflow (for example, my-byom-workflow). See Slugs. |
version | string | Semantic version with a leading v (for example, v1.0.0) |
manifest.json Optional Fields
| Field | Type | Description |
|---|---|---|
name | string | Display name of the workflow in the AI Services UI |
description | string | A description of the workflow's functionality |
invoke | array | Defines the Databricks jobs that can be invoked for this workflow. Each entry includes a key (referencing the job in resources/), name, type, and description. |
include | array | Glob patterns specifying which files to include when publishing the artifact (for example, "notebooks/*.py", "resources/*.yml") |
NOTEFor more information about
manifest.jsonfield conventions, see SSP Artifact manifest.json Files. AI workflow manifests follow the same conventions as otherts-cliartifact types.
Configure the Databricks Asset Bundle
The scaffolded project is a Databricks Asset Bundle. Configure the following files for your model:
databricks.yml— The top-level bundle configuration. Itsvariablesblock names the registered model (model_name,model_alias) and configures the serving endpoint (endpoint_name,workload_size,workload_type,scale_to_zero). Authentication is not set here; the CLI uses the profile you saved in Step 2.resources/minimal_ai_workflow_job.yml— The Databricks job definitions. The scaffold defines two jobs.minimal_ai_workflow_jobrunsnotebooks/entrypoint.py.model_registrationrunsnotebooks/register_model.py, thennotebooks/register_endpoint.pyonce registration succeeds. Configure the job tasks, cluster settings, and notebook references here.notebooks/register_model.py— Customize this notebook with your model registration logic.notebooks/register_endpoint.py— Customize this notebook with your serving endpoint configuration.notebooks/entrypoint.py— The main notebook entrypoint that orchestrates the workflow.
IMPORTANTEnsure your Databricks workspace is accessible from the TetraScience platform infrastructure. Contact your customer account leader if you need assistance with network connectivity requirements.
Step 5: Publish the Workflow
Publish the configured workflow to TetraScience AI Services from the project directory:
ts-cli publish . --config ./dev-cfg.jsonIf your project directory includes a manifest.json file, ts-cli reads the artifact type, namespace, slug, and version from it automatically.
If you saved your configuration to a profile, you can use the --profile flag instead of --config:
ts-cli publish . --profile <profile-name>On success, ts-cli returns confirmation that the workflow was published, including the namespace, slug, and version.
NOTE
- To validate your configuration before publishing, use the
--dry-runflag:ts-cli publish . --config ./dev-cfg.json --dry-run- To redeploy the same version, include the
--forceflag to force overwrite:ts-cli publish . --config ./dev-cfg.json --force- To add the artifact to more than one organization, see Add Artifacts to Multiple Organizations.
- For more details about available arguments, run
ts-cli publish --help.
Unpublish a Workflow
To remove a published AI workflow version, use ts-cli unpublish:
ts-cli unpublish . --config ./dev-cfg.jsonThis removes the workflow version specified in your manifest.json from AI Services. For more information, see Unpublish Self-Service Artifacts.
Step 6: Activate, Install, and Run Inference
After publishing, the workflow appears on the Scientific AI Workflows page in the TDP. Follow the standard AI Services workflow lifecycle:
- Activate the workflow version to make it available to authorized users.
- Install the workflow to provision compute resources and obtain an inference endpoint.
- Run an inference using the batch or real-time inference API endpoints.
Model Training for BYOM Workflows
After publishing a BYOM workflow, you can initiate model training through the AI Services API by using the POST /v1/inference/invoke/* endpoint. For more information, see Model Training API.
NOTEUI-based model training is not supported in this release. The Upload Supporting Files button in the AI Services UI does not work for model training workflows. Use the AI Services API directly for model training file uploads and training initiation. For more information, see the Known and Possible Issues section.
Model Training API
TetraScience AI Services v1.2.0 introduces a Model Training API that allows you to invoke any notebook within an AI Workflow, including training notebooks, directly through the AI Services API. Use the POST /v1/inference/invoke/* endpoint to trigger model training, data prefetching, and other custom notebook tasks. The endpoint accepts arbitrary JSON payloads and S3 input files (using file IDs).
For more information, see Invoke a Custom Notebook in Run an Inference (AI Services v1.2.x).
Knowledge Base and Vector Store
TetraScience AI Services v1.2.x supports the creation and management of vectorized knowledge bases, powered by Databricks Vector Search. This capability enables AI use cases that require retrieval-augmented generation (RAG) and semantic search over enterprise knowledge bases.
IMPORTANTBefore you can use the vector store API, an administrator must activate and install the Vector Store AI workflow in your organization. Vector store API requests are unavailable until this workflow is installed.
You can use the Knowledge Base API to do the following:
- Create and manage vector stores scoped to your organization with role-based access control. Deleting a vector store removes the internal database record, but the associated Databricks vector search endpoint and index, the Delta tables, and the knowledge base files in Amazon S3 are not removed and require manual cleanup. Contact TetraScience Support to remove the orphaned resources.
- Upload and update knowledge base content through the API. When you update a vector store using a PUT request, AI Services re-parses newly added files, re-chunks them using the configured chunking mechanism, inserts them into the delta table, and issues a sync operation for incremental index catchup.
- Query vector stores using natural language text, without needing to manually generate embeddings
- Upload knowledge base files through the AI Asset Files API, with support for multipart uploads for large files
- Monitor vector store health and performance using key metrics piped to Amazon CloudWatch
For more information, see Manage Knowledge Bases in Run an Inference (AI Services v1.2.x).
Vector Store Observability
TetraScience AI Services captures key metrics for your vector stores and pipes them to Amazon CloudWatch. These metrics provide the foundation for performance evaluation and ongoing monitoring of vector store health. You can use CloudWatch dashboards and alarms to track vector store performance over time.
Model Aliases
AI Workflows can use model aliases to reference model versions by lifecycle stage instead of by version number. Supported aliases include dev, staging, canary, champion, prod, and rollback. Updating an alias automatically updates endpoint routing without requiring redeployment, enabling fast and safe model promotions and rollbacks.
Promote Assets Between Environments
NOTEModel Promotion is available as beta release feature and must be enabled by TetraScience. For more information, contact your customer account leader.
TetraScience AI Services supports promoting AI assets (models and tables) between TDP environments (for example, from a development environment to a production environment) using Databricks Delta Sharing. Every promotion creates an audit record that captures the asset that was promoted, the source and target environments, the timestamp, and the user who authorized the promotion. This provides a complete, immutable chain of custody for compliance reporting.
Prerequisites
Before you can promote a model between environments, the following is required:
- Model Promotion is enabled for your TDP environments by TetraScience.
- The source and target TDP environments are TetraScience-provisioned for you.
- The target catalog and schema in the destination environment already exist in Unity Catalog.
- You have a TDP role that includes at least one of the following policy permissions :
Promote an Asset
To promote a model or table from a source environment to a target environment, do the following:
- Initiate the promotion from the source environment. Send a
POST /v1/promotionsrequest that specifies the source asset (catalog, schema, and asset name) and the target environment. TetraScience AI Services creates an outbound promotion record, sets up the underlying Delta Share, and returns apromotionIdthat you use in subsequent calls.
POST /v1/promotions Request Example
curl -s -X POST "https://<source-gateway>/ai-platform/v1/promotions" \
  -H "ts-auth-token: $TOKEN" -H "x-org-slug: $ORG_SLUG" \
  -H "Content-Type: application/json" \
  -d '{
    "sourceCatalog": "dev_catalog",
    "sourceSchema": "ml_models",
    "sourceAssetName": "molecule-predictor-v2",
    "targetEnvironment": "prod-environment-id"
  }'
POST /v1/promotions Response Example
{
  "promotionId": "promo-550e8400-e29b-41d4-a716-446655440000",
  "status": "INITIATED"
}- Accept the promotion in the target environment. Send a
POST /v1/promotions/{promotionId}/acceptrequest that specifies the destinationtargetCatalog,targetSchema, andtargetAssetName. The target catalog and schema must already exist in Unity Catalog. AI Services mounts the share, deep-clones the asset to the target location, and updates the promotion record.
POST /v1/promotions/{promotionId}/accept Request Example
curl -s -X POST "https://<target-gateway>/ai-platform/v1/promotions/promo-550e8400-e29b-41d4-a716-446655440000/accept" \
  -H "ts-auth-token: $TOKEN" -H "x-org-slug: $ORG_SLUG" \
  -H "Content-Type: application/json" \
  -d '{
    "targetCatalog": "prod_catalog",
    "targetSchema": "ml_models",
    "targetAssetName": "molecule-predictor-v2"
  }'
POST /v1/promotions/{promotionId}/accept Response Example
{
  "promotionId": "promo-550e8400-e29b-41d4-a716-446655440000",
  "status": "IN_PROGRESS",
  "targetCatalog": "prod_catalog",
  "targetSchema": "ml_models",
  "targetAssetName": "molecule-predictor-v2",
  "acceptedBy": "[email protected]",
  "acceptedAt": "2026-04-29T14:32:10Z"
}- Monitor promotion status. Send a
GET /v1/promotions/{promotionId}request to check progress. The status moves throughINITIATED→IN_PROGRESS→TRANSFERRED→COMPLETED. If the promotion fails, the status becomesFAILEDand the response includeserrorMessageanderrorCodefields you can use to diagnose the issue.
GET /v1/promotions/{promotionId} Request Example
curl -s "https://<source-gateway>/ai-platform/v1/promotions/promo-550e8400-e29b-41d4-a716-446655440000" \
  -H "ts-auth-token: $TOKEN" -H "x-org-slug: $ORG_SLUG"
** GET /v1/promotions/{promotionId} Response Example**
{
  "promotionId": "promo-550e8400-e29b-41d4-a716-446655440000",
  "status": "COMPLETED",
  "sourceCatalog": "dev_catalog",
  "sourceSchema": "ml_models",
  "sourceAssetName": "molecule-predictor-v2",
  "targetCatalog": "prod_catalog",
  "targetSchema": "ml_models",
  "targetAssetName": "molecule-predictor-v2",
  "targetEnvironment": "prod-environment-id",
  "initiatedBy": "[email protected]",
  "initiatedAt": "2026-04-29T14:30:00Z",
  "completedAt": "2026-04-29T14:35:22Z"
}
When the promotion completes, the promoted asset is available in the target environment's Unity Catalog at the location you specified and can be used to install or run AI Workflows.
Remove a Promoted Asset
To remove a previously promoted asset from the target environment, send a POST /v1/promotions/{promotionId}/unpromote request from the source environment. AI Services drops the cloned asset from the target catalog, cleans up the underlying Delta Share, and records the removal in the promotion's audit history.
POST /v1/promotions/{promotionId}/unpromote Request Example
curl -s -X POST "https://<source-gateway>/ai-platform/v1/promotions/promo-550e8400-e29b-41d4-a716-446655440000/unpromote" \
  -H "ts-auth-token: $TOKEN" -H "x-org-slug: $ORG_SLUG"
Review Promotion History
All promotion lifecycle actions (initiate, accept, complete, fail, unpromote) are recorded in the TDP System Log along with the user who authorized each action and the source and target environments. Use the System Log to review the promotion history of any asset for compliance and GxP audit reporting.
Known and Possible Issues
For the current list of known and possible issues by release, see the TetraScience AI Services Release Notes.
Limitations
The following are known limitations of Tetra AI Services:
- Task Script README Parsing: The platform uses task script README files to determine input configurations. Parsing might be inconsistent due to varying README file formats.
- AI Agent Accuracy: AI-generated information cannot be guaranteed to be accurate. Agents may hallucinate or provide incorrect information.
- Organization-Specific Components: AI capabilities are limited to publicly available TetraScience components and cannot incorporate organization-specific components.
- Complex Logic Implementation: AI-generated pipelines with complex logic may require manual implementation and refinement.
- Databricks Workspace Mapping: Initially, one TDP organization maps to one Databricks workspace only.
For more information, see the AI Services FAQs .
Documentation Feedback
Do you have questions about our documentation or suggestions for how we can improve it? Start a discussion in TetraConnect Hub. For access, see Access the TetraConnect Hub.
NOTEFeedback isn't part of the official TetraScience product documentation. TetraScience doesn't warrant or make any guarantees about the feedback provided, including its accuracy, relevance, or reliability. All feedback is subject to the terms set forth in the TetraConnect Hub Community Guidelines.
Updated 5 days ago