Data Sync Utility Setup Guide (v2.0.x)
How to install and configure the Data Sync Utility on macOS and Windows
This guide shows how to install and configure the Data Sync Utility on a local computer and sync a saved search in the Tetra Data Platform (TDP).
For more information about how to use the Data Sync Utility after setup, see the Data Sync Utility User Guide.
Prerequisites
- Tetra Data Platform (TDP) v4.2.3 or higher
- Administrator privileges (required for macOS installation)
- Supported operating systems:
- Windows 10 or higher
- macOS 11 (Big Sur) or higher
- Minimum hardware requirements:
- 1.6 GHz processor
- 1 GB RAM
- 1 GB storage, plus space for synchronized data
Install the Data Sync Utility
Download the appropriate installer for your operating system from the Data Sync Utility Installers page on TetraConnect Hub. For access, see Access the TetraConnect Hub.
Then, do the following based on your operating system.
macOS Installation
To install the Data Sync Utility on macOS, do the following:
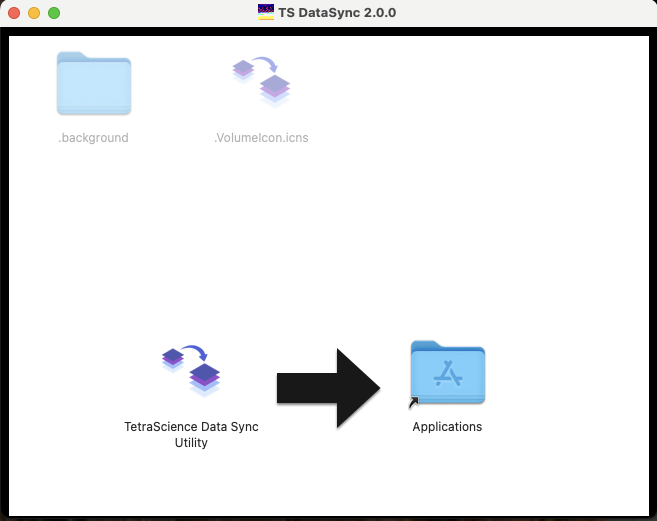
- Open the downloaded installer and drag the TetraScience icon to the Applications folder.
- Open the application and configure the TDP instance connection by entering your TDP server URL (for example,
tdp.tetrascience-demo.com).
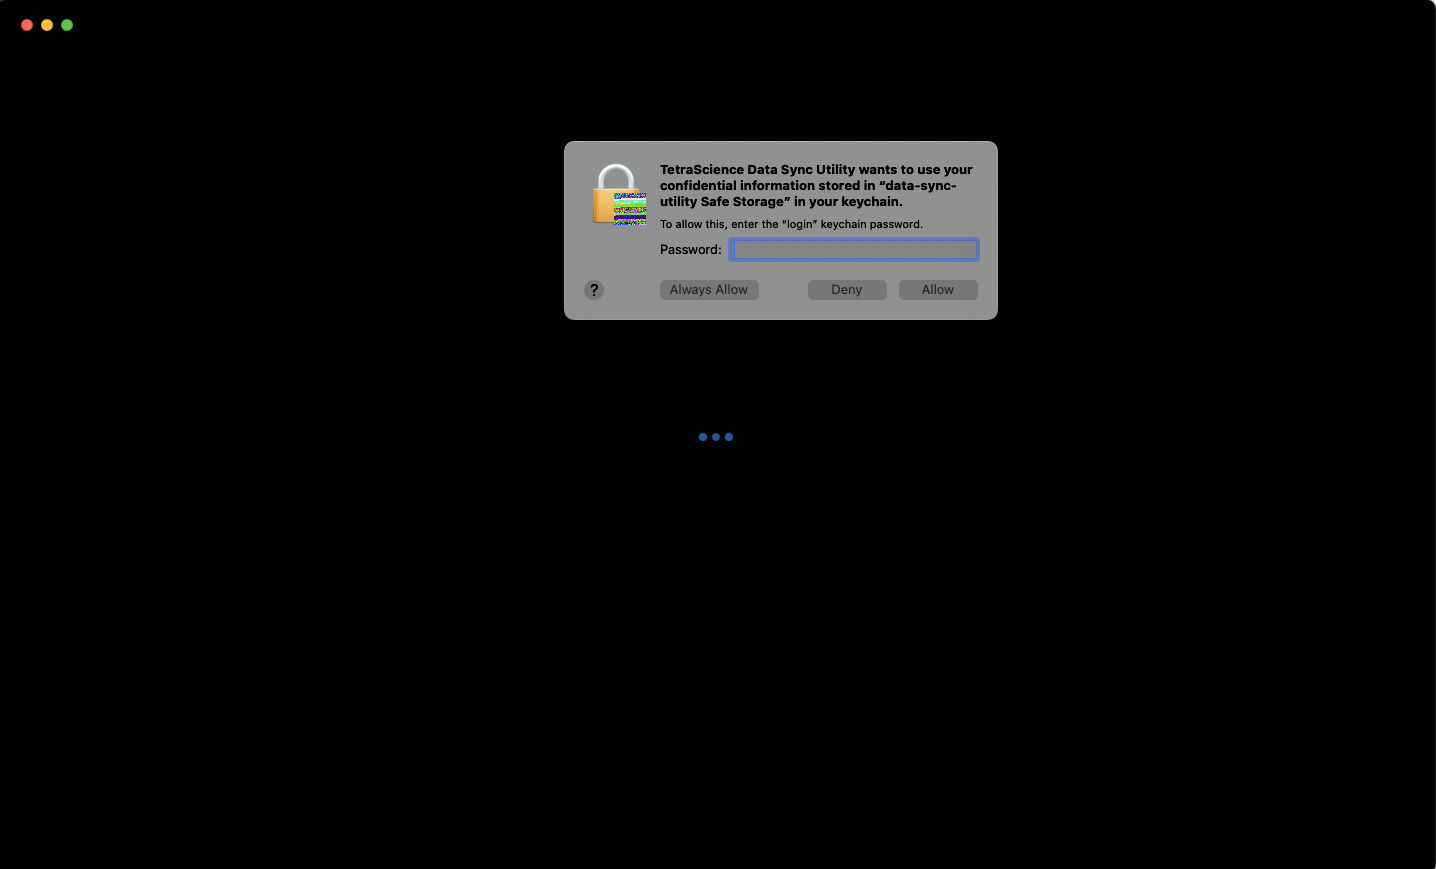
NOTEThe first time you open the Data Sync Utility on macOS, the operating system may prompt you to allow access to confidential information stored in "data-sync-utility Safe Storage" in your keychain. The Data Sync Utility uses the macOS Keychain to encrypt stored authentication data. Enter your macOS login password and choose Always Allow so that the prompt doesn't appear on every launch.
Windows Installation
To install the Data Sync Utility on Windows, do the following:
- Run the downloaded installer locally.
- Open the application and configure the TDP instance connection by entering your TDP server URL (for example,
tdp.tetrascience-demo.com).
NOTEFor multi-tenant (MT) deployments, enter
tetrascience.comas the URL, add your tenant to the Tenant Domain field, and your organization to the Organization field.
Initial Configuration
Sign in with either your TDP credentials (email and password) or single sign-on (SSO), if your organization has SSO configured.
Sign In with TDP Credentials
To sign in with your TDP credentials, do the following:
- Open the TetraScience Data Sync Utility. The Let's Get Started dialog appears.
- For TetraScience URL, enter your Tetra Data Platform (TDP) server URL (for example,
tdp.tetrascience-demo.com). Leave the Tenant Domain (optional) field blank.
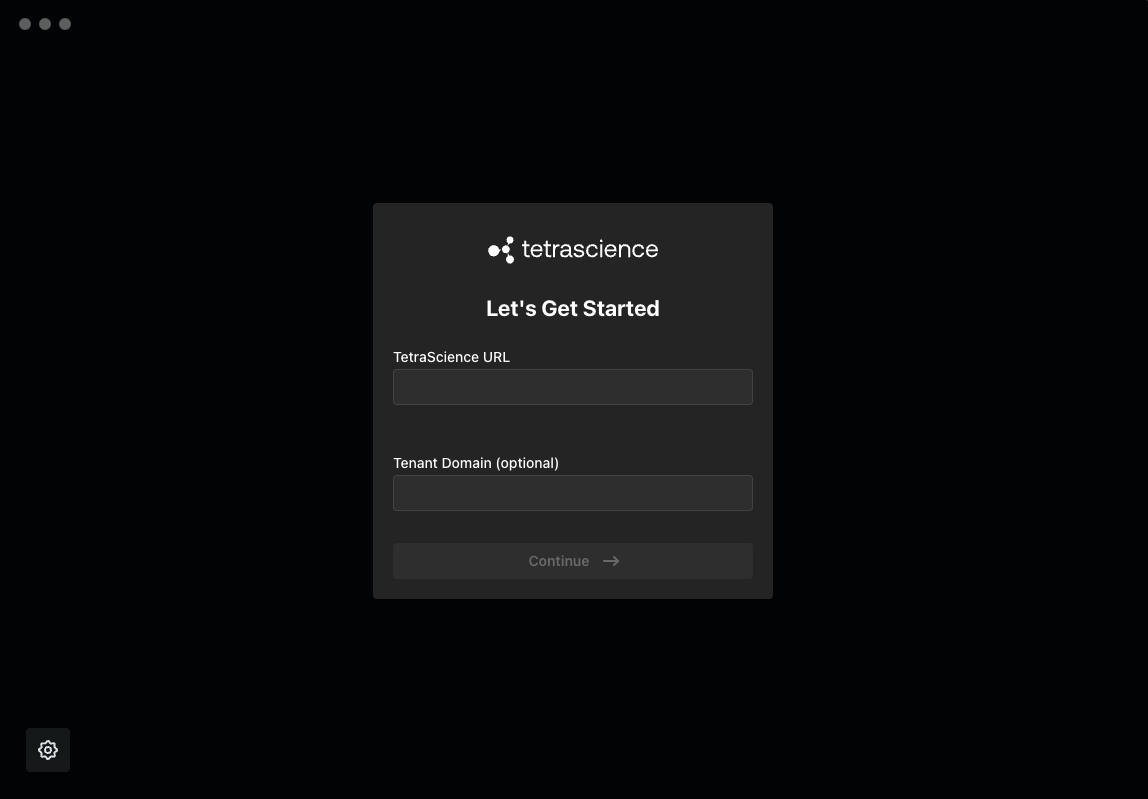
NOTEIf your TDP server URL is
platform.tetrascience.com, enterapi.tetrascience.com.
- Choose Continue. A dialog appears that prompts you to enter your TDP credentials.
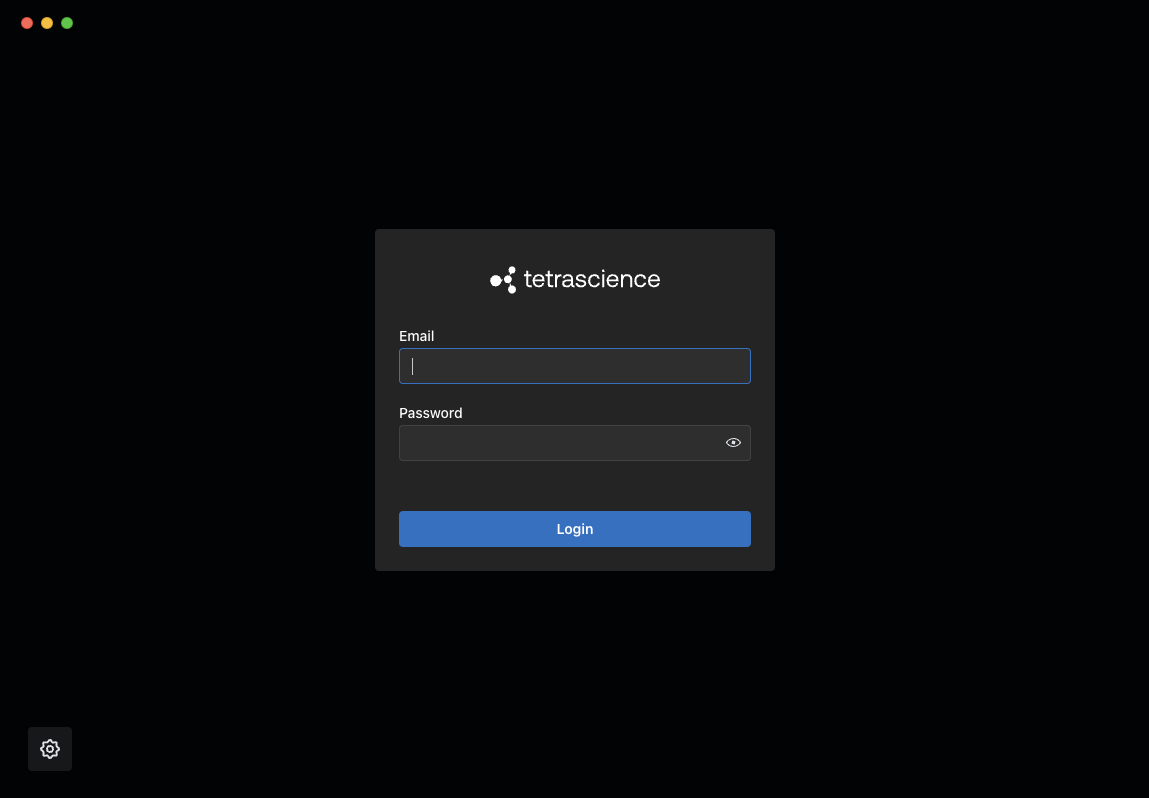
4. Enter your email and password.
5. If you belong to multiple organizations, select an organization. No organization dropdown appears if you belong to a single org.
6. Choose Login.
Sign In with SSO
To sign in with your TDP organization's SSO credentials, do the following:
NOTETo sign in with SSO, your TDP organization must have SSO configured.
- Open the TetraScience Data Sync Utility. The Let's Get Started dialog appears.
- For TetraScience URL, enter your Tetra Data Platform (TDP) server URL (for example,
tdp.tetrascience-demo.com). - For Tenant Domain (optional), enter your TDP tenant path (for example,
<companyname>-ssowould be the tenant path of the following TDP URL:platform.tetrascience.com/<companyname>-sso/login). - Choose Continue.
Sync a Saved Search
To sync a saved search in the TDP, do the following.
Step 1: Sync Data from the TDP
- Open the Data Sync Utility. The Search page appears.
- Identify the files in the TDP that you want to sync by either selecting a saved search from the Existing Saved Search dropdown, or creating a new search. For more information, see Search in the TetraScience product documentation.
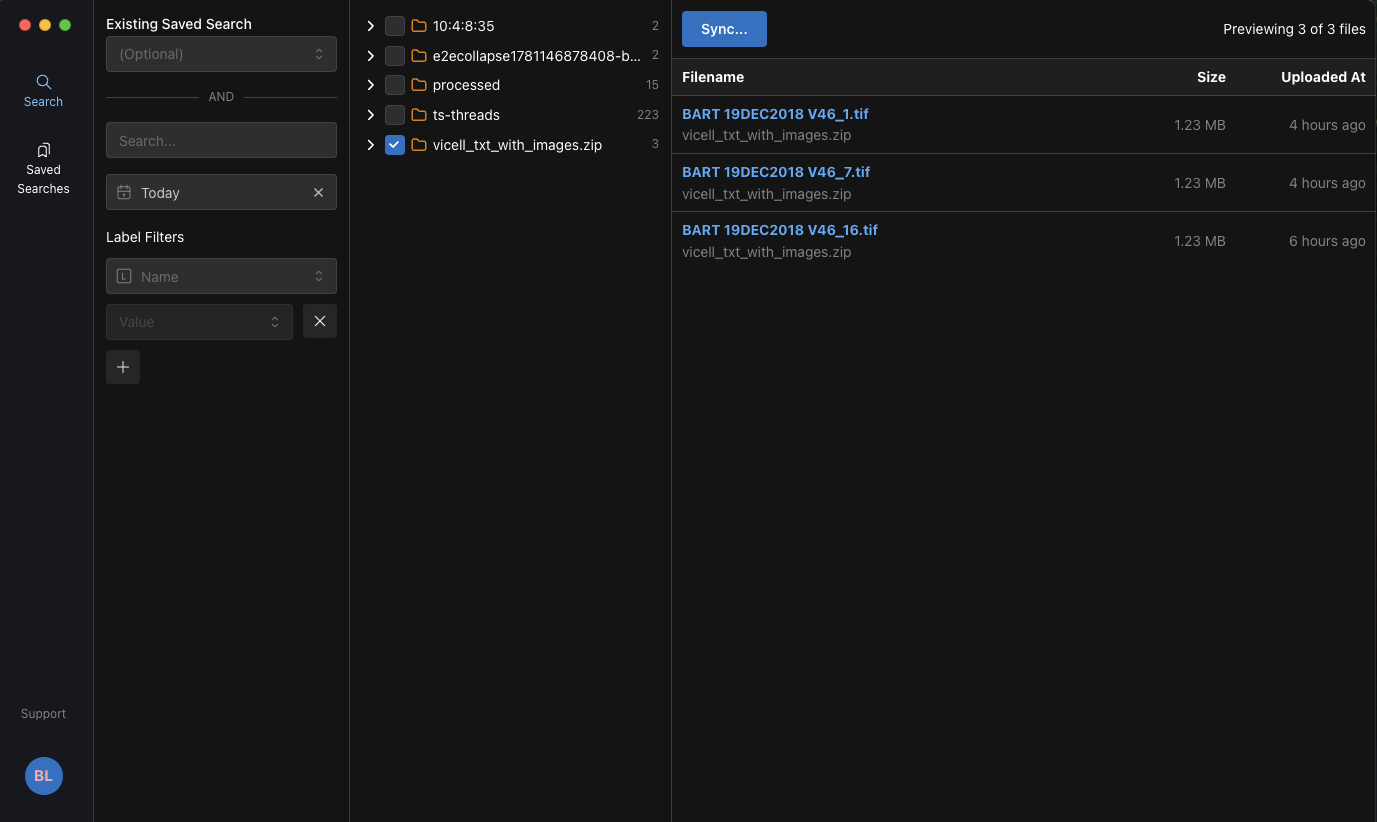
- Choose Sync. A dialog appears and prompts you to confirm that you want to download the search results.
For Existing Saved Searches
In the Sync Saved Search dialog, choose Sync. Choosing Cancel closes the dialog. Synced files are automatically saved in your local Documents folder under a TetraScience directory.
For New Searches
In the Create and Sync Saved Search dialog, do the following:
- For Name, enter a name for the new download folder. This folder is added to the
TetraSciencedirectory in your localDocumentsfolder. - Then, choose Sync. Choosing Cancel closes the dialog.
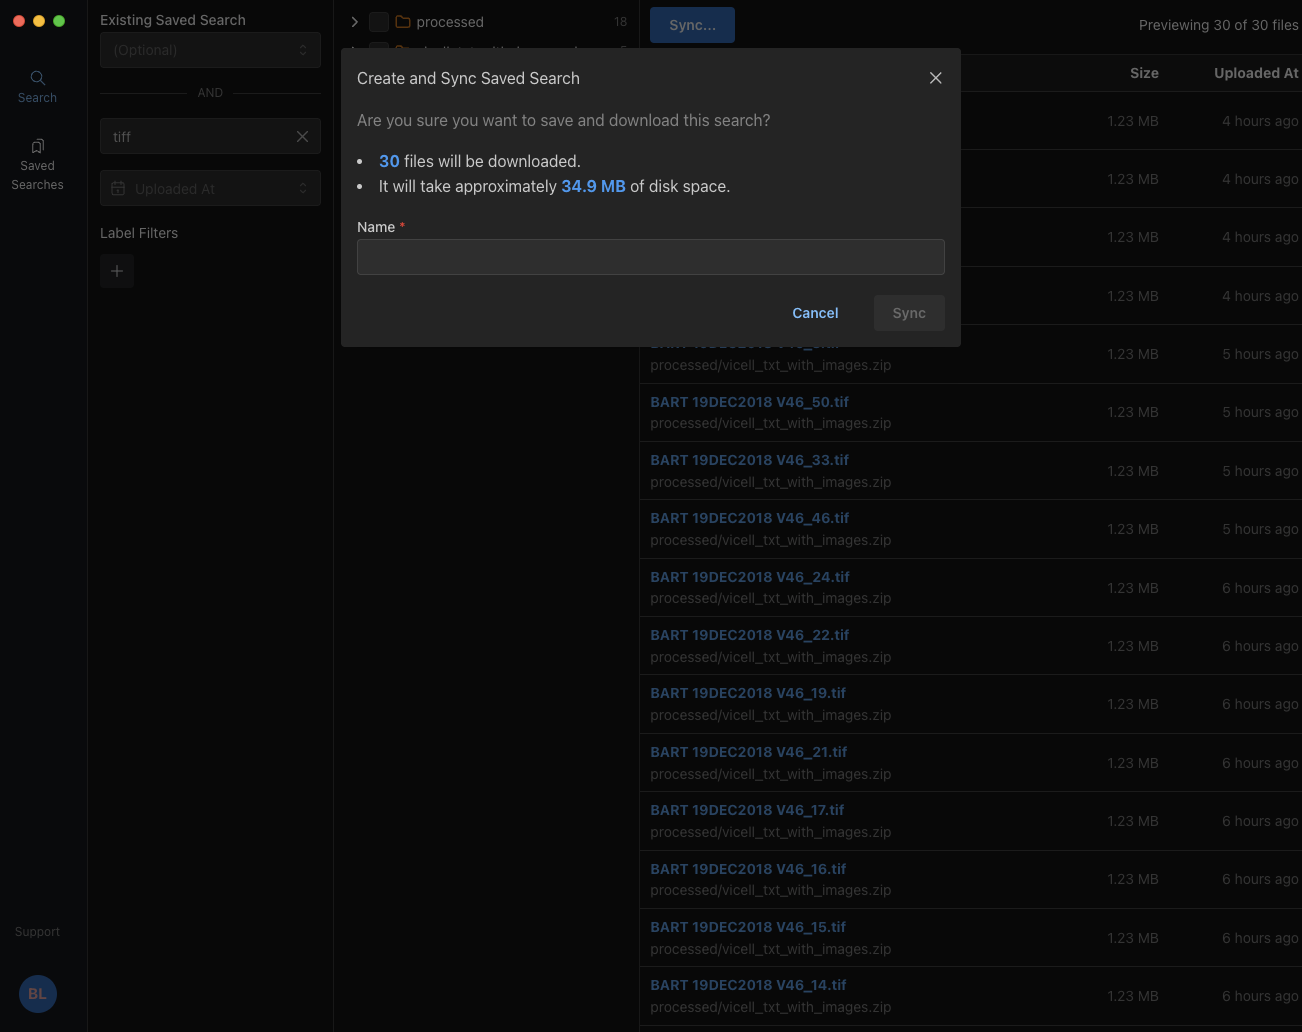
NOTETo customize the default download folder location, go to Settings and edit the Download Folder field.
For more detailed instructions, see Sync Data in the Data Sync Utility User Guide.
Step 2: Upload Data
- Open the downloaded files in your preferred analysis software. Then, conduct your analysis.
- Save the analysis results to the synced folder you created. After you save the results to the synced folder, the Data Sync Utility automatically does the following:
- Uploads the new, synced files to the TDP with the appropriate metadata
- Continues to detect any new or modified files in the synced folder, and then uploads them to the TDP
For more detailed instructions, see Upload Files in the Data Sync Utility User Guide.
Configure Org-Level Settings
The Data Sync Utility can be installed with organization-level defaults by using a system-wide default-settings.json file. This file lets IT administrators pre-configure connection settings and enforce selected app settings across users.
Create default-settings.json in the appropriate system location:
macOS
/Library/Application Support/tetrascience/default-settings.json
Windows
%ProgramData%\tetrascience\default-settings.json
On most Windows installations, this resolves to:
C:\ProgramData\tetrascience\default-settings.json
Restart the Data Sync Utility after creating or changing this file.
Configuration File Example
{
  "endpoint": "https://api.tetrascience.com",
  "subdomain": "your-organization-subdomain",
  "orgSlug": "your-organization-slug",
  "downloadFolder": "/absolute/path/to/download/folder",
  "helpLink": "https://your-organization-support-url.com",
  "idleTimeout": 30,
  "disableRememberMe": true,
  "globalDownloadOnly": true,
  "caCertPath": "/absolute/path/to/company-root-ca.pem"
}
Only include the settings your organization wants to configure.
Default Settings
The following settings provide initial default values. Users can change these later in the app.
| Setting | Description |
|---|---|
endpoint | Default TDP API endpoint. |
subdomain | Default SSO tenant or subdomain value. |
orgSlug | Default organization slug. |
downloadFolder | Default local download folder. |
Administrator-Managed Settings
The following settings are administrator-managed when present in default-settings.json. Users cannot override these values in the app.
| Setting | Description |
|---|---|
helpLink | Sets the in-app help or support link. |
idleTimeout | Sets the idle timeout in minutes. Use a number, for example 30. |
disableRememberMe | When set to true, disables Remember Me and clears remembered login state. This prevents users from persisting authenticated sessions across application restarts. |
globalDownloadOnly | When set to true, disables uploads for all saved searches across the organization. The app can still download files, but local changes are not uploaded. |
caCertPath | Absolute path to a PEM file that contains the root CA certificate (or a bundle that contains the full CA chain) for on-premises TDP instances that use an internally issued certificate. If the TDP server doesn't present its intermediate certificates, include them in the bundle. Don't use the server's leaf certificate. This certificate is applied to the Node.js HTTP layer and background workers. The renderer process uses Chromium's certificate handling, which defers to the operating system certificate store (for example, macOS Keychain or the Windows Certificate Store), so the CA certificate must also be installed at the OS level for full coverage. |
NOTEUser preferences only take precedence for default settings:
endpoint,subdomain,orgSlug, anddownloadFolder. Administrator-managed settings override user preferences and cannot be changed by users in the app.
Troubleshooting
If you encounter issues when either installing the Data Sync Utility or setting up a sync, verify the following:
- Your local computer has a stable internet connection
- Your local computer has sufficient disk space for downloaded files
- Your TDP credentials are valid and have the required permissions
- If you're using Windows OneDrive, make sure that you sync a local folder that's not in OneDrive
Documentation Feedback
Do you have questions about our documentation or suggestions for how we can improve it? Start a discussion in TetraConnect Hub. For access, see Access the TetraConnect Hub.
NOTEFeedback isn't part of the official TetraScience product documentation. TetraScience doesn't warrant or make any guarantees about the feedback provided, including its accuracy, relevance, or reliability. All feedback is subject to the terms set forth in the TetraConnect Hub Community Guidelines.
Updated about 1 month ago