Set Up and Edit Pipelines
This page shows how you can create a new pipeline or edit an existing one.
To manage pipelines or compare and restore different pipeline versions, see Manage Pipelines.
NOTE
Only organization administrators can set up, edit, deactivate, and activate pipelines.
Set Up a Pipeline
To create a pipeline, do the following.
Try Our New AI Assistants
- Lab Data Automation Assistant: helps you quickly design, develop, test, and deploy your own lab data automation pipelines for selected ELNs using an AI-powered workflow
- Visual Pipeline Builder: provides no-code and low-code tools to help you quickly build and edit pipelines
Step 1: Open the Pipeline Edit Page to Create a New Pipeline
To open the Pipeline Edit page to create a new pipeline, do the following:
- Sign in to the TDP as a user with an Administrator role.
- In the left navigation menu, choose Pipelines. A menu appears.
- Choose Pipeline Manager. The Pipeline Manager page appears.
- Select the New Pipeline button. The Pipeline Edit page appears.
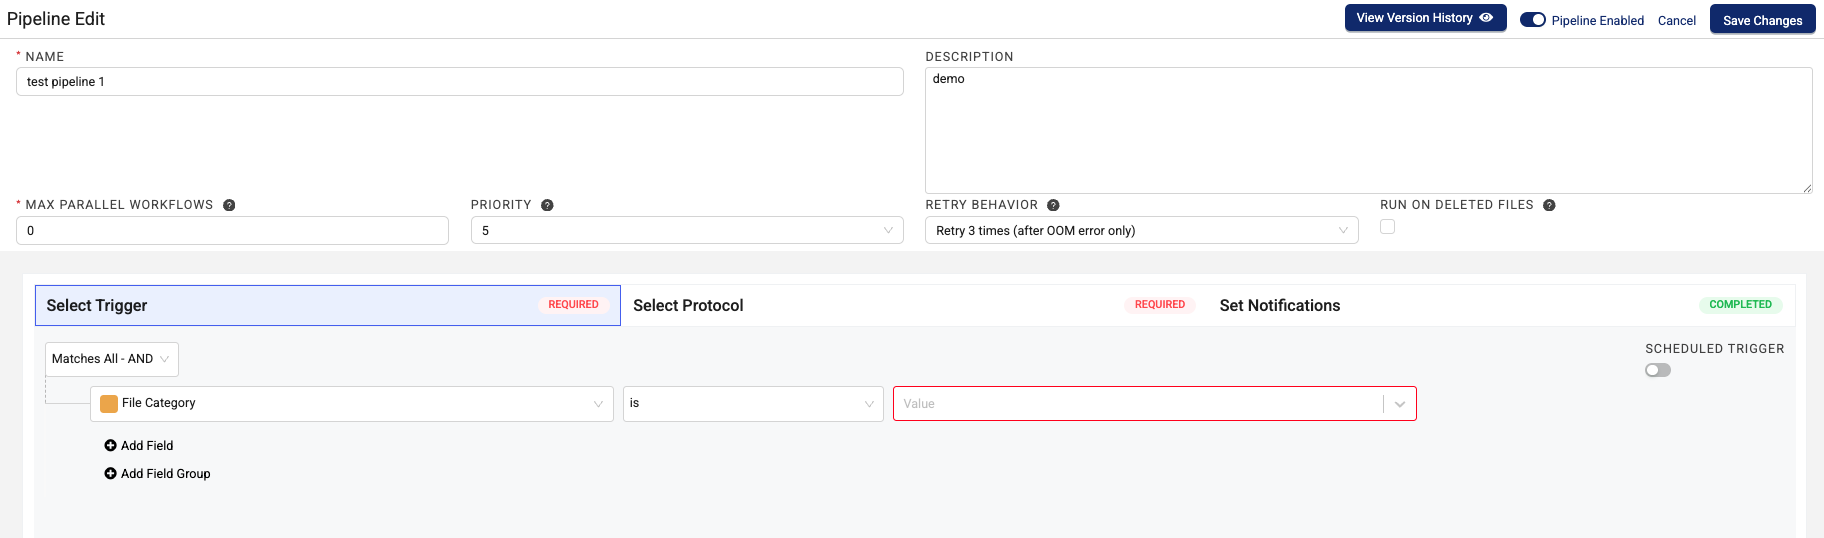
Step 2: Configure the Pipeline
To configure a new pipeline on the Pipeline Edit page, do the following:
-
For NAME, enter a name for the pipeline.
-
For DESCRIPTION, enter a description of the pipeline.
-
If you want the pipeline to be available for processing files, move the upper right ENABLED toggle to the right. It appears blue when the pipeline is active.
-or-
If you don't want the pipeline to be available for processing files yet, move the ENABLED toggle to the left. It appears gray when the pipeline is inactive.
-
For MAX PARALLEL WORKFLOWS, it's typically a best practice to not change the default value (
0). The default0value indicates that the pipeline allows an unlimited number of concurrent workflows, which helps with throughput.IMPORTANT
Changing the MAX PARALLEL WORKFLOWS setting from the default
0value severely limits pipeline throughput and must be done in collaboration with your customer success manager (CSM) or account executive. If one of the following situations applies, contact TetraScience to determine the correct MAX PARALLEL WORKFLOWS setting for your use case:- For pipelines that must process one file at a time only, with zero parallel processing, MAX PARALLEL WORKFLOWS can be set to
1. - For uploading or processing a high number of files at the same time when there are upstream systems that can't handle the required rate of parallel processing, MAX PARALLEL WORKFLOWS can be set to a low number.
- For processing a high number of files with a long-running pipeline processes, MAX PARALLEL WORKFLOWS can be set to a low number.
- For pipelines that must process one file at a time only, with zero parallel processing, MAX PARALLEL WORKFLOWS can be set to
-
For PRIORITY, select the pipeline's priority level. Increasing or decreasing this value will adjust the slot assignment prioritization for that pipeline within the organization, which raises or lowers the likelihood that the pipeline's workflows are scheduled before another pipeline's. This setting is typically used to decrease the likelihood a pipeline is run before others to prevent it from constraining resources. You can assign a priority number from
1-10, where10is the highest priority and1is the lowest. The default setting is5. -
(Optional) To override the pipeline's default retry behavior setting, select another option from the RETRY BEHAVIOR menu. The default retry setting for pipelines that use the
protocol.ymlprotocol definition file format is Exponential retry interval increasing (default). The default retry setting for all other pipelines is Always retry 3 times. For more information, see Retry Behavior Settings.
IMPORTANT
Do not select the Run on Deleted Files checkbox when selecting trigger conditions unless you are converting your data to Lakehouse tables with an
ids-to-lakehousepipeline. All other pipeline protocols should not use the Run on Deleted Files setting. This setting ensures that any upstream file delete events are accurately propagated to the downstream Lakehouse tables.
Step 3: Select Trigger Conditions
Triggers indicate the criteria a file must meet for pipeline processing to begin. There are three types of trigger conditions:
- Simple trigger conditions require files to meet just one condition to trigger the pipeline. For example, you can configure data files that have a specific label to trigger a pipeline.
- Complex trigger conditions require files to meet several conditions before they trigger the pipeline. For example, you can require a file to have both a specific label and file path to trigger a pipeline. Complex trigger conditions can be combined by using standard Boolean operators (AND/OR) and can be nested.
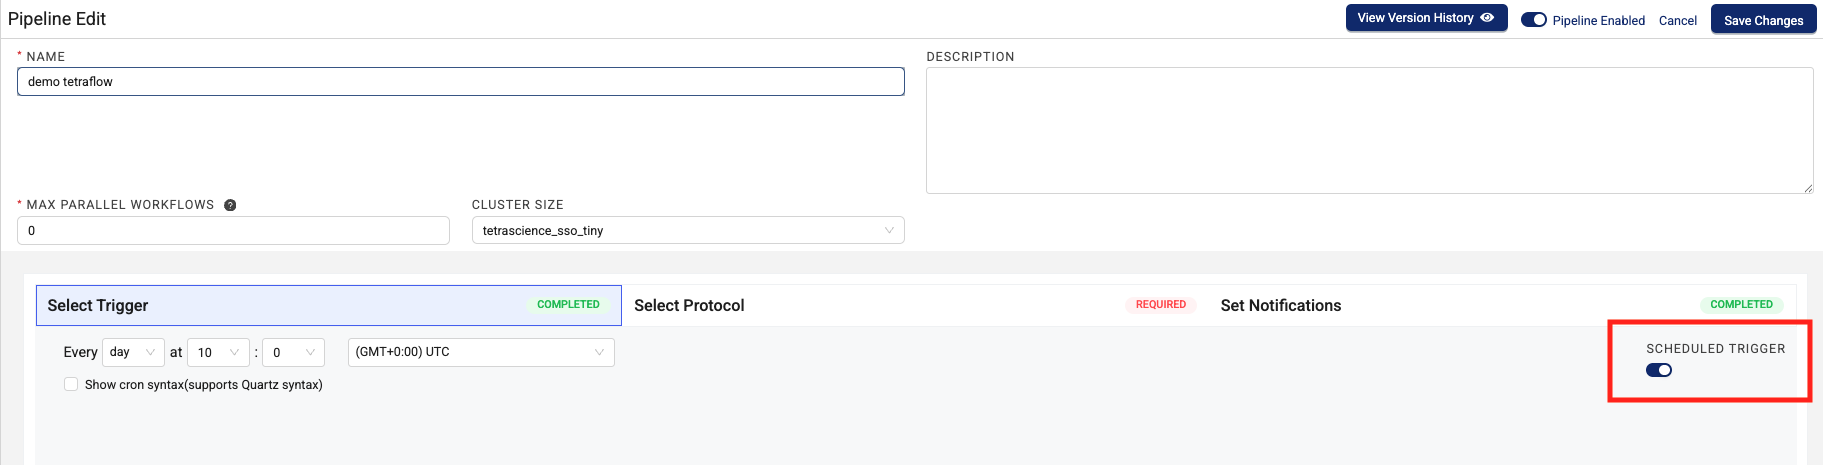
- Scheduled trigger conditions run pipelines at a specific, recurring time.
NOTE
Tetraflow pipelines require scheduled trigger conditions.
Simple and Complex trigger types are divided into two categories: Platform Metadata and Custom Metadata. Platform Metadata types are available to all TDP users. Custom Metadata types are available to your organization only.
IMPORTANT
Keep in mind the following when configuring your pipeline's trigger conditions:
- Pipelines can run on the latest version of a file only. This behavior ensures that previous file versions don't overwrite the latest data. If a pipeline tries to process an outdated or deleted file version, the workflow errors out and the TDP now displays the following error message on the Workflow Details page:
"message":"file is outdated or deleted so not running workflow"- Trigger conditions that are set with a text option must match all of the characters that are entered in the text field. This includes trailing spaces, if there are any.
- You can’t use a new attribute as a pipeline trigger until you add a file to the TDP that includes the attribute. For instructions on how to manually upload files, see Upload a New File or New Version of the File.
- If a file has more than 4,000 labels (or its labels are 256k+ in size) Pipelines might not properly index the file for search in the TDP. To make sure that your labels are properly indexed and available for search, it's recommended that you do the following:
- Reduce the size of your label data as much as possible.
- Limit the number of labels applied to each file.
To define your pipeline's trigger conditions, do the following:
-
On the Pipeline Edit page, choose Select Trigger to create either simple or complex trigger conditions. These are trigger conditions that require files to meet one or more conditions before they trigger the pipeline.

-or-
To create a scheduled trigger, which runs the pipeline at a scheduled, recurring time, select the SCHEDULED TRIGGER check box. Then, enter a specific, recurring time for the pipeline to run on and continue to Step 4: Select a Protocol. The minimum time interval is a
minute. The maximum time interval is ayear. To define more complicated trigger schedules, you can also enter a cron expression. For more information, see the Cron Trigger Tutorial in the Quartz documentation.IMPORTANT
Existing file-triggered protocols require a specific file to start processing and cannot run on a schedule by default. For a protocol to use a scheduled trigger, its task script must not depend on the context.input_file property in the Context API.
-
To configure the pipeline to run if the file meets more than one trigger condition, select Matches All-AND from the top drop-down menu in the Select Trigger section.
-or-
To configure the pipeline to run if the file meets at least one trigger condition, select Matches All-ANY.
-
Select a trigger type from the left drop-down menu (the field is prepopulated with the File Category value). For more information about the available triggers, see Trigger Types.
-
In the middle drop-down menu, enter how you want the trigger to match the value you'll set for the trigger condition by selecting the relevant conditional operator (is or is not).
NOTE
Using the
is notconditional operator verifies that there is a pipeline value and that it's not the value that is specified. This result of this operator is always FALSE for files that have not been processed through a pipeline. -
In the Value field, enter the value for the trigger condition that you want or select an option from the drop-down menu.
-
(Optional) To add another condition to your trigger, choose Add Field. Then, repeat steps 3-5.
-or-
To nest trigger conditions, choose Add Field Group. Then, repeat steps 3-5.
Simple and Complex Trigger Types
| Trigger Type | Description |
|---|---|
| Source Type | The instrument that generated the data Note: The Source Type drop-down provides both a static list of common source types and any custom sources that you've created. |
| Source | The source that loaded the data into the Tetra Data Lake (for example, specific Agents, API uploads, or box uploads) |
| Pipeline | The pipeline used |
| IDS | The Intermediate Data Schema (IDS) used |
| IDS Type | The type of IDS (for example, lcuv_empower) |
| File Path | The Tetra Data Lake file path |
| File Category | The file category, which can either be RAW (sourced directly from an instrument), IDS (harmonized JSON), or PROCESSED (auxiliary data extracted from a RAW file) |
| Tags | Tags available to the organization |
| Custom Metadata | Custom defined metadata |
| Labels | Custom defined labels |
Step 4: Select a Protocol
Protocols define the business logic of your pipeline by specifying the steps and the functions within task scripts that run those steps. For a complete list of supported Tetra Data models and their associated protocols as well as a list of upcoming Tetra Data model releases, see Tetra Data Models in the TetraConnect Hub. To request access, see Access the TetraConnect Hub.
For more information, see Tetra Data Models and Custom Schemas.
NOTE
You can configure your own custom pipeline logic by using either a Python script and the
python-execprotocol or creating a self-service Tetra Data Pipeline (SSP). For custom pipeline setups that are more complex (scripts with 12,000 characters or more), it's recommended that you create and manage your own SSP.For more information and best practices, see Data Engineering and Tooling and Automation in the TetraConnect Hub. For access, see Access the TetraConnect Hub.
To select a protocol for your pipeline, do the following:
- On the Pipeline Edit page, choose Select Protocol.
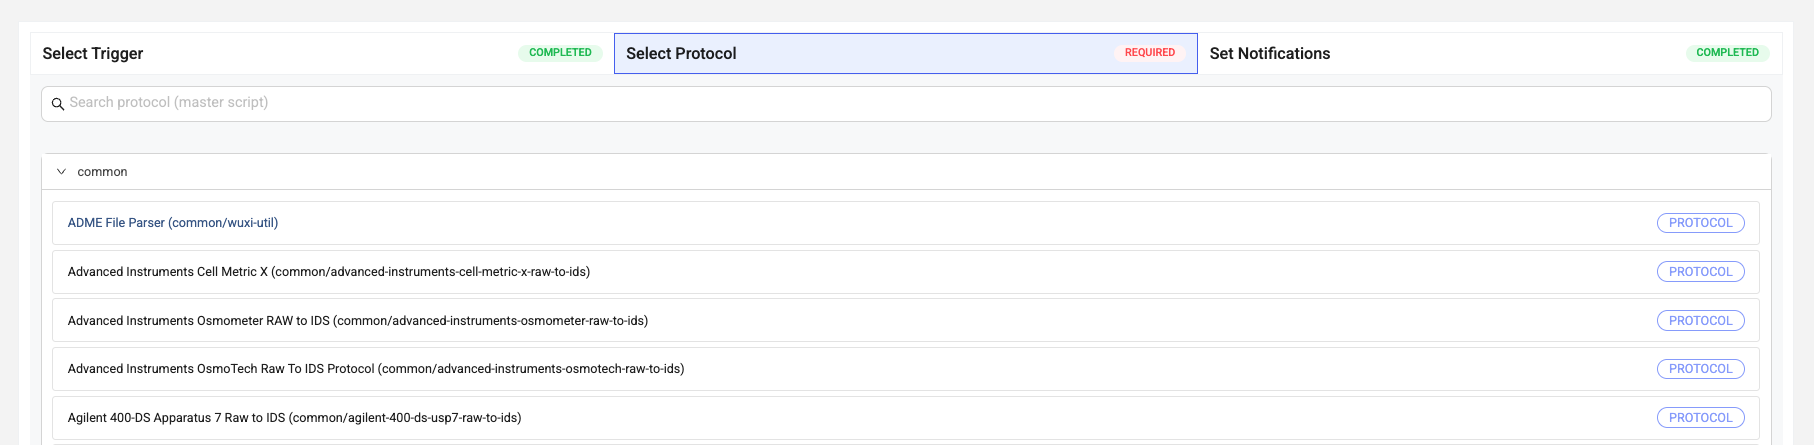
- Select a protocol from the list. To search for a specific protocol, enter the protocol's name in the Search field. The protcol's configuration options appear.
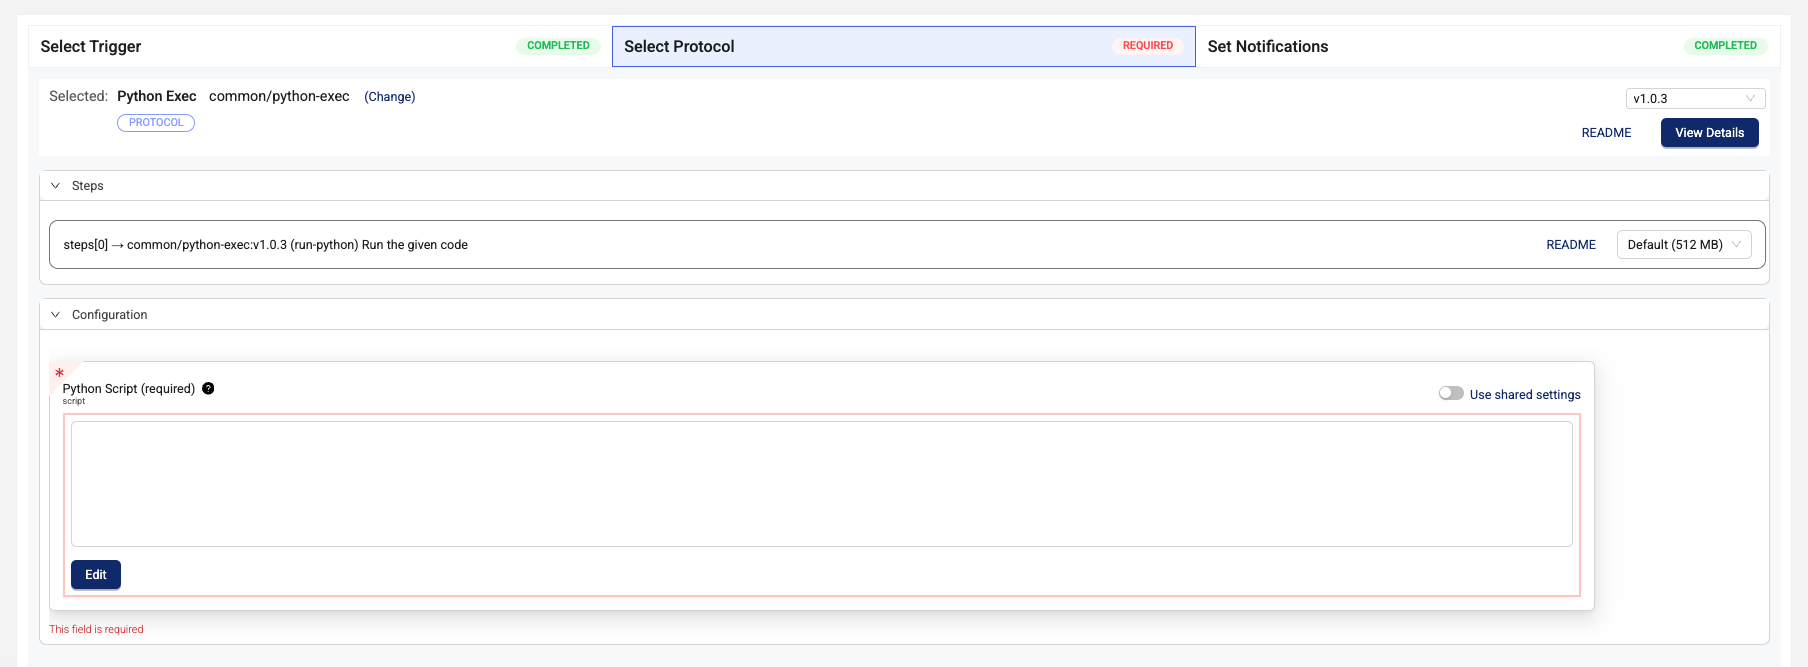
- In the Configuration section of the Select Protocol section, enter the configuration options for the protocol, if there are any. Not all protocols have configuration options.
Optional Protocol Configurations
View Protocol Details
To see more information about the protocol, select the View Details button in the *Select Protocol section. A page that contains the protocol's protocol.json and script.js files appears. The protocol.json file defines the protocol. It provides a brief description of the steps run and the configurations. The script.js file shows the workflow.
View Protocol Steps
To see more information about the protocol steps, choose README in the Steps section.
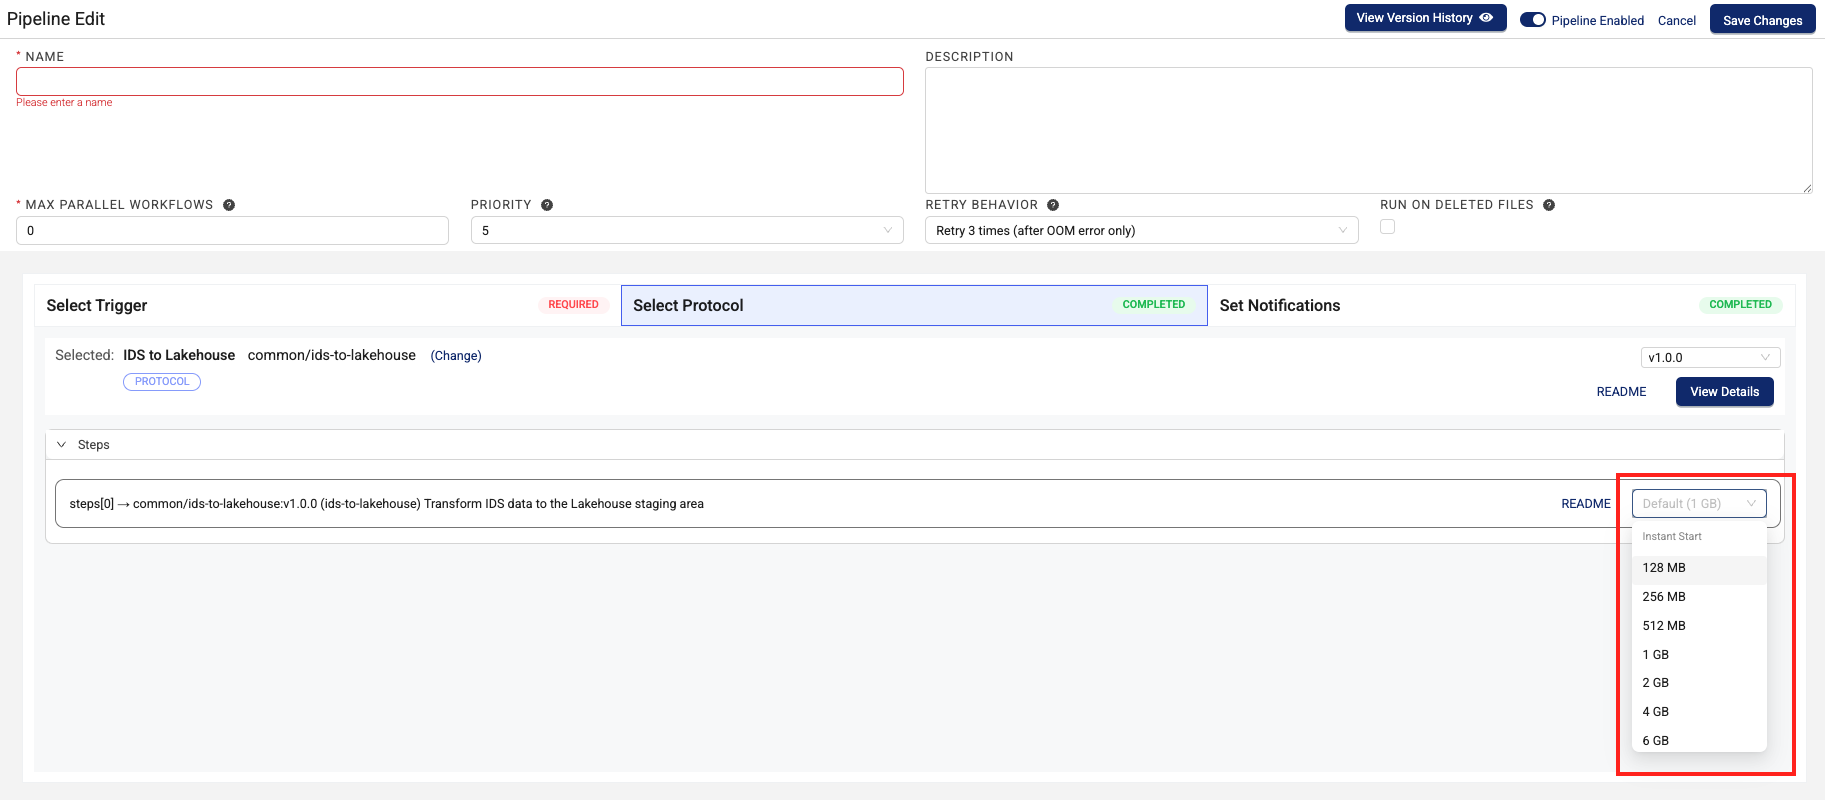
Configure Custom Memory and Compute Settings
To configure custom memory and compute settings for each step of the pipeline, select a memory option from from the Default ([#] MB) drop-down menu in the Steps section. For information about the available settings, see Memory and Compute Settings.
NOTE
For latency-sensitive lab data automation workflow use cases that use either Python- or Node-based pipelines, it's recommended that you select one of the Instant Start pipeline compute types. The Instant Start compute type offers ~1-second startup time after the initial deployment, regardless of how recently the pipeline was run. There’s little to no additional cost impact. The Classic compute type is ideal for use cases that don't require low data latency (one minute-plus pipeline startups).
Step 4: Set Notifications
To configure email notifications about successful and failed pipeline executions, do the following:
NOTE:
For maintenance purposes, make sure that you use a group alias for notification email addresses instead of individuals' emails.
- On the Pipeline Edit page, choose Set Notifications.
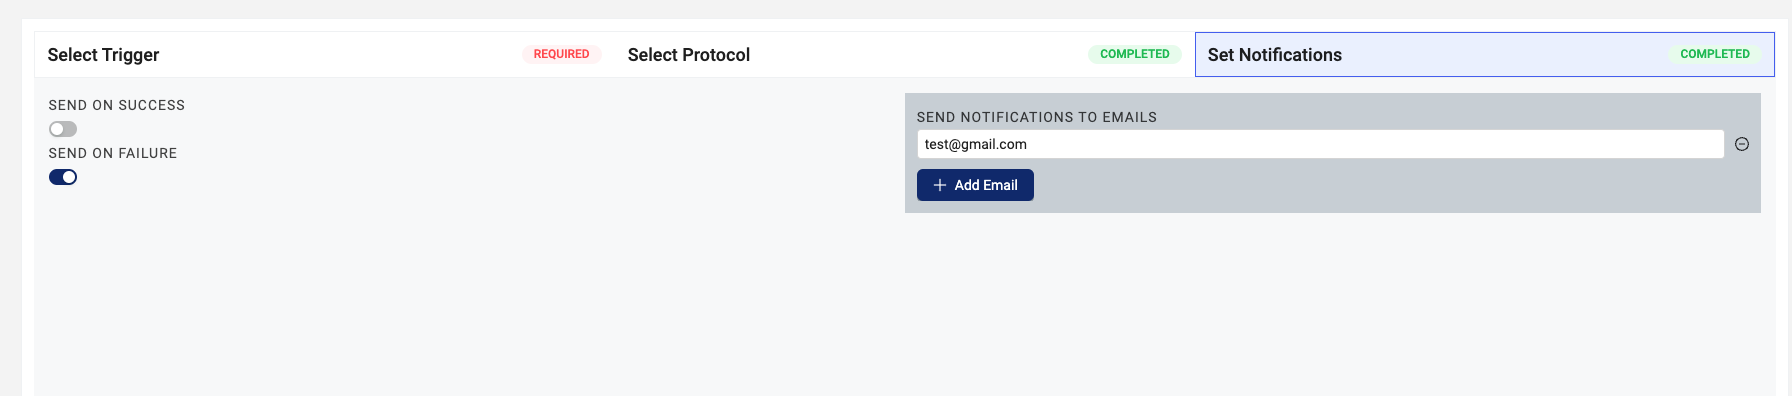
- Select one of the following toggles based on the type of notifications that you want to send:
- SEND ON SUCCESS: sends an email after the pipeline runs successfully
-or- - SEND ON FAILURE: sends an email after the pipeline fails
- SEND ON SUCCESS: sends an email after the pipeline runs successfully
- In the SEND NOTIFICATIONS TO EMAILS field, enter the email address that you want to send the notifications to. To add more than one address, select the Add Email button and enter another email address in the new field that appears.
- Choose Save Changes.
Edit a Pipeline
To edit an existing pipeline, do the following:
- Sign in to the TDP as a user with an Administrator role.
- In the left navigation menu, choose Pipelines. A menu appears.
- Choose Pipeline Manager. The Pipeline Manager page appears.
- Select the name of the pipeline that you want to edit. The Pipeline Actions pane appears on the right.
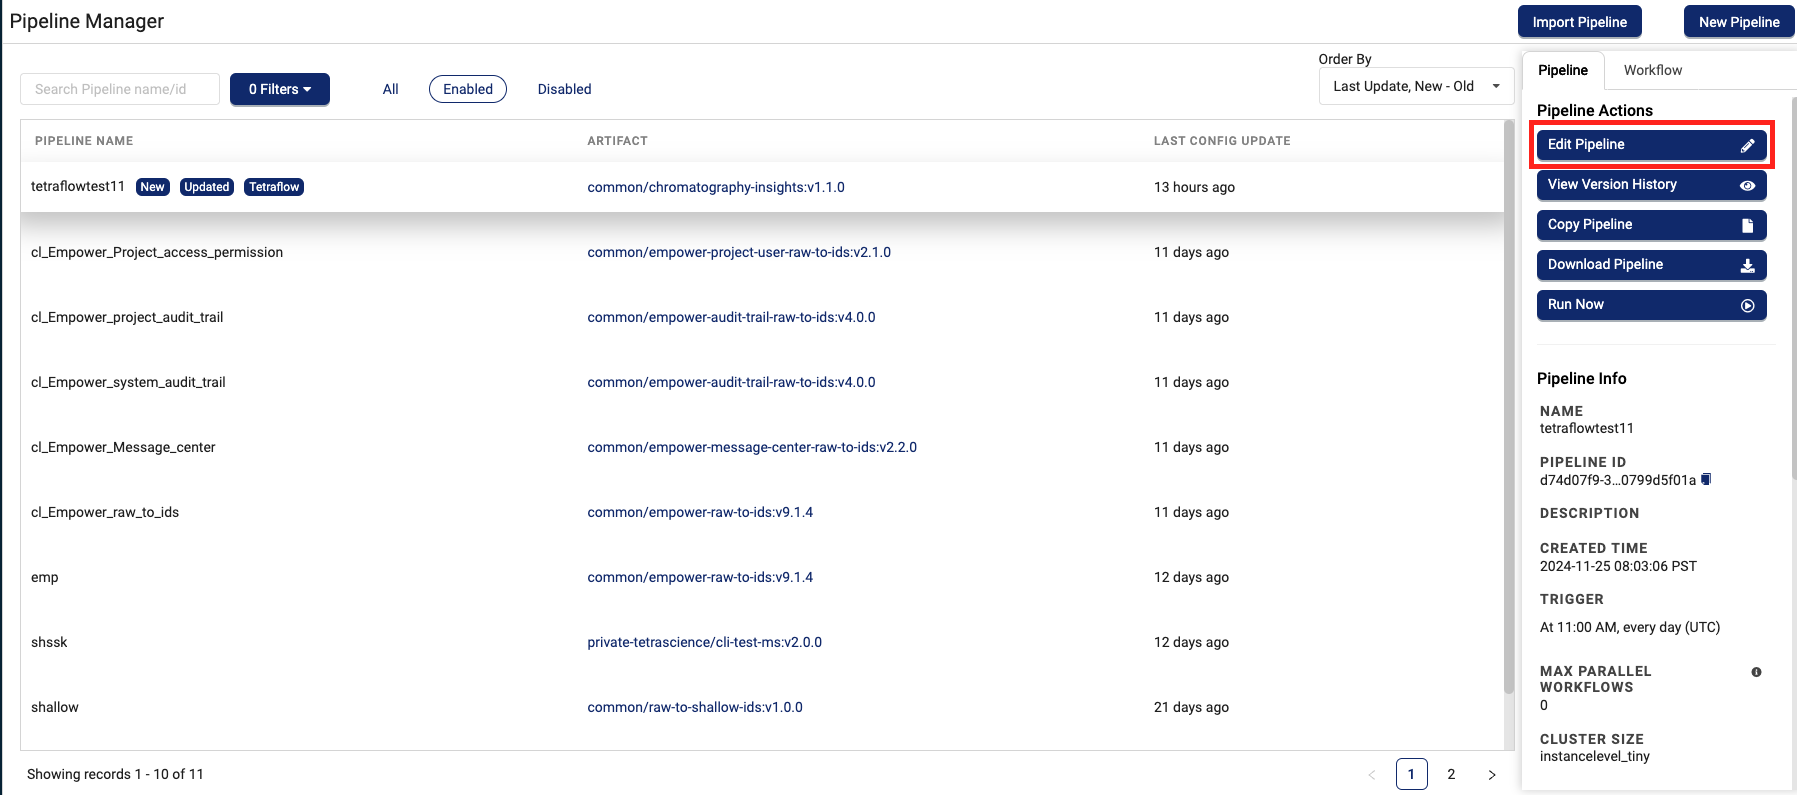
- Choose Edit Pipeline. The Edit Pipeline page appears.

- Modify the section of the pipeline that you want to edit.
- Select the Save Changes button to save the edits you've made to the section.
Copy a Pipeline
To copy an existing pipeline, do the following:
-
Sign in to the TDP as a user with an Administrator role.
-
In the left navigation menu, choose Pipelines. A menu appears.
-
Choose Pipeline Manager. The Pipeline Manager page appears.
-
Select the name of the pipeline that you want to copy. The Pipeline Actions pane appears on the right.
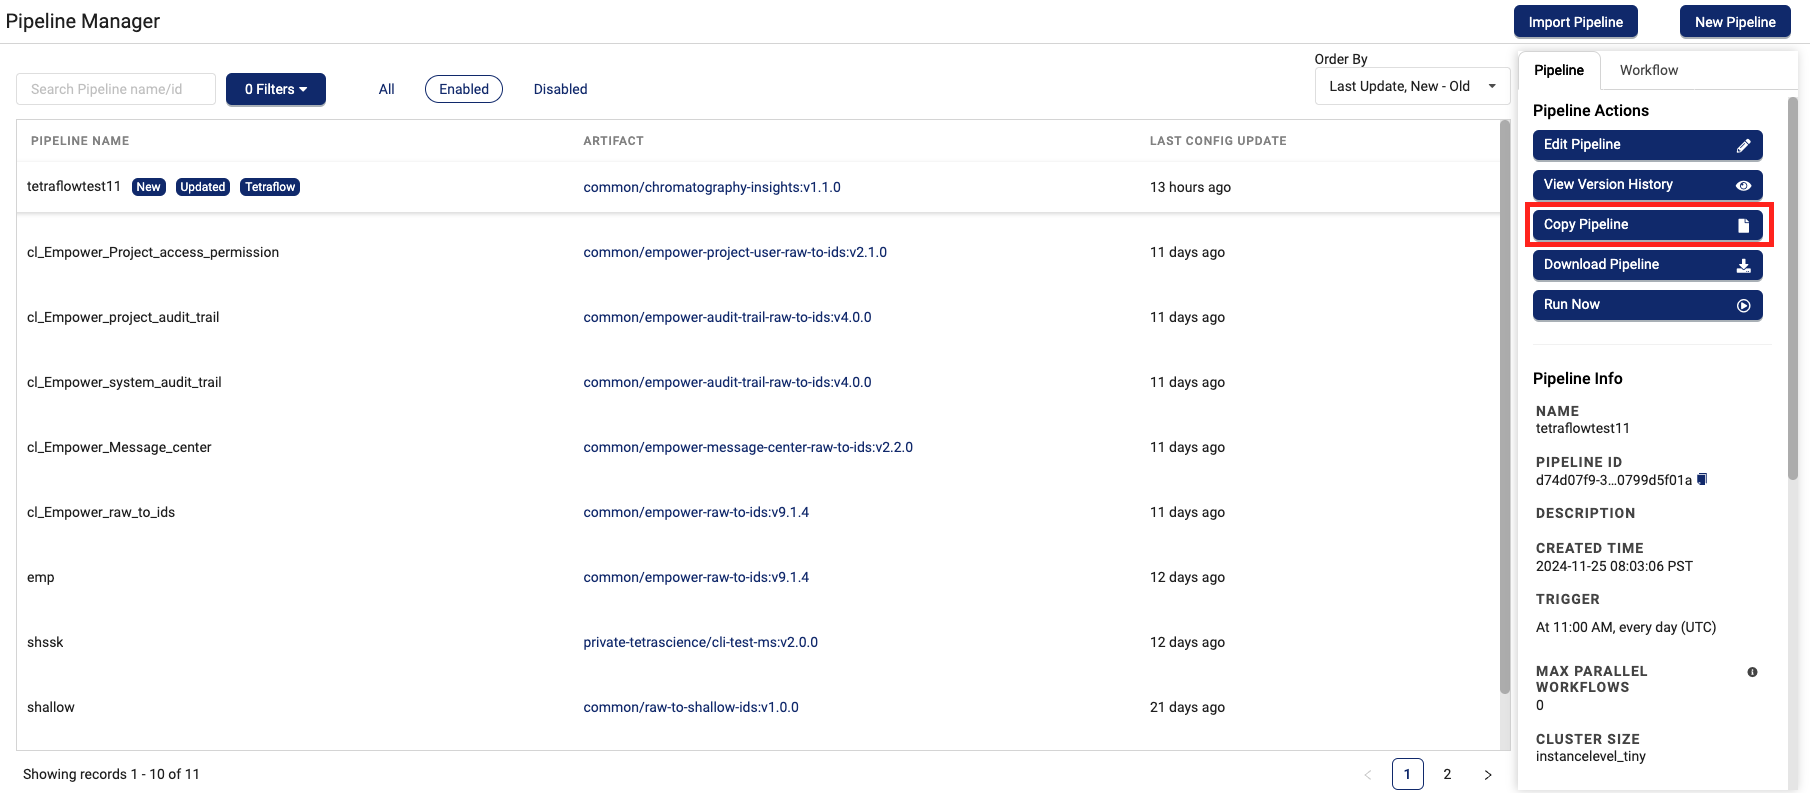
-
Choose Copy Pipeline. The Copy Pipeline dialog appears.
-
For New Pipeline name, enter the new pipeline's name.
-
To save an exact copy of the pipeline choose Save.
-or-
To save and edit a new version of the pipeline, choose Save and Edit.
The new pipeline appears on the Pipeline Manager page list with a New icon next to it.
NOTE
Copied pipelines are inactive (disabled) by default. To activate a copied pipeline, follow the instructions in Activate or Deactivate Pipelines.
Download a Pipeline
To download a pipeline definition to your local machine, do the following:
- Sign in to the TDP as a user with an Administrator role.
- In the left navigation menu, choose Pipelines. A menu appears.
- Choose Pipeline Manager. The Pipeline Manager page appears.
- Select the name of the pipeline that you want to download. The Pipeline Actions pane appears on the right.
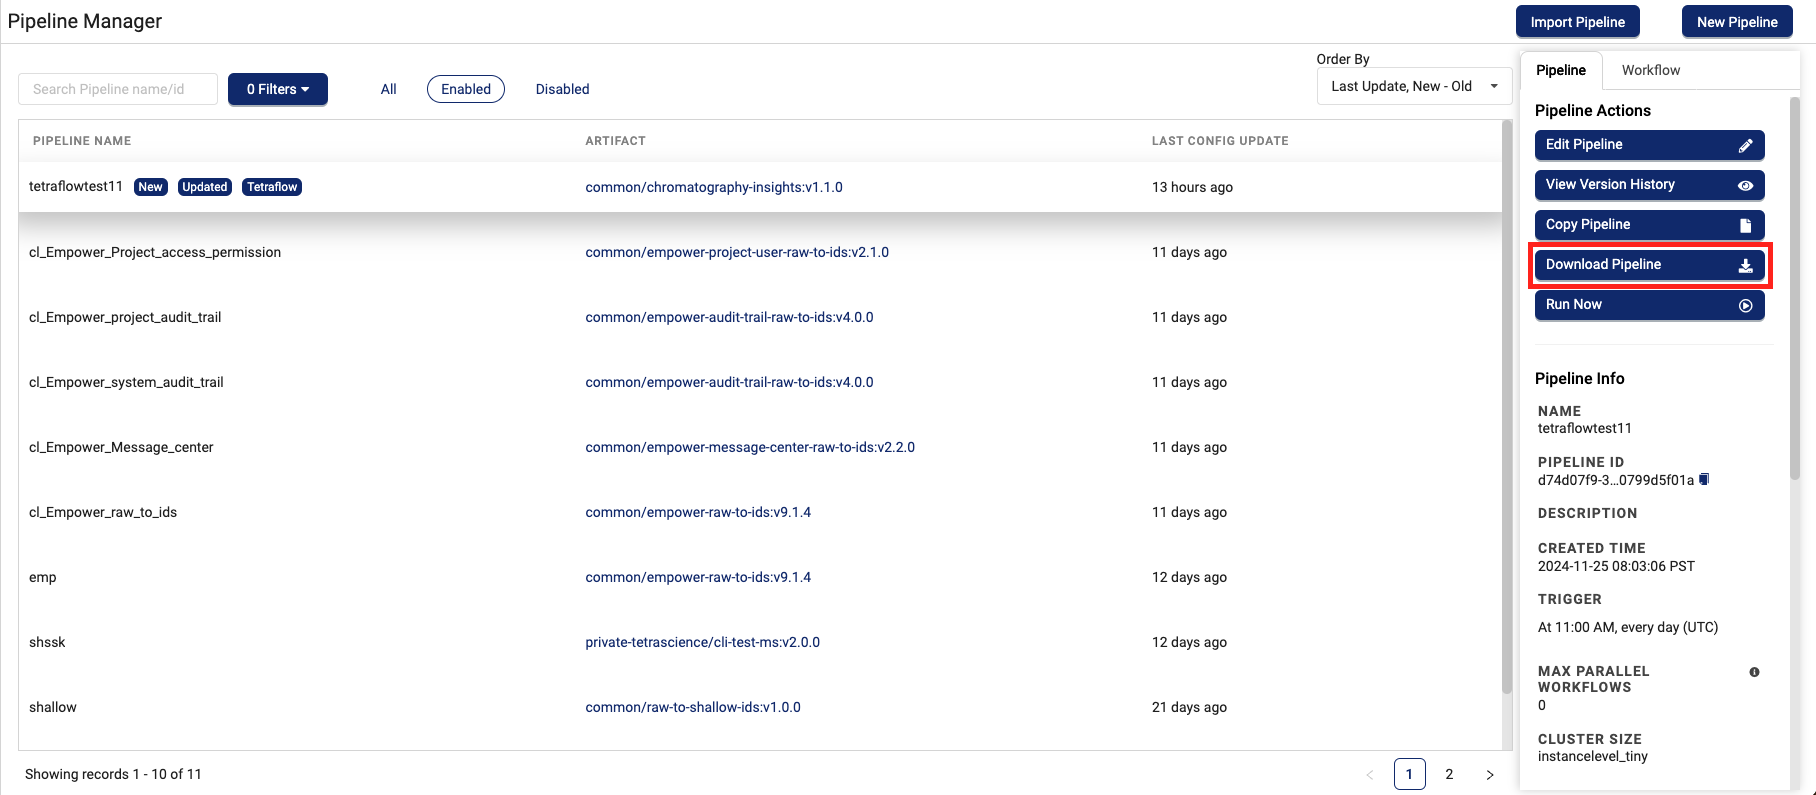
- Choose Download Pipeline. The pipeline definition downloads to your local machine as a JSON file.
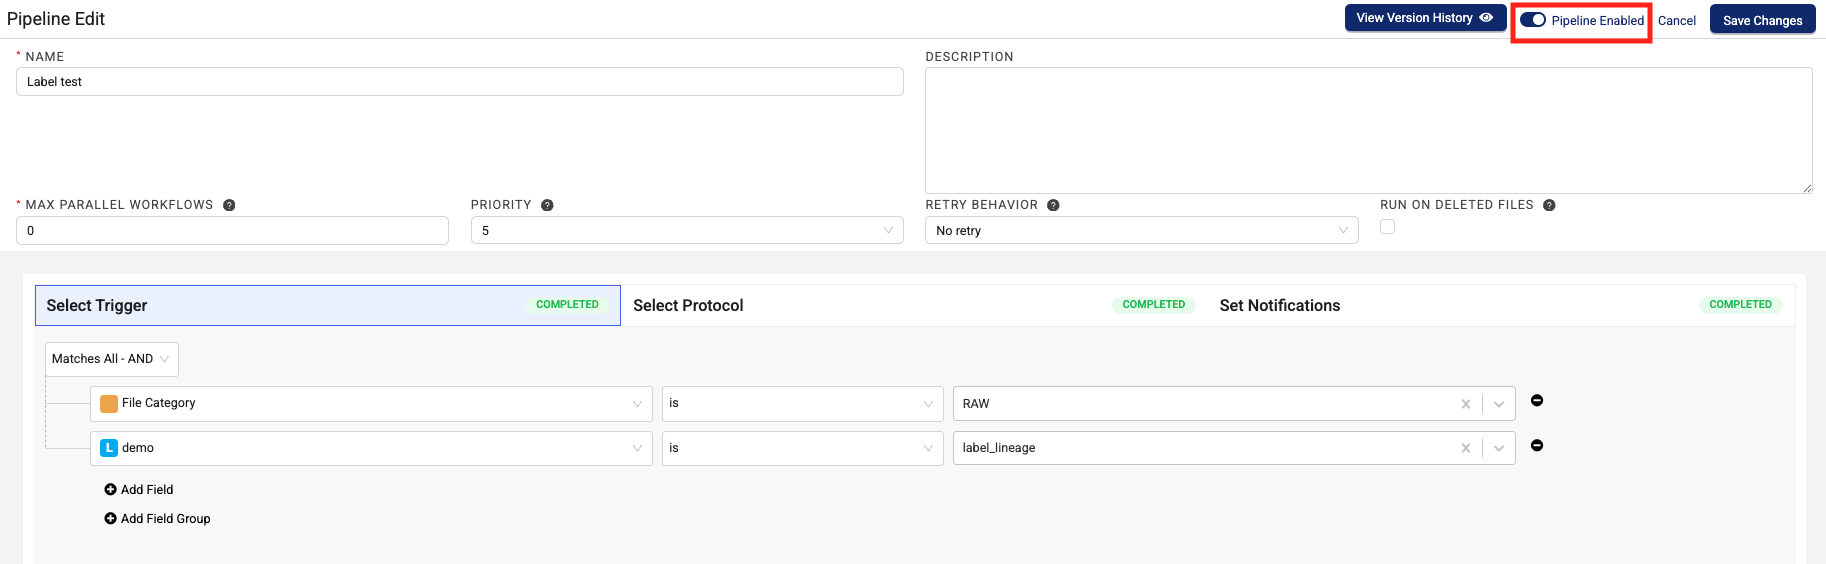
Activate or Deactivate Pipelines
For a pipeline to run if a file meets the defined trigger condition, you must activate it. You can make any existing pipeline activate or inactive by doing the following:
-
Sign in to the TDP as a user with an Administrator role.
-
In the left navigation menu, choose Pipelines. A menu appears.
-
Choose Pipeline Manager. The Pipeline Manager page appears.
-
Select the name of the pipeline that you want to activate or deactivate. The Pipeline Actions pane appears on the right.
-
Choose Edit Pipeline. The Edit Pipeline page appears.
-
To activate the pipeline, move the ENABLED toggle to the right. It appears blue when the pipeline is active.
-or-
To deactivate the pipeline, move the ENABLED toggle to the left. It appears gray when the pipeline is inactive.
-
Choose Save Changes.
Import a Pipeline
To import a pipeline definition from another TDP environment (for example, when moving a pipeline from development to production), do the following:
Step 1: Import a Pipeline Definition
To import a pipeline definition into a TDP environment, do the following:
- Sign in to the TDP as a user with an Administrator role.
- In the left navigation menu, choose Pipelines. A menu appears.
- Choose Pipeline Manager. The Pipeline Manager page appears.
- Select the upper right Import Pipeline button.
- Select the pipeline that you want to import from your local server. The pipeline imports to the TDP environment you're in.
Step 2: Check for Dependencies
IMPORTANT
If any of an imported pipeline’s dependencies aren’t available in the target organization, the pipeline will either not behave as expected or fail.
Before you run an imported pipeline in your target organization, make sure that you verify that all of the pipeline's dependencies are available in the target organization.
To check for pipeline dependencies, review the imported pipeline's configuration for the following potential dependencies. Then, make sure that all of the imported pipeline's configured dependencies are available in the target organization.
Potential Pipeline Dependencies
The following are potential imported pipeline dependencies, which must exist in the target organization before the imported pipeline can run:
- Artifacts: To view the artifacts available in the target organization, see View Artifact Information. To add a custom artifcat to your target organization, see Add Artifacts to Multiple Organizations.
- Shared settings and secrets: To view the shared settings and secrets available in the target organization, see Access the Shared Settings Page. To add a secret, see Add a Secret. To add a shared setting, see Add a Shared Setting.
- Any pipeline trigger types configured as attributes: To view the attributes available in the target organization, see View Attributes. To create a new label, see Create a new label. To add a new metadata field, see Add a New Metadata Field. To add a new tag, see Add a New Tag.
IMPORTANT
When importing a pipeline to a new environment, make sure that you update the pipeline's secrets configuration so that it can run in the environment that you're importing the pipeline to. For more information, see Context API.
Retry Behavior Settings
If a pipeline fails for any reason, the TDP automatically retries running the pipeline again up to three times before the pipeline fails. You can change this default retry behavior when you create or edit a pipeline on the Pipeline Management page by selecting one of the following retry settings. These settings vary, based on the type of protocol definition file format the pipeline uses (protocol.yml or protocol.json).
You can also manually retry a failed pipeline by selecting the Retry button that displays next to the pipeline's workflow steps in the TDP.
NOTE
Each pipeline retry uses double the memory of the previous attempt to run the pipeline, up to 120 GB. Compute and CPU capacity will also increase based on the amount of memory used for each retry. This increase in memory and compute usage can increase the cost of processing files significantly. For more information, see the Memory and Compute Settings section of this procedure.
protocol.yml Pipeline Retry Settings
protocol.yml Pipeline Retry SettingsThe following pipeline retry behavior settings are available for pipelines that use the protocol.yml protocol definition file format only. For more information, see Protocol YAML Files.
| Retry Setting | Description | |||
|---|---|---|---|---|
| Exponential retry interval increasing (default) | Sets a specific BASE RETRY DELAY for the first retry attempt, and then doubles each time period for each following attempt exponentially. | |||
| Constant retry interval | Sets a specific, custom time period (BASE RETRY DELAY) between each retry attempt. | |||
| Linear retry interval increasing | Sets a specific BASE RETRY DELAY for the first retry attempt, and then adds that same time period to the delay for each following attempt. | |||
| No Retry | Pipeline processing isn't automatically retried for any reason. | Retry 3 times (after OOM error only) | Pipeline processing is retried only if the failure is caused by an out-of-memory (OOM) error. The system then retries the pipeline up to three more times. Each subsequent retry must also fail because of an OOM error for the system to retry the pipeline again. \n \nNote: Each pipeline retry will use double the memory of the previous attempt to run the pipeline, up to 120 GB. For more information, see the Memory and Compute table. |
protocol.json Pipeline Retry Settings
protocol.json Pipeline Retry SettingsThe following pipeline retry behavior settings are available for pipelines that use the legacy protocol.json protocol definition file format only.
| Retry Setting | Description |
|---|---|
| Always retry 3 times | If the pipeline fails for any reason, the system retries pipeline processing up to three more times before the pipeline fails. \n \nNote: Each pipeline retry will use double the memory of the previous attempt to run the pipeline, up to 120 GB. For more information, see the Memory and Compute table. |
| No Retry | Pipeline processing isn't automatically retried for any reason. |
| Retry 3 times (after OOM error only) | Pipeline processing is retried only if the failure is caused by an out-of-memory (OOM) error. The system then retries the pipeline up to three more times. Each subsequent retry must also fail because of an OOM error for the system to retry the pipeline again. \n \nNote: Each pipeline retry will use double the memory of the previous attempt to run the pipeline, up to 120 GB. For more information, see the Memory and Compute table. |
Memory and Compute Settings
When configuring a protocol, you can override the default memory setting with a custom memory setting for each step of a pipeline.
There are two types of memory and compute settings:
- Classic: ideal for use cases that don't require low data latency (one minute-plus pipeline startups)
- (For Python- and Node-based pipelines only) Instant Start: ideal for latency-sensitive lab data automation use cases (~1 second pipeline startups)
To configure a custom memory setting for a pipeline step, see Configure Custom Memory and Compute Settings.
The following tables shows the available memory setting options and how much compute capacity each setting uses.
Classic Memory and Compute Settings
| Classic Memory Setting | Compute |
|---|---|
| 512 MB | .25 vCPU |
| 1 GB | .25 vCPU |
| 2 GB | .5 vCPU |
| 4 GB | .5 vCPU |
| 8 GB | 1 vCPU |
| 16 GB | 2 vCPU |
| 30 GB | 4 vCPU |
| 60 GB | 8 vCPU |
| 120 GB | 16 vCPU |
Instant Start Memory and Compute Settings
| Instant Start Memory Setting | Compute |
|---|---|
| 128 MB | .07 vCPU |
| 256 MB | .15 vCPU |
| 512 MB | .29 vCPU |
| 1 GB | .57 vCPU |
| 2 GB | 1.13 vCPU |
| 4 GB | 2.26 vCPU |
| 6 GB | 3.39 vCPU |
| 8 GB | 4.52 vCPU |
| 10 GB | 5.65 vCPU |
Documentation Feedback
Do you have questions about our documentation or suggestions for how we can improve it? Start a discussion in TetraConnect Hub. For access, see Access the TetraConnect Hub.
NOTE
Feedback isn't part of the official TetraScience product documentation. TetraScience doesn't warrant or make any guarantees about the feedback provided, including its accuracy, relevance, or reliability. All feedback is subject to the terms set forth in the TetraConnect Hub Community Guidelines.
Updated 23 days ago