Tetra Chromeleon Agent Installation and Configuration (Version 1.0.x)
This guide is intended for use by an IT administrator. It describes how to select and set up a data connection, how to configure the Tetra Chromeleon Agent, and how to monitor installation progress.
PREREQUISITESBefore you begin, ensure that your environment meets the prerequisites listed here: https://developers.tetrascience.com/docs/thermofisher-chromeleon-agent#requirements.
Data Connection Setup
The RAW files generated by the Tetra Chromeleon Agent are uploaded to the Tetra Data Platform (TDP) through a data connector.
TetraScience provides a Generic Data Connector (GDC) and User Defined Integrations (UDI to facilitate secure file transfers. (Note that the UDI was renamed the Cloud Data Connector (CDC) in version 3.1 of the TDP software.)
We recommend that you have either the GDC connector or the UDI connector set up before installing the Chromeleon Agent.
NOTE:To learn more about the difference between these two connection options, read this topic.
Agent Installation
TetraScience provides an installation package (.msi) file to install the Chromeleon Agent in the host server. The current version is v1.0.0. Note that when a new version is released, the Agent can auto-upgrade from the previous version without manual intervention.
-
Obtain the installation package from TetraScience and place it on a machine that runs a supported version of Thermo Fisher Chromeleon.
-
Run the installation package to set up the Agent. The installation wizard guides you through the prompts The default installation folder is C:\Tetrascience\Tetrascience.Agent.Chromeleon.v1.0.0.
Agent Configuration
After the Tetra Chromeleon Agent is installed, configure the Agent run-time settings.
Management Console
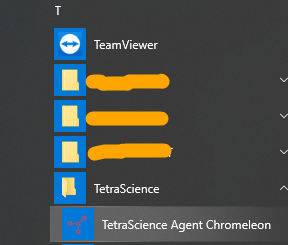
Select "TetraScience Agent Chromeleon" from the Windows Programs list to open the Agent.
Configuration
In the Chromeleon Agent's Management Console, click Configuration from the menu on the left.
The Configuration window is divided into four sections as shown below: 1 - Agent Status, 2- Agent Configuration, 3 - Agent Group User, and 4 - Service Settings.

-
As its name implies, Agent Status displays the current state of the agent: Running or Stopped. As you work through these configuration instructions, you can click the Save button to save the change. When the configuration is complete, you will click the Start button to start the Agent.
-
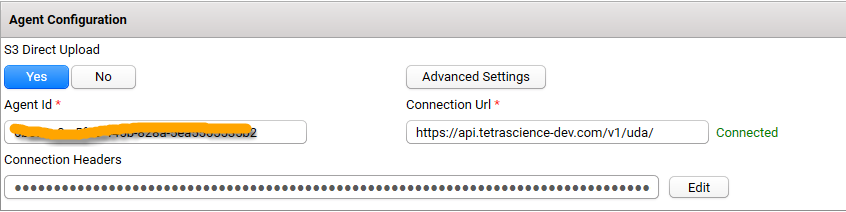
The Agent Configuration section specifies how the Agent connects to the Tetra Data Platform. TetraScience provides various ways to connect the Tetra Data Platform. Please reference this link to select the best option to fit your needs.
S3 Direct Upload
- If you enable this option, the Agent upload files directly to AWS S3 bucket, bypassing from GDC or UDI. Please be aware that if you use the S3 Direct Upload option with GDC, an L7 Proxy Data Connector must be created in the same Data Hub where the GDC is set. Also, the port of the L7 Proxy Data Connector must be open.
NOTE:If you want the agent to automatically perform regular backups of the SQLite database file, ensure that the S3 Direct Upload option is enabled. When this option is enabled, the SQLite database file, which stores agent configuration data, is uploaded to the backup bucket in the data lake. Should an agent failure occur, you can restore the database file from the backup bucket so that processing can continue.
Data Connection Agent Id and URL
Earlier in these instructions, you created a GDC or UDI connection.
For more information on this see this topic
- Agent ID is a UUID
- Examples of the URL from GDC or UDI are listed below:
GDC URL ishttp://10.100.1.1:8888/generic-connector/v1/agent
 UDI URL ishttps://api.tetrascience-dev.com/v1/uda/
We strongly suggest that you verify the Agent ID and URL with you TetraScience Delivery Engineer before you use it.
Please make sure you enter the full URL in Connection Url.
Additional note when using UDI:
If you use the UDI URL, attach the API Key or JWT token to the header.
Reference the doc regarding UDI to learn how to get API key or JWT Token.
Click the Edit button of Connection Headers. A model window pops up with three predefined header keys:
If you use an API Key, put the value next to the x-api-key.

If you use the JWT token, fill in both the x-org-slug and Authorization fields.

NOTE
Authorization,Beareris optional. If you do not provide it, the Agent will add it automatically.
When the header values are saved, the model window will close. The Agent validates the connection immediately. The connection status is shown in front.
- The Agent Group User section indicates the account used to run the Chromeleon Agent.
- If Chromeleon enables LDAP, this account should be a valid Chromeleon user account.
- If Chromeleon doesn't enable LDAP, this account can be any valid Windows Account. The user account used to access Chromeleon is defined in next section, which addresses Service Settings.
- The Services Settings section defines the configuration of the Chromeleon Agent at run time.
- Processing Interval (Second). The Chromeleon Agent runs the Injection extract task in the specified time interval. The extract task includes scanning Chromeleon to detect new or modified injections and the generation of the RAW injection file.
- Injection Service Output folder. The temp folder where the RAW file is stored. When the files are uploaded to the Tetra Data Platform successfully, the RAW file will be deleted from the temp folder to save disk space.
- Chromeleon LDAP Setting. This should match the LDAP setting in Chromeleon.
- User Name, Password, and Role. If LDAP is not enabled, the User Name, Password and Role are required, so that the Agent can access Chromeleon based on that specific account.
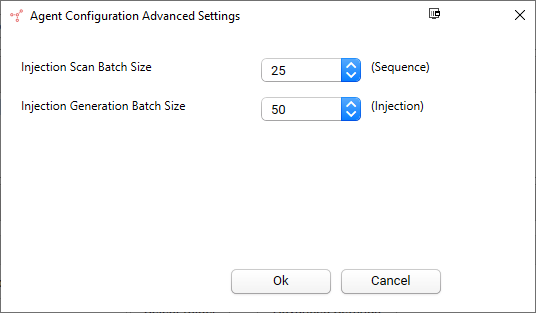
- Advanced Settings. Specifies the batch size to scan and generate the injection.
- After all of the information is entered, click Start button near the top of the window, in the Agent Status section. Once started, the Agent will begin to run.

NOTEOnce installation and your initial configuration are complete, use a windows task script to start the agent daily (such as at 1:00 a.m.) to ensure that the agent continues to remain running. For information on how to do this, view this topic.
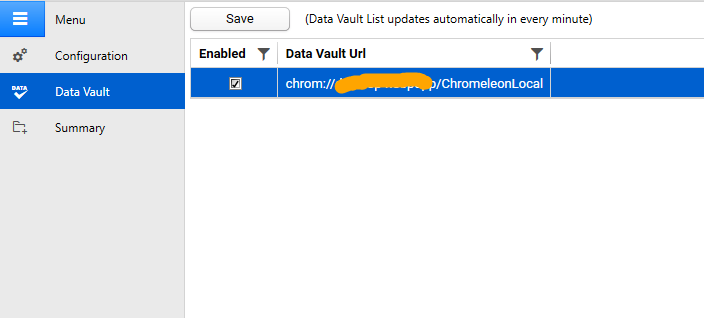
Data Vault
The Chromeleon Agent can access all of the Data Vaults the user has permission to access. Instead of generating the injections from all of the Data Vaults, you can select the ones you want from the Data Vault list.
To do this, complete the following steps.
- In the Management Console, make sure the agent has been started.
- Select the Data Vault option from the menu to the left of the Management Console. The Data Vault screen appears.
- The data vault list populates. This usually takes a minute or two to complete.
- Select the data vaults you want to obtain the agent to injections from. The Agent will extract injections from the data vaults you selected.
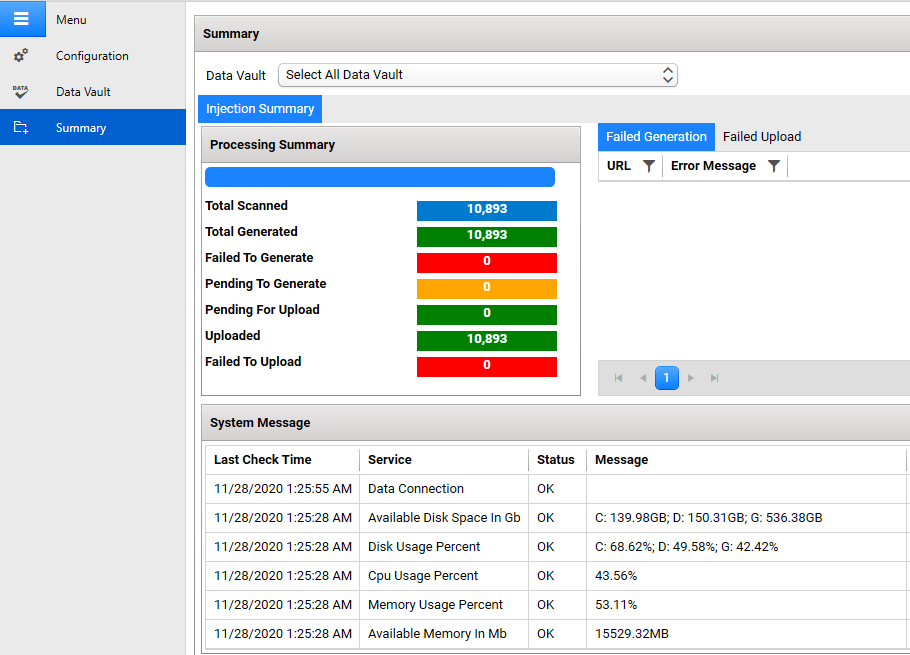
Processing Summary
The processing summary page displays agency processing progress.
In the Management Console, select Summary from the menu on the left. The Summary screen appears. From the summary page, you can see how many total injections have been scanned in a given Data Vault, as well as how many have been generated and uploaded. If there are any errors, the error message, and related injection URL is displayed on a data grid on the right.
In addition to the Injection processing summary, the Agent includes system metrics on the host server as well. That information is uploaded to the Tetra Data Platform.