Tetra Empower Agent User Manual (Version 3.1.0)
This guide explains how to use the TetraScience Empower Data Connector and TetraScience Empower Agent. It explains how to configure the agent, use the project panel, monitor processing, and troubleshoot issues.
Version
This guide is for version 3.1.0 of the software.
Configuration
Empower Agent Management Console
Agent Management Console is divided into eight sections as shown in the screenshot below.
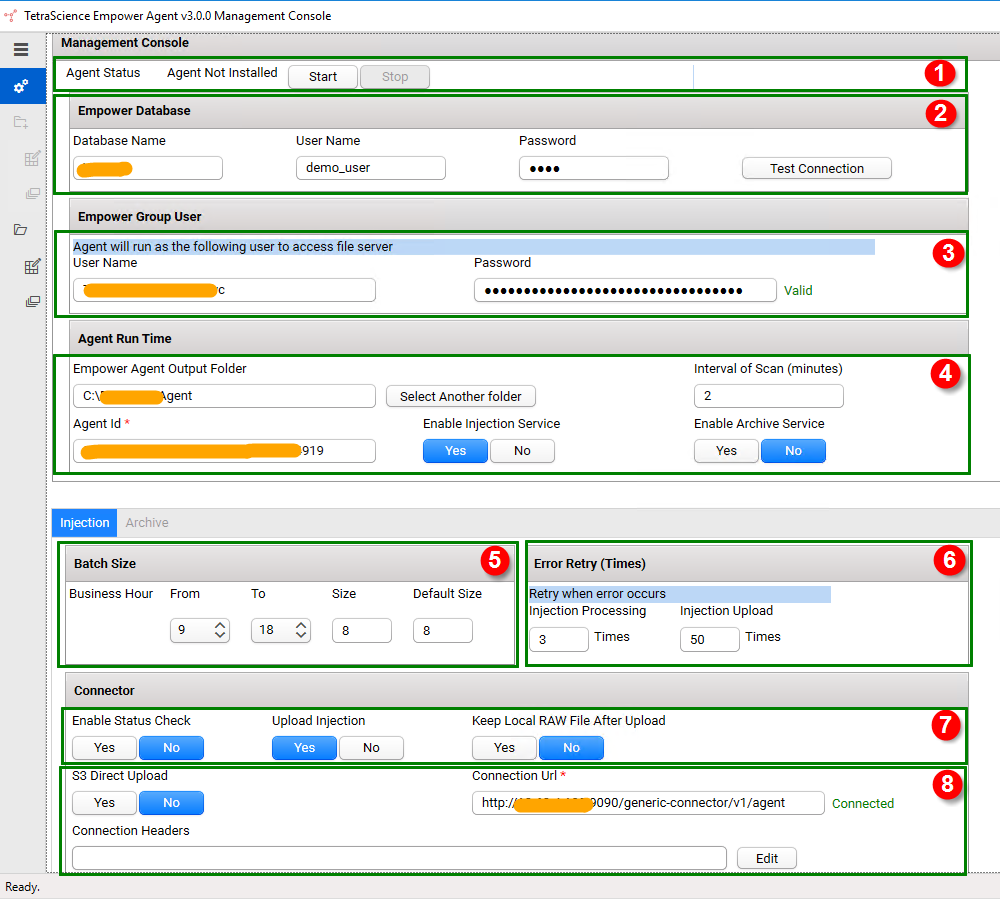
-
It indicates the Agent's running status. There has a couple of status as below:
- Agent Not Installed
- Running
- Stopped
When the System Administrator sets up all of the required parameters completely, she can click the Start button to start the Agent or click the Stop button when the Agent is running.
-
Empower Database Name, DB User Name, and Password are required to access Empower. Please make sure this account has the right privilege for the projects to be extracted.
-
Empower Group User Account. This is the account running TetraScience Empower Agent, this user account is suggested to be in the same Organization Unit as Empower so that it has the privilege to access Empower File Server to fetch raw data.
-
Empower Injection RAW file output folder. This folder path should be valid.
TetraScience Empower Agent periodically scans Empower projects to detect if there has any new injection or reprocessed injection. Interval of Scan indicates the time period for this scan.Currently, TetraScience Empower Agent contains two Services, Injection Service and Archive Service. The user can enable either of them or both. Just a friendly reminder that this User Manual focuses on Injection Service only.
Agent ID is part of the information used for connecting the TetraScience Data Platform. It can be retrieved from the TetraScience Data Platform when setting up GDC or UDI.
-
Batch Size, the number of Injections being processed simultaneously. 8 is the default size. The System Administrator can adjust it based on the "hours" of the day. The number can be set up to 10 or 12 if the host server has better hardware specifications. The number also can be adjusted lower, if, the Agent consumes more CPU and Memory than is allowed in the host server.
-
Retry policies for Injection RAW file generation and upload if any unhandled error occurs in either of the cases.
-
The System Administrator can define the Agent runtime configuration. She can decide whether it is needed to send Heart Beat to the Data Platform, whether the Agent needs to upload the RAW file to the Data Platform and whether the RAW files should be kept in the local drive after the files are uploaded successfully.
-
Configure Data Connection to TetraScience Data Platform
S3 Direct Upload
When turning on this option, the Agent is going to upload the files directly to the AWS S3 bucket bypassing GDC or UDI
Please check the links if you like to learn more about GDC or UDI.
When using the S3 Direct Upload option with GDC, an L7 Proxy Data Connector should be added in the same Data Hub where the GDC is set up. Also, the port of the L7 Proxy Data Connector is open.
*Connection Url
The prerequisite is to set up an Agent from GDC or UDI
Agent ID is a UUID (Enter in section) 
 Examples of the URL from GDC or UDI as below.
GDC URL ishttp://10.100.1.1:8888/generic-connector/v1/agent
UDI URL is https://api.tetrascience-dev.com/v1/uda
It is strongly suggested to verify the Agent ID and URL with TetraScience Delivery Engineer before using it.
Please make sure to enter the full URL to Connection Url
Additional note when using UDI:
If the user uses the UDI, it is required to attach either API Key or JWT token to the header.
Please reference the doc regarding UDI to learn how to get API key and JWT Token.
The user clicks Edit button of Connection Headers, a model window pops up with three predefined header keys.
If the user uses API Key, she needs to put the value next to x-api-key

If the user uses JWT token, she needs to fill both x-org-slug and Authorization

Please note: when entering the value for Authorization, Bearer is optional. If it is not provided by the user, the Agent will add it automatically.
When the header values are saved, the model window closes. The Agent validates the connection immediately. The connection status is shown in front.

When the required parameters are set up, System Administrator clicks Start to run Agent. The screenshot below shows the Agent is successfully running.
When the Agent is running, all of the parameters are disabled.

In case, System Administrator likes to modify the parameters, she needs to Stop the Agent first.
Project Panel
Project Selection
Usually, one Empower Database can contain hundreds or even thousands of Projects. It is flexible for System Administrator to select the Projects she wants to process. Initially, the Project list contains all of the Projects with which the Empower DB User can access. The System Administrator can select the Projects to enable the Agen to generate the RAW files. The System Administrator needs to click Save button.
In case, new Empower projects are added to Empower System, the Agent can detect them from its periodical Scan job. The new Projects are included in the Project list, the System Administrator can apply the same way by manually selecting the projects for processing.
During the processing, the Conversion Status indicates the overall status. Status has three options.
- No Injection: The Project is not selected
- Pending: The Project is selected but has not been processed yet.
- Generated: The Injection in the Project has been processed completely. In case, it is in the middle of the processing, it will show how many percentages of total injections have been processed.
Result Sign Off Option

The System Administrator can choose one of the following Result Sign Off options for a Project.
- Not Required
- Level 1 Required
- Level 2 Required
This option determines injections to be generated and what content is included in the output Raw Injection JSON files. The detailed description can be found in the FAQ section
When the TetraScience Empower Agent is running, the System Administrator can monitor the progress by checking the status from the Processing Status.
Processing Status contains a dashboard showing:
- Number of injections scanned by the agent
- Number of Injections that raw files generated
- Number of Injections that are failed to generate
- Number of the Injections have been uploaded
- Number of Injections pending for upload
- Number of Injections failed to upload
- Exception messages
Processing Summary
The TetraScience Empower Agent detects and generates the injections from the enabled Projects. This section provides clarity on agent scanning, generation, and upload activities. All date/time displayed are local time.

System Administrators can select an individual project from the drop-down list. The data in the dashboard will change according to the selection. The dropdown list can be cleared to go back to All Projects. Note that only enabled projects will be included.
In case, the System Administrator like to re-generate Injection RAW files from any of the projects, she can select the Project(s) and click Rerun Project(s) button.
System Administrator can choose Re-upload Injections for the Project(s). The Agent will reupload the generated RAW files to the Data Connector. Please be aware, if System Administrator has turned off the option, Keep Local RAW File After Upload, the Agent will regenerate the Injections.
There have two possible types of errors that occur during processing.
- Injection Generation Error
- Injection Upload Error
When an error occurs, the Injection information is captured and shown in the data grid with a detailed error message. The Agent will retry the failed ones multiple times based on the setting specified in Management Console. System Administrators can regenerate and re-upload the failed injections manually by clicking the buttons above the data grid.
Troubleshooting
Missing Result and Chromatogram Data
It is due to the Group User Account running the Tetrascience Empower Agent is not part of the Empower User Group.
Injection JSON is not generated
Check if the Agent is up running from Management Console. If it stops unexpectedly, restarts the Agent from Management Console.
Previous Version Empower Project is not generated
Empower V3 can automatically upgrade Project with the Previous version. System Admin still needs to double-check it by opening the Project from Empower Client application to make sure it can be accessed by Empower. A manual conversion might be required.

Channel Data missing from the output
That is because the accounting running Empower Agent is not part of Empower User Group in Active Directory when Empower Software was installed initially.
Need Additional Information regarding TetraScience Empower Agent
Please check FAQ section to learn more about TetraScience Empower Agent or connect a TetraScience Delivery Engineer directly.
Updated 23 days ago