(Version 3.1.x) Searching the Tetra Data Lake
NOTE:This article explains how to use the Search User Interface in the Tetra Data Platform, versions 3.1.x. If you are using the Tetra Data Platform, version 3.0.x and earlier, see this topic instead.
The Tetra Data Platform provides a robust search feature that allows you to search for your files in the Tetra Data Lake. You can search using two different methods:
- The Search User interface (screen) in the Tetra Data Platform web-based user interface.
- The Tetra Web API. The Web API is discussed in detail here.
This topic addresses the Tetra Data Platform Search User Interface.
Overview
The Search screen provides an easy way for you to search data quickly. You search by entering text in the search bar. You can easily refine your search using search filters. The Search screen is quite robust and allows you to do things like:
- View and sort search results by name, source type, or last modified date.
- Browse files in specific folders.
- Filter search results by entering terms in a text box.
- View files from specific sources or pipelines.
- Upload, download, and delete files.
- Open the file page to view its contents.
- View JSON files.
- Add or Edit attributes (metadata, tags, and/or labels).
Accessing the Search Screen
To access the Search screen, do the following.
- In the Tetra Data Platform, click the Hamburger icon near the top of the screen.
Hamburger Menu
- Select Search Files from the menu that appears on the left side of the screen.
Search Files Options
- The Search screen appears. The Search screen has:
- Quick filters that allow you list files by source or pipeline, or to browse files by folder in the Tetra Data Lake.
- A search bar, where you can enter text and see the filters that have been applied.
- Additional filters and features that you can apply.
- A display area that shows file search results.
Search Screen
A field-by-field description of the items in this screen appears in the following table.
| Field | Description |
|---|---|
| List Button | Displays files in a list format. |
| Browse | Displays your organization's folders. Click the folder (and subfolders if needed) that you want to browse. |
| Search Box | Allows you to type terms in and fields that you want to search. |
| Full-Text | Searches all of the text associated with a file. For a detailed explanation of how this search operates, see this article. |
| Options | Provides advanced ways to search. You can search using basic filters, search on attributes, Data (IDS) filters, search IDS files by schema field, and search RAW ElasticSearch searches. |
| Upload File | Allows you to upload files. |
| List of Sources | Searches for files generated by a certain source, such as your organization's Empower instances. |
| Tetra Lake | This option appears when you click the Browse button. It displays of the files that are assigned to your organization, grouped by folder. |
| Name | Filename. |
| Source Type | Indicates the source. |
| Last Modified | Indicates when the file was last modified. |
| Show Match Details | Allows you to see details about where matched terms appear in the file. |
Performing a Basic Search, Browsing Folders in the Tetra Data Lake, and Viewing File Details
You can easiily perform a basic search using the search bar, browse for files in the Tetra Data Lake, and view details about a file.
Performing a Basic File Search
To perform a basic file search, complete the following steps.
- In the Search screen, click the List button. The name, source type and the date that each file was last modified appear.
- Enter search terms in the search box.

List of Files
- If you want to search the full-text, turn the Full-Text option on. Note that the Full-text option causes the search to perform a bit like a google search in that the AND/OR etc. is not treated as a boolean.
- Click the Search button. Files that match what you entered in the search box appear in the list.
- If you want to further filter the files by source or pipeline, select the desired source or pipeline from the list on the left side of the window. Note that you might need to scroll down to see the pipeline.
You can now view more details about specific files or apply more filters.
Viewing File Details
To view a summary of file details, click the file. A summary of file details appear.

File Detail Summary
| Field | Description |
|---|---|
| Related Files | Lists the input and output files. The input file is the file the current file was derived from. For example, for an IDS file, the RAW file would be the input file. The output file lists files this file was used to procuded. For example, the IDS file typically produces a JSON file. |
| Date Created | Lists the date and time the file was created. |
| Integration Type | Lists the integration (e.g. Egnyte) that was used to ingest the file into the data lake. |
| Protocol | Lists the pipeline protocol used, if any |
| Task Script | Lists the task scripts related to this file if any |
| Tags | Displays the file tags. |
There are several icons and a menu in the upper right corner.
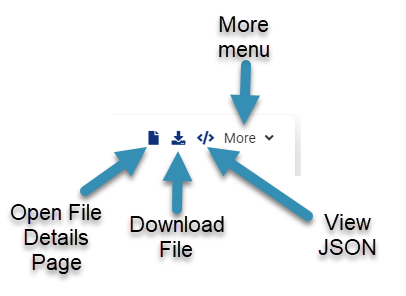
- To view more file details, click the Open File Details page button. This page is covered in detail in this topic.
- To download the file to your computer, click the Download File button.
- To view the JSON file, click the View JSON button. This button allows you to view the JSON file that show elasticsearch indexed data that is placed in S3, such as the source type, when the file was created, the location of the file (bucket), source, and more.
You can further filter your search results by using the filters in the option windows or by manually creating a search query.
Browsing for a Files in Folders
To browse files in folders, do the following.
- Click the Browse button.
- The Tetra Lake directories appear in place of the Source Panel.
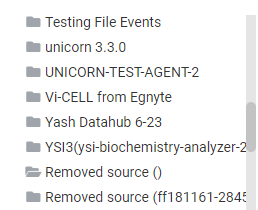
- Select the folder you want to browse. If needed, select subfolders until you see the files in the results part of the screen.
You can further filter your search results by using the filters in the option windows or by manually creating a search query.
Applying Filters: Using Options User Interface to Fine-Tune Searches
Complex searches can now be accomplished more easily with the options screen. You don't need to know EQL to perform a complex search because the options screen provides an easy way for you to use the user interface to search for specific files. This makes it easy for you to:
- Search for files based on the date modified, by source, pipeline, or file category (RAW, IDS, or PROCESSED).
- Search for files that have certain attributes, such as platform and custom metadata, as well as labels.
- Files from a specific schema with data that matches values that you specify.
Although you don't have to know EQL to perform a query, you can run EQL queries and modify them in the options screen as well.
Filtering By Date, Source Name, Pipeline, or File Category
To filter search results by date, source, pipeline, or file category, use the Basic Filters tab in the Options window.
- In the Search screen, click the Options button. The Options screen appears.
- Make sure the Basic Filters tab is showing.
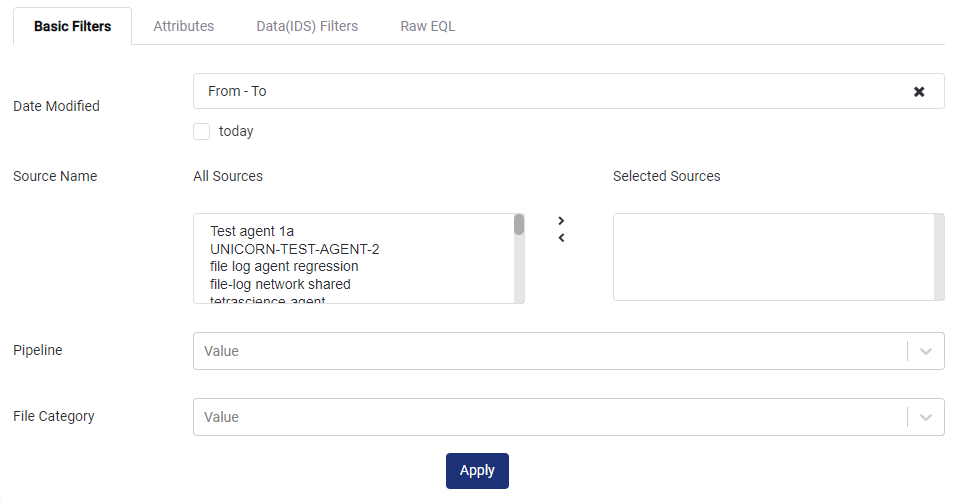
Basic Filters Tab
Filter by Date
- To search for files modified today: Click the "Today" checkbox beneath the Date Modified field.
- To search for files modified on a specific date: Click the Date Modified field. A calendar pops up; select a date from the calendar, then click in another part of the window other than the calendar. The calendar disappears and the date you selected appears in the field.
- To search for files modified during a range of dates: Click the Date Modified field. A calendar pops up; select the first date of the range from the calendar, then select the second date. When you are done, click in another part of the screen other than the calendar. The calendar disappears and the dates you selected appear in the field.
Filter By Source:
- To search for files from a single source: Click the source in the All Sources field, then click the ">" arrow. The source you selected appears in the Selected Sources field.
- To search for files from multiple sources: Hold down the SHIFT or CTRL keys and click the sources you want to search for. Once selected, click the ">" arrow. The sources you selected appear in the Selected Sources field. You can also select one source at a time and add using the ">" arrow.
- To remove a source from the Selected Sources field, click the source you want to remove, then click the "<" arrow. The source reappears in the All Sources field.
Filter for Files Generated by a Specific Pipeline:
To search for files generated by a specific pipeline, click the Pipeline drop down list and select the pipeline you want.
Filter for Files in a Specific Category
To search only for files of a specific type, click the File Category drop down list, then select the File Category you want to search for.
Filter for Files by Attribute (Platform or Custom Metadata, Labels, or Tags)
To filter search results by attribute, use the Attributes tab in the Options window.
- In the Search screen, click the Options button. The Options screen appears
- Click the Attributes tab.
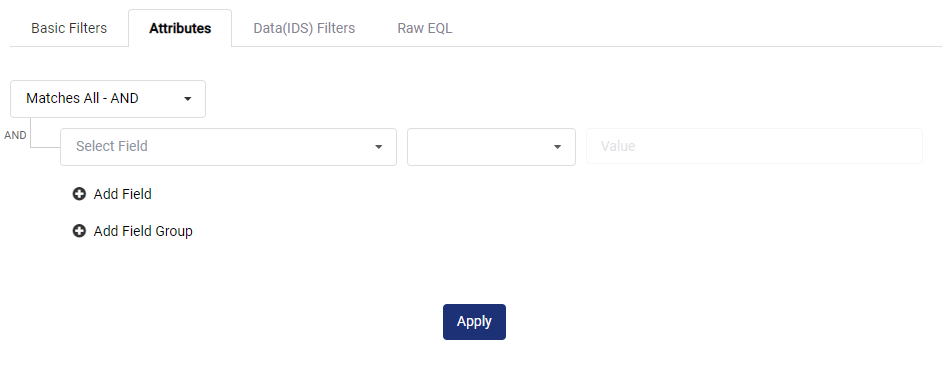
Attributes Tab
- Click the Source Type and select either an item from Platform Metadata, Custom Metadata, or Labels. (If you want to search by Tag, search for that option under the Platform Metadata source type.)
- Enter whether you want the item to match the value by selecting is or is not from the drop-down menu. Note that some source types have other options.
- If you want to add another item for your query (like, whether a certain tag is present) click Add Field and repeat steps 3-4.
- If you want the search result to return files that meet both of the conditions, select "Matches All-AND". If you want the search to return files that meet at least one of the conditions, select "Matches All-ANY".
- If you want to nest query conditions, select Add Field Group, then repeat steps 3-4.
Filter by Schema Data:
To filter search results by schema data, use the Schema Data tab in the Options window.
- In the Search screen, click the Options button. The Options screen appears
- Click the Data (IDS) Filters tab.
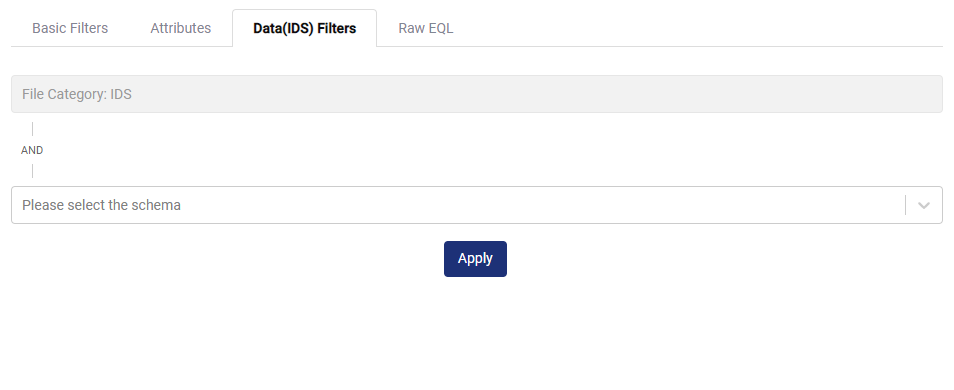
Data (IDS) Filter Tab
- Click the Schema field and select the schema you want to filter on from the drop down list.
- Enter whether you want the item to match the value by selecting is or is not from the drop-down menu. Note that some source types have other options.
- If you want to add another item for your query (like, whether a certain value is present in the IDS) click Add Field and repeat steps 3-4.
- If you want the search result to return files that meet both of the conditions, select "Matches All-AND". If you want the search to return files that meet at least one of the conditions, select "Matches All-ANY".
- If you want to nest query conditions, select Add Field Group, then repeat steps 3-4.
Search using RAW EQL:
To search using elasticsearch query language, use the RAW EQL tab in the Options window. This can be particularly useful if you want to test your searches before using them in a third party tool.
- In the Search screen, click the Options button. The Options screen appears.
- Click the Raw EQL tab.
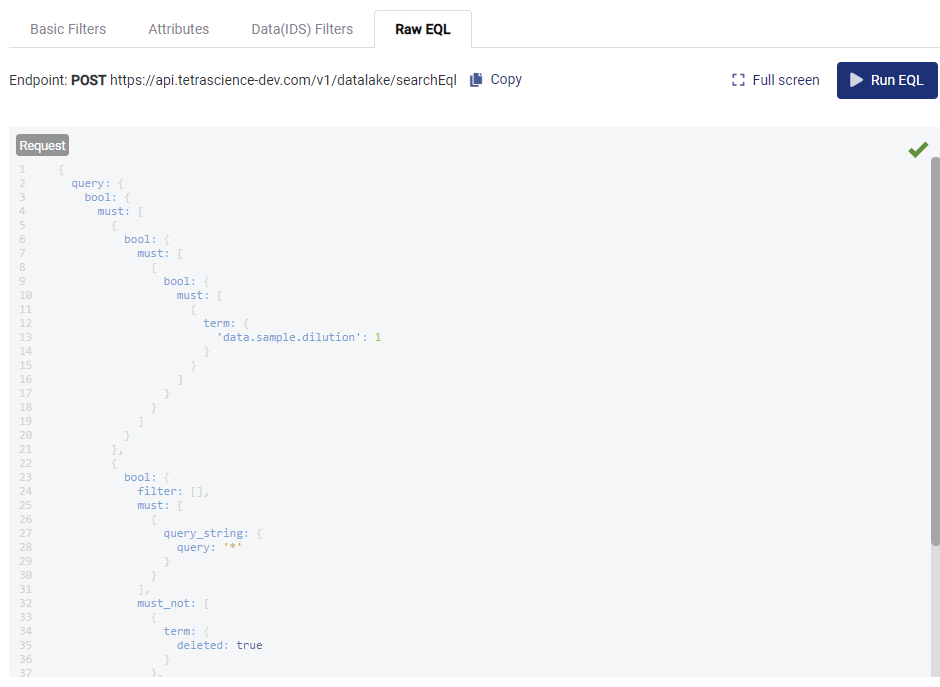
Raw EQL Tab
- The searchEql endpoint request appears on the screen (
POST https://api.tetrascience-dev.com/v1/datalake/searchEql). - If desired modify the EQL.
- Click Run EQL to see the result.
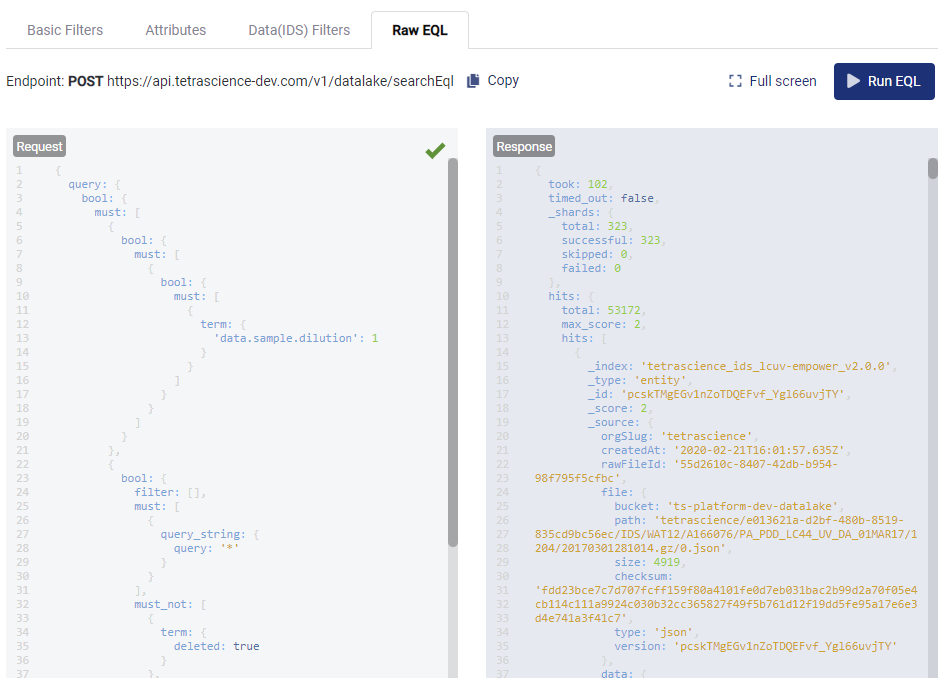
EQL Results (Response)
Manual EQL Search and Filter Examples
If you are familiar with Elasticsearch Query Language (EQL), you can type your query directly in the search bar instead of using options window. The search bar uses Elasticsearch's query_string query.
NOTE:If you are not familiar with EQL, see Elasticsearch's documentation. Another helpful resource is the Amazon Elasticsearch documentation.
NOTE:To find the field you want to search for, select a file on the search file page and click "Preview" in the lower right corner. You will see a file with JSON format. If the field is like this { data: { sample: { id: "fake-id1" } } }, then you will type data.sample.id:"fake-id1" with the quotes into the search bar.
Manual Search Query Examples
You can enter text in the search bar to search. Note that:
- If you are searching without specifying a field, the value is case-insensitive.
- If you are searching for a specific field, the value you provide must be the exact value and it is case-sensitive.
Search Text | Search every doc that... | Notes |
|---|---|---|
word1 |
| case-insensitive |
word1 word2 |
| case-insensitive |
word1 OR word2 |
| case-insensitive |
word1 AND word2 |
| case-insensitive |
word1 AND NOT word2 |
| case-insensitive |
"word1 word2" |
| case-insensitive. Note the behavior will change if a specific field is provided |
data.sample.id: id1 | field "data.sample.id" is exactly "id1" | case-sensitive |
metadata.compound\ id : TS14224012 | field "metadata.compound id" is exactly TS14224012 | Since "compound id" has a space in the name it is necessary to escape ("\ ") the space. |
data.sample.id:"fake-id1" | field "data.sample.id" is exactly | case-sensitive |
source.type:"empower" AND data.sample.id:id1 | "source.type" is exactly "empower" and sample ID is exactly "id1" | case-sensitive |
| where the field "source.type" has any non-null value | |
!(_exists_:traceId) | field "traceId" does not exist | |
file.size:>1000 | field "file.size" is greater than 1000 |
Plain Text Processing
Plain text entered in the TetraScience search bar is analyzed using ElasticSearch's Standard Tokenizer. Word boundaries are determined based on the
Unicode Text Segmentation algorithm, as specified in Unicode Standard Annex #29.
This means searches with spaces, hyphens, '+', and some other common symbols are broken down into terms, however underscores are not. For example, the following sentence:
The 2 QUICK Brown-Foxes jumped_over the lazy dog's bone.is broken down into the following terms:
[ The, 2, QUICK, Brown, Foxes, jumped_over, the, lazy, dog's, bone ]This may make exact-match searches unpredictable (ex: when trying to match an exact ID that includes hyphens). Consider searching for the following UUID:
576fd742-c1a6-4fb4-9ecb-398d53e4addbThis matches any data including:
"576fd742", "c1a6", "4fb4", "9ecb", "398d53e4addb"When querying for an exact match for such a value, consider wrapping the search string with quotes like this:
"576fd742-c1a6-4fb4-9ecb-398d53e4addb"This will cause ElasticSearch to ignore word boundaries and produce a more appropriate result.
Keep in mind, this behavior exists for "free-text" searches only. Searches on exact fields are analyzed based on that particular field's type. For example, the following query will use the Keyword tokenizer, as this field is a keyword type:
source.type.executionId: 576fd742-c1a6-4fb4-9ecb-398d53e4addbBy default, the "Keyword" tokenizer does not adhere to the same word boundaries rules as the "Standard" tokenizer. An exact-match query without quotations will work as expected.
Nested Types
The search bar doesn't reliably support queries on fields of the "Nested" type. But, you can use the options window to query those fields.
The best way to determine if a field is nested is through the IDS Schema Viewer http://platform.tetrascience.com/schemas.
After selecting a schema, select the "elasticsearch.json" artifact from the artifacts dropdown on the right. The JSON file will show which fields are mapped as a nested type.
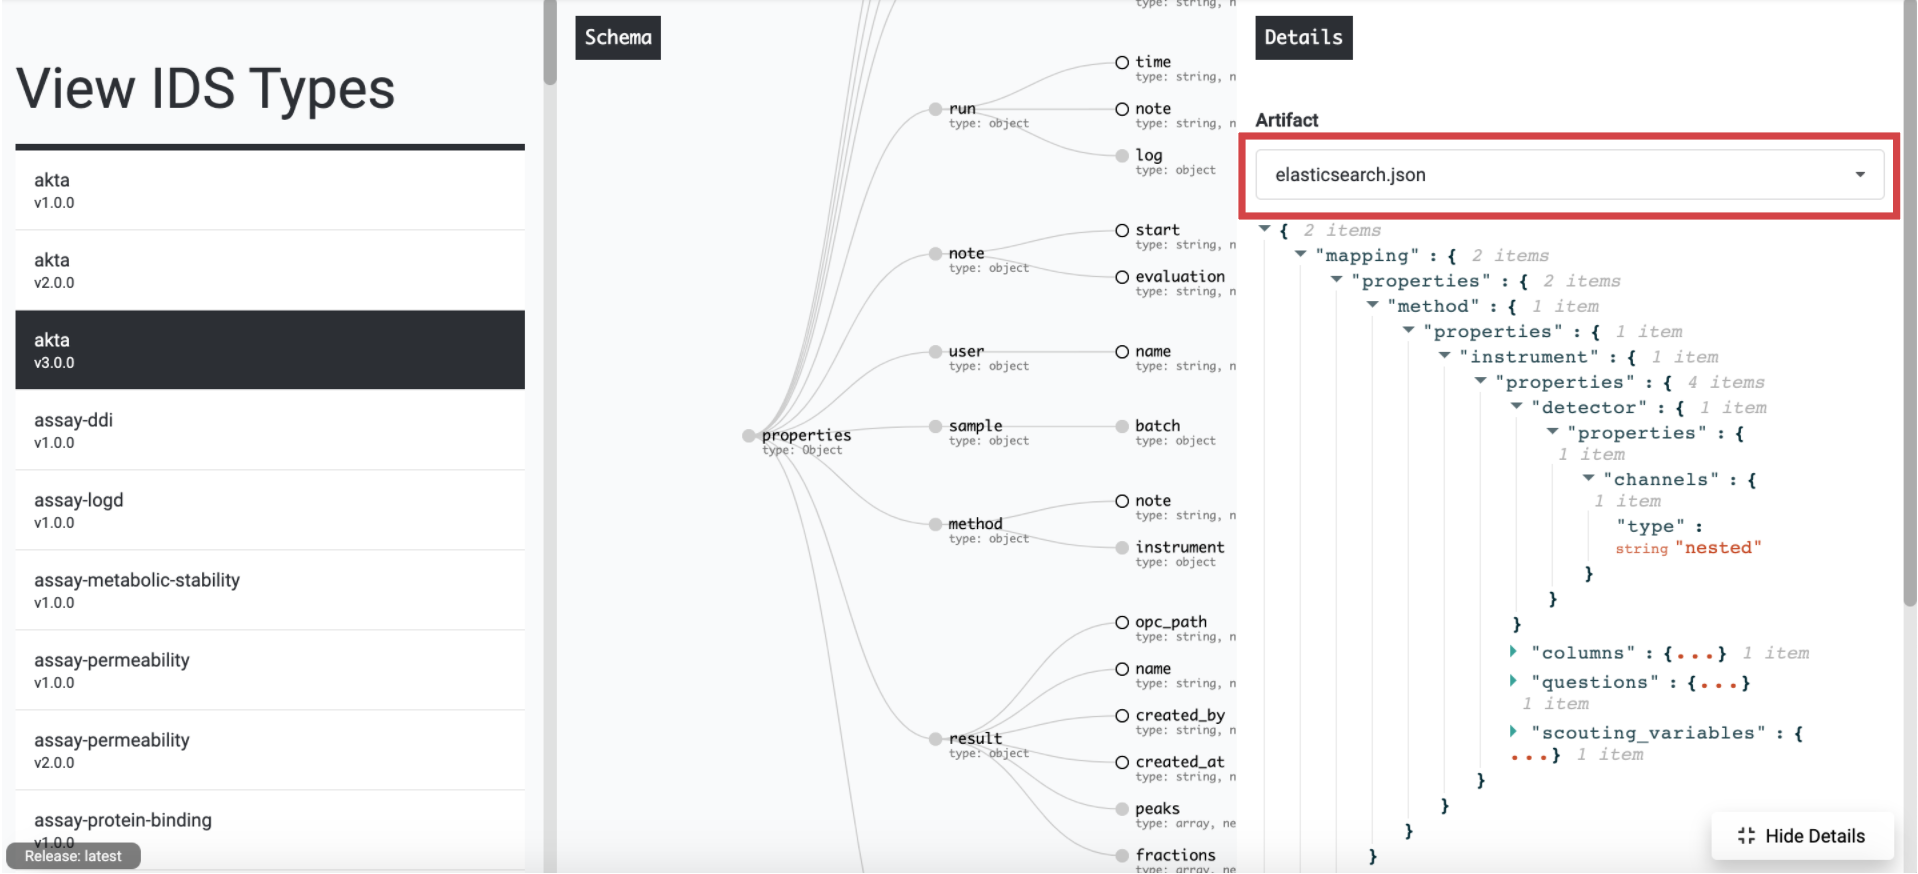
Additional details about the Nested datatype: https://www.elastic.co/guide/en/elasticsearch/reference/current/nested.html
Wildcard Searches
* and ? are used as wildcards. They can be applied to both field key or value.
qu?ck | "?" can be any character. contains the word that stars with "qu" plus one character plus "ck" in any field | case-insensitive. matches "quick", "quack" etc. |
science* |
| case-insensitive |
qu?ck OR science* |
| case-insensitive |
data.\*:(quick OR brown) | any field key that starts with data. that has exactly "quick" or "brown" | case-sensitive. matches data like "data.id: quick" |
Grouping Search Terms
() Parentheses are used to group words or operations
word1 AND (word2 OR word3) | case-insensitive.
|
status:(active OR pending) title:(full text search) | case-sensitive. |
Specifying a Range
Ranges can be specified for date, numeric or string fields. Inclusive ranges are specified with square brackets ets {min TO and exclusive ranges with curly brackets {min TO max}.
All dates in 2012 | |
count::callout | Numbers 1..5 |
tag:{alpha TO omega} | Tags between alpha and omega, excluding alpha and omega |
count::callout] | Numbers from 10 upwards |
date:{* TO 2012-01-01} | Dates before 2012 |
count:[1 TO 5} | Numbers from 1 up to but not including 5 |
Reserved charactersIf you need to use any of the characters which function as operators in your query itself (and not as operators), then you should escape them with a leading backslash. For instance, to search for (1+1)=2, you would need to write your query as \(1\+1\)\=2.
The reserved characters are: + - = && || > < ! ( ) { } [ ] ^ " ~ * ? : \ /
The escape characters are dropped in the webview, and should also be escaped.
For instance, to search for (1+1)=2, you would need to write your query as \(1\+1\)\=2.
Adding and Editing Attributes (Metadata, Tags, and Labels)
To add or edit attributes, such as metadata, tags, and labels, complete the following steps.
- Click the file that you want to modify.
- In the right corner, select More, then select Add/Edit Attributes.
- Follow the instructions in this topic. When complete, click Apply.
Uploading a New Version of the File
To upload a new version of the file, do the following.
- Click the file that you want.
- In the right corner, select More, then select Upload New Version.
- Add a label, metadata, or tags if desired. For information on how to do this, see this topic.
- Click the file upload box to select a file to upload or drag and drop the file into the box.
- When complete, click Upload
Deleting a File
To delete a file, complete the following steps.
- Click the file that you want to delete.
- In the right corner, select More, then select Delete.
Updated 4 months ago
