

Tetra Empower Agent Archive Service Installation Guide
The Tetra Empower Agent Archive service streamlines the complex tasks of Empower project backup and restoration. Available for Tetra Empower Agent v5.3.0 and higher, the Archive service facilitates Empower project archival to the Tetra Data Platform (TDP) and allows you to seamlessly restore the archived projects back to Empower, if needed.
The following procedure shows how to install and set up the Tetra Empower Agent Archive service. For instructions on how to use the Archive service, see the Tetra Empower Agent Archive Service User Guide.
Prerequisites
Before you can install and use the Tetra Empower Agent Archive service, you must do the following:
- Verify that hardware and software requirements are met
- Configure the required user account credentials
- Set up the connection to the Tetra Data Platform (TDP)
- Create a Tetra Empower Agent v5.3.0 or higher
Hardware and Software Requirements
To install and run Tetra Empower Agent v5.3.0, the following hardware and software versions are required:
- One of the following Microsoft Windows versions:
- Windows 10 Enterprise or Professional, 64-bit
- Windows Server 2016 Standard or 2019 Standard
- .NET Framework 4.8
- 16 GB RAM at minimum (64 GB RAM is recommended)
- 8 Core CPU
- Minimum 300 GB of free disk space
- Empower 3 Service Release 2 or higher Client Software (English Edition)
- If installing Empower software on an English-language computer, make sure that you confirm that the Windows region settings are configured for English (United States). The symbols for English (United States) use decimal formatting, not comma formatting, which is important when displaying numeric values (for example: 12.56, not 12,56)
NOTEThe required disk space needs to accommodate both the project data fetched from the Empower Oracle database and the project RAW files from the Empower File System.
Empower 3 Client SoftwareEmpower version
You must install the Tetra Empower Agent at the same workstation where the Empower 3 Client Software is running. The Tetra Empower Agent is compatible with Empower 3 Service Release 2 or higher. If the Empower 3 Client version is earlier than Service Release 2, then you must upgrade the Empower 3 Client software. For detailed system requirements, see the Client Software section in the Empower 3 System Administrator Guide.
Empower System Audit Trail Policy
The Tetra Empower Agent Archive Service offers support for both Project Comment and Confirm Identity features.
User Account Credentials Requirements
To run the Tetra Empower Agent, you must have the following valid user account credentials:
-
Empower Database User account provides access to the Empower database through the Empower Toolkit. Projects that can be extracted by using the Tetra Empower Agent are contingent on the access permissions granted to the User Group associated with the Empower Database User account. The account's Default User Type should possess the following privileges:
- View Audit Trails
- Backup Projects
- Delete Projects
- Restore Projects
- Lock Projects
- Unlock Projects
- Create Projects at root
-
Empower Oracle TNS Names details provides access to the Empower database through the Empower client (the required information can typically be found in the
<Oracle Client Install folder>\\network\\admin\\tnsnames.orafile in the Oracle folder of the Empower client machine). -
Oracle TNS Names details extracts the
datetimefields in a consistent ISO format. -
Group User account runs the Tetra Empower Agent and accesses the Empower file server. You must ensure that the Group User account that runs the Tetra Empower Agent is part of the Empower User Group in the Active Directory Organizational Unit, and has the same privileges as the standard Empower User, which requires read-only permissions to access the Empower RAW data on the Empower File System. This account must also have the following requirements from Empower and Windows:
- The Group User account should have Windows Log on as a service permissions to run the Agent as a Windows Services program.
- Always verify the date time and decimal format settings of the Group User's Windows Profile to make sure that they match the settings from the current login user that's configuring the Empower Agent.
Set Up the TDP Connection
The Tetra Empower Agent generates RAW files that are then uploaded to the TDP through one of two methods:
-
On-Premises—requires the use of a Tetra Hub.
-or-
-
TDP (No Connector)—allows the Agent to upload source data directly to the TDP or Amazon Simple Storage Service (Amazon S3).
Before you install the Tetra Empower Agent, you must set up one of these data connections. To determine which data connection type is required for your use case, see Agent Deployment Options.
Create a Tetra Empower Agent v5.3.0 or Higher
To create a new Tetra Empower Agent, follow the instructions in Cloud Configuration of Tetra Agents.
Install the Tetra Empower Agent
TetraScience provides a Microsoft Installation Package (.msi) file to install the Tetra Empower Agent on the host server.
To get the installation package and install the Agent, do the following:
- Get the link to the .msi installation package by contacting your TetraScience Customer Success Manager (CSM).
- After you have the link to the installation package, download the Agent to a machine that runs Empower 3 SR2 or higher.
- Start the installation wizard by double-clicking the Tetra Agent installation file (
TetraScience.Agent.Empower.v5.3.0.msi). The installation wizard guides you through the prompts. The following is the default Tetra Empower Agent installation path:C:\TetraScience\TetraScience.Agent.Empower.v5.3.0\
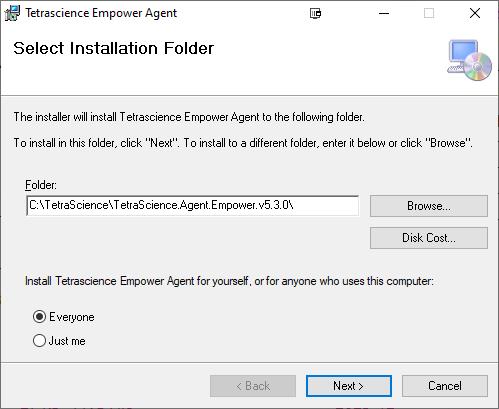
After the Tetra Empower Agent is installed, the TetraScience Agent Empower shortcut is added to the Windows All Program Group menu.
NOTETo restrict access to the local Tetra Agent Management Console, you can edit the Agent’s installation folder’s permissions to grant least privilege access. For more information, see Restrict Access to Agent Installation.
Verify Tetra Empower Agent Installation
Confirm that the Tetra Empower Agent was installed on the local drive by verifying the following:
- The TetraScience Empower Agent is installed under the
C:\TetraSciencedirectory by default. - Under the TetraScience folder, TetraScience.Agent.Empower.v5.3.x appears.
- The following subfolders appear under the TetraScience.Agent.Empower.v5.3.x folder:
- bin
- bin64
- db
- logs
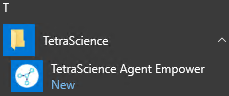
- The TetraScience folder is added to the Windows Start Menu, which includes the TetraScience Agent Empower application.
Verify the Tetra Empower Agent Connection Setup
To verify that the Agent can connect to Waters Empower and the TDP, do the following.
NOTETo launch the TetraScience Empower Agent Management Console, select the TetraScience Agent Empower from the Windows Start Menu.
Verify the Connection to Waters Empower
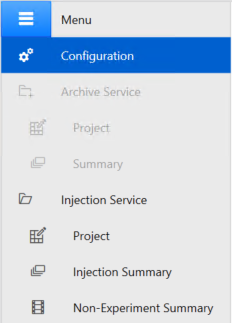
- Open the Tetra Empower Agent Management Console. Then, in the left navigation menu, under Menu, choose Configuration.
- Populate the requested fields in the Empower Database section by doing the following:
- For Database Name, enter the Waters Empower Database Account.
- For User Name, enter the Waters Empower User Account.
- For Password, enter the Waters Empower User password.
- For Oracle Host Name, enter the Waters Empower Database Oracle Host Name (retrieve from the
tnsnames.orafile). - For Service Name, enter the Waters Empower Database Oracle Service Name (retrieve from the
tnsnames.orafile). - For Port, enter the Waters Empower Database Oracle Port (retrieve from the
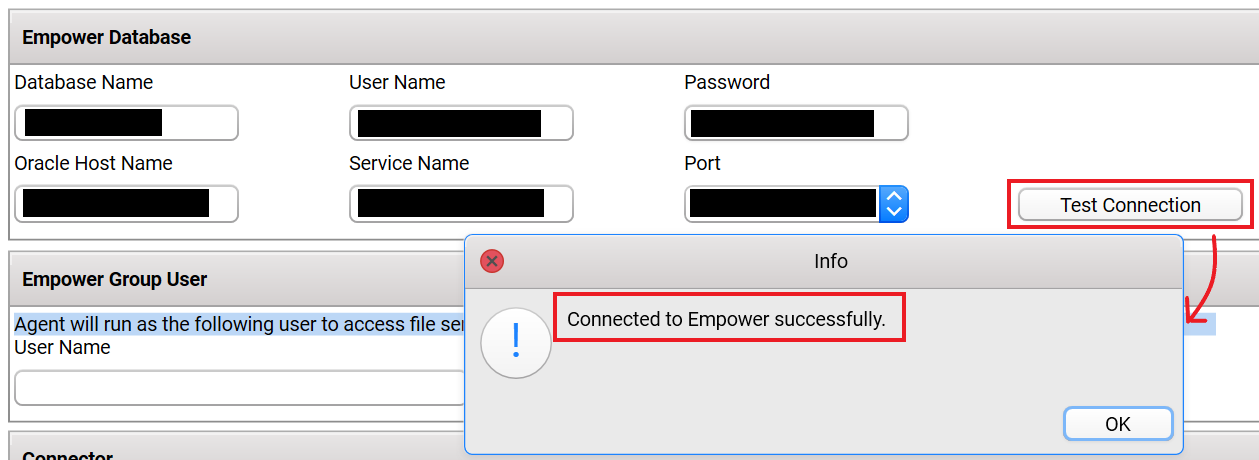
tnsnames.orafile). - Select Test Connection. Then, do one of the following based on if the connection test is successful or not:
- If the connection was successful, a dialog appears. Select OK to confirm the connection to the Empower system.
-or- - If the connection was not successful, then check the database account name/Empower user account credentials or the Oracle host name/service name/port. Then, repeat the actions in this step to verify the connection.
- If the connection was successful, a dialog appears. Select OK to confirm the connection to the Empower system.
Verify the Empower Group User Account
The Empower Group User is the Windows user that Agent service will run as. It is recommended that you create a service user account specifically for the Empower Agent.
To verify the Empower Group User Account, do the following:
- Open Tetra Empower Agent Management Console. Then, in the left navigation menu, under Menu, choose Configuration.
- In the User Name field enter the Waters Empower User Group Account.
- For Password, enter the password for the user.
After you move the cursor, the Tetra Empower Agent validates the account immediately.

Verify Connector Settings
- Open Tetra Empower Agent Management Console. Then, in the left navigation menu, under Menu, choose Configuration.
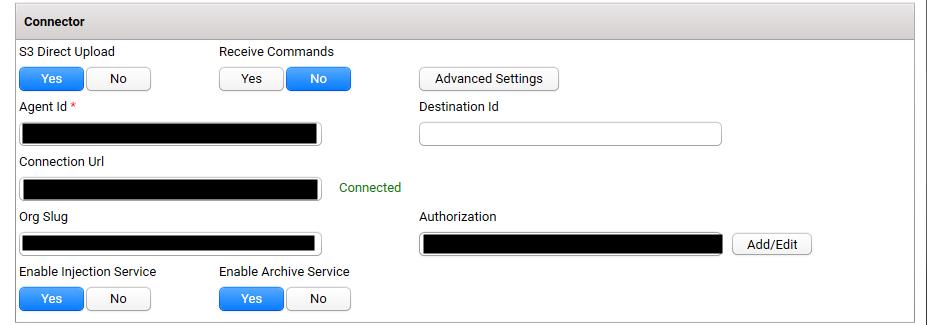
- In the Connector section, populate the details for connecting to the TDP by doing the following:
-
For S3 Direct Upload, select Yes.
NOTEThe Archive Service requires S3 Direct Upload because of the size of archive files and the use of labels. For more information, see S3 Direct Upload (Recommended).
Archive and Restore also require network access to the regional Amazon S3 service endpoint (for example,
https://s3.us-east-1.amazonaws.com), in addition to the S3 bucket endpoints. For the full list, see Tetra Agent Allow List Endpoints.
-
-
For Receive Commands, select Yes.
-
(Optional) To change the default settings for data connection status checks and Agent log file uploads, select Advanced Settings. The Agent Configuration Advanced Settings dialog appears and displays the following settings:
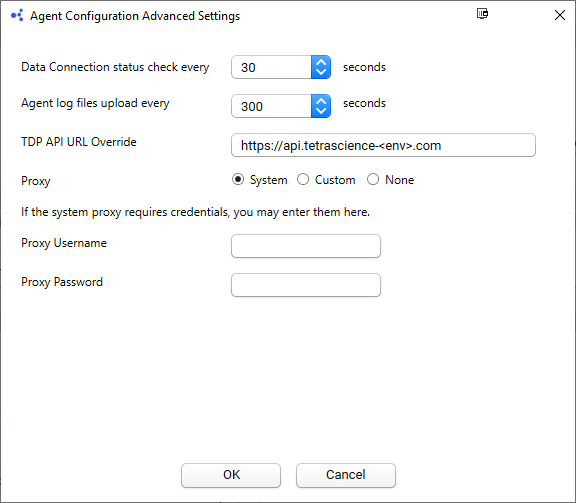
- The Data Connection status check every setting has a default value of
30seconds. - The Agent log files upload every setting has a default value of
300seconds. - TDP API URL Override: Indicates the TDP API endpoint for your deployment (for example, platform.tetrascience.com). This field is required if you are using Tetra Hub connection
- Proxy configuration: Indicates what type of proxy the agent is using (System or Custom), or if it's not using a proxy (None).
- System (default setting): Uses the system proxy specified in Windows for the service user account. If basic authentication is required, you can assign a username and password for the proxy.
- Custom: Makes all of the agent's proxy options configurable, regardless of any other settings. This custom proxy takes precedence over any existing system proxy or L7 proxy.
- None: Explicitly configures the agent to not use any proxies for web requests.
- To keep the recommended settings or to save the new values you entered, choose OK. Only consider changing these values if connection checks (heartbeat) frequency needs to be changed, or if logs files must be uploaded to the TDP at a different frequency.
- The Data Connection status check every setting has a default value of
-
Agent Id, enter the Agent ID (created in the TDP).
-
Connection Url, enter the complete connection URL of the Connector or integration type that you’re using. It's recommended that you verify the connection URL with your CSM.
-
(Optional if you select no connector) Enter the Org Slug and JSON Web Token (JWT) in the Org Slug and Authorization fields, respectively.
-
(Optional Destination Id) When the Destination Id is entered, the Agent uploads the files to the platform using the Destination Id instead of the Agent Id. Agents sharing the same Destination Id will upload files to the same Data Lake location defined using the Destination Id instead of Agent Id, which allows files from multiple Agents to be uploaded to the same Amazon Simple Storage Serive (Amazon S3) location.
After you move the cursor,the Tetra Empower Agent immediately validates the connection status.
Populate the Empower Agent Output Folder
For Empower Agent Output Folder, enter the folder that you'll use to temporarily store intermediary files during archive and restore operations. Temporary files will be cleared after each project archive or restore operation.

Verify Archive Service Configuration Settings
- In the Connector section, for Enable Archive Service, select Yes.
- Select the Archive tab.
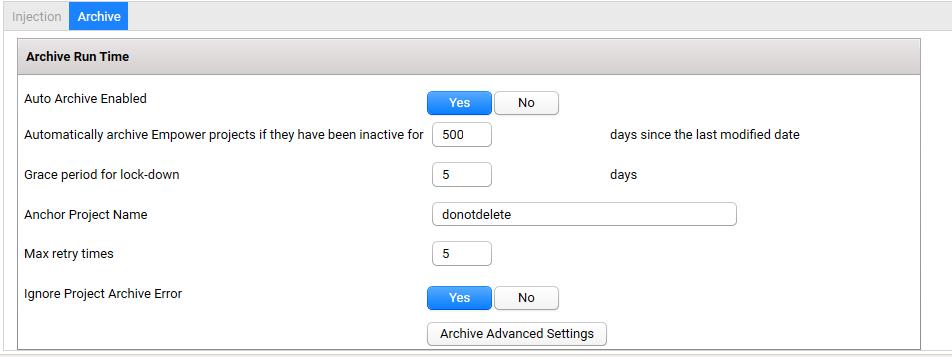
- Configure the Archive Run Time settings.
Archive Run Time Settings
- Auto Archive Enabled: The Agent offers support for both manual (ad hoc) archive and automatic archive. When the Auto Archive option is activated (set to Yes), the Agent archives Empower projects by following a predefined workflow determined by the Archive Run Time Settings that you configure. When deactivating this option (set to No), the Agent won't archive Empower projects automatically, but users can still archive Empower projects manually.
- Automatically archive Empower projects if they have been inactive for x days since the last modified date: This option is activated when Auto Archive Enabled is set to Yes.
Once activated, the Archive service applies read-only locks on any Empower projects that have not been updated for the number of days specified. For example, you could set 180 for this rule, and old projects that have not been updated for at least 180 days will be locked as automatic archive candidates. The Archive service would then periodically scan all available projects for archive candidates.
IMPORTANTThe Archive service relies on the full Audit Trail for each project to determine its last change date. Projects with Audit Trail turned off will not be eligible for automatic archive.
-
Grace Period for lock-down: This option is activated when Auto Archive Enabled is set to Yes. This rule makes the Archive service hold off the archive operation after projects are locked as archive candidates from the step above. During this grace period, projects that incur changes will not be archived. The project will then be put back to the project list and will be processed during the Agent's next scan. In the example shown above, you could set 5 days as the grace period, and then projects, which are locked from the prior step, will not be archived until the end of the five-day grace period.
-
Anchor Project Name: The Agent requires a valid and unlocked project to access Empower during archive or restore operations. It's recommended that you dedicate a project in Empower for this purpose. This project won't be auto archived.
-
Max retry times: You can specify the maximum retry count when the archive or restore fails because of any exception.
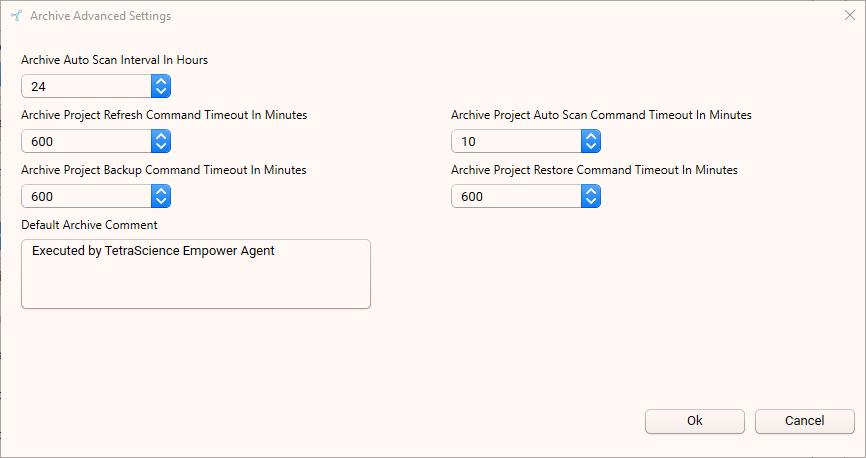
- Configure Archive Advanced Settings.
Archive Advanced Settings
-
Archive Auto Scan Interval In Hours: Determines the frequency of project scans. The default value is set to
24hours, meaning that the Agent will not scan Empower for project changes if it has been less than 24 hours since the last scan. -
Archive Project Refresh Command Timeout In Minutes: Determines the timeout duration (in minutes) for the Agent to detect the new projects from Empower. The default time is
600minutes. -
Archive Project Auto Scan Command Timeout In Minutes: Specifies the timeout duration (in minutes) for the Agent to scan projects in Empower and detect any changes. The default duration is set to
600minutes. -
Archive Project Backup Command Timeout In Minutes: Specifies the timeout duration (in minutes) for backing up a project in Empower. The default time is set to
600minutes. -
Archive Project Restore Command Timeout In Minutes: Specifies the timeout duration (in minutes) for restoring a project in Empower. The default duration is set to
600minutes. -
Default Archive Comment: Defines the comment that may be necessary for Empower when archiving or restoring the Empower project.
- Select Save to commit the settings changes.

Post-Installation Verification
When the configuration is saved, select Start to start the Tetra Empower Agent. The Agent Status will change from Stopped to Running.

Verify the Project List is Fetched
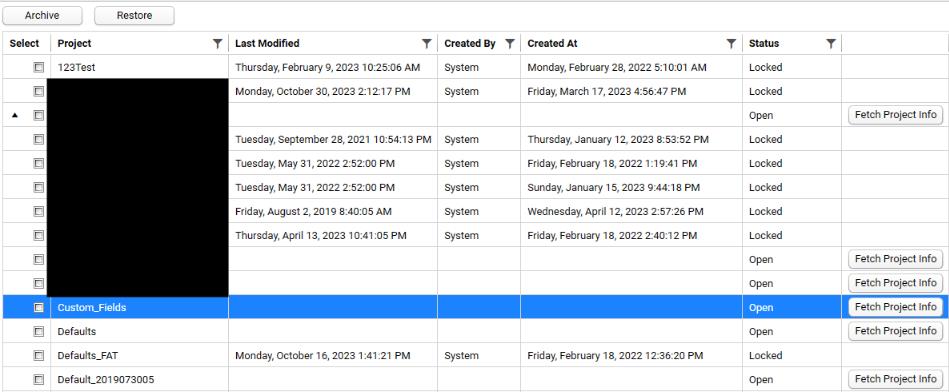
When the Agent is up and running, switch to the Project menu under Archive Service to verify that the Agent fetches the Empower project list. It should display all of the Empower projects that the Empower Database User has permission to access.
Updated 8 days ago
What’s Next
Check out the installation guide